Page Summary
-
Users can search for your loyalty program and join or sign-in to their account from Google Wallet, after which they can add their loyalty card.
-
To implement this feature, you need to set up a test class in Google Wallet, develop enrollment/sign-in pages that use Google Wallet
SharedDataType, implement push back of the loyalty card to Google Wallet after enrollment/sign-in, and finally, request verification and activation. -
When a user chooses to sign-in or enroll, they are directed to a tailored page on your website to complete the process where user data is shared via
SharedDataTypefor a seamless experience. -
After successful enrollment or sign-in, your page should immediately push the loyalty card to Google Wallet using a specific link structure containing a JWT.
-
To ensure ongoing compliance and an optimal user experience, recurring checks of your implementation will be conducted.
The loyalty enrollment and sign-in feature allows users to search for your loyalty program and join or sign-in to their account directly from Google Wallet. Users will be directed to your mobile-friendly website to complete the process, after which they can add their official card to Google Wallet.
Implementing this feature is the prerequisite for converting "static" user-added passes into "dynamic" API linked passes. This guide provides an overview of the benefits and the implementation steps required to enable your loyalty program for enrollment, sign-in, and pass upgrades.
Overview
To get started, make sure you have previously set up your project and have access to Google Wallet API.
You must follow these four steps to implement the feature:
- Set up a test class: Configure Google Wallet for testing your flows.
- Develop pages: Build enrollment/sign-in pages using Google Wallet
SharedDataType. - Implement push back: Send the loyalty card to Google Wallet after action.
- Request verification: Submit for review and request upgrade activation.
Why Implement Loyalty Enrollment?
To understand the value of this integration, it is important to distinguish between the two types of passes that exist in Google Wallet: L1 (User-Added) and L2 (Partner-Issued).
The Difference Between L1 and L2
| Feature | L1 Pass (User-Added) | L2 Pass (Partner-Issued) |
|---|---|---|
| Origin | Created when a user manually scans a physical card or types in a number. | Created and pushed using the Wallet API after a user signs up or signs in using your flow. |
| Control | Static. The partner has no visibility or control over this pass. | Dynamic. The partner has full control using the API. |
| Functionality | A static image of a barcode. Cannot be updated. | Can update point balances, tier status, display personalized offers, and receive notifications. |
The Upgrade Paths: The "Bridge" to your Program
By building the Loyalty Enrollment flow (the "destination"), you enable Google to build a "bridge" that upgrades users from static L1 passes to your official L2 passes. There are two primary upgrade triggers:
- L1-to-L2 Pass Upgrades: If a user has previously manually added your card (L1), Google Wallet can prompt them to visit your new sign-in flow to upgrade to the official, dynamic pass (L2).
- Gmail Imported Pass Upgrades: If Google Wallet detects a loyalty card using a user's Gmail, it can prompt the user to visit your flow and authenticate to receive the official L2 pass.
Step 1: Set up a test class in Google Wallet
Determine the enrollment and sign-in URLs, your program logo, and the chosen
user fields. Then, use the discoverableProgram nested fields in the
loyaltyclass
to set the appropriate values.
Set the values in the discoverableProgram to create a draft version of your enrollment/sign-in enabled loyalty program. To make sure this is visible to testers, verify that the testers have access to your Google Pay and Wallet Console. For details on how to share your Google Pay and Wallet Console's access with other people, see Learn about the Users page.
To complete the verification of your implementation's functionality during the development process, reach out to us using the contact support widget in the Google Pay and Wallet Console. While in the console, select Google Wallet API in the topic, and select Loyalty sign-in/enrollment in the subtopic.
Step 2: Develop enrollment and sign-in pages
When a user chooses to sign-in or enroll for your loyalty program, they are directed to a tailored page on your website in order to complete the enrollment or sign-in process. If a user chooses to enroll, Google Wallet will request the user to approve sharing their user data with you.
You are required to provide one of the two pages, or both, that allow users to complete these actions:
- A sign-in URL where a user can sign in to an existing account.
- An enrollment URL where a user can create a new account.
Your sign in and enrollment pages must meet the following requirements:
- Provide a mobile-friendly user experience.
- Minimize the number of required fields during the enrollment process.
- Allow the user to complete sign-in or enrollment within one single page.
- Use
HTTPSencryption with a valid certificate to ensure user data is transmitted securely. - Ensure at least 99.9% uptime of your sign-in and enrollment pages.
In addition to these requirements, we recommend you allow users to enroll in your loyalty program without filling out any form or keeping the page to just your terms of service acceptance.
- By leveraging the user data provided in the
SharedDataType, you can create an account and immediately push back their loyalty card. - You can subsequently email the user a one-time password, or a link to configure their password and optional account details.
- This reduces the chance of users abandoning their enrollment process, as every additional step can lead to additional drop-out.
When presenting the sign-in or enrollment page, Google Wallet will create an
Android WebView and a POST request is made to your provided URL. User data is
provided in the parameter SharedDataType which is included in the POST
request with a Content-Type of application/x-www-form-urlencoded and UTF-8 encoding.
The value of the SharedDataType parameter is a Base64 encoded JSON object.
Depending on the action chosen by the user and the fields you have specified to request from the user, the JSON object may contain the following fields.
| Field | Enrollment |
|---|---|
| ✓ | |
| firstName | ✓ |
| lastName | ✓ |
| addressLine [1-3] | ✓ |
| city | ✓ |
| state | ✓ |
| zipcode | ✓ |
| country | ✓ |
| phone | ✓ |
Refer to the following for a decoded sample JSON object contained in the SharedDataType.
Resource
{
  "firstName": "Jane",
  "lastName": "Doe",
  "addressLine1": "1600 Amphitheatre Pkwy",
  "addressLine2": "Apt 123",
  "addressLine3": "Attn:Jane",
  "city": "Mountain View",
  "state": "CA",
  "zipcode": "94043",
  "country": "US",
  "email": "jane.doe@example.com",
  "phone": "555-555-5555"
}
Step 3: Implement immediate push back to Google Wallet
Once authenticated (sign-in), or after account creation (enrollment), your page should immediately push back the user's loyalty card to Google Wallet.
You can push back the loyalty card to Google Wallet by redirecting to a link that follows the structure as following.
https://pay.google.com/gp/v/save/{jwt_generated}
The safe length for a URL is 2000 characters. Your links shouldn't exceed this limit. Objects encoded in JWTs should be small, containing only data that is specific to the user. Try to keep most data in the object's class, creating it before making the JWT. For larger objects that don't the limit, consider first creating the object in the Google Wallet API and sending only the object ID in the JWT.
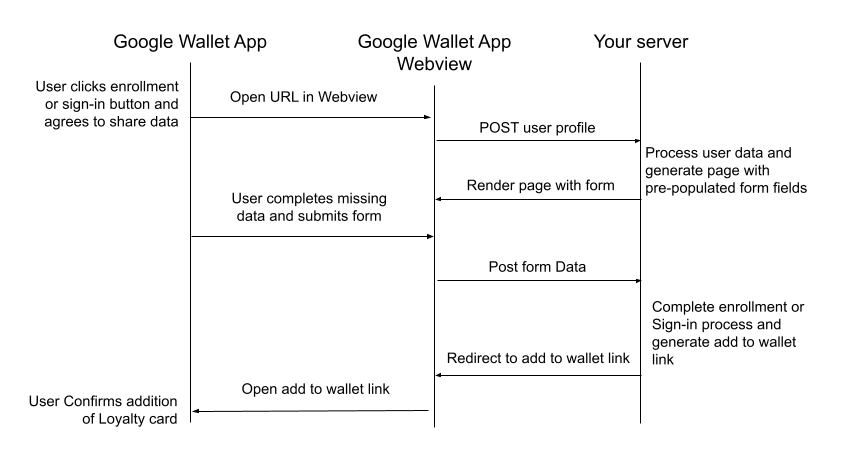
Typical Communication Flow
The communication flow for a user completing enrollment or sign-in is illustrated in the following image. All actions between "Your Server" are your responsibility to implement.
Step 4: Request verification and activation
After you complete the development work and test your enrollment/sign-in flows, you must submit a request to have your implementation reviewed and fully activated.
- Navigate to the Google Pay and Wallet Console.
- Use the Contact Support widget.
- Inform the support team that you have completed your Loyalty Enrollment integration.
After a full review of your implementation that confirms correct functionality in combination with the Google Wallet app, the loyalty enrollment/sign-in feature will be publicly launched for your loyalty program.
In order to ensure an optimal user experience, recurring checks of your enrollment/sign-in implementation will be conducted to ensure ongoing compliance with the feature requirements. You will be notified in the event of discrepancies and the sign-in/enrollment functionality may be disabled until the issue is resolved.
Frequently Asked Questions
Are there any requirements for the images used in my loyalty program? Yes, your images should be hosted on an
HTTPSlocation as they won't be visible in Google Wallet otherwise.Are there any tools that simplify the implementation and debugging of JWTs? Yes, platforms such as www.jwt.io allow you to decode and debug your tokens during your development process, allowing you to verify the content you are submitting. Do note that Google has no affiliation and does not specifically recommend any of such third parties.
How do we correctly handle the Base64 encoded
SharedDataTypedata? Ensure that you are using UTF-8 encoding throughout your process. The JSON string is first UTF-8 encoded and subsequently encoded using android.util.Base64 with the options NO_WRAP and URL_SAFE. This corresponds with RFC 3548 section 4.