Analizowanie i etykietowanie wiadomości w Gmailu za pomocą Gemini i Vertex AI

Masz 5 minut?
Pomóż nam ulepszyć dokumentację Google Workspace, wypełniając krótką ankietę online.

To rozwiązanie wykorzystuje Vertex AI i Gemini do analizowania wiadomości w Gmailu i oznaczania ich na podstawie sentymentu.

Poziom kodowania: średnio zaawansowany
Czas trwania: 30 minut
Typ projektu: dodatek do Google Workspace

  • Dodatek do Google Workspace, który rozszerza Gmaila w panelu bocznym.
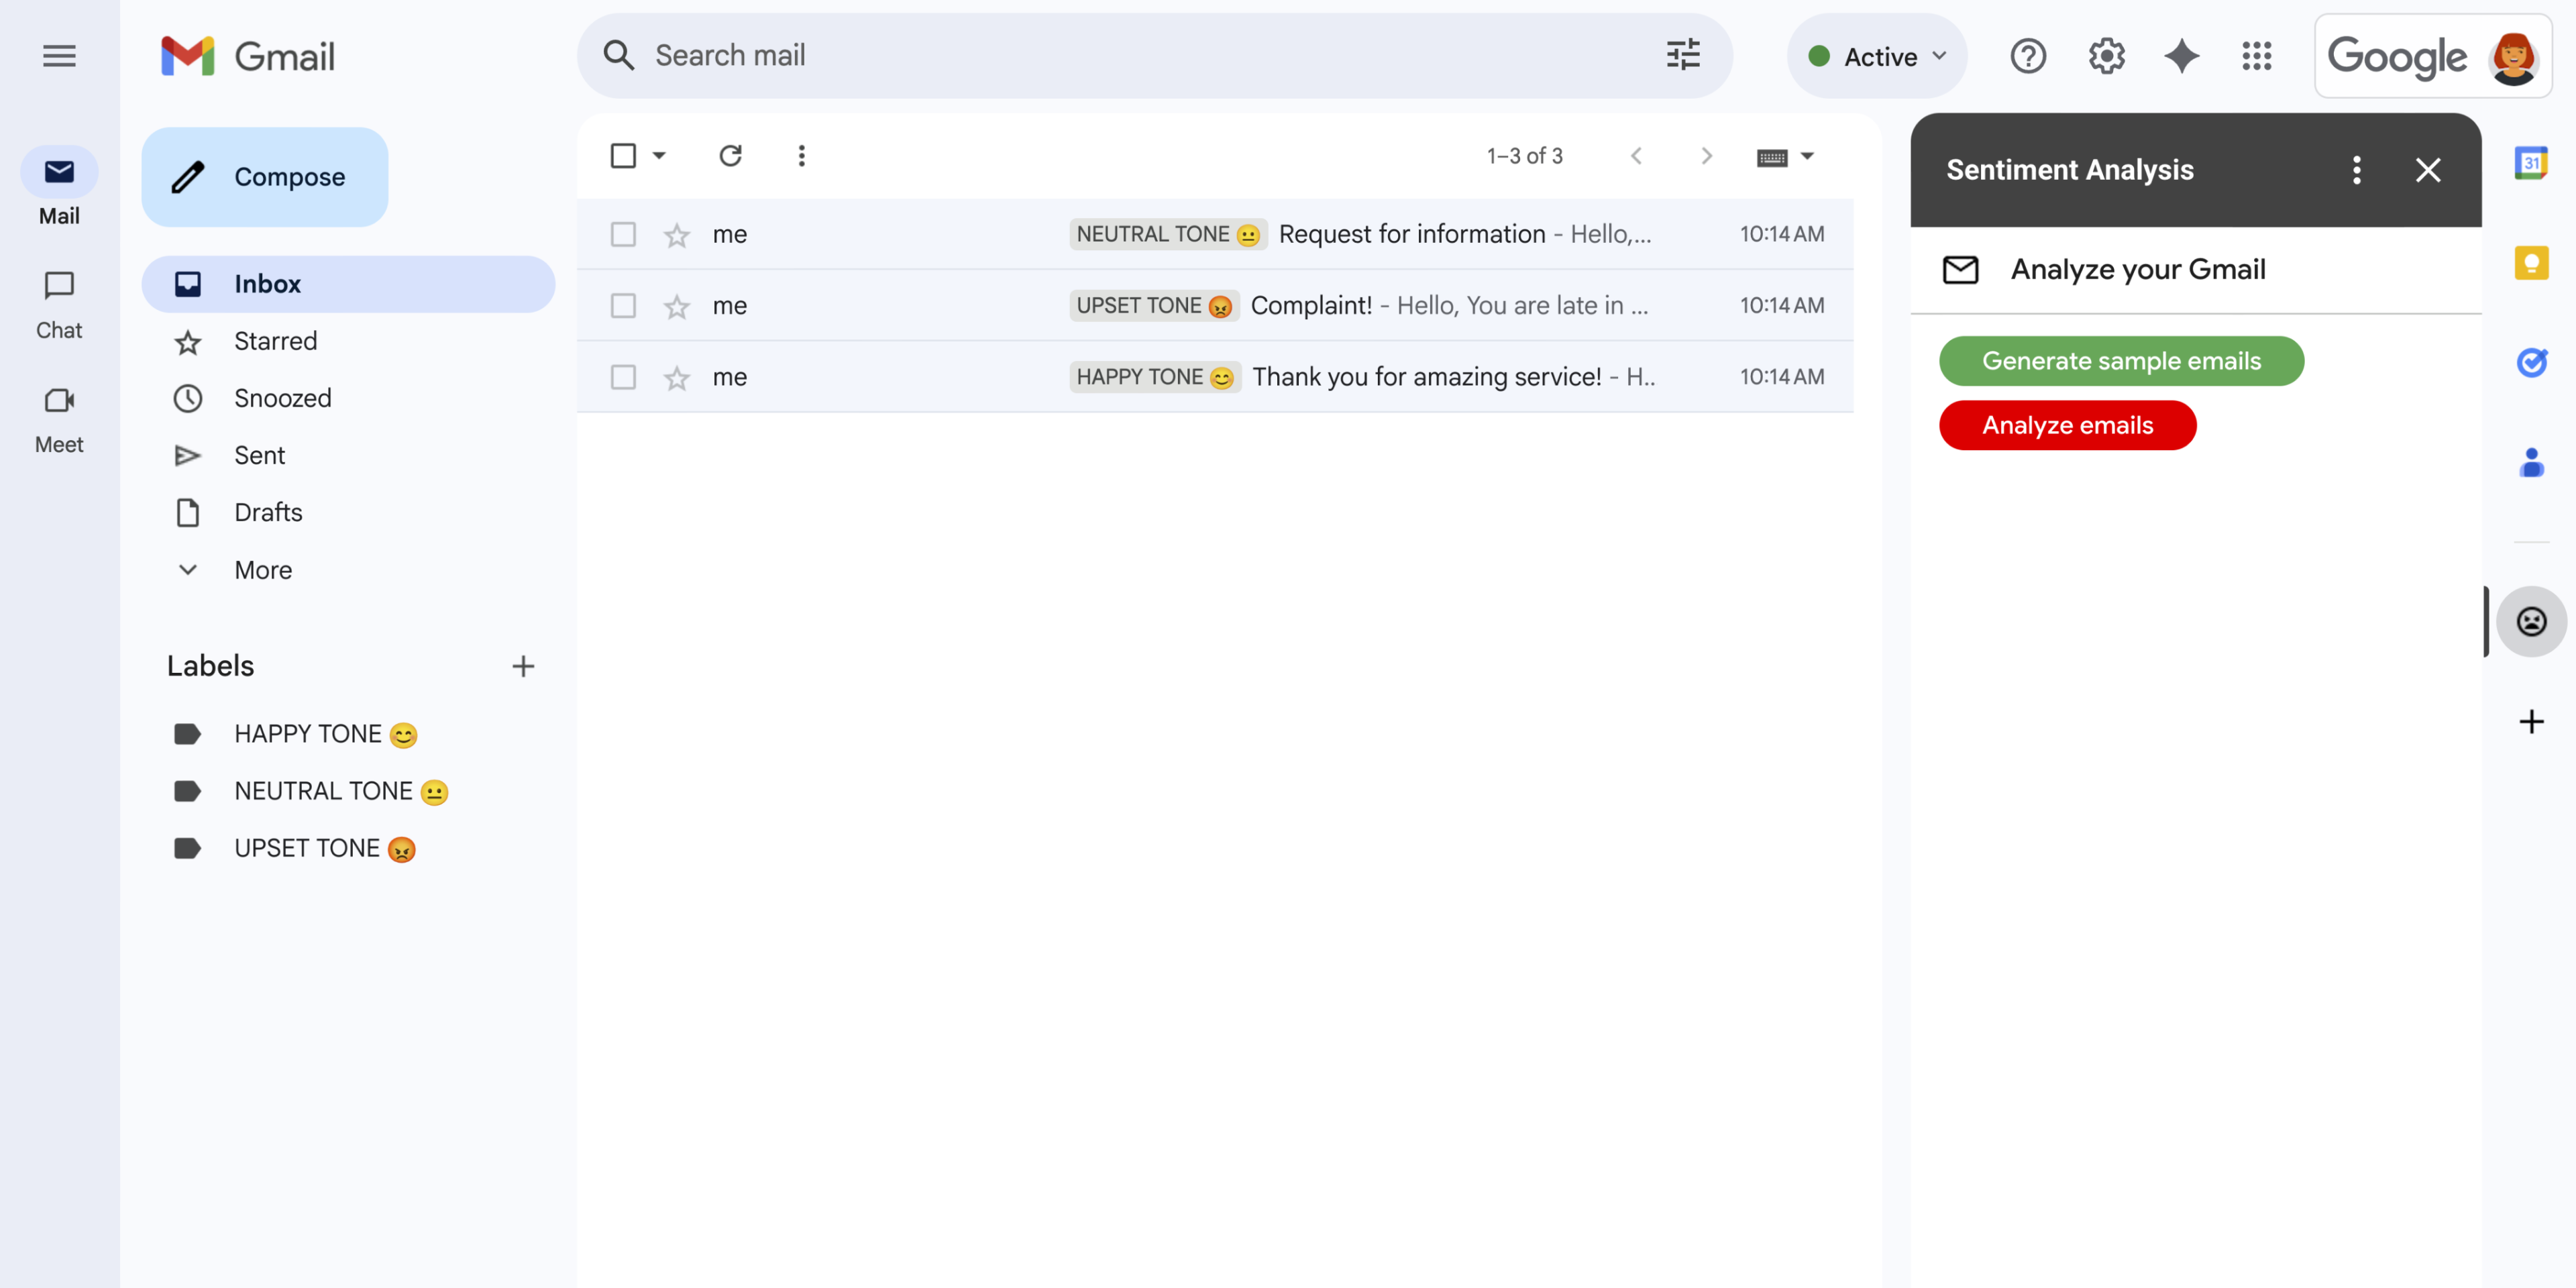
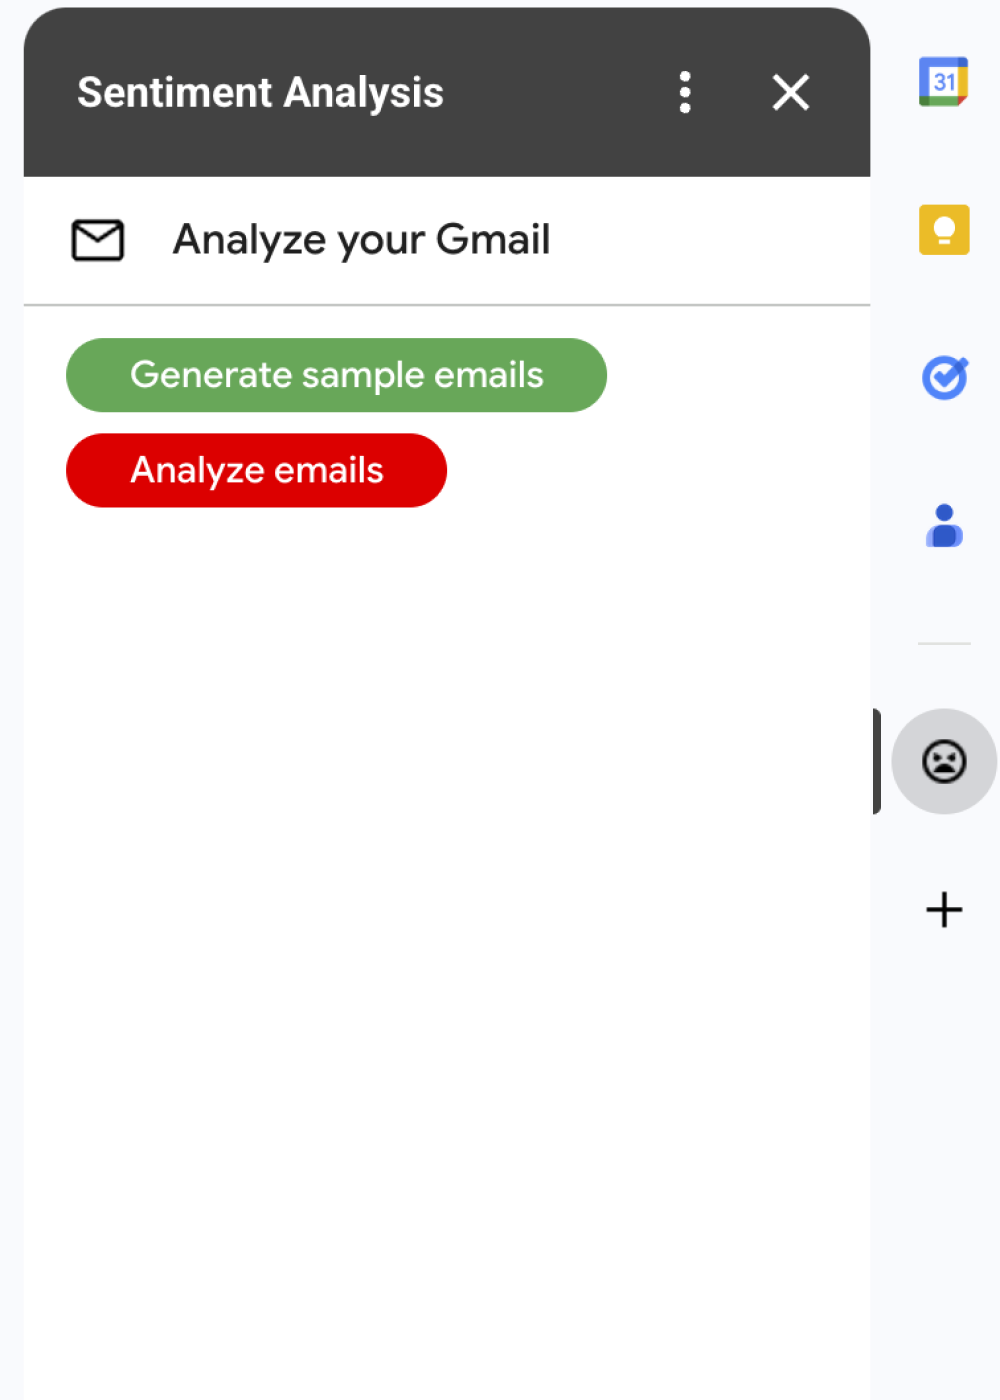
    Ilustracja 1. Dodatek Analiza sentymentu wyświetla w Gmailu pasek boczny, na którym użytkownicy mogą poprosić Gemini o analizę wiadomości i przypisanie do nich etykiet na podstawie sentymentu.
  • Wiadomość z Gmaila o neutralnym wydźwięku.
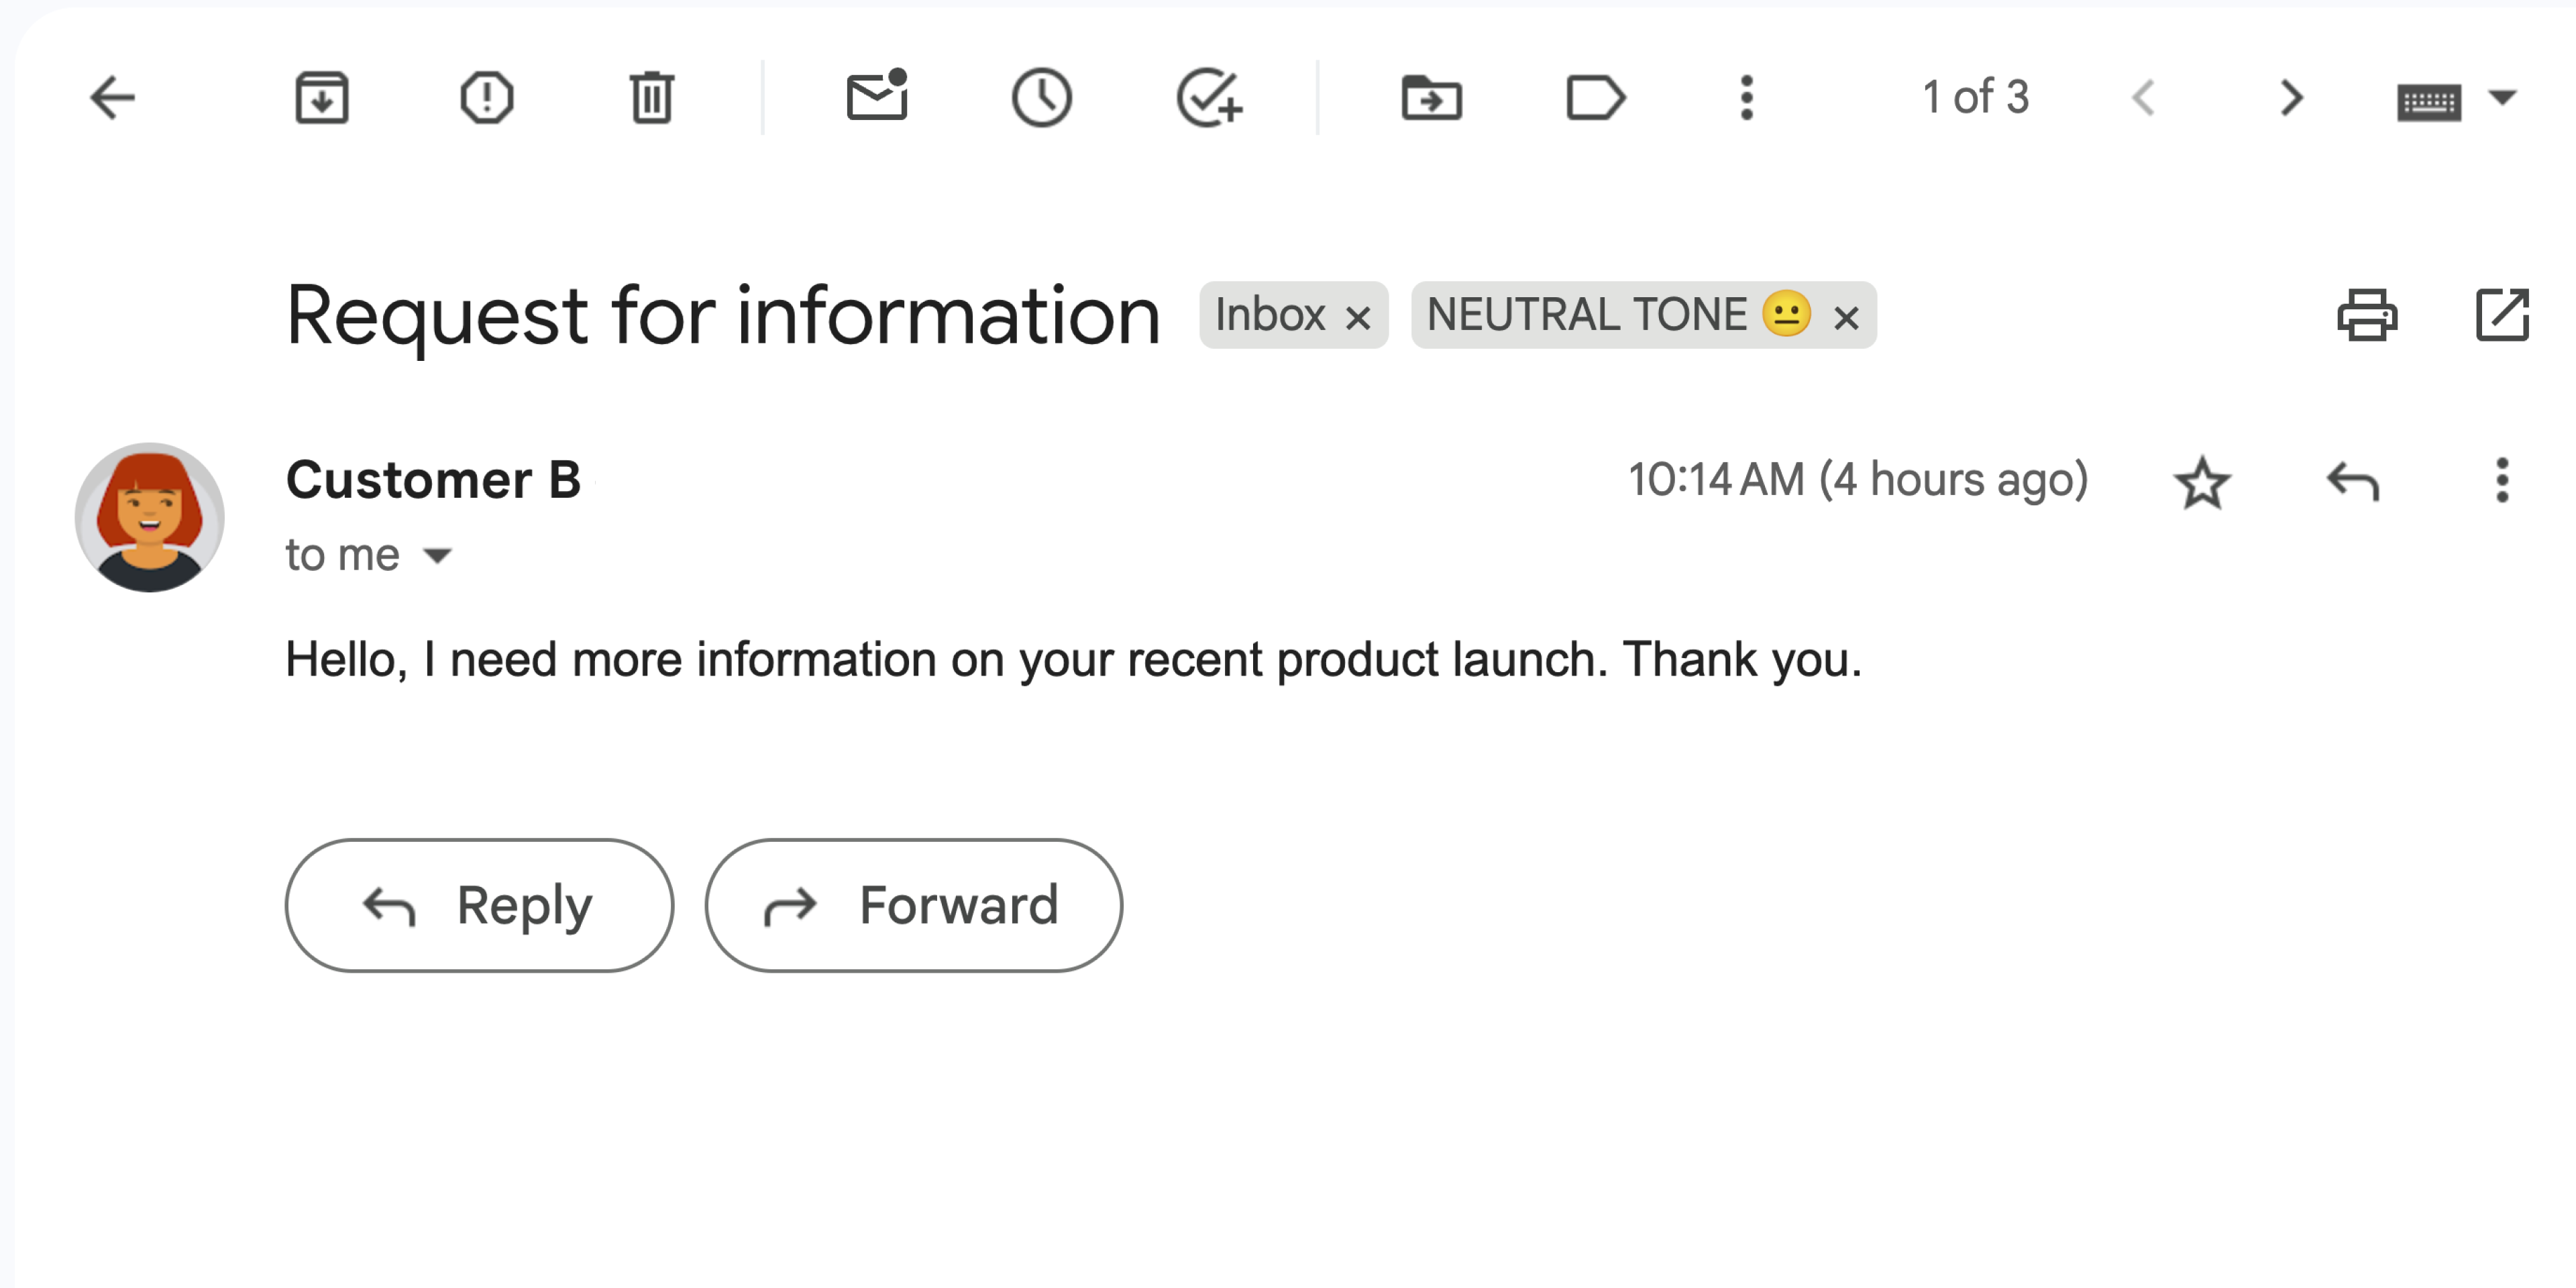
    Ilustracja 2. Dodatek oznacza wiadomość w Gmailu etykietą NEUTRAL TONE 😐.
  • Wiadomość z Gmaila o pozytywnym wydźwięku.
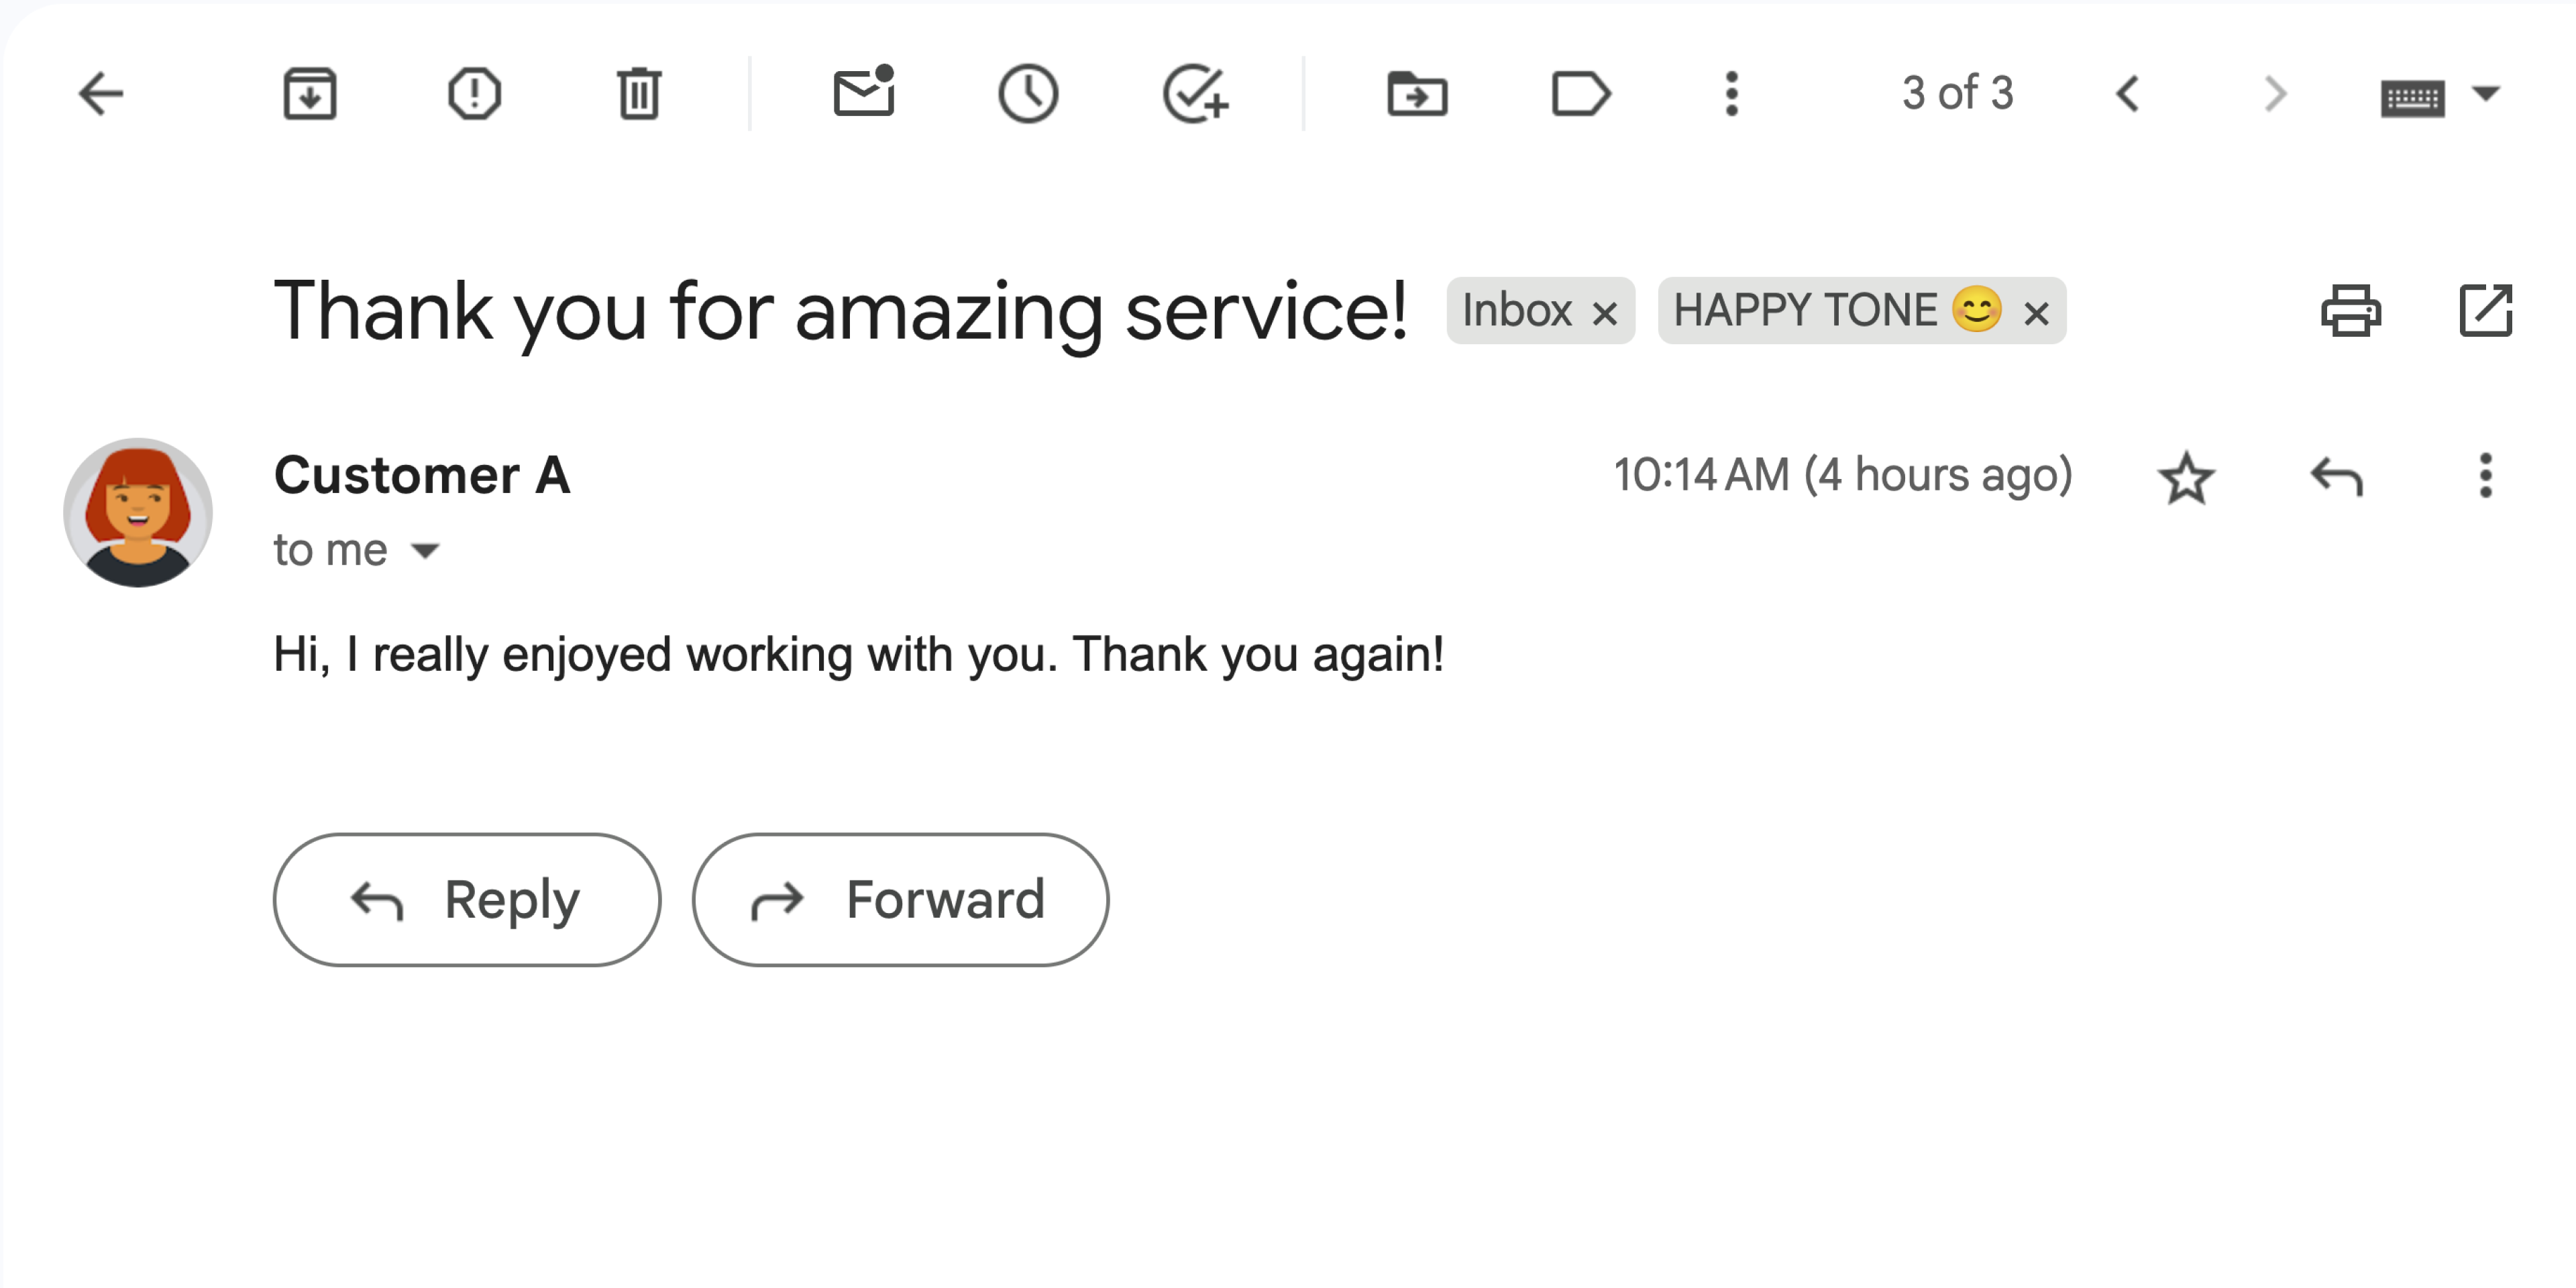
    Rysunek 3. Dodatek oznacza wiadomość w Gmailu etykietą HAPPY TONE 😊.
  • Wiadomość z Gmaila o negatywnym wydźwięku.
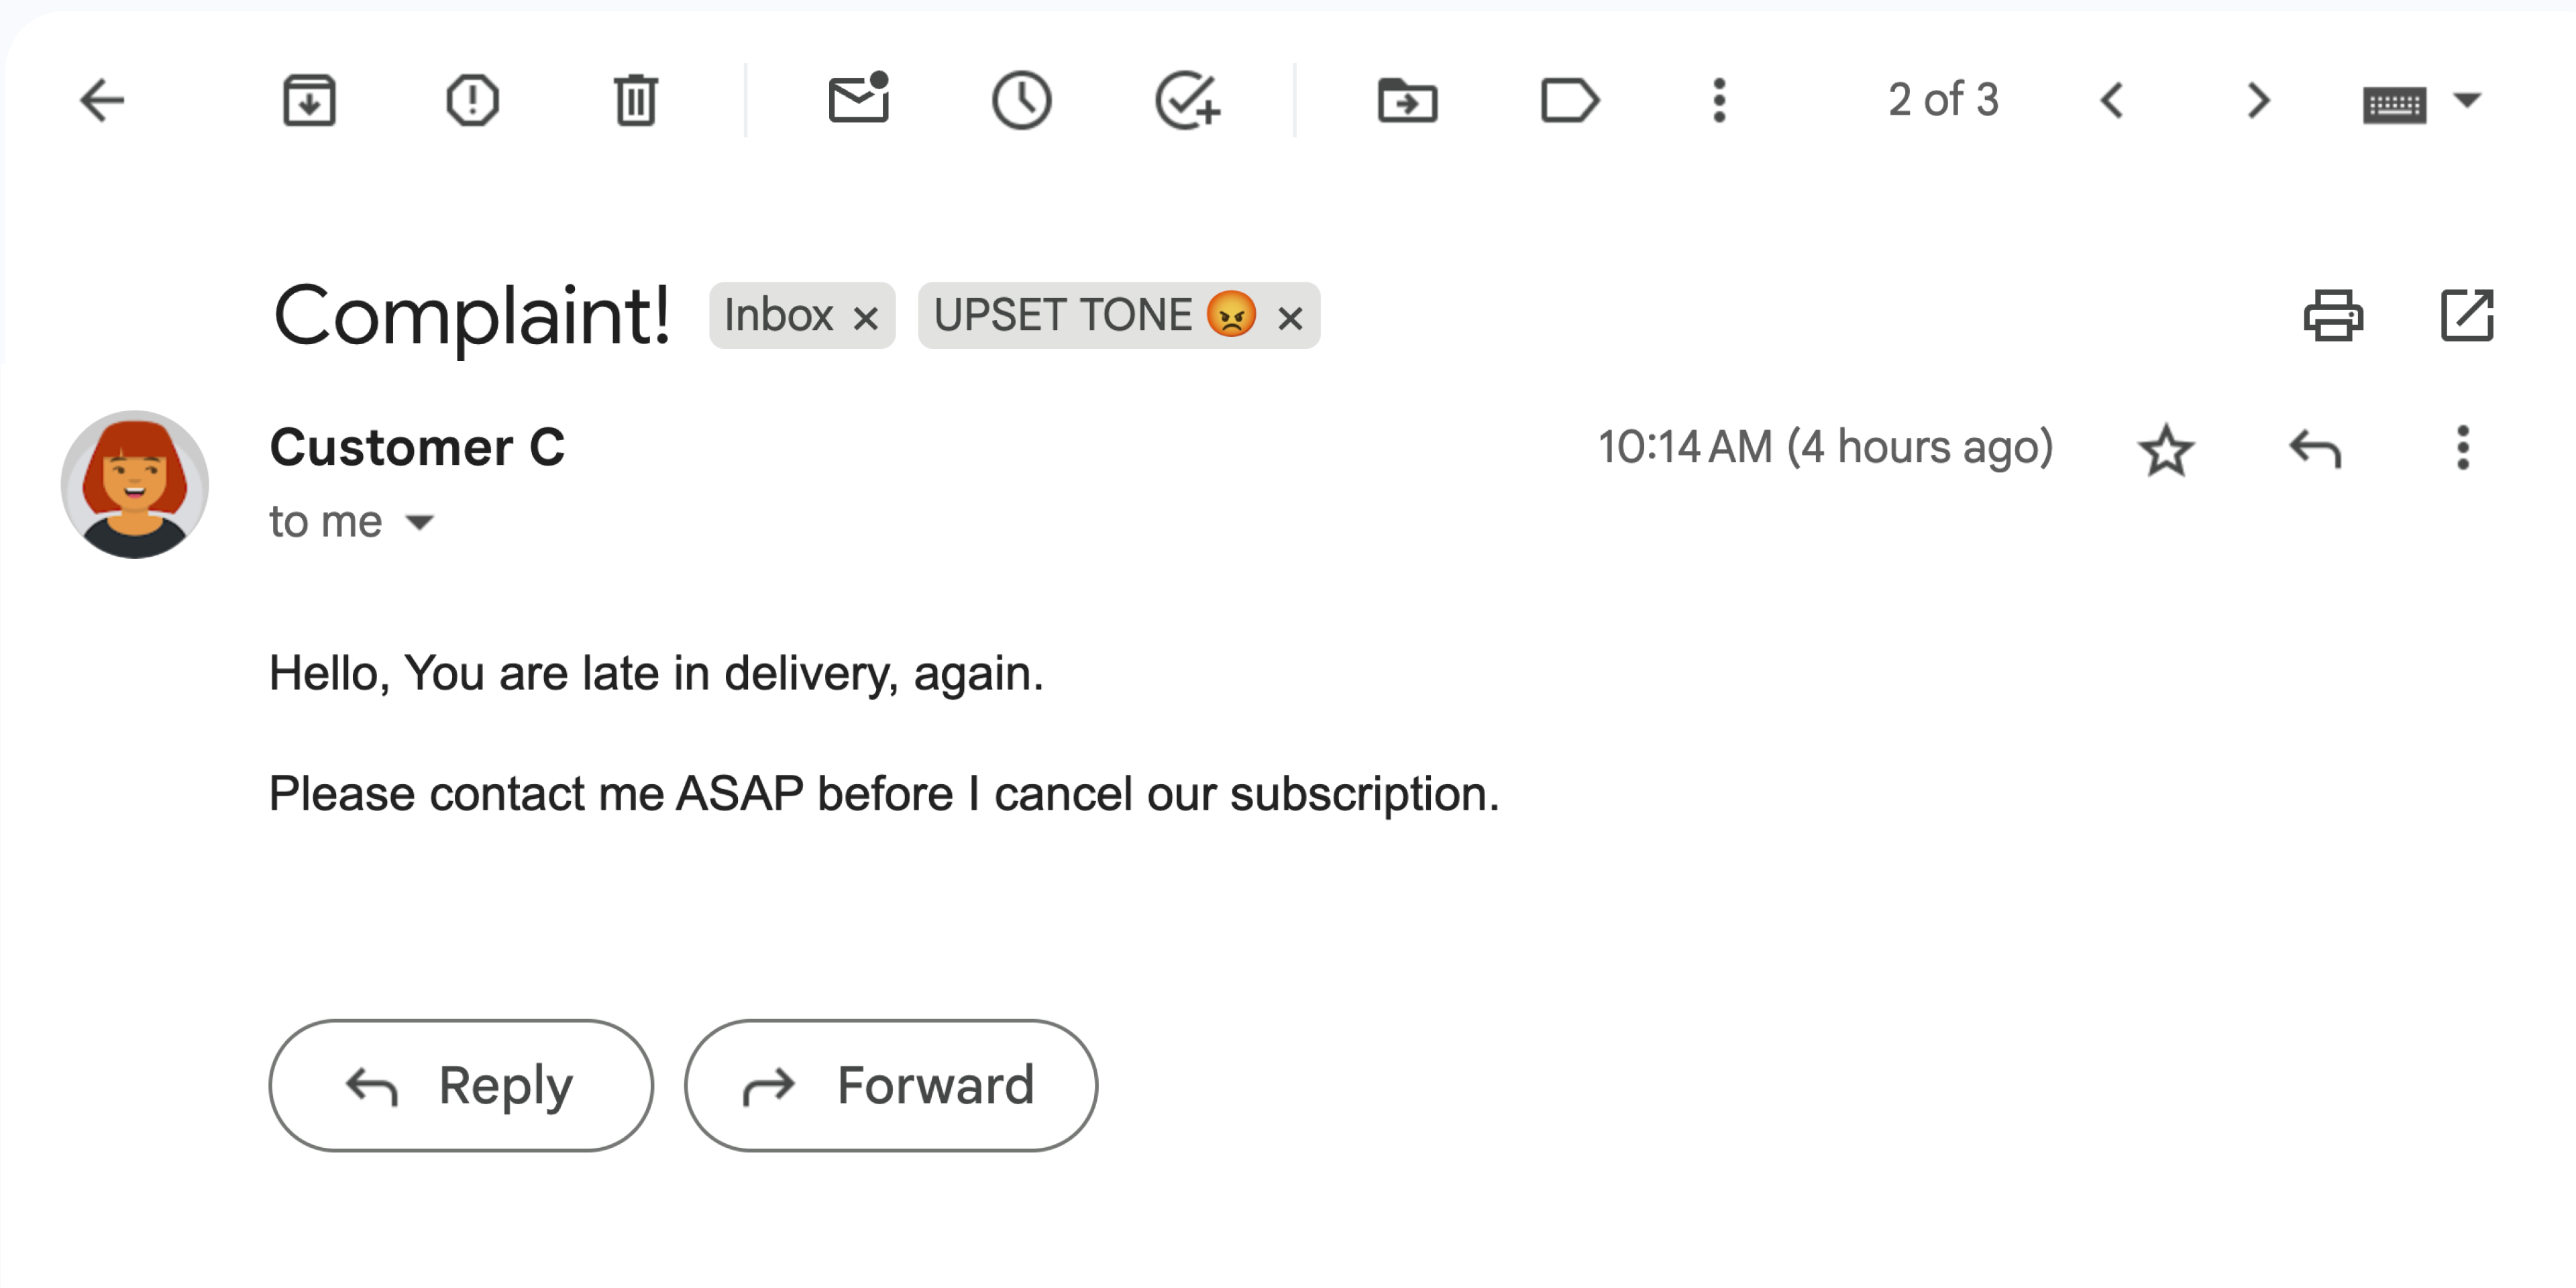
    Ilustracja 4. Dodatek oznacza wiadomość w Gmailu etykietą UPSET TONE 😡.

Cele

  • Dowiedz się, co robi rozwiązanie.
  • Dowiedz się, co robią usługi Google w ramach rozwiązania.
  • Skonfiguruj środowisko.
  • Skonfiguruj projekt Google Apps Script.
  • Uruchom skrypt.

Informacje o rozwiązaniu

Zrzut ekranu dodatku do Google Workspace Sentiment Analysis

To rozwiązanie jest dodatkiem do Google Workspace, który stosuje etykiety na podstawie sentymentu wiadomości w Gmailu. Aby przeanalizować treść wiadomości, dodatek używa Vertex AI do wysyłania promptów do modelu Gemini 2.5 Flash i zwracania jednego z tych sentymentów:

  • Pozytywny wynik
  • Negatywny wynik
  • Neutralny

Po otrzymaniu odpowiedzi od Gemini dodatek stosuje do wiadomości odpowiednią etykietę Gmaila.

Aby ograniczyć żądanie do interfejsu Vertex AI API, ten dodatek analizuje i stosuje etykiety tylko do 10 najnowszych wiadomości w skrzynce odbiorczej użytkownika Gmaila. Więcej informacji o limitach i limitach znajdziesz w dokumentacji Vertex AI.

Jak to działa

To rozwiązanie jest oparte na Google Apps Script i korzysta z tych usług i produktów Google:

  • Vertex AI API – wysyła do modelu Gemini 2.5 Flash prompty, aby analizować treść wiadomości w Gmailu i określać nastawienie.
  • Usługi Apps Script:

    • Usługa Gmail – pobiera i stosuje etykiety do wiadomości w Gmailu. Opcjonalnie tworzy przykładowe wiadomości do testowania dodatku.
    • Usługa karty – tworzy interfejs użytkownika dodatku, który pojawia się jako pasek boczny w Gmailu.
    • Usługa pobierania danych z adresów URL – łączy się z interfejsem Vertex AI API w celu analizy sentymentu.
    • Usługa skryptów – aby wywołać interfejs Vertex AI API, pobiera token dostępu OAuth 2.0 dla dodatku za pomocą metody getOAuthToken.

Wymagania wstępne

Konfigurowanie środowiska

W tej sekcji dowiesz się, jak skonfigurować i skonfigurować środowisko w konsoli Google Cloud i Apps Script.

Konfigurowanie projektu Cloud w konsoli Google Cloud

W tej sekcji dowiesz się, jak włączyć interfejs Vertex AI API i skonfigurować ekran zgody OAuth w projekcie Cloud.

Włączanie interfejsu Vertex AI API

  1. W konsoli Google Cloud otwórz projekt Google Cloud i włącz interfejs Vertex AI API:

    Włączanie interfejsu API

  2. Sprawdź, czy włączasz interfejs API w odpowiednim projekcie Cloud, a potem kliknij Dalej.

  3. Sprawdź, czy włączasz właściwy interfejs API, a potem kliknij Włącz.

Konfigurowanie ekranu zgody OAuth

Dodatki do Google Workspace wymagają konfiguracji ekranu zgody. Skonfigurowanie ekranu zgody OAuth dodatku określa, co Google wyświetla użytkownikom.

  1. W konsoli Google Cloud otwórz Menu  > > Branding.

    Otwórz Promowanie marki

  2. Jeśli masz już skonfigurowany , możesz skonfigurować te ustawienia ekranu zgody OAuth w sekcjach Branding, OdbiorcyDostęp do danych. Jeśli zobaczysz komunikat Jeszcze nie skonfigurowano, kliknij Rozpocznij:
    1. W sekcji Informacje o aplikacji w polu Nazwa aplikacji wpisz nazwę aplikacji.
    2. W sekcji Adres e-mail pomocy dla użytkowników wybierz adres e-mail, na który użytkownicy mogą pisać, jeśli mają pytania dotyczące ich zgody.
    3. Kliknij Dalej.
    4. W sekcji Odbiorcy wybierz Wewnętrzny.
    5. Kliknij Dalej.
    6. W sekcji Dane kontaktowe wpisz adres e-mail, na który będziesz otrzymywać powiadomienia o wszelkich zmianach w projekcie.
    7. Kliknij Dalej.
    8. W sekcji Zakończ zapoznaj się z zasadami dotyczącymi danych użytkownika w usługach interfejsów API Google i jeśli się z nimi zgadzasz, kliknij Akceptuję zasady dotyczące danych użytkownika w usługach interfejsów API Google.
    9. Kliknij Dalej.
    10. Kliknij Utwórz.
  3. Na razie możesz pominąć dodawanie zakresów. W przyszłości, gdy będziesz tworzyć aplikację do użytku poza organizacją Google Workspace, musisz zmienić Typ użytkownika na Zewnętrzny. Następnie dodaj zakresy autoryzacji wymagane przez aplikację. Więcej informacji znajdziesz w pełnym przewodniku Konfigurowanie zgody OAuth.

Tworzenie i konfigurowanie projektu Apps Script

Aby utworzyć i skonfigurować projekt Apps Script dla dodatku, wykonaj te czynności:

  1. Kliknij ten przycisk, aby otworzyć projekt Analiza sentymentu w Gmailu za pomocą Gemini i Vertex AI Apps Script.
    Otwórz projekt Apps Script

  2. Kliknij Przegląd .

  3. Na stronie przeglądu kliknij Utwórz kopię Ikona tworzenia kopii.

  4. Uzyskaj numer projektu Cloud:

    1. W konsoli Google Cloud kliknij Menu  > Administracja > Ustawienia.

      Otwórz Ustawienia w obszarze Administracja

    2. W polu Numer projektu skopiuj wartość.
  5. Połącz projekt Cloud z projektem Apps Script:

    1. W skopiowanym projekcie Apps Script kliknij Ustawienia projektu Ikona ustawień projektu.
    2. W sekcji Projekt Google Cloud Platform (GCP) kliknij Zmień projekt.
    3. W sekcji Numer projektu GCP wklej numer projektu w Google Cloud.
    4. Kliknij Ustaw projekt.

Testowanie dodatku

Aby wypróbować dodatek, zainstaluj wdrożenie testowe i otwórz dodatek w Gmailu:

  1. Utwórz i zainstaluj testowe wdrożenie Apps Script:
    1. W skopiowanym projekcie Apps Script kliknij Edytor .
    2. Otwórz plik Code.gs i kliknij Uruchom. Gdy pojawi się odpowiedni komunikat, autoryzuj skrypt.
    3. Kliknij Wdróż > Testuj wdrożenia.
    4. Kliknij Zainstaluj > Gotowe.
  2. Otwórz aplikację Gmail.

    Otwórz Gmaila

  3. Na pasku bocznym po prawej stronie otwórz dodatek Analiza sentymentu.

  4. W razie potrzeby autoryzuj dodatek.

  5. Opcjonalnie: aby utworzyć wiadomości do testowania dodatku, kliknij Wygeneruj przykładowe e-maile. W skrzynce odbiorczej pojawią się 3 wiadomości. Jeśli ich nie widzisz, odśwież stronę.

  6. Aby dodać etykiety, kliknij Analizuj e-maile.

Dodatek sprawdza 10 ostatnich wiadomości w skrzynce odbiorczej, a następnie stosuje jedną z tych etykiet na podstawie treści wiadomości:

  • RADOSNY TON 😊
  • NEUTRALNY WYRAZ TWARZY 😐
  • UPSET TONE 😡

Sprawdź kod

Sprawdź kod Apps Script dla tego rozwiązania:

Pokaż kod źródłowy

Code.gs

gmail-sentiment-analysis/Code.gs
/*
Copyright 2024 Google LLC

Licensed under the Apache License, Version 2.0 (the "License");
you may not use this file except in compliance with the License.
You may obtain a copy of the License at

    https://www.apache.org/licenses/LICENSE-2.0

Unless required by applicable law or agreed to in writing, software
distributed under the License is distributed on an "AS IS" BASIS,
WITHOUT WARRANTIES OR CONDITIONS OF ANY KIND, either express or implied.
See the License for the specific language governing permissions and
limitations under the License.
*/

/**
 * Triggered when the add-on is opened from the Gmail homepage.
 *
 * @param {Object} e - The event object.
 * @returns {Card} - The homepage card.
 */
function onHomepageTrigger(e) {
  return buildHomepageCard();
}

Cards.gs

gmail-sentiment-analysis/Cards.gs
/*
Copyright 2024-2025 Google LLC

Licensed under the Apache License, Version 2.0 (the "License");
you may not use this file except in compliance with the License.
You may obtain a copy of the License at

    https://www.apache.org/licenses/LICENSE-2.0

Unless required by applicable law or agreed to in writing, software
distributed under the License is distributed on an "AS IS" BASIS,
WITHOUT WARRANTIES OR CONDITIONS OF ANY KIND, either express or implied.
See the License for the specific language governing permissions and
limitations under the License.
*/

/**
 * Builds the main card displayed on the Gmail homepage.
 *
 * @returns {Card} - The homepage card.
 */
function buildHomepageCard() {
  // Create a new card builder
  const cardBuilder = CardService.newCardBuilder();

  // Create a card header
  const cardHeader = CardService.newCardHeader();
  cardHeader.setImageUrl('https://fonts.gstatic.com/s/i/googlematerialicons/mail/v6/black-24dp/1x/gm_mail_black_24dp.png');
  cardHeader.setImageStyle(CardService.ImageStyle.CIRCLE);
  cardHeader.setTitle("Analyze your Gmail");

  // Add the header to the card
  cardBuilder.setHeader(cardHeader);

  // Create a card section
  const cardSection = CardService.newCardSection();

  // Create buttons for generating sample emails and analyzing sentiment
  const buttonSet = CardService.newButtonSet();

  // Create "Generate sample emails" button
  const generateButton = createFilledButton('Generate sample emails', 'generateSampleEmails', '#34A853');
  buttonSet.addButton(generateButton);

  // Create "Analyze emails" button
  const analyzeButton = createFilledButton('Analyze emails', 'analyzeSentiment', '#FF0000');
  buttonSet.addButton(analyzeButton);

  // Add the button set to the section
  cardSection.addWidget(buttonSet);

  // Add the section to the card
  cardBuilder.addSection(cardSection);

  // Build and return the card
  return cardBuilder.build();
}

/**
 * Creates a filled text button with the specified text, function, and color.
 *
 * @param {string} text - The text to display on the button.
 * @param {string} functionName - The name of the function to call when the button is clicked.
 * @param {string} color - The background color of the button.
 * @returns {TextButton} - The created text button.
 */
function createFilledButton(text, functionName, color) {
  // Create a new text button
  const textButton = CardService.newTextButton();

  // Set the button text
  textButton.setText(text);

  // Set the action to perform when the button is clicked
  const action = CardService.newAction();
  action.setFunctionName(functionName);
  textButton.setOnClickAction(action);

  // Set the button style to filled
  textButton.setTextButtonStyle(CardService.TextButtonStyle.FILLED);

  // Set the background color
  textButton.setBackgroundColor(color);

  return textButton;
}

/**
 * Creates a notification response with the specified text.
 *
 * @param {string} notificationText - The text to display in the notification.
 * @returns {ActionResponse} - The created action response.
 */
function buildNotificationResponse(notificationText) {
  // Create a new notification
  const notification = CardService.newNotification();
  notification.setText(notificationText);

  // Create a new action response builder
  const actionResponseBuilder = CardService.newActionResponseBuilder();

  // Set the notification for the action response
  actionResponseBuilder.setNotification(notification);

  // Build and return the action response
  return actionResponseBuilder.build();
}

Gmail.gs

gmail-sentiment-analysis/Gmail.gs
/*
Copyright 2024-2025 Google LLC

Licensed under the Apache License, Version 2.0 (the "License");
you may not use this file except in compliance with the License.
You may obtain a copy of the License at

    https://www.apache.org/licenses/LICENSE-2.0

Unless required by applicable law or agreed to in writing, software
distributed under the License is distributed on an "AS IS" BASIS,
WITHOUT WARRANTIES OR CONDITIONS OF ANY KIND, either express or implied.
See the License for the specific language governing permissions and
limitations under the License.
*/

/**
 * Analyzes the sentiment of the first 10 threads in the inbox
 * and labels them accordingly.
 *
 * @returns {ActionResponse} - A notification confirming completion.
 */
function analyzeSentiment() {
  // Analyze and label emails
  analyzeAndLabelEmailSentiment();

  // Return a notification
  return buildNotificationResponse("Successfully completed sentiment analysis");
}

/**
 * Analyzes the sentiment of emails and applies appropriate labels.
 */
function analyzeAndLabelEmailSentiment() {
  // Define label names
  const labelNames = ["HAPPY TONE 😊", "NEUTRAL TONE 😐", "UPSET TONE 😡"];

  // Get or create labels for each sentiment
  const positiveLabel = GmailApp.getUserLabelByName(labelNames[0]) || GmailApp.createLabel(labelNames[0]);
  const neutralLabel = GmailApp.getUserLabelByName(labelNames[1]) || GmailApp.createLabel(labelNames[1]);
  const negativeLabel = GmailApp.getUserLabelByName(labelNames[2]) || GmailApp.createLabel(labelNames[2]);

  // Get the first 10 threads in the inbox
  const threads = GmailApp.getInboxThreads(0, 10);

  // Iterate through each thread
  for (const thread of threads) {
    // Iterate through each message in the thread
    const messages = thread.getMessages();
    for (const message of messages) {
      // Get the plain text body of the message
      const emailBody = message.getPlainBody();

      // Analyze the sentiment of the email body
      const sentiment = processSentiment(emailBody);

      // Apply the appropriate label based on the sentiment
      if (sentiment === 'positive') {
        thread.addLabel(positiveLabel);
      } else if (sentiment === 'neutral') {
        thread.addLabel(neutralLabel);
      } else if (sentiment === 'negative') {
        thread.addLabel(negativeLabel);
      }
    }
  }
}

/**
 * Generates sample emails for testing the sentiment analysis.
 *
 * @returns {ActionResponse} - A notification confirming email generation.
 */
function generateSampleEmails() {
  // Get the current user's email address
  const userEmail = Session.getActiveUser().getEmail();

  // Define sample emails
  const sampleEmails = [
    {
      subject: 'Thank you for amazing service!',
      body: 'Hi, I really enjoyed working with you. Thank you again!',
      name: 'Customer A'
    },
    {
      subject: 'Request for information',
      body: 'Hello, I need more information on your recent product launch. Thank you.',
      name: 'Customer B'
    },
    {
      subject: 'Complaint!',
      body: '',
      htmlBody: `<p>Hello, You are late in delivery, again.</p>
<p>Please contact me ASAP before I cancel our subscription.</p>`,
      name: 'Customer C'
    }
  ];

  // Send each sample email
  for (const email of sampleEmails) {
    GmailApp.sendEmail(userEmail, email.subject, email.body, {
      name: email.name,
      htmlBody: email.htmlBody
    });
  }

  // Return a notification
  return buildNotificationResponse("Successfully generated sample emails");
}

Vertex.gs

gmail-sentiment-analysis/Vertex.gs
/*
Copyright 2024-2025 Google LLC

Licensed under the Apache License, Version 2.0 (the "License");
you may not use this file except in compliance with the License.
You may obtain a copy of the License at

    https://www.apache.org/licenses/LICENSE-2.0

Unless required by applicable law or agreed to in writing, software
distributed under the License is distributed on an "AS IS" BASIS,
WITHOUT WARRANTIES OR CONDITIONS OF ANY KIND, either express or implied.
See the License for the specific language governing permissions and
limitations under the License.
*/

// Replace with your project ID
const PROJECT_ID = '[ADD YOUR GCP PROJECT ID HERE]';

// Location for your Vertex AI model
const VERTEX_AI_LOCATION = 'us-central1';

// Model ID to use for sentiment analysis
const MODEL_ID = 'gemini-2.5-flash';

/**
 * Sends the email text to Vertex AI for sentiment analysis.
 *
 * @param {string} emailText - The text of the email to analyze.
 * @returns {string} - The sentiment of the email ('positive', 'negative', or 'neutral').
 */
function processSentiment(emailText) {
  // Construct the API endpoint URL
  const apiUrl = `https://${VERTEX_AI_LOCATION}-aiplatform.googleapis.com/v1/projects/${PROJECT_ID}/locations/${VERTEX_AI_LOCATION}/publishers/google/models/${MODEL_ID}:generateContent`;

  // Prepare the request payload
  const payload = {
    contents: [
      {
        role: "user",
        parts: [
          {
            text: `Analyze the sentiment of the following message: ${emailText}`
          }
        ]
      }
    ],
    generationConfig: {
      temperature: 0.9,
      maxOutputTokens: 1024,
      responseMimeType: "application/json",
      // Expected response format for simpler parsing.
      responseSchema: {
        type: "object",
        properties: {
          response: {
            type: "string",
            enum: ["positive", "negative", "neutral"]
          }
        }
      }
    }
  };

  // Prepare the request options
  const options = {
    method: 'POST',
    headers: {
      'Authorization': `Bearer ${ScriptApp.getOAuthToken()}`
    },
    contentType: 'application/json',
    muteHttpExceptions: true, // Set to true to inspect the error response
    payload: JSON.stringify(payload)
  };

  // Make the API request
  const response = UrlFetchApp.fetch(apiUrl, options);

  // Parse the response. There are two levels of JSON responses to parse.
  const parsedResponse = JSON.parse(response.getContentText());
  const sentimentResponse = JSON.parse(parsedResponse.candidates[0].content.parts[0].text).response;

  // Return the sentiment
  return sentimentResponse;
}

appsscript.json

gmail-sentiment-analysis/appsscript.json
{
  "timeZone": "America/Toronto",
  "oauthScopes": [
    "https://www.googleapis.com/auth/cloud-platform",
    "https://www.googleapis.com/auth/gmail.addons.execute",
    "https://www.googleapis.com/auth/gmail.labels",
    "https://www.googleapis.com/auth/gmail.modify",
    "https://www.googleapis.com/auth/script.external_request",
    "https://www.googleapis.com/auth/userinfo.email"
  ],
  "addOns": {
    "common": {
      "name": "Sentiment Analysis",
      "logoUrl": "https://fonts.gstatic.com/s/i/googlematerialicons/sentiment_extremely_dissatisfied/v6/black-24dp/1x/gm_sentiment_extremely_dissatisfied_black_24dp.png"
    },
    "gmail": {
      "homepageTrigger": {
        "runFunction": "onHomepageTrigger",
        "enabled": true
      }
    }
  },
  "exceptionLogging": "STACKDRIVER",
  "runtimeVersion": "V8"
}

Czyszczenie danych

Aby uniknąć obciążenia konta Google Cloud opłatami za zasoby zużyte w tym samouczku, zalecamy usunięcie projektu w Cloud.

  1. W konsoli Google Cloud otwórz stronę Zarządzanie zasobami. Kliknij Menu > Administracja > Zarządzaj zasobami.

    Otwórz Menedżera zasobów

  2. Na liście projektów wybierz projekt, który chcesz usunąć, a potem kliknij Usuń .
  3. W oknie wpisz identyfikator projektu i kliknij Wyłącz, aby usunąć projekt.

Dalsze kroki