پیام های Gmail را با Gemini و Vertex AI تجزیه و تحلیل و برچسب گذاری کنید

5 دقیقه وقت دارید؟
با شرکت در یک نظرسنجی آنلاین سریع به ما در بهبود اسناد Google Workspace کمک کنید.

این راه حل از Vertex AI و Gemini برای تجزیه و تحلیل پیام های Gmail و برچسب گذاری آن ها بر اساس احساساتشان استفاده می کند.

سطح کدنویسی : متوسط
مدت زمان : 30 دقیقه
نوع پروژه : افزونه Google Workspace

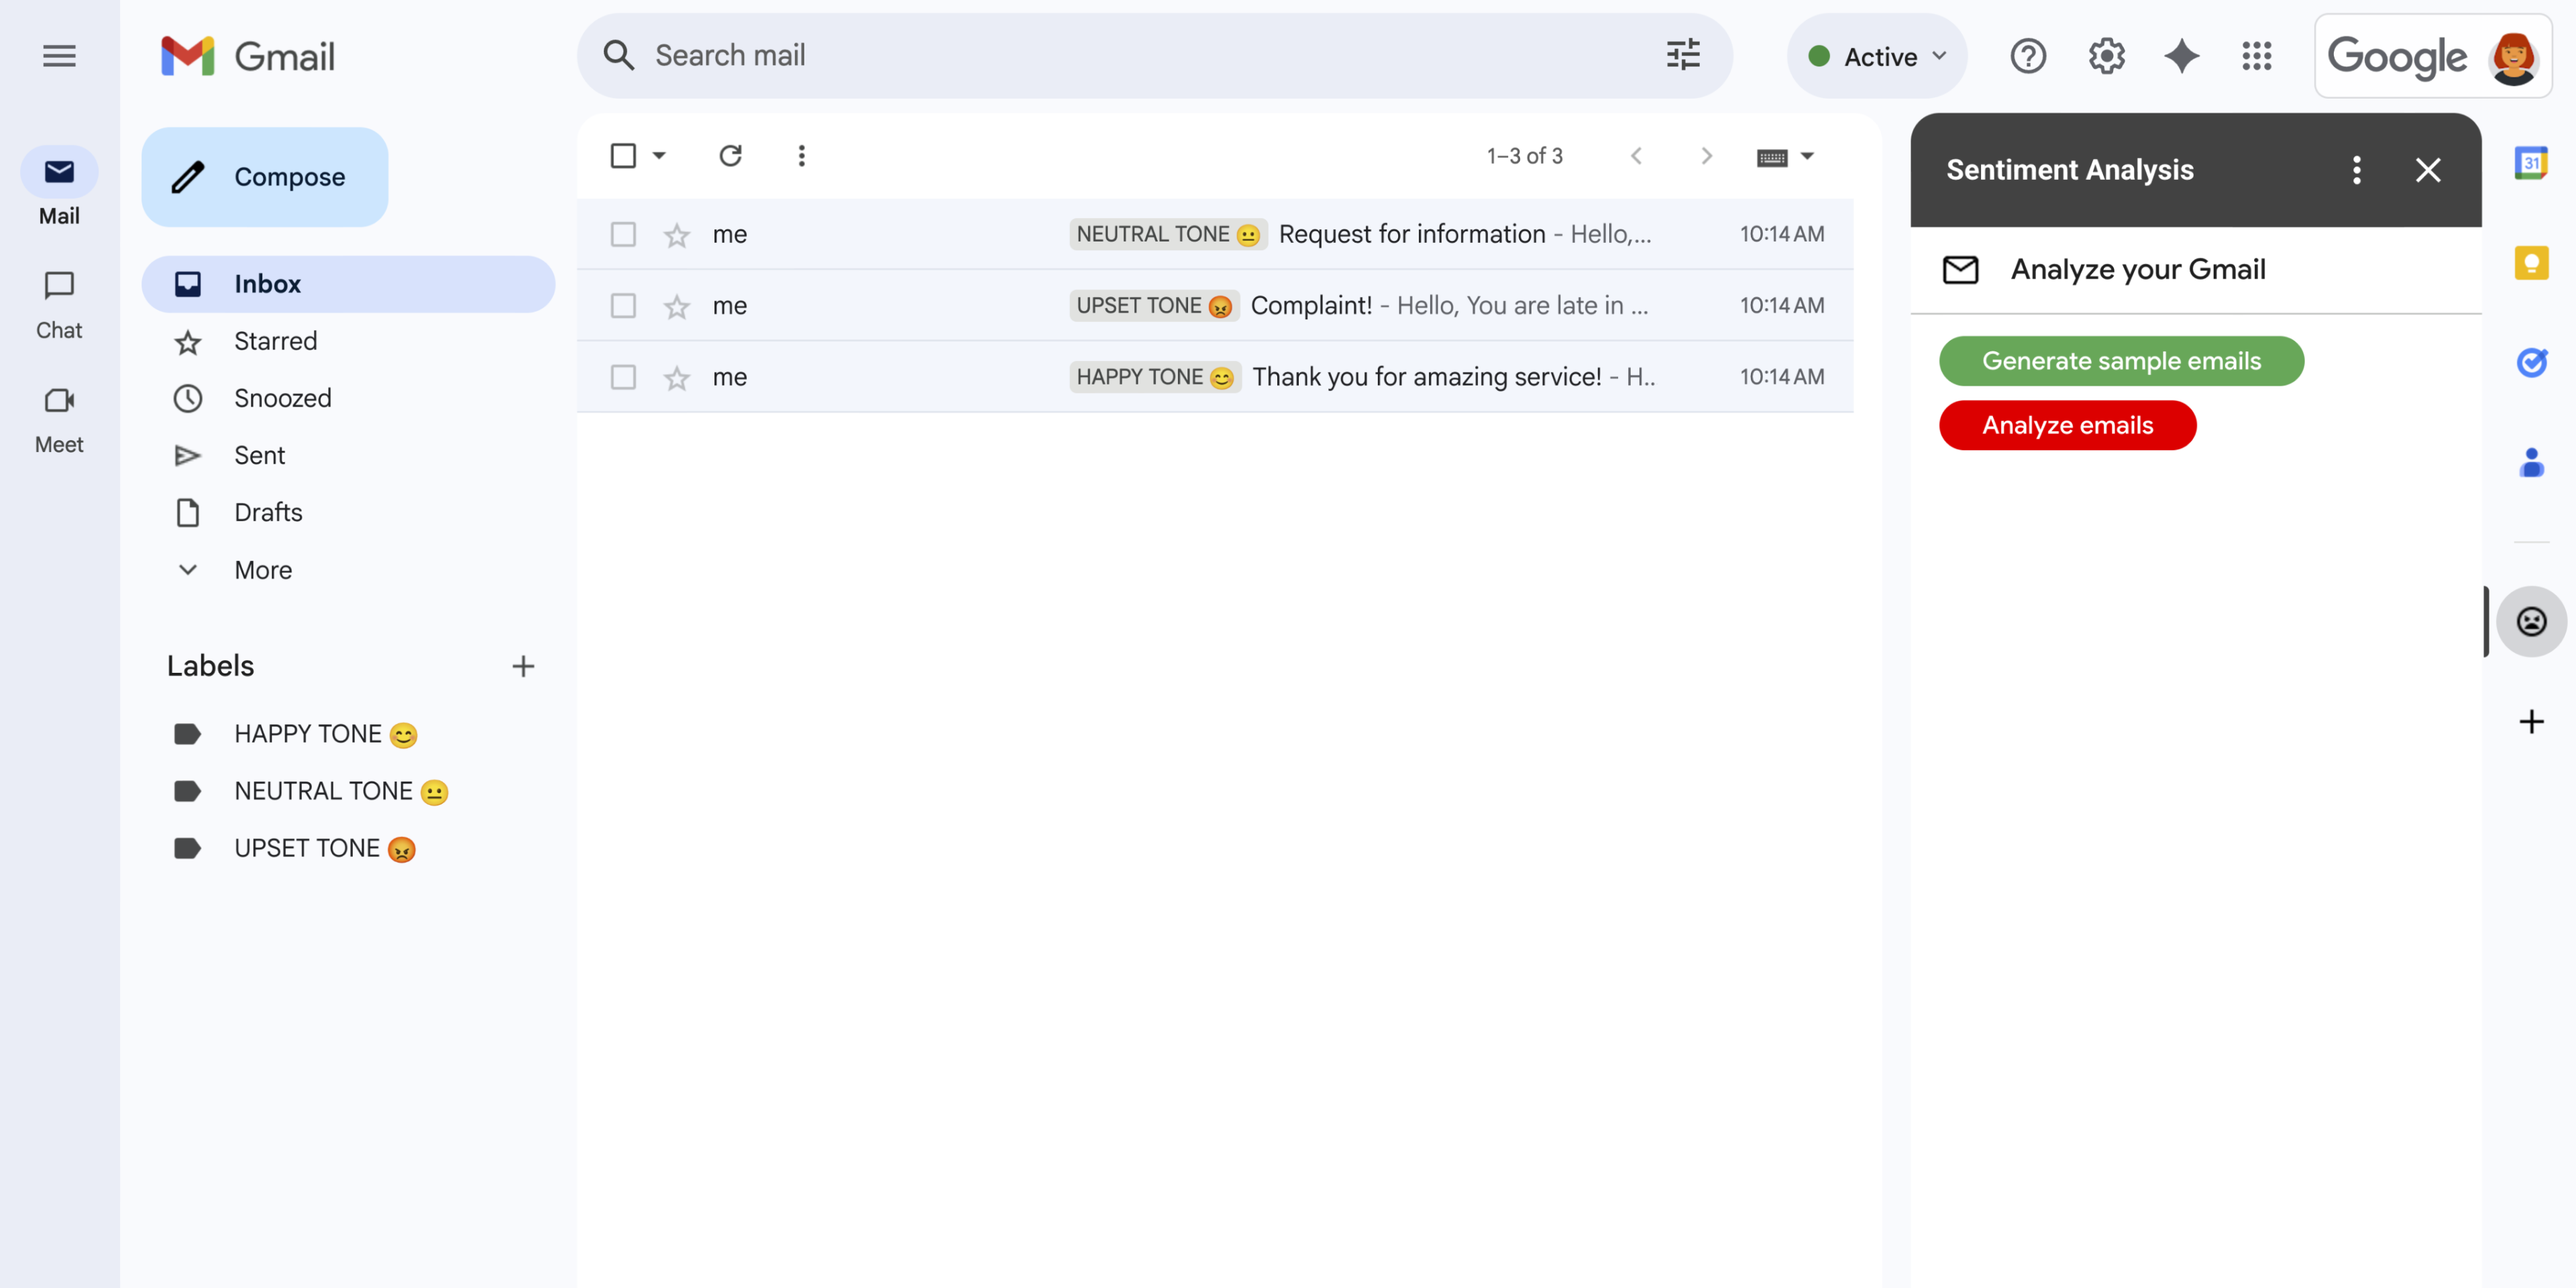
  • یک افزونه Google Workspace که Gmail را در نوار کناری گسترش می دهد.
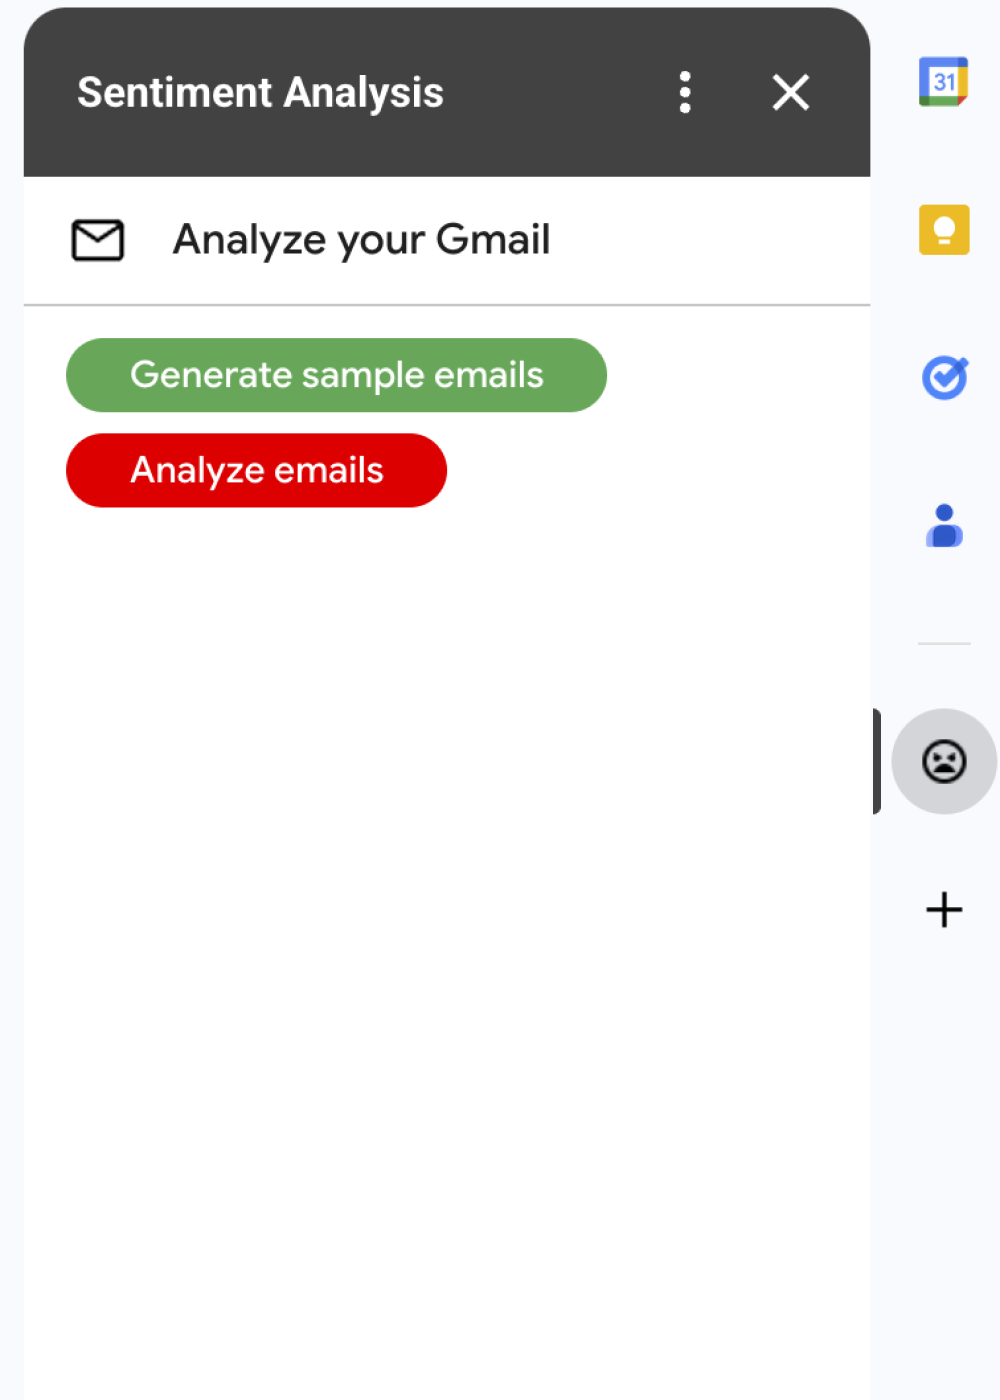
    شکل 1: افزونه Sentiment Analysis نوار کناری را در Gmail نشان می‌دهد که در آن کاربران می‌توانند از Gemini بخواهند بر اساس احساسات پیام‌ها را تجزیه و تحلیل و برچسب‌هایی اعمال کنند.
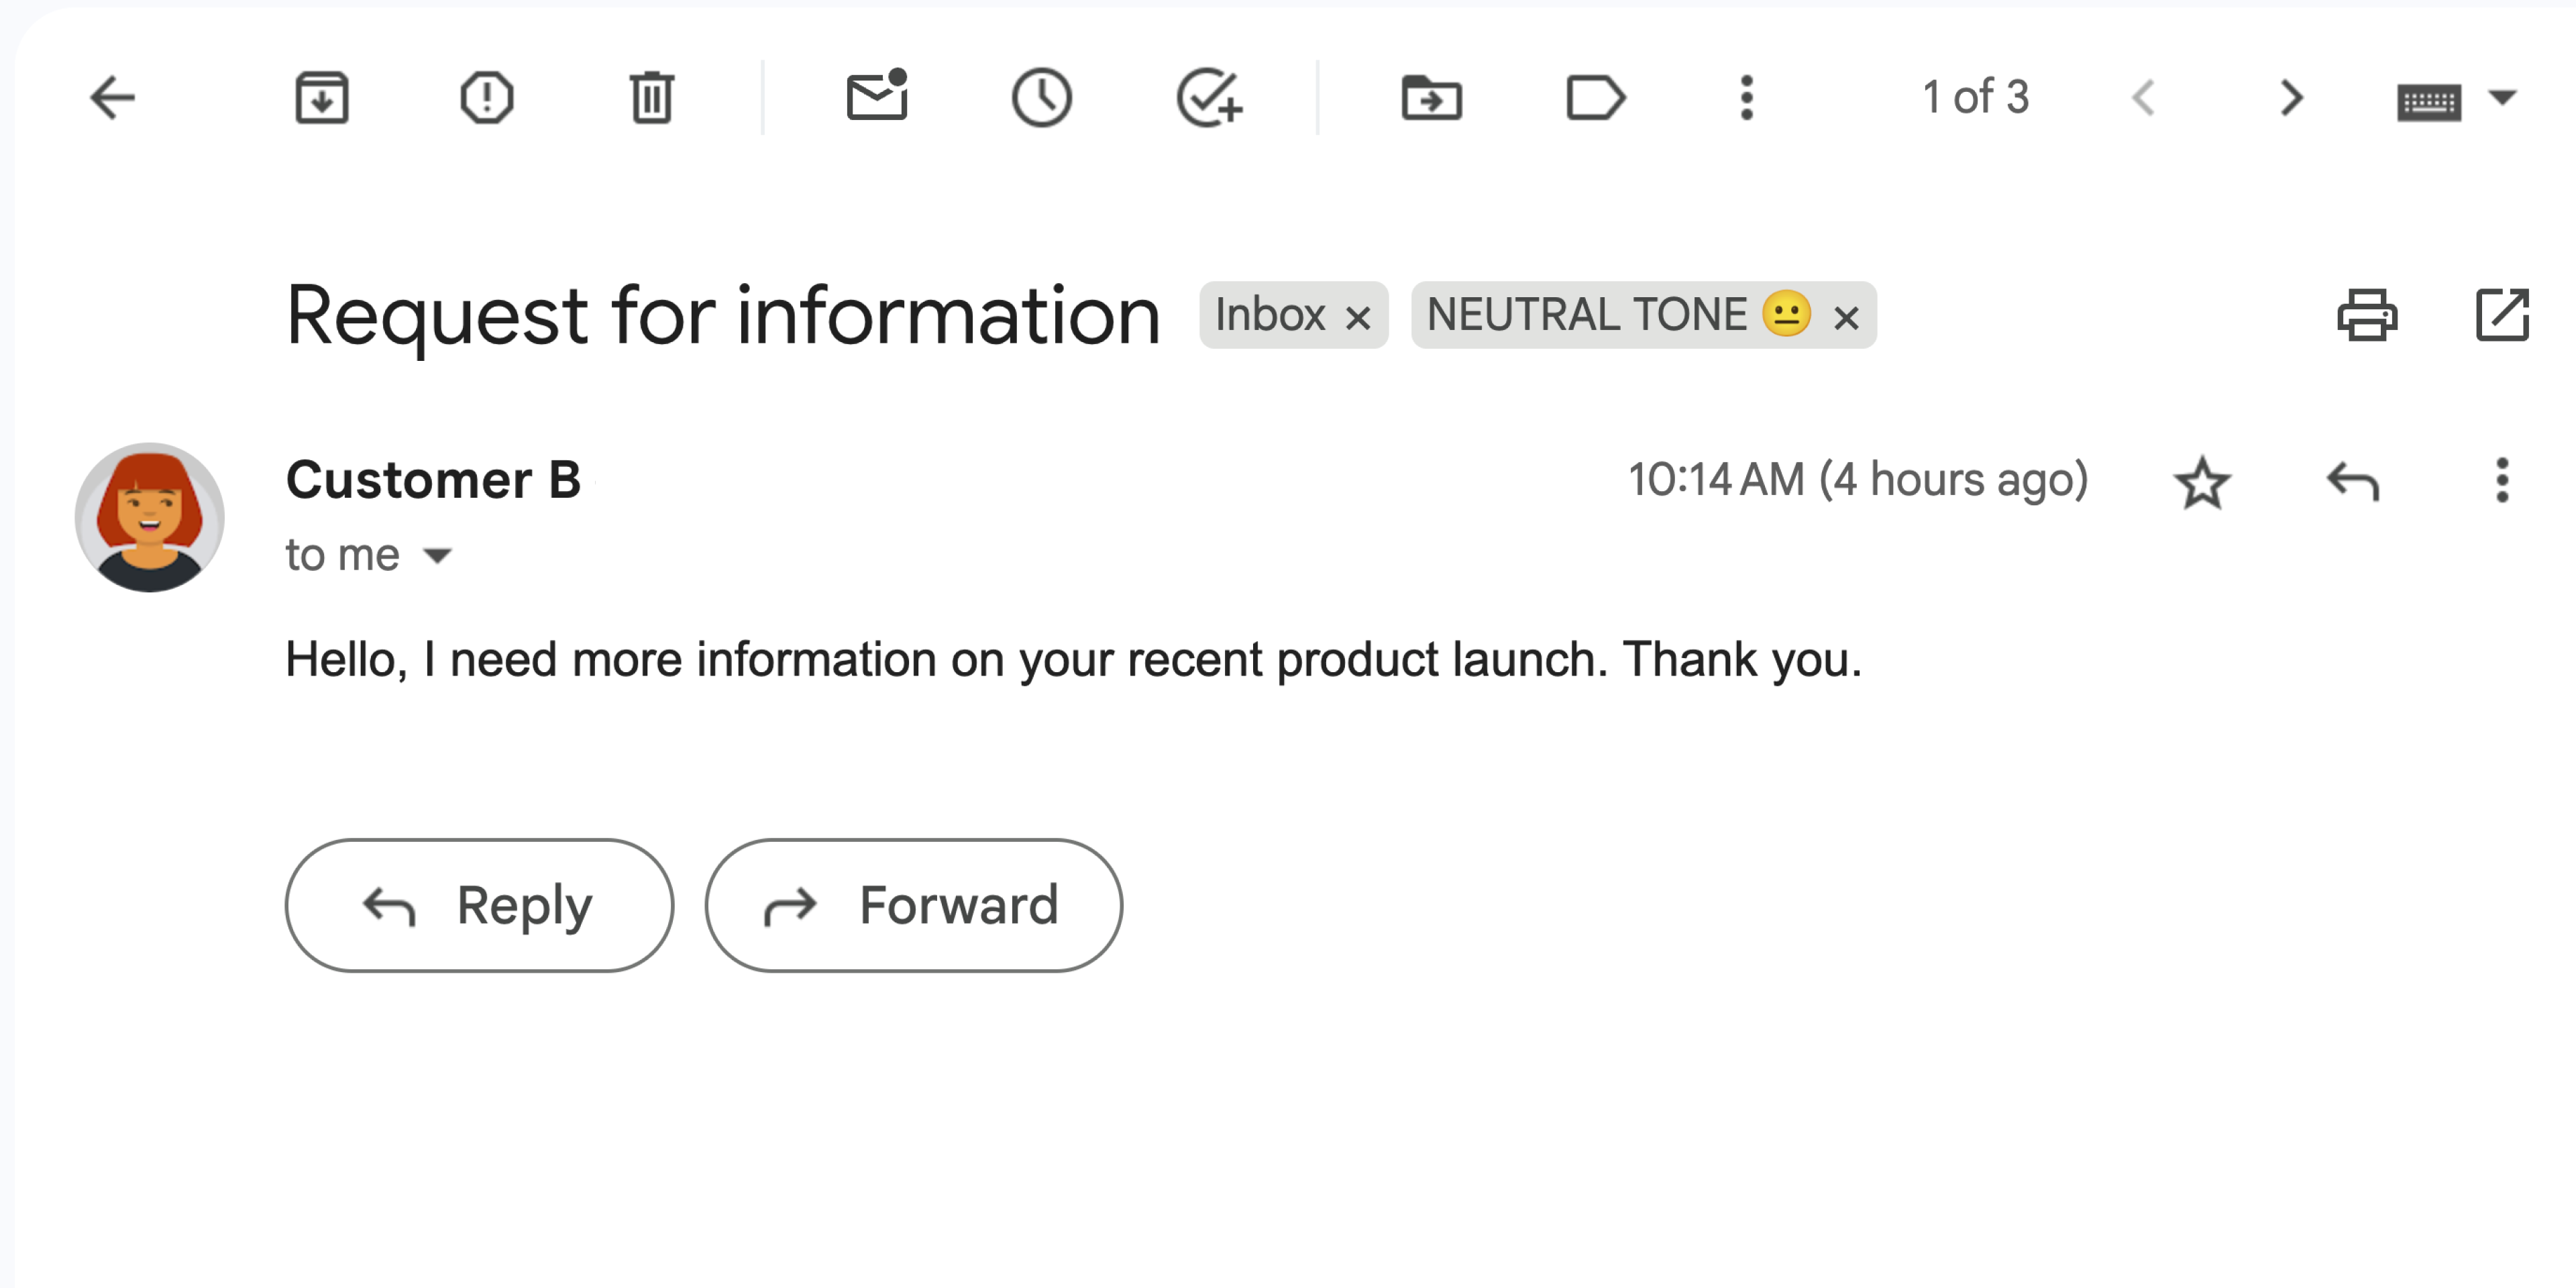
  • یک پیام جیمیل با احساسات خنثی.
    شکل 2: افزونه یک پیام جیمیل را با برچسب NEUTRAL TONE برچسب گذاری می کند.
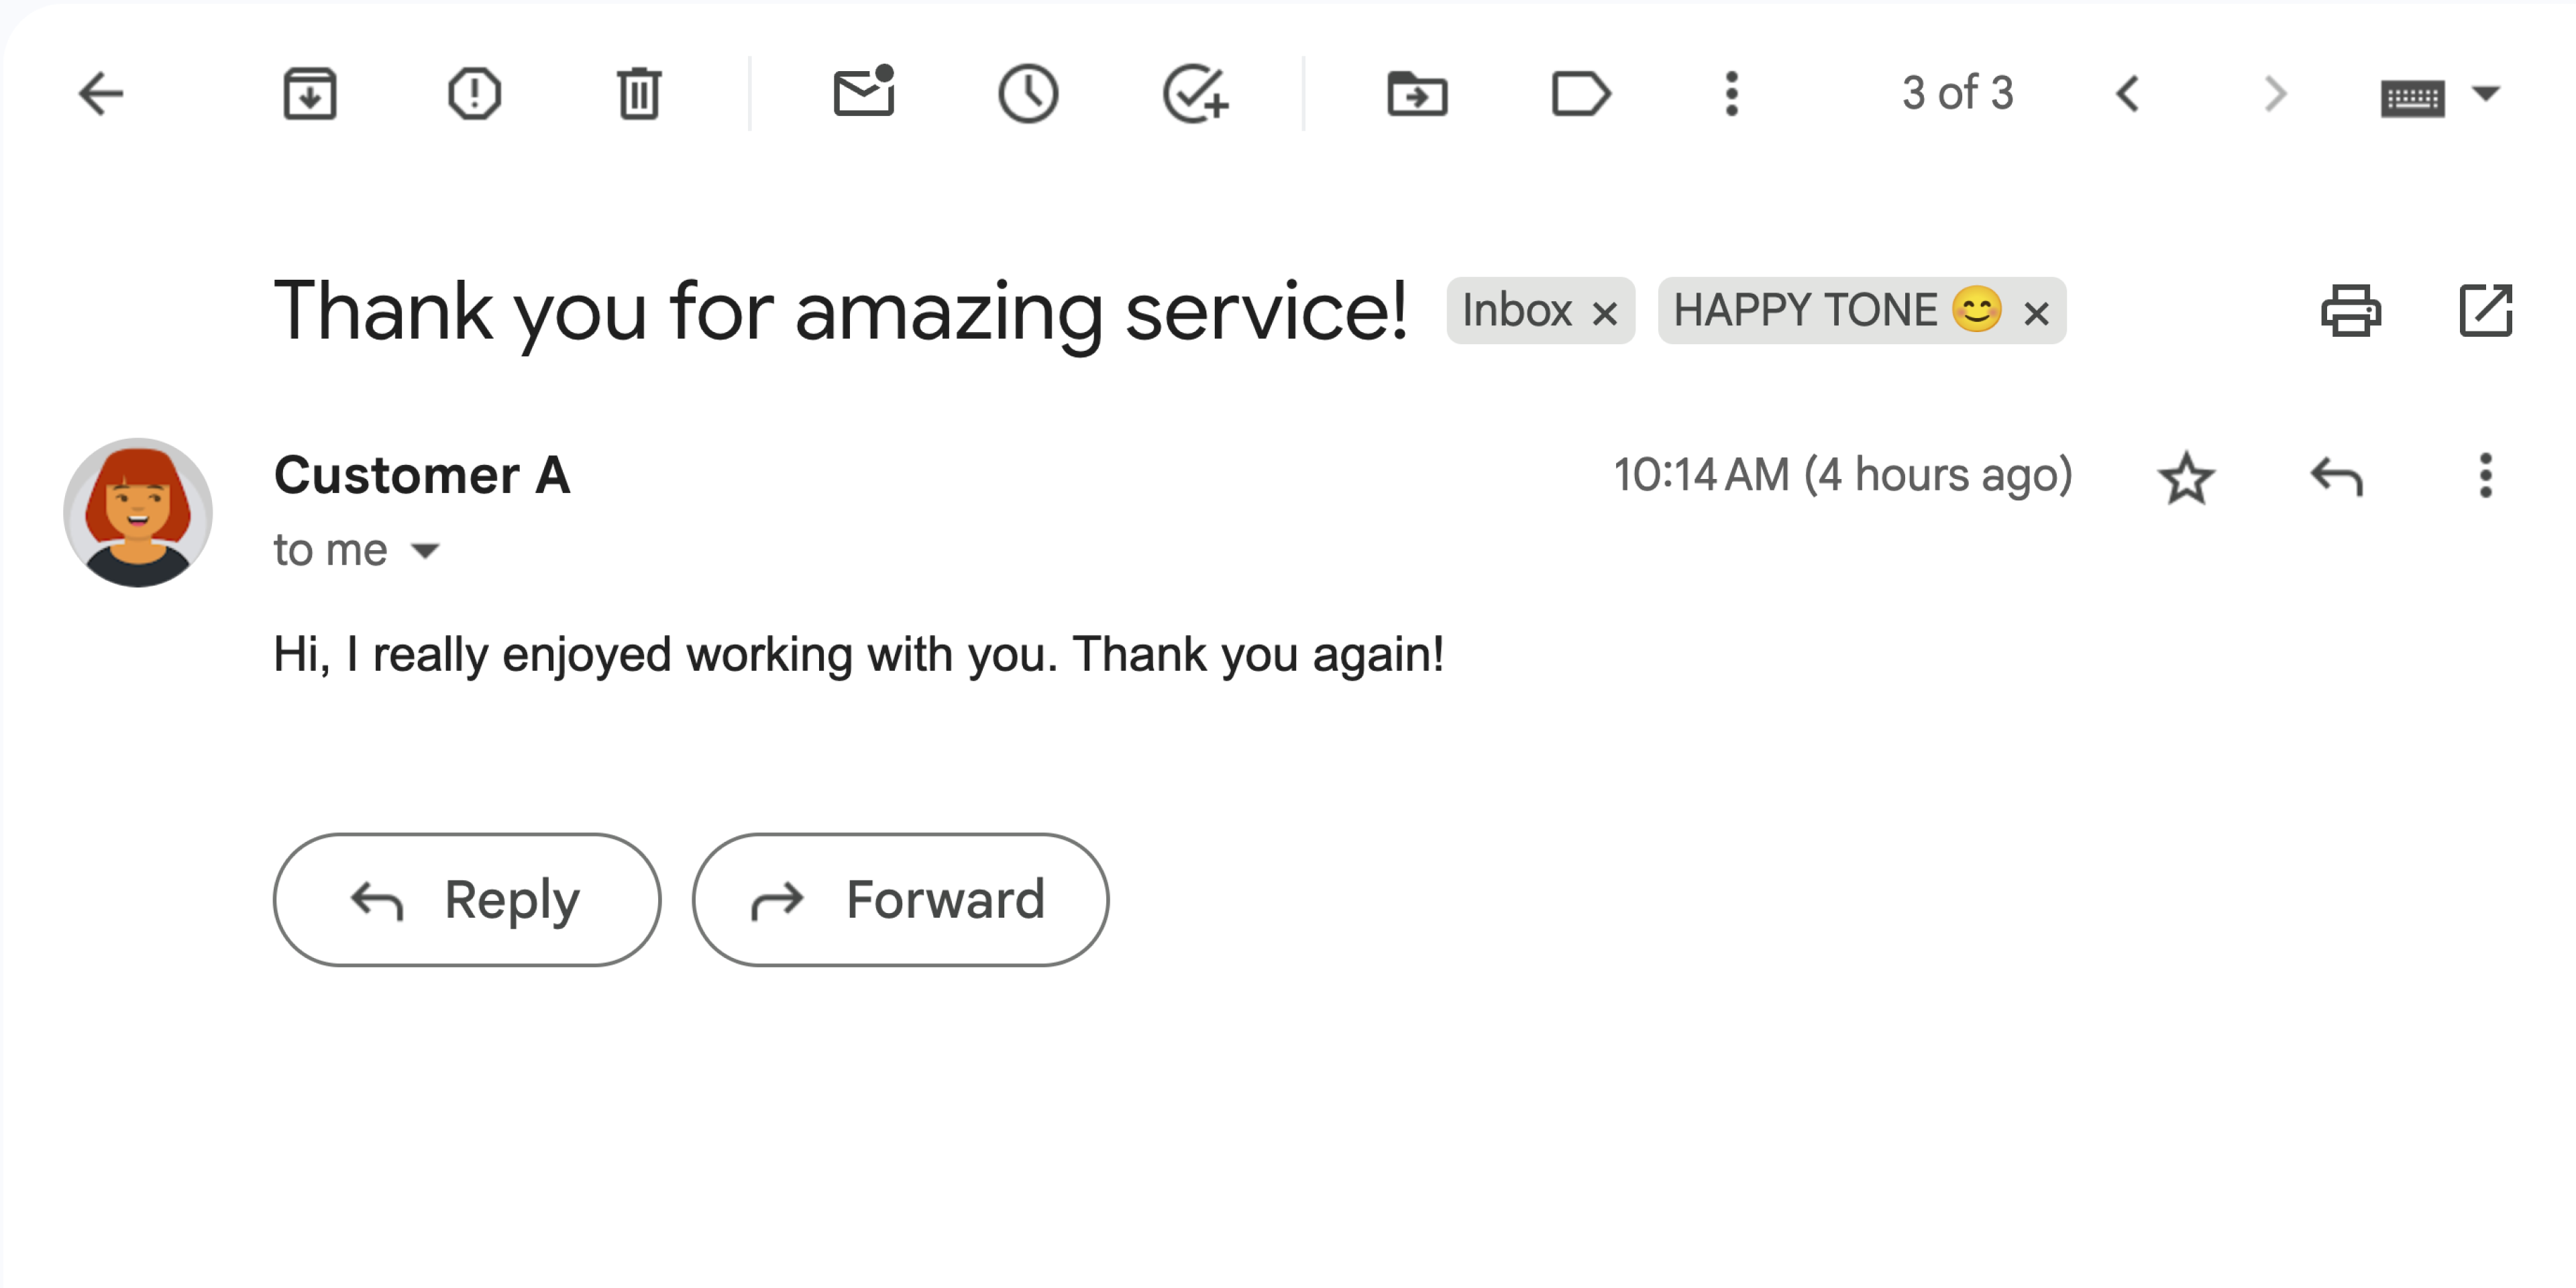
  • یک پیام جیمیل با احساسات شاد.
    شکل 3: افزونه یک پیام جیمیل را با برچسب HAPPY TONE برچسب گذاری می کند.
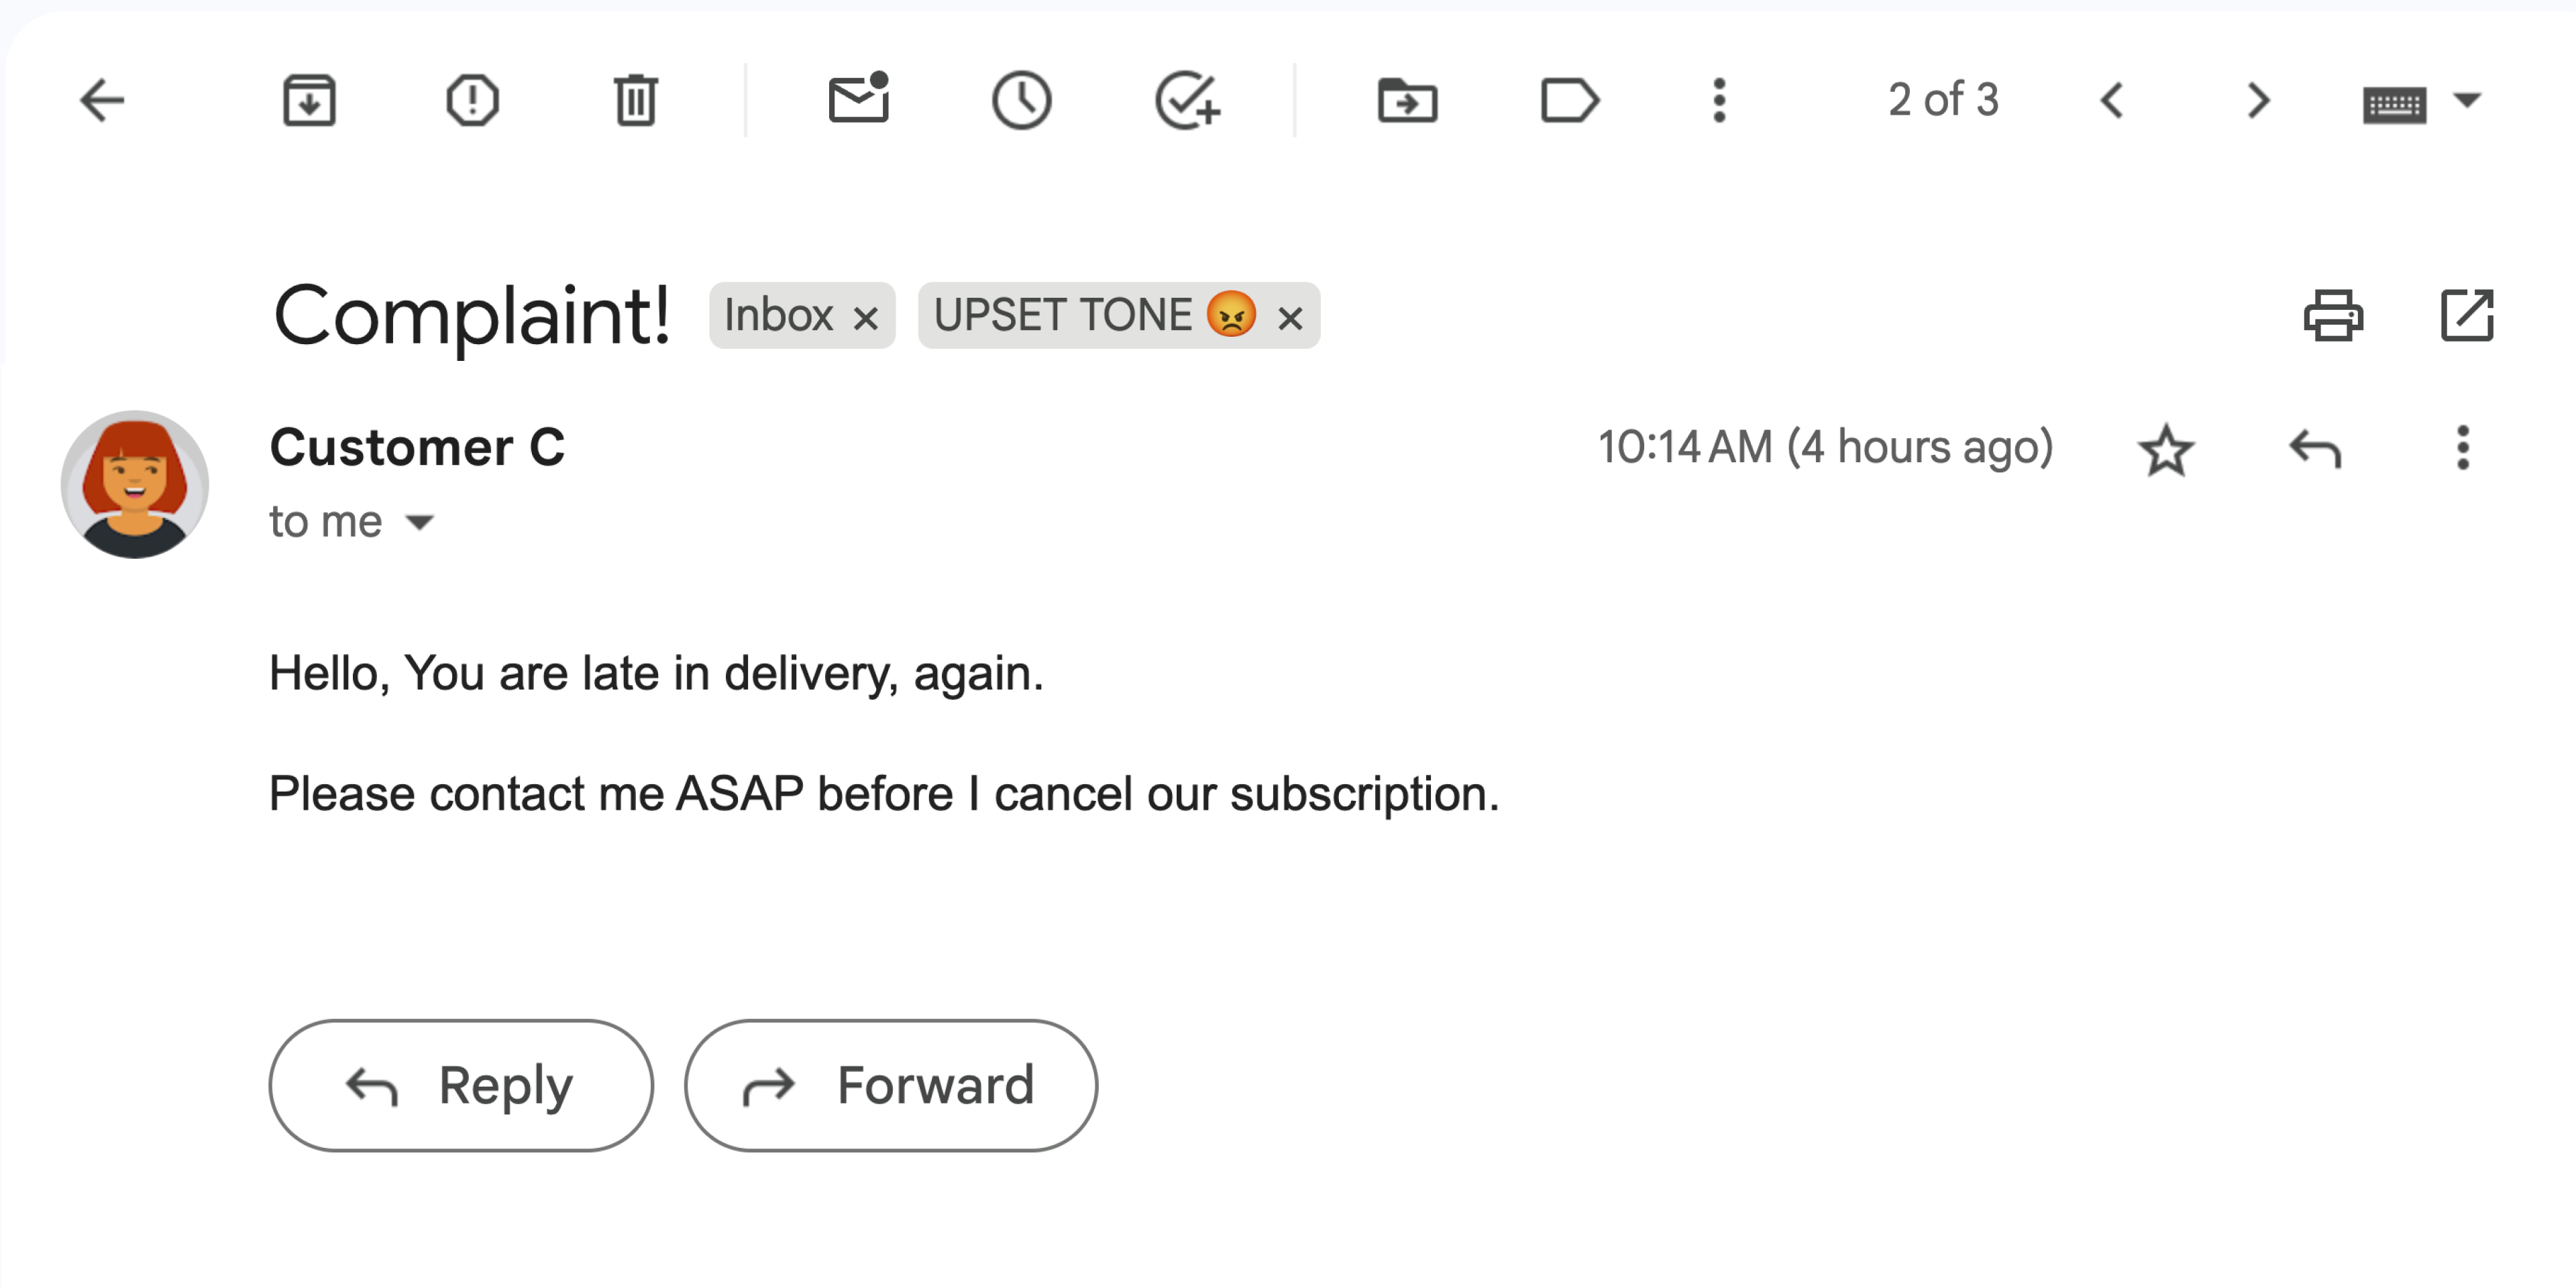
  • یک پیام جیمیل با احساسات ناراحت کننده.
    شکل 4: افزونه یک پیام جیمیل را با برچسب UPSET TONE برچسب گذاری می کند.

اهداف

  • درک کنید که راه حل چه کاری انجام می دهد.
  • بدانید که خدمات Google در این راه حل چه کاری انجام می دهند.
  • محیط را تنظیم کنید.
  • پروژه Google Apps Script را راه اندازی کنید.
  • اسکریپت را اجرا کنید.

در مورد این راه حل

عکس صفحه افزونه Google Workspace تجزیه و تحلیل احساسات

این راه حل یک افزونه Google Workspace است که برچسب‌هایی را بر اساس احساسات پیام‌های Gmail اعمال می‌کند. برای تجزیه و تحلیل محتوای پیام، این افزونه از Vertex AI استفاده می کند تا مدل Gemini 2.5 Flash را درخواست کند و یکی از احساسات زیر را برگرداند:

  • مثبت
  • منفی
  • خنثی

با پاسخ Gemini، این افزونه یک برچسب Gmail مربوط به پیام را اعمال می کند.

برای محدود کردن درخواست به Vertex AI API، این افزونه فقط 10 پیام اخیر موجود در صندوق ورودی کاربر Gmail را تجزیه و تحلیل و برچسب‌ها را اعمال می‌کند. برای کسب اطلاعات بیشتر در مورد سهمیه ها و محدودیت ها، به مستندات Vertex AI مراجعه کنید.

چگونه کار می کند

این راه حل در Google Apps Script ساخته شده است و از خدمات و محصولات Google زیر استفاده می کند:

  • Vertex AI APIمدل فلش Gemini 2.5 را برای تجزیه و تحلیل محتوای پیام‌های Gmail و شناسایی احساسات تحریک می‌کند.
  • خدمات Apps Script:

    • سرویس Gmail – برچسب‌ها را بر روی پیام‌های Gmail بازیابی و اعمال می‌کند. به صورت اختیاری، پیام های نمونه را برای آزمایش افزونه ایجاد می کند.
    • سرویس کارت – رابط کاربری افزونه را ایجاد می کند که به عنوان یک نوار کناری در Gmail ظاهر می شود.
    • سرویس واکشی URL – برای تجزیه و تحلیل احساسات به Vertex AI API متصل می شود.
    • سرویس اسکریپت – برای فراخوانی Vertex AI API، یک نشانه دسترسی OAuth 2.0 برای افزونه با استفاده از روش getOAuthToken دریافت می کند.

پیش نیازها

محیط خود را تنظیم کنید

این بخش نحوه پیکربندی و تنظیم محیط خود را در کنسول Google Cloud و Apps Script توضیح می دهد.

پروژه Cloud خود را در کنسول Google Cloud پیکربندی کنید

این بخش به شما نشان می دهد که چگونه Vertex AI API را فعال کنید و صفحه رضایت OAuth را در پروژه Cloud خود پیکربندی کنید.

Vertex AI API را فعال کنید

  1. در کنسول Google Cloud، پروژه Google Cloud خود را باز کنید و Vertex AI API را فعال کنید:

    API را فعال کنید

  2. تأیید کنید که API را در پروژه Cloud صحیح فعال می‌کنید، سپس روی Next کلیک کنید.

  3. تأیید کنید که API صحیح را فعال کرده اید، سپس روی فعال کردن کلیک کنید.

صفحه رضایت OAuth را پیکربندی کنید

افزونه‌های Google Workspace به پیکربندی صفحه رضایت نیاز دارند. پیکربندی صفحه رضایت OAuth افزونه شما، آنچه را که Google برای کاربران نمایش می‌دهد مشخص می‌کند.

  1. در کنسول Google Cloud، به > بروید > برندسازی

    به برندینگ بروید

  2. اگر قبلاً آن را پیکربندی کرده اید ، می توانید تنظیمات صفحه رضایت OAuth زیر را در نام تجاری ، مخاطب و دسترسی به داده پیکربندی کنید. اگر پیامی دیدید که می گوید هنوز پیکربندی نشده است ، روی شروع کلیک کنید:
    1. در قسمت اطلاعات برنامه ، در نام برنامه ، نامی برای برنامه وارد کنید.
    2. در ایمیل پشتیبانی کاربر ، آدرس ایمیل پشتیبانی را انتخاب کنید که در صورت داشتن رضایت، کاربران بتوانند با شما تماس بگیرند.
    3. روی Next کلیک کنید.
    4. در قسمت Audience ، Internal را انتخاب کنید.
    5. روی Next کلیک کنید.
    6. در قسمت اطلاعات تماس ، آدرس ایمیلی را وارد کنید که در آن می‌توانید از هرگونه تغییر در پروژه خود مطلع شوید.
    7. روی Next کلیک کنید.
    8. در قسمت پایان ، خط‌مشی داده‌های کاربر سرویس‌های API Google را مرور کنید و در صورت موافقت، من با خدمات Google API موافقم: خط‌مشی داده‌های کاربر را انتخاب کنید.
    9. روی Continue کلیک کنید.
    10. روی ایجاد کلیک کنید.
  3. در حال حاضر، می توانید از افزودن دامنه ها صرف نظر کنید. در آینده، وقتی برنامه‌ای را برای استفاده خارج از سازمان Google Workspace خود ایجاد می‌کنید، باید نوع کاربر را به خارجی تغییر دهید. سپس محدوده های مجوز مورد نیاز برنامه خود را اضافه کنید. برای کسب اطلاعات بیشتر، راهنمای کامل Configure OAuth رضایت را ببینید.

پروژه Apps Script خود را ایجاد و تنظیم کنید

برای ایجاد و راه‌اندازی پروژه Apps Script خود برای افزونه، مراحل زیر را انجام دهید:

  1. روی دکمه زیر کلیک کنید تا پروژه تحلیل احساسات Gmail با Gemini و Vertex AI Apps Script باز شود.
    پروژه Apps Script را باز کنید

  2. روی نمای کلی کلیک کنید.

  3. در صفحه نمای کلی، روی Make a copy کلیک کنید نماد ایجاد یک کپی .

  4. شماره پروژه Cloud خود را دریافت کنید:

    1. در کنسول Google Cloud، به > IAM & Admin > تنظیمات بروید.

      به تنظیمات IAM و Admin بروید

    2. در قسمت Project number مقدار را کپی کنید.
  5. پروژه Cloud خود را با پروژه Apps Script خود وصل کنید:

    1. در پروژه Apps Script کپی شده خود، روی تنظیمات پروژه کلیک کنید نماد تنظیمات پروژه .
    2. در پروژه Google Cloud Platform (GCP) ، روی تغییر پروژه کلیک کنید.
    3. در شماره پروژه GCP ، شماره پروژه Cloud را جای‌گذاری کنید.
    4. روی تنظیم پروژه کلیک کنید.

افزونه را تست کنید

برای آزمایش افزونه، یک برنامه آزمایشی نصب کنید و سپس آن را در Gmail باز کنید:

  1. ایجاد و نصب استقرار آزمایشی Apps Script:
    1. در پروژه Apps Script کپی شده خود، روی Editor کلیک کنید.
    2. فایل Code.gs را باز کرده و روی Run کلیک کنید. وقتی از شما خواسته شد، اسکریپت را مجاز کنید.
    3. روی Deploy > Test Deployments کلیک کنید.
    4. روی Install > Done کلیک کنید.
  2. جیمیل را باز کنید.

    به جیمیل بروید

  3. در نوار کناری سمت راست، افزونه Sentiment Analysis را باز کنید.

  4. اگر از شما خواسته شد، افزونه را مجاز کنید.

  5. اختیاری: برای ایجاد پیام هایی برای آزمایش با افزونه خود، روی ایجاد ایمیل های نمونه کلیک کنید. سه پیام در صندوق ورودی شما ظاهر می شود. اگر آنها را نمی بینید، صفحه را رفرش کنید.

  6. برای افزودن برچسب، روی تجزیه و تحلیل ایمیل‌ها کلیک کنید.

این افزونه آخرین 10 پیام را در صندوق ورودی شما بررسی می کند و سپس یکی از برچسب های زیر را بر اساس محتوای پیام اعمال می کند:

  • لحن شاد 😊
  • لحن خنثی 😐
  • لحن ناراحت کننده 😡

کد را مرور کنید

کد Apps Script را برای این راه حل مرور کنید:

مشاهده کد منبع

Code.gs

gmail-sentiment-analysis/Code.gs
/*
Copyright 2024 Google LLC

Licensed under the Apache License, Version 2.0 (the "License");
you may not use this file except in compliance with the License.
You may obtain a copy of the License at

    https://www.apache.org/licenses/LICENSE-2.0

Unless required by applicable law or agreed to in writing, software
distributed under the License is distributed on an "AS IS" BASIS,
WITHOUT WARRANTIES OR CONDITIONS OF ANY KIND, either express or implied.
See the License for the specific language governing permissions and
limitations under the License.
*/

/**
 * Triggered when the add-on is opened from the Gmail homepage.
 *
 * @param {Object} e - The event object.
 * @returns {Card} - The homepage card.
 */
function onHomepageTrigger(e) {
  return buildHomepageCard();
}

Cards.gs

gmail-sentiment-analysis/Cards.gs
/*
Copyright 2024-2025 Google LLC

Licensed under the Apache License, Version 2.0 (the "License");
you may not use this file except in compliance with the License.
You may obtain a copy of the License at

    https://www.apache.org/licenses/LICENSE-2.0

Unless required by applicable law or agreed to in writing, software
distributed under the License is distributed on an "AS IS" BASIS,
WITHOUT WARRANTIES OR CONDITIONS OF ANY KIND, either express or implied.
See the License for the specific language governing permissions and
limitations under the License.
*/

/**
 * Builds the main card displayed on the Gmail homepage.
 *
 * @returns {Card} - The homepage card.
 */
function buildHomepageCard() {
  // Create a new card builder
  const cardBuilder = CardService.newCardBuilder();

  // Create a card header
  const cardHeader = CardService.newCardHeader();
  cardHeader.setImageUrl('https://fonts.gstatic.com/s/i/googlematerialicons/mail/v6/black-24dp/1x/gm_mail_black_24dp.png');
  cardHeader.setImageStyle(CardService.ImageStyle.CIRCLE);
  cardHeader.setTitle("Analyze your Gmail");

  // Add the header to the card
  cardBuilder.setHeader(cardHeader);

  // Create a card section
  const cardSection = CardService.newCardSection();

  // Create buttons for generating sample emails and analyzing sentiment
  const buttonSet = CardService.newButtonSet();

  // Create "Generate sample emails" button
  const generateButton = createFilledButton('Generate sample emails', 'generateSampleEmails', '#34A853');
  buttonSet.addButton(generateButton);

  // Create "Analyze emails" button
  const analyzeButton = createFilledButton('Analyze emails', 'analyzeSentiment', '#FF0000');
  buttonSet.addButton(analyzeButton);

  // Add the button set to the section
  cardSection.addWidget(buttonSet);

  // Add the section to the card
  cardBuilder.addSection(cardSection);

  // Build and return the card
  return cardBuilder.build();
}

/**
 * Creates a filled text button with the specified text, function, and color.
 *
 * @param {string} text - The text to display on the button.
 * @param {string} functionName - The name of the function to call when the button is clicked.
 * @param {string} color - The background color of the button.
 * @returns {TextButton} - The created text button.
 */
function createFilledButton(text, functionName, color) {
  // Create a new text button
  const textButton = CardService.newTextButton();

  // Set the button text
  textButton.setText(text);

  // Set the action to perform when the button is clicked
  const action = CardService.newAction();
  action.setFunctionName(functionName);
  textButton.setOnClickAction(action);

  // Set the button style to filled
  textButton.setTextButtonStyle(CardService.TextButtonStyle.FILLED);

  // Set the background color
  textButton.setBackgroundColor(color);

  return textButton;
}

/**
 * Creates a notification response with the specified text.
 *
 * @param {string} notificationText - The text to display in the notification.
 * @returns {ActionResponse} - The created action response.
 */
function buildNotificationResponse(notificationText) {
  // Create a new notification
  const notification = CardService.newNotification();
  notification.setText(notificationText);

  // Create a new action response builder
  const actionResponseBuilder = CardService.newActionResponseBuilder();

  // Set the notification for the action response
  actionResponseBuilder.setNotification(notification);

  // Build and return the action response
  return actionResponseBuilder.build();
}

Gmail.gs

gmail-sentiment-analysis/Gmail.gs
/*
Copyright 2024-2025 Google LLC

Licensed under the Apache License, Version 2.0 (the "License");
you may not use this file except in compliance with the License.
You may obtain a copy of the License at

    https://www.apache.org/licenses/LICENSE-2.0

Unless required by applicable law or agreed to in writing, software
distributed under the License is distributed on an "AS IS" BASIS,
WITHOUT WARRANTIES OR CONDITIONS OF ANY KIND, either express or implied.
See the License for the specific language governing permissions and
limitations under the License.
*/

/**
 * Analyzes the sentiment of the first 10 threads in the inbox
 * and labels them accordingly.
 *
 * @returns {ActionResponse} - A notification confirming completion.
 */
function analyzeSentiment() {
  // Analyze and label emails
  analyzeAndLabelEmailSentiment();

  // Return a notification
  return buildNotificationResponse("Successfully completed sentiment analysis");
}

/**
 * Analyzes the sentiment of emails and applies appropriate labels.
 */
function analyzeAndLabelEmailSentiment() {
  // Define label names
  const labelNames = ["HAPPY TONE 😊", "NEUTRAL TONE 😐", "UPSET TONE 😡"];

  // Get or create labels for each sentiment
  const positiveLabel = GmailApp.getUserLabelByName(labelNames[0]) || GmailApp.createLabel(labelNames[0]);
  const neutralLabel = GmailApp.getUserLabelByName(labelNames[1]) || GmailApp.createLabel(labelNames[1]);
  const negativeLabel = GmailApp.getUserLabelByName(labelNames[2]) || GmailApp.createLabel(labelNames[2]);

  // Get the first 10 threads in the inbox
  const threads = GmailApp.getInboxThreads(0, 10);

  // Iterate through each thread
  for (const thread of threads) {
    // Iterate through each message in the thread
    const messages = thread.getMessages();
    for (const message of messages) {
      // Get the plain text body of the message
      const emailBody = message.getPlainBody();

      // Analyze the sentiment of the email body
      const sentiment = processSentiment(emailBody);

      // Apply the appropriate label based on the sentiment
      if (sentiment === 'positive') {
        thread.addLabel(positiveLabel);
      } else if (sentiment === 'neutral') {
        thread.addLabel(neutralLabel);
      } else if (sentiment === 'negative') {
        thread.addLabel(negativeLabel);
      }
    }
  }
}

/**
 * Generates sample emails for testing the sentiment analysis.
 *
 * @returns {ActionResponse} - A notification confirming email generation.
 */
function generateSampleEmails() {
  // Get the current user's email address
  const userEmail = Session.getActiveUser().getEmail();

  // Define sample emails
  const sampleEmails = [
    {
      subject: 'Thank you for amazing service!',
      body: 'Hi, I really enjoyed working with you. Thank you again!',
      name: 'Customer A'
    },
    {
      subject: 'Request for information',
      body: 'Hello, I need more information on your recent product launch. Thank you.',
      name: 'Customer B'
    },
    {
      subject: 'Complaint!',
      body: '',
      htmlBody: `<p>Hello, You are late in delivery, again.</p>
<p>Please contact me ASAP before I cancel our subscription.</p>`,
      name: 'Customer C'
    }
  ];

  // Send each sample email
  for (const email of sampleEmails) {
    GmailApp.sendEmail(userEmail, email.subject, email.body, {
      name: email.name,
      htmlBody: email.htmlBody
    });
  }

  // Return a notification
  return buildNotificationResponse("Successfully generated sample emails");
}

Vertex.gs

gmail-sentiment-analysis/Vertex.gs
/*
Copyright 2024-2025 Google LLC

Licensed under the Apache License, Version 2.0 (the "License");
you may not use this file except in compliance with the License.
You may obtain a copy of the License at

    https://www.apache.org/licenses/LICENSE-2.0

Unless required by applicable law or agreed to in writing, software
distributed under the License is distributed on an "AS IS" BASIS,
WITHOUT WARRANTIES OR CONDITIONS OF ANY KIND, either express or implied.
See the License for the specific language governing permissions and
limitations under the License.
*/

// Replace with your project ID
const PROJECT_ID = '[ADD YOUR GCP PROJECT ID HERE]';

// Location for your Vertex AI model
const VERTEX_AI_LOCATION = 'us-central1';

// Model ID to use for sentiment analysis
const MODEL_ID = 'gemini-2.5-flash';

/**
 * Sends the email text to Vertex AI for sentiment analysis.
 *
 * @param {string} emailText - The text of the email to analyze.
 * @returns {string} - The sentiment of the email ('positive', 'negative', or 'neutral').
 */
function processSentiment(emailText) {
  // Construct the API endpoint URL
  const apiUrl = `https://${VERTEX_AI_LOCATION}-aiplatform.googleapis.com/v1/projects/${PROJECT_ID}/locations/${VERTEX_AI_LOCATION}/publishers/google/models/${MODEL_ID}:generateContent`;

  // Prepare the request payload
  const payload = {
    contents: [
      {
        role: "user",
        parts: [
          {
            text: `Analyze the sentiment of the following message: ${emailText}`
          }
        ]
      }
    ],
    generationConfig: {
      temperature: 0.9,
      maxOutputTokens: 1024,
      responseMimeType: "application/json",
      // Expected response format for simpler parsing.
      responseSchema: {
        type: "object",
        properties: {
          response: {
            type: "string",
            enum: ["positive", "negative", "neutral"]
          }
        }
      }
    }
  };

  // Prepare the request options
  const options = {
    method: 'POST',
    headers: {
      'Authorization': `Bearer ${ScriptApp.getOAuthToken()}`
    },
    contentType: 'application/json',
    muteHttpExceptions: true, // Set to true to inspect the error response
    payload: JSON.stringify(payload)
  };

  // Make the API request
  const response = UrlFetchApp.fetch(apiUrl, options);

  // Parse the response. There are two levels of JSON responses to parse.
  const parsedResponse = JSON.parse(response.getContentText());
  const sentimentResponse = JSON.parse(parsedResponse.candidates[0].content.parts[0].text).response;

  // Return the sentiment
  return sentimentResponse;
}

appsscript.json

gmail-sentiment-analysis/appsscript.json
{
  "timeZone": "America/Toronto",
  "oauthScopes": [
    "https://www.googleapis.com/auth/cloud-platform",
    "https://www.googleapis.com/auth/gmail.addons.execute",
    "https://www.googleapis.com/auth/gmail.labels",
    "https://www.googleapis.com/auth/gmail.modify",
    "https://www.googleapis.com/auth/script.external_request",
    "https://www.googleapis.com/auth/userinfo.email"
  ],
  "addOns": {
    "common": {
      "name": "Sentiment Analysis",
      "logoUrl": "https://fonts.gstatic.com/s/i/googlematerialicons/sentiment_extremely_dissatisfied/v6/black-24dp/1x/gm_sentiment_extremely_dissatisfied_black_24dp.png"
    },
    "gmail": {
      "homepageTrigger": {
        "runFunction": "onHomepageTrigger",
        "enabled": true
      }
    }
  },
  "exceptionLogging": "STACKDRIVER",
  "runtimeVersion": "V8"
}

پاک کن

برای جلوگیری از تحمیل هزینه به حساب Google Cloud خود برای منابع استفاده شده در این آموزش، توصیه می کنیم پروژه Cloud را حذف کنید.

  1. در کنسول Google Cloud، به صفحه مدیریت منابع بروید. > IAM & Admin > Manage Resources کلیک کنید.

    به Resource Manager بروید

  2. در لیست پروژه، پروژه ای را که می خواهید حذف کنید انتخاب کنید و سپس روی حذف کلیک کنید.
  3. در گفتگو، ID پروژه را تایپ کنید و سپس بر روی Shut down کلیک کنید تا پروژه حذف شود.

مراحل بعدی