
Questa guida spiega come utilizzare il metodo
create()
nella risorsa Message dell'API Google Chat per eseguire una delle seguenti operazioni:
- Inviare messaggi contenenti testo, schede e widget interattivi.
- Inviare messaggi privati a un utente di Chat specifico.
- Avviare o rispondere a un thread di messaggi.
- Assegna un nome a un messaggio in modo da poterlo specificare in altre richieste dell'API Chat.
La dimensione massima del messaggio (incluso qualsiasi testo o scheda) è di 32.000 byte. Per inviare un messaggio che supera questa dimensione, l'app Chat deve inviare più messaggi.
Oltre a chiamare l'API Chat per creare messaggi, le app di Chat possono creare e inviare messaggi per rispondere alle interazioni degli utenti, ad esempio pubblicare un messaggio di benvenuto dopo che un utente aggiunge l'app di Chat a uno spazio. Quando rispondono alle interazioni, le app di chat possono utilizzare altri tipi di funzionalità di messaggistica, tra cui dialoghi interattivi e interfacce di anteprima dei link. Per rispondere a un utente, l'app di Chat restituisce il messaggio in modo sincrono, senza chiamare l'API Chat. Per informazioni sull'invio di messaggi per rispondere alle interazioni, vedi Ricevere e rispondere alle interazioni con l'app Google Chat.
Come Chat visualizza e attribuisce i messaggi creati con l'API Chat
Puoi chiamare il metodo create() utilizzando
l'autenticazione dell'app
e l'autenticazione utente.
Chat attribuisce il mittente del messaggio in modo diverso
a seconda del tipo di autenticazione che utilizzi.
Quando esegui l'autenticazione come app Chat, l'app Chat invia il messaggio.

App accanto al suo nome.Quando ti autentichi come utente, l'app di Chat invia il messaggio per conto dell'utente. Chat attribuisce anche l'app di chat al messaggio visualizzandone il nome.

Il tipo di autenticazione determina anche le funzionalità e le interfacce di messaggistica che puoi includere nel messaggio. Con l'autenticazione delle app, le app di chat possono inviare messaggi che contengono testo RTF, interfacce basate su schede e widget interattivi. Con l'autenticazione utente, puoi inviare messaggi. Nella Anteprima per gli sviluppatori, puoi anche inviare schede, come descritto in Creare e aggiornare schede.
Per scoprire di più sulle funzionalità di messaggistica disponibili per l'API Chat, consulta la panoramica dei messaggi di Google Chat.
Questa guida spiega come utilizzare uno dei due tipi di autenticazione per inviare un messaggio con l'API Chat.
Prerequisiti
Node.js
- Un account Google Workspace Business o Enterprise con accesso a Google Chat.
- Configura l'ambiente:
- Crea un progetto Google Cloud.
- Configura la schermata per il consenso OAuth.
- Attiva e configura l'API Google Chat con un nome, un'icona e una descrizione per la tua app di chat.
- Installa la libreria client Cloud Node.js.
- Crea le credenziali di accesso in base a come vuoi autenticarti nella richiesta dell'API Google Chat:
- Per l'autenticazione come utente di Chat,
crea le credenziali dell'ID client OAuth e salvale come file JSON denominato
credentials.jsonnella directory locale. - Per l'autenticazione come app Chat,
crea le credenziali
dell'account di servizio e salvale come file JSON denominato
credentials.json.
- Per l'autenticazione come utente di Chat,
crea le credenziali dell'ID client OAuth e salvale come file JSON denominato
- Scegli un ambito di autorizzazione in base al fatto che tu voglia eseguire l'autenticazione come utente o come app di chat.
- Uno spazio di Chat di Google Chat di cui l'utente autenticato o l'app Chat chiamante è membro. Per eseguire l'autenticazione come app Chat, aggiungi l'app Chat allo spazio.
Python
- Un account Google Workspace Business o Enterprise con accesso a Google Chat.
- Configura l'ambiente:
- Crea un progetto Google Cloud.
- Configura la schermata per il consenso OAuth.
- Attiva e configura l'API Google Chat con un nome, un'icona e una descrizione per la tua app di chat.
- Installa la libreria client Python Cloud.
- Crea le credenziali di accesso in base a come vuoi autenticarti nella richiesta dell'API Google Chat:
- Per l'autenticazione come utente di Chat,
crea le credenziali dell'ID client OAuth e salvale come file JSON denominato
credentials.jsonnella directory locale. - Per l'autenticazione come app Chat,
crea le credenziali
dell'account di servizio e salvale come file JSON denominato
credentials.json.
- Per l'autenticazione come utente di Chat,
crea le credenziali dell'ID client OAuth e salvale come file JSON denominato
- Scegli un ambito di autorizzazione in base al fatto che tu voglia eseguire l'autenticazione come utente o come app di chat.
- Uno spazio di Chat di Google Chat di cui l'utente autenticato o l'app Chat chiamante è membro. Per eseguire l'autenticazione come app Chat, aggiungi l'app Chat allo spazio.
Java
- Un account Google Workspace Business o Enterprise con accesso a Google Chat.
- Configura l'ambiente:
- Crea un progetto Google Cloud.
- Configura la schermata per il consenso OAuth.
- Attiva e configura l'API Google Chat con un nome, un'icona e una descrizione per la tua app di chat.
- Installa la libreria client Java Cloud.
- Crea le credenziali di accesso in base a come vuoi autenticarti nella richiesta dell'API Google Chat:
- Per l'autenticazione come utente di Chat,
crea le credenziali dell'ID client OAuth e salvale come file JSON denominato
credentials.jsonnella directory locale. - Per l'autenticazione come app Chat,
crea le credenziali
dell'account di servizio e salvale come file JSON denominato
credentials.json.
- Per l'autenticazione come utente di Chat,
crea le credenziali dell'ID client OAuth e salvale come file JSON denominato
- Scegli un ambito di autorizzazione in base al fatto che tu voglia eseguire l'autenticazione come utente o come app di chat.
- Uno spazio di Chat di Google Chat di cui l'utente autenticato o l'app Chat chiamante è membro. Per eseguire l'autenticazione come app Chat, aggiungi l'app Chat allo spazio.
Apps Script
- Un account Google Workspace Business o Enterprise con accesso a Google Chat.
- Configura l'ambiente:
- Crea un progetto Google Cloud.
- Configura la schermata per il consenso OAuth.
- Attiva e configura l'API Google Chat con un nome, un'icona e una descrizione per la tua app di chat.
- Crea un progetto Apps Script autonomo e attiva il servizio di chat avanzato.
- In questa guida devi utilizzare l'autenticazione utente o dell'app. Per eseguire l'autenticazione come app Chat, crea le credenziali del service account. Per conoscere la procedura, vedi Autenticare e autorizzare come app Google Chat.
- Scegli un ambito di autorizzazione in base al fatto che tu voglia eseguire l'autenticazione come utente o come app di chat.
- Uno spazio di Chat di Google Chat di cui l'utente autenticato o l'app Chat chiamante è membro. Per eseguire l'autenticazione come app Chat, aggiungi l'app Chat allo spazio.
Inviare un messaggio come app Chat
Questa sezione spiega come inviare messaggi contenenti testo, schede e widget interattivi per accessori utilizzando l'autenticazione dell'app.

Per chiamare il metodo CreateMessage()
utilizzando l'autenticazione dell'app, devi specificare i seguenti campi nella
richiesta:
chat.botAmbito di autorizzazione.- La risorsa
Spacein cui vuoi pubblicare il messaggio. L'app Chat deve far parte dello spazio. - La risorsa
Messageda creare. Per definire i contenuti del messaggio, puoi includere testo RTF (text), una o più interfacce di schede (cardsV2) o entrambe.
In via facoltativa, puoi includere quanto segue:
- Il campo
accessoryWidgetsper includere pulsanti interattivi nella parte inferiore del messaggio. - Il campo
privateMessageViewerper inviare il messaggio in privato a un utente specifico. - Il campo
messageId, che ti consente di assegnare un nome al messaggio da utilizzare in altre richieste API. - I campi
thread.threadKeyemessageReplyOptionper avviare o rispondere a un thread. Se lo spazio non utilizza i thread, questo campo viene ignorato.
Il seguente codice mostra un esempio di come un'app di chat può inviare un messaggio pubblicato come app di chat che contiene testo, una scheda e un pulsante su cui è possibile fare clic nella parte inferiore del messaggio:
Node.js
Python
Java
Apps Script
Per eseguire questo esempio, sostituisci SPACE_NAME con l'ID del campo
name
dello spazio. Puoi ottenere l'ID chiamando il metodo
ListSpaces() o dall'URL dello spazio.
Aggiungere widget interattivi in fondo a un messaggio
Nel primo esempio di codice di questa guida, il messaggio dell'app di chat mostra un pulsante cliccabile nella parte inferiore del messaggio, noto come widget accessorio. I widget degli accessori vengono visualizzati dopo il testo o le schede di un messaggio. Puoi utilizzare questi widget per invitare gli utenti a interagire con il tuo messaggio in molti modi, tra cui:
- Valuta l'accuratezza o la soddisfazione di un messaggio.
- Segnala un problema relativo all'app Messaggi o Chat.
- Aprire un link a contenuti correlati, ad esempio la documentazione.
- Ignora o posticipa messaggi simili dall'app Chat per un periodo di tempo specifico.
Per aggiungere widget di accessori, includi il campo
accessoryWidgets[]
nel corpo della richiesta e specifica uno o più widget da includere.
L'immagine seguente mostra un'app Chat che aggiunge un messaggio di testo con widget accessori in modo che gli utenti possano valutare la loro esperienza con l'app Chat.
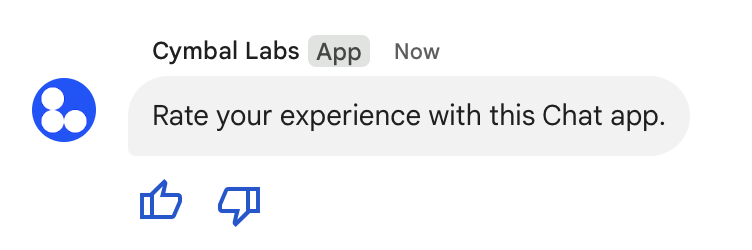
Di seguito è riportato il corpo della richiesta che crea un messaggio di testo con
due pulsanti accessorio. Quando un utente fa clic su un pulsante, la funzione corrispondente (ad esempio doUpvote) elabora l'interazione:
{
  text: "Rate your experience with this Chat app.",
  accessoryWidgets: [{ buttonList: { buttons: [{
    icon: { material_icon: {
      name: "thumb_up"
    }},
    color: { red: 0, blue: 255, green: 0 },
    onClick: { action: {
      function: "doUpvote"
    }}
  }, {
    icon: { material_icon: {
      name: "thumb_down"
    }},
    color: { red: 0, blue: 255, green: 0 },
    onClick: { action: {
      function: "doDownvote"
    }}
  }]}}]
}
Inviare un messaggio privato
Le app di chat possono inviare messaggi privati in modo che il messaggio sia visibile solo a un utente specifico nello spazio. Quando un'app di chat invia un messaggio privato, il messaggio mostra un'etichetta che informa l'utente che il messaggio è visibile solo a lui.
Per inviare un messaggio in privato utilizzando l'API Chat, specifica il campo
privateMessageViewer
nel corpo della richiesta. Per specificare l'utente, imposta il valore sulla
risorsa
User
che rappresenta l'utente Chat. Puoi anche utilizzare il campo
name
della risorsa User, come mostrato nell'esempio seguente:
{
  text: "Hello private world!",
  privateMessageViewer: {
    name: "users/USER_ID"
  }
}
Per utilizzare questo esempio, sostituisci USER_ID
con un ID univoco per l'utente, ad esempio 12345678987654321 o
hao@cymbalgroup.com. Per saperne di più su come specificare gli utenti, vedi
Identificare e specificare gli utenti di Google Chat.
Per inviare un messaggio privato, devi omettere quanto segue nella richiesta:
Inviare notifiche forzate o messaggi silenziosi
Quando un'app di Chat invia un messaggio, può utilizzare una di queste opzioni per avvisare gli utenti:
- Forza una notifica: Chat invia sempre una notifica push ai destinatari, indipendentemente dalle impostazioni di notifica o dallo stato Non disturbare (NND). In Chat, il messaggio attiva un comportamento di grassetto e spostamento nell'elenco dei destinatari o nella lista Home e mostra un badge.
- Inviare un messaggio silenzioso: Chat sopprime le notifiche push per i destinatari. In Chat, il messaggio non attiva il comportamento di grassetto o riposizionamento nell'elenco dei destinatari o nella lista Home e non mostra un badge. Se il messaggio silenzioso è l'ultimo messaggio di una conversazione, il suo contenuto non viene mostrato nello snippet della home page.
Che siano forzati o silenziosi, questi messaggi includono un indicatore visivo che notifica ai destinatari il comportamento speciale delle notifiche.
Le notifiche forzate e i messaggi silenziosi sono disponibili solo per le app di chat che utilizzano l'autenticazione dell'app.
Le notifiche forzate e i messaggi silenziosi presentano le seguenti limitazioni:
- Utenti esterni: le notifiche forzate e i messaggi silenziosi non si applicano agli utenti esterni (ospiti) in uno spazio. Gli utenti esterni ricevono le notifiche in base alle proprie impostazioni.
- Menzioni: i messaggi silenziosi non supportano le menzioni degli utenti. Se includi una menzione in un messaggio silenzioso, viene trattata come testo normale.
- Thread: non puoi avviare o rispondere a un thread con un messaggio silenzioso.
- Tipo di spazio: le notifiche forzate e i messaggi silenziosi non sono supportati nei messaggi diretti (MD) o negli spazi di proprietà di persone che non hanno un account Google Workspace.
- Notifiche email: i messaggi silenziosi non attivano le notifiche email. I messaggi con notifica forzata attivano le notifiche email solo se includono anche una menzione per un utente specifico.
Per forzare una notifica o inviare un messaggio silenzioso, includi il campo
createMessageNotificationOptions
nella richiesta e imposta notificationType su uno dei seguenti valori:
| Valore | Comportamento |
|---|---|
NOTIFICATION_TYPE_FORCE_NOTIFY |
Forza una notifica. |
NOTIFICATION_TYPE_SILENT |
Invia il messaggio in modalità silenziosa. |
Il seguente esempio mostra il corpo JSON di una richiesta per inviare un messaggio con una notifica forzata:
{
  "text": "Critical update: the server is down!",
  "createMessageNotificationOptions": {
    "notificationType": "NOTIFICATION_TYPE_FORCE_NOTIFY"
  }
}
Inviare un messaggio per conto di un utente
Questa sezione spiega come inviare messaggi per conto di un utente utilizzando l'autenticazione utente. Con l'autenticazione utente, il contenuto del messaggio può contenere solo testo e deve omettere le funzionalità di messaggistica disponibili solo per le app di chat, tra cui interfacce di schede e widget interattivi. In Anteprima per gli sviluppatori, puoi creare messaggi con schede per conto di un utente. Per maggiori dettagli, vedi Creare e aggiornare le schede.

Per chiamare il metodo CreateMessage() utilizzando l'autenticazione utente, devi specificare
i seguenti campi nella richiesta:
- Un ambito di autorizzazione
che supporta l'autenticazione utente per questo metodo. L'esempio seguente utilizza
l'ambito
chat.messages.create. - La risorsa
Spacein cui vuoi pubblicare il messaggio. L'utente autenticato deve essere un membro dello spazio. - La risorsa
Messageda creare. Per definire i contenuti del messaggio, devi includere il campotext.
In via facoltativa, puoi includere quanto segue:
- Il campo
createMessageNotificationOptionsper forzare una notifica o inviare il messaggio in modalità silenziosa. - Il campo
messageId, che ti consente di assegnare un nome al messaggio da utilizzare in altre richieste API. - I campi
thread.threadKeyemessageReplyOptionper avviare o rispondere a un thread. Se lo spazio non utilizza i thread, questo campo viene ignorato.
Il seguente codice mostra un esempio di come un'app Chat può inviare un messaggio di testo in un determinato spazio per conto di un utente autenticato:
Node.js
Python
Java
Apps Script
Per eseguire questo esempio, sostituisci SPACE_NAME con l'ID del campo
name
dello spazio. Puoi ottenere l'ID chiamando il metodo
ListSpaces() o dall'URL dello spazio.
Avviare o rispondere a un thread
Per gli spazi che utilizzano i thread, puoi specificare se un nuovo messaggio avvia un thread o risponde a un thread esistente.
Per impostazione predefinita, i messaggi che crei utilizzando l'API Chat avviano un nuovo thread. Per aiutarti a identificare il thread e rispondere in un secondo momento, puoi specificare una chiave del thread nella richiesta:
- Nel corpo della richiesta, specifica il campo
thread.threadKey. - Specifica il parametro di query
messageReplyOptionper determinare cosa succede se la chiave esiste già.
Per creare un messaggio che risponde a un thread esistente:
- Nel corpo della richiesta, includi il campo
thread. Se impostato, puoi specificare ilthreadKeyche hai creato. In caso contrario, devi utilizzarenamedel thread. - Specifica il parametro di query
messageReplyOption.
Il seguente codice mostra un esempio di come un'app Chat può inviare un messaggio di testo che avvia o risponde a un determinato thread identificato dalla chiave di un determinato spazio per conto di un utente autenticato:
Node.js
Python
Java
Apps Script
Per eseguire questo esempio, sostituisci quanto segue:
THREAD_KEY: una chiave di thread esistente nello spazio oppure, per creare un nuovo thread, un nome univoco per il thread.SPACE_NAME: l'ID del camponamedello spazio. Puoi ottenere l'ID chiamando il metodoListSpaces()o dall'URL dello spazio.
Dare un nome a un messaggio
Per recuperare o specificare un messaggio nelle chiamate API future, puoi assegnare un nome a un messaggio
impostando il campo messageId nella richiesta.
La denominazione del messaggio ti consente di specificarlo senza dover memorizzare l'ID assegnato dal sistema dal nome della risorsa del messaggio (rappresentato nel campo name).
Ad esempio, per recuperare un messaggio utilizzando il metodo get(), utilizzi il nome della risorsa per specificare quale messaggio recuperare. Il nome della risorsa è
formattato come spaces/{space}/messages/{message}, dove {message} rappresenta
l'ID assegnato dal sistema o il nome personalizzato che hai impostato durante la creazione del
messaggio.
Per assegnare un nome a un messaggio, specifica un ID personalizzato nel campo
messageId
quando crei il messaggio. Il campo messageId imposta il valore del campo
clientAssignedMessageId
della risorsa Message.
Puoi assegnare un nome a un messaggio solo al momento della creazione. Non puoi assegnare un nome o modificare un ID personalizzato per i messaggi esistenti. L'ID personalizzato deve soddisfare i seguenti requisiti:
- Inizia con
client-. Ad esempio,client-custom-nameè un ID personalizzato valido, mentrecustom-namenon lo è. - Contiene fino a 63 caratteri e solo lettere minuscole, numeri e trattini.
- È univoco all'interno di uno spazio. Un'app di chat non può utilizzare lo stesso ID personalizzato per messaggi diversi.
Il seguente codice mostra un esempio di come un'app Chat può inviare un messaggio con un ID a un determinato spazio per conto di un utente autenticato:
Node.js
Python
Java
Apps Script
Per eseguire questo esempio, sostituisci quanto segue:
SPACE_NAME: l'ID del camponamedello spazio. Puoi ottenere l'ID chiamando il metodoListSpaces()o dall'URL dello spazio.MESSAGE-ID: un nome per il messaggio che inizia concustom-. Deve essere univoco rispetto a qualsiasi altro nome di messaggio creato dall'app Chat nello spazio specificato.
Citare un messaggio
Puoi citare un altro messaggio chiamando
CreateMessage()
(rpc,
rest)
e impostando quotedMessageMetadata
(rpc,
rest)
nella richiesta.
Puoi citare messaggi all'interno di un thread o nella chat principale, ma non puoi citare un messaggio di un altro thread.
Il seguente codice mostra come creare un messaggio che cita un altro messaggio:
Node.js
import {createClientWithUserCredentials} from './authentication-utils.js';

const USER_AUTH_OAUTH_SCOPES = ['https://www.googleapis.com/auth/chat.messages.create'];

// This sample shows how to create a message that quotes another message.
async function main() {

  // Create a client
  const chatClient = await createClientWithUserCredentials(USER_AUTH_OAUTH_SCOPES);

  // Initialize request argument(s)
  const request = {

    // TODO(developer): Replace SPACE_NAME .
    parent: 'spaces/SPACE_NAME',

    message: {
      text: 'I am responding to a quoted message!',

      // quotedMessageMetadata lets Chat apps respond to a message by quoting it.
      quotedMessageMetadata: {

        // TODO(developer): Replace QUOTED_MESSAGE_NAME
        // and QUOTED_MESSAGE_LAST_UPDATE_TIME.
        name: 'QUOTED_MESSAGE_NAME',
        lastUpdateTime: 'QUOTED_MESSAGE_LAST_UPDATE_TIME'
      }
    }
  };

  // Make the request
  const response = await chatClient.createMessage(request);

  // Handle the response
  console.log(response);
}

main().catch(console.error);
Python
from authentication_utils import create_client_with_user_credentials
from google.apps import chat_v1 as google_chat
from google.protobuf.timestamp_pb2 import Timestamp

SCOPES = ['https://www.googleapis.com/auth/chat.messages.create']

# This sample shows how to create a message that quotes another message.
def create_message_quote_message():
    '''Creates a message that quotes another message.'''

    # Create a client
    client = create_client_with_user_credentials(SCOPES)

    # Create a timestamp from the RFC-3339 string.
    # TODO(developer): Replace QUOTED_MESSAGE_LAST_UPDATE_TIME.
    last_update_time = Timestamp()
    last_update_time.FromJsonString('QUOTED_MESSAGE_LAST_UPDATE_TIME')

    # Initialize request argument(s)
    request = google_chat.CreateMessageRequest(

        # TODO(developer): Replace SPACE_NAME.
        parent='spaces/SPACE_NAME',

        # Create the message.
        message = google_chat.Message(
            text='I am responding to a quoted message!',

            # quotedMessageMetadata lets Chat apps respond to a message by quoting it.
            quoted_message_metadata=google_chat.QuotedMessageMetadata(

                name='QUOTED_MESSAGE_NAME',
                last_update_time=last_update_time
            )
        )
    )

    # Make the request
    response = client.create_message(request)

    # Handle the response
    print(response)

create_message_quote_message()
Java
import com.google.chat.v1.ChatServiceClient;
import com.google.chat.v1.CreateMessageRequest;
import com.google.chat.v1.Message;
import com.google.chat.v1.QuotedMessageMetadata;
import com.google.protobuf.util.Timestamps;
import com.google.workspace.api.chat.samples.utils.AuthenticationUtils;
import java.text.ParseException;

// This sample shows how to create a message that quotes another message.
public class CreateMessageQuoteMessage {
  public static void main(String[] args) throws Exception, ParseException {
    // Create a client.
    ChatServiceClient chatClient = AuthenticationUtils.createClientWithUserCredentials();

    // Initialize request argument(s).
    // TODO(developer): Replace SPACE_NAME, QUOTED_MESSAGE_NAME,
    // and QUOTED_MESSAGE_LAST_UPDATE_TIME here.
    String parent = "spaces/SPACE_NAME";
    String quotedMessageName = "QUOTED_MESSAGE_NAME";
    String lastUpdateTime = "QUOTED_MESSAGE_LAST_UPDATE_TIME";

    QuotedMessageMetadata quotedMessageMetadata =
        QuotedMessageMetadata.newBuilder()
            .setName(quotedMessageName)
            .setLastUpdateTime(Timestamps.parse(lastUpdateTime))
            .build();

    Message message = Message.newBuilder()
        .setText("I am responding to a quoted message!")
        .setQuotedMessageMetadata(quotedMessageMetadata)
        .build();

    CreateMessageRequest request =
        CreateMessageRequest.newBuilder()
            .setParent(parent)
            .setMessage(message)
            .build();

    // Make the request.
    Message response = chatClient.createMessage(request);

    // Handle the response.
    System.out.println(response);
  }
}
Apps Script
/**
 * Creates a message that quotes another message.
 *
 * Relies on the OAuth2 scope 'https://www.googleapis.com/auth/chat.messages.create'
 * referenced in the manifest file (appsscript.json).
 */
function createMessageQuoteMessage() {

  // Initialize request argument(s)
  // TODO(developer): Replace SPACE_NAME here.
  const parent = 'spaces/SPACE_NAME';

  const message = {

    // The text content of the message.
    text: 'I am responding to a quoted message!',

    // quotedMessageMetadata lets Chat apps respond to a message by quoting it.
    //
    // TODO(developer): Replace QUOTED_MESSAGE_NAME
    // and QUOTED_MESSAGE_LAST_UPDATE_TIME .
    quotedMessageMetadata: {
      name: 'QUOTED_MESSAGE_NAME',
      lastUpdateTime: 'QUOTED_MESSAGE_LAST_UPDATE_TIME',
    }
  };

  // Make the request
  const response = Chat.Spaces.Messages.create(message, parent);

  // Handle the response
  console.log(response);
}
Per eseguire questo esempio, sostituisci quanto segue:
SPACE_NAME: l'ID del camponamedello spazio. Puoi ottenere l'ID chiamando il metodoListSpaces()(rpc,rest) o dall'URL dello spazio.QUOTED_MESSAGE_NAME: la risorsa del messaggioname(rpc,rest) del messaggio da citare nel formatospaces/{space}/messages/{message}.QUOTED_MESSAGE_LAST_UPDATE_TIME: l'ora dell'ultimo aggiornamento del messaggio che vuoi citare. Se il messaggio non è mai stato modificato, corrisponde acreateTime(rpc,rest). Se il messaggio è stato modificato, corrisponde alastUpdateTime(rpc,rest).
Risoluzione dei problemi
Quando un'app Google Chat o una scheda restituisce un errore, l'interfaccia di Chat mostra il messaggio "Si è verificato un problema". o "Impossibile elaborare la tua richiesta". A volte l'interfaccia utente di Chat non mostra alcun messaggio di errore, ma l'app o la scheda Chat produce un risultato imprevisto; ad esempio, un messaggio della scheda potrebbe non essere visualizzato.
Anche se nell'interfaccia utente di Chat potrebbe non essere visualizzato un messaggio di errore, sono disponibili messaggi di errore descrittivi e dati di log per aiutarti a correggere gli errori quando la registrazione degli errori per le app di chat è attivata. Per assistenza nella visualizzazione, nel debug e nella correzione degli errori, consulta Risolvere gli errori di Google Chat.
Argomenti correlati
- Utilizza Card Builder per progettare e visualizzare in anteprima i messaggi delle schede JSON per le app di chat.
- Formattare i messaggi.
- Visualizzare i dettagli di un messaggio.
- Elenca i messaggi in uno spazio.
- Aggiornare un messaggio.
- Eliminare un messaggio.
- Identificare gli utenti nei messaggi di Google Chat.
- Inviare messaggi a Google Chat con webhook in arrivo.