Organiza tus páginas con colecciones
Guarda y categoriza el contenido según tus preferencias.
Cada app de Google Chat que crees requiere su propio proyecto de Google Cloud con la API de Chat habilitada y configurada. En esta página, se muestra cómo configurar la API de Chat.
Elige un nombre visible, un avatar y una descripción para tu app de Chat
Cuando habilitas la API de Chat, configuras los detalles sobre tu app de Chat que aparecen a los usuarios en Chat, incluidos un nombre visible, un avatar y una descripción. Estos detalles solo aparecen en Chat. Para publicar tu app de Chat en Marketplace, también debes especificar los detalles que aparecen en la ficha de Marketplace de tu app de Chat.
Para llamar a la API de Chat, debes configurar una app de Google Chat con la siguiente información:
Campo
Descripción
Formato
Nombre de la aplicación
Es el nombre visible de la app de Chat.
Hasta 25 caracteres alfanuméricos
URL del avatar
Es la imagen que se muestra como avatar de tu app de Chat.
Es una URL HTTPS que apunta a una imagen gráfica cuadrada (PNG o JPEG).
El tamaño recomendado es de 256 × 256 píxeles o más.
Descripción
Es una breve descripción del propósito de la app de Chat.
Hasta 40 caracteres alfanuméricos
El nombre, el avatar y la descripción de la app de Chat se muestran a los usuarios en la IU de Chat. En el caso de algunas solicitudes de escritura de la API de Chat, Chat usa esta información para atribuir las acciones que realiza una app de Chat en Chat.
Por ejemplo, si llamas al método spaces.create(), Chat incluye el nombre de la app de Chat en la descripción de quién creó el espacio, como se muestra en la siguiente imagen:
Figura 1: 
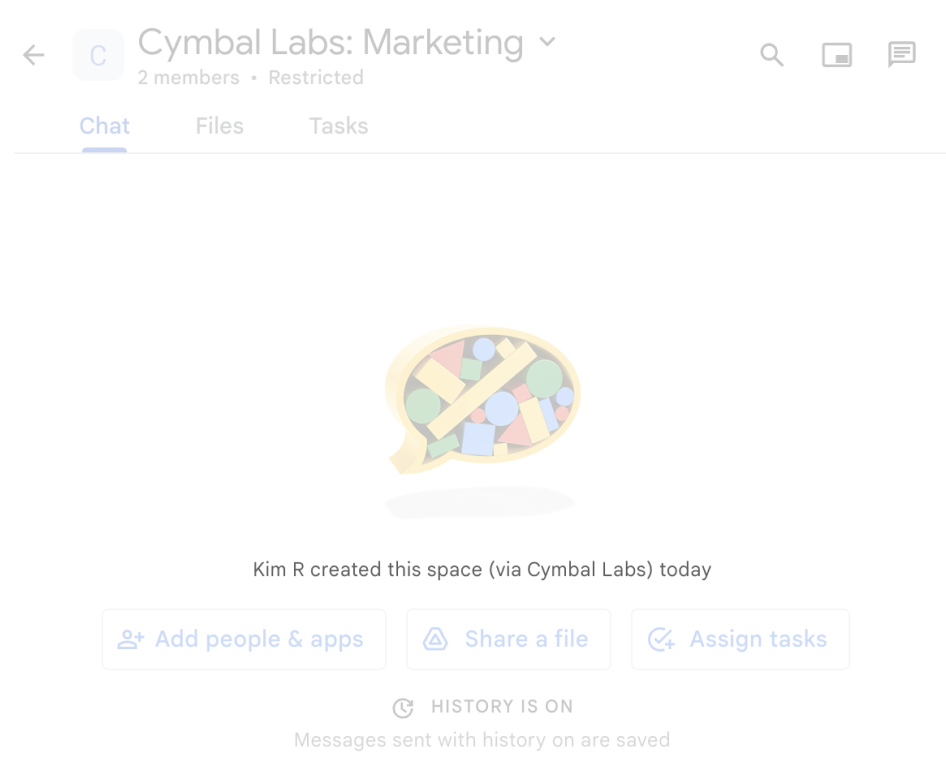
spaces.create()Es el mensaje de atribución que muestra Chat cuando se usa el método spaces.create() para crear un espacio en nombre de un usuario.
Para interactuar con las apps de Chat, los usuarios también pueden ver o usar esta información de las siguientes maneras:
Invoca la app de Chat mencionando su nombre con @.
Busca la app de Chat y comienza un mensaje directo con ella.
En el menú Apps, los mensajes directos muestran el nombre y el avatar de la app de Chat.
Desde la barra de redacción, los usuarios pueden explorar las apps de Chat y ver su nombre, avatar y descripción.
Configura tu app de Chat en la consola de Google Cloud
Cuando tengas los detalles de tu app de Chat, abre tu proyecto de Cloud y configura la API de Chat:
En la consola de Google Cloud, ve a la página de la API de Chat y haz clic en la página Configuración:
En Información de la aplicación, completa los campos Nombre de la app, URL del avatar y Descripción.
En Funciones interactivas, haz clic en el botón de activación Habilitar funciones interactivas a la posición desactivada para inhabilitar las funciones interactivas de la app de Chat. Puedes configurar esto más adelante. Para obtener información sobre cómo configurar y compilar funciones interactivas, consulta Cómo recibir y responder a las interacciones del usuario.
Opcional: En Registros, selecciona la casilla de verificación Registrar errores en Logging para usar Google Cloud Logging. Para obtener más información, consulta Registros de errores de consultas para apps de Chat.
Haz clic en Guardar.
Otorga permiso a otras personas para configurar la API de Chat
Puedes otorgar acceso a usuarios específicos a la página de configuración de la app de Chat otorgándoles el rol de Identity and Access Management (IAM) de Google Cloud de Propietario de apps de Chat o Visualizador de apps de Chat.
Los usuarios con estos roles no pueden navegar a la página de configuración de las apps de Chat con el panel de APIs y servicios, pero pueden acceder a la página de configuración navegando a la consola de Google Cloud del proyecto de Cloud host de la app de Chat de la siguiente manera:
[null,null,["Última actualización: 2025-08-29 (UTC)"],[[["\u003cp\u003eEvery Google Chat app needs its own Google Cloud project with the Chat API enabled and configured, following specific prerequisites.\u003c/p\u003e\n"],["\u003cp\u003eChat apps require a display name, avatar URL, and description, which are visible to users and used by Chat for attributions.\u003c/p\u003e\n"],["\u003cp\u003eThe Chat API is configured in the Google Cloud console, where you can set the app's details, enable/disable interactive features, and optionally enable error logging.\u003c/p\u003e\n"],["\u003cp\u003eAccess to the Chat app configuration page can be granted to other users via specific Google Cloud IAM roles.\u003c/p\u003e\n"]]],["Each Google Chat app requires a dedicated Google Cloud project with the Chat API enabled. Configuration involves setting up the app's display name (up to 25 characters), avatar URL (square image, 256x256 pixels or more), and description (up to 40 characters). In the Google Cloud console, you must fill out these application details, and optionally, enable or disable interactive features and log errors. Additionally, you can grant specific users access to configure the Chat API by assigning them the \"Chat apps Owner\" or \"Chat apps Viewer\" IAM roles.\n"],null,["# Configure the Google Chat API\n\nEach Google Chat app that you create requires its own\nGoogle Cloud project with the Chat API enabled and configured. This page\nshows you how to configure the Chat API.\n\nPrerequisites\n-------------\n\n- A Business or Enterprise [Google Workspace](https://support.google.com/a/answer/6043576) account with access to [Google Chat](https://workspace.google.com/products/chat/).\n- [Create a Google Cloud project](/workspace/guides/create-project).\n- [Configure the OAuth consent screen](/workspace/guides/configure-oauth-consent).\n- [Enable the Google Chat API](/workspace/guides/enable-apis).\n\nChoose a display name, avatar, and description for your Chat app\n----------------------------------------------------------------\n\nWhen you enable the Chat API, you configure the details about your\nChat app that appear to users in Chat,\nincluding a display name, avatar, and description. These details only appear\nin Chat. To publish your Chat app to the\nMarketplace, you must also specify the details that\nappear in your Chat app's\n[Marketplace listing](/workspace/marketplace/create-listing).\n\nTo call the Chat API, you must set up a\nGoogle Chat app with the following information:\n\n| Field | Description | Format |\n|-------------|-----------------------------------------------------|----------------------------------------------------------------------------------------------------------------|\n| App name | The display name for the Chat app. | Up to 25 alphanumeric characters |\n| Avatar URL | The image that displays as your Chat app's avatar. | An HTTPS URL pointing to a square graphics image (PNG or JPEG). Recommended size is 256 by 256 pixels or more. |\n| Description | A brief description of the purpose of the Chat app. | Up to 40 alphanumeric characters |\n\nThe Chat app's name, avatar, and description are\ndisplayed to users in the Chat UI. For some Chat API\nwrite requests, Chat uses this information to attribute the\nactions that a Chat app takes in Chat.\n\nFor example, if you call the `spaces.create()` method, Chat\nincludes the name of the Chat app in the\ndescription of who created the space, as shown in the following image:\n**Figure 1** . The attribution message that Chat displays when the `spaces.create()` method is used to create a space on behalf of a user.\n\nTo interact with Chat apps, users can also see or use this\ninformation in the following ways:\n\n- Invoke the Chat app by @mentioning its name.\n- Find and start a direct message with the Chat app. In the **Apps** menu, direct messages display the Chat app's name and avatar.\n- From the compose bar, users can browse Chat apps and see their name, avatar, and description.\n\nConfigure your Chat app in the Google Cloud console\n---------------------------------------------------\n\nWhen you have your Chat app details, open your\nCloud project and configure the Chat API:\n\n1. In the Google Cloud console, go to the Chat API page and click the\n **Configuration** page:\n\n [Go to Chat API Configuration page](https://console.cloud.google.com/apis/api/chat.googleapis.com/hangouts-chat)\n2. Under **Application info** , fill out the **App name** , **Avatar URL** ,\n and **Description** fields.\n\n3. Under Interactive features, click the **Enable interactive features** toggle\n to the off position to disable interactive features for the\n Chat app. You can set this up later. To learn about\n configuring and building interactive features, see\n [Receive and respond to user interactions](/workspace/chat/receive-respond-interactions).\n\n4. Optional: Under **Logs** , select the **Log errors to Logging** checkbox to\n use Google Cloud Logging. For more information, see\n [Query error logs for Chat apps](/workspace/chat/query-logs).\n\n5. Click **Save**.\n\nGrant other people permission to configure the Chat API\n-------------------------------------------------------\n\nYou can\n[give specific users access](https://cloud.google.com/iam/docs/granting-changing-revoking-access#single-role)\nto the Chat app configuration page by granting them\nthe **Chat apps Owner** or **Chat apps Viewer**\n[Google Cloud Identity Access Management (IAM) role](https://cloud.google.com/iam/docs/understanding-roles#chat-roles).\nUsers with these roles can't navigate to the Chat apps\nconfiguration page by using the **APIs \\& Services** dashboard, but can\naccess the configuration page by navigating to the Google Cloud console for the\nChat app's host Cloud project as follows: \n\n```\nhttps://console.developers.google.com/apis/api/chat.googleapis.com/hangouts-chat?project=PROJECT_ID\n```\n\nWhere \u003cvar translate=\"no\"\u003ePROJECT_ID\u003c/var\u003e is the project ID of the\nGoogle Cloud project hosting the Chat app.\n| Users with **Project** roles can also access the app configuration page.\n|\n|\n| Users with custom roles containing the\n| `resourcemanager.projects.(get|update)` permissions cannot access\n| the Chat app configuration. For custom roles, use\n| the `chat.bots.(get|update)` permissions instead.\n\nRelated topics\n--------------\n\n- [Choose a Chat app architecture](/workspace/chat/structure)\n- To configure your Chat app for interactive features, see [Receive and respond to user interactions](/workspace/chat/receive-respond-interactions)"]]