Tetap teratur dengan koleksi
Simpan dan kategorikan konten berdasarkan preferensi Anda.
Setiap aplikasi Google Chat yang Anda buat memerlukan project Google Cloud sendiri dengan Chat API yang diaktifkan dan dikonfigurasi. Halaman ini menunjukkan cara mengonfigurasi Chat API.
Pilih nama tampilan, avatar, dan deskripsi untuk aplikasi Chat Anda
Saat mengaktifkan Chat API, Anda mengonfigurasi detail tentang aplikasi Chat yang muncul kepada pengguna di Chat, termasuk nama tampilan, avatar, dan deskripsi. Detail ini hanya muncul di Chat. Untuk memublikasikan aplikasi Chat Anda ke Marketplace, Anda juga harus menentukan detail yang muncul di listingan Marketplace aplikasi Chat Anda.
Untuk memanggil Chat API, Anda harus menyiapkan aplikasi Google Chat dengan informasi berikut:
Kolom
Deskripsi
Format
Nama aplikasi
Nama tampilan untuk aplikasi Chat.
Maksimal 25 karakter alfanumerik
URL avatar
Gambar yang ditampilkan sebagai avatar
aplikasi Chat Anda.
URL HTTPS yang mengarah ke gambar grafik persegi (PNG atau JPEG).
Ukuran yang direkomendasikan adalah 256 x 256 piksel atau lebih besar.
Deskripsi
Deskripsi singkat tujuan aplikasi Chat.
Maksimal 40 karakter alfanumerik
Nama, avatar, dan deskripsi aplikasi Chat ditampilkan kepada pengguna di UI Chat. Untuk beberapa permintaan penulisan Chat API, Chat menggunakan informasi ini untuk mengatribusikan tindakan yang dilakukan aplikasi Chat di Chat.
Misalnya, jika Anda memanggil metode spaces.create(), Chat akan menyertakan nama aplikasi Chat dalam deskripsi tentang siapa yang membuat ruang, seperti yang ditunjukkan pada gambar berikut:
Gambar 1. Pesan atribusi yang ditampilkan Chat saat metode 
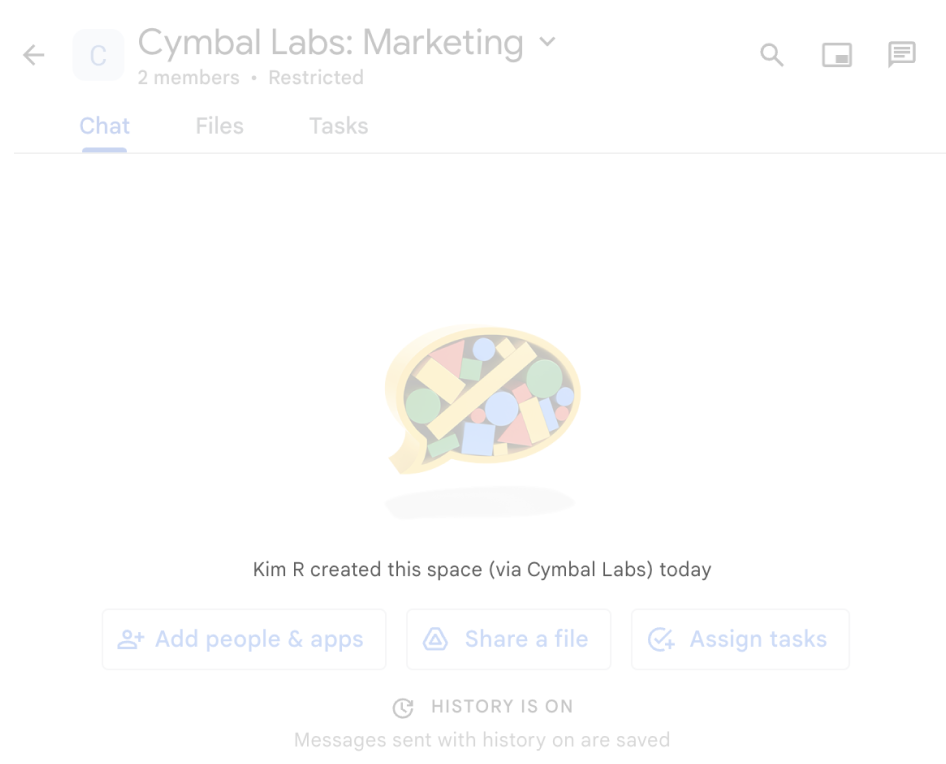
spaces.create() digunakan untuk membuat ruang atas nama pengguna.
Untuk berinteraksi dengan aplikasi Chat, pengguna juga dapat melihat atau menggunakan informasi ini dengan cara berikut:
Panggil aplikasi Chat dengan @menyebutkan namanya.
Temukan dan mulai pesan langsung dengan aplikasi Chat.
Di menu Aplikasi, pesan langsung menampilkan
nama dan avatar aplikasi Chat.
Dari kolom penulisan, pengguna dapat menjelajahi aplikasi Chat dan melihat nama, avatar, dan deskripsinya.
Mengonfigurasi aplikasi Chat Anda di konsol Google Cloud
Setelah Anda memiliki detail aplikasi Chat, buka project Cloud Anda dan konfigurasi Chat API:
Di konsol Google Cloud, buka halaman Chat API, lalu klik halaman
Configuration:
Di bagian Info aplikasi, isi kolom Nama aplikasi, URL avatar, dan Deskripsi.
Di bagian Fitur interaktif, klik tombol Aktifkan fitur interaktif ke posisi nonaktif untuk menonaktifkan fitur interaktif untuk aplikasi Chat. Anda dapat menyiapkannya nanti. Untuk mempelajari cara mengonfigurasi dan membuat fitur interaktif, lihat Menerima dan merespons interaksi pengguna.
Opsional: Di bagian Logs, pilih kotak centang Log errors to Logging untuk
menggunakan Google Cloud Logging. Untuk mengetahui informasi selengkapnya, lihat
Membuat kueri log error untuk aplikasi Chat.
Klik Simpan.
Memberi orang lain izin untuk mengonfigurasi Chat API
Anda dapat
memberi pengguna tertentu akses
ke halaman konfigurasi aplikasi Chat dengan memberi mereka
peran Pengelolaan Identitas dan Akses (IAM) Google CloudPemilik aplikasi Chat atau Pelihat aplikasi Chat.
Pengguna dengan peran ini tidak dapat membuka halaman konfigurasi aplikasi Chat menggunakan dasbor APIs & Services, tetapi dapat mengakses halaman konfigurasi dengan membuka konsol Google Cloud untuk project Cloud host aplikasi Chat sebagai berikut:
[null,null,["Terakhir diperbarui pada 2025-08-29 UTC."],[[["\u003cp\u003eEvery Google Chat app needs its own Google Cloud project with the Chat API enabled and configured, following specific prerequisites.\u003c/p\u003e\n"],["\u003cp\u003eChat apps require a display name, avatar URL, and description, which are visible to users and used by Chat for attributions.\u003c/p\u003e\n"],["\u003cp\u003eThe Chat API is configured in the Google Cloud console, where you can set the app's details, enable/disable interactive features, and optionally enable error logging.\u003c/p\u003e\n"],["\u003cp\u003eAccess to the Chat app configuration page can be granted to other users via specific Google Cloud IAM roles.\u003c/p\u003e\n"]]],["Each Google Chat app requires a dedicated Google Cloud project with the Chat API enabled. Configuration involves setting up the app's display name (up to 25 characters), avatar URL (square image, 256x256 pixels or more), and description (up to 40 characters). In the Google Cloud console, you must fill out these application details, and optionally, enable or disable interactive features and log errors. Additionally, you can grant specific users access to configure the Chat API by assigning them the \"Chat apps Owner\" or \"Chat apps Viewer\" IAM roles.\n"],null,["# Configure the Google Chat API\n\nEach Google Chat app that you create requires its own\nGoogle Cloud project with the Chat API enabled and configured. This page\nshows you how to configure the Chat API.\n\nPrerequisites\n-------------\n\n- A Business or Enterprise [Google Workspace](https://support.google.com/a/answer/6043576) account with access to [Google Chat](https://workspace.google.com/products/chat/).\n- [Create a Google Cloud project](/workspace/guides/create-project).\n- [Configure the OAuth consent screen](/workspace/guides/configure-oauth-consent).\n- [Enable the Google Chat API](/workspace/guides/enable-apis).\n\nChoose a display name, avatar, and description for your Chat app\n----------------------------------------------------------------\n\nWhen you enable the Chat API, you configure the details about your\nChat app that appear to users in Chat,\nincluding a display name, avatar, and description. These details only appear\nin Chat. To publish your Chat app to the\nMarketplace, you must also specify the details that\nappear in your Chat app's\n[Marketplace listing](/workspace/marketplace/create-listing).\n\nTo call the Chat API, you must set up a\nGoogle Chat app with the following information:\n\n| Field | Description | Format |\n|-------------|-----------------------------------------------------|----------------------------------------------------------------------------------------------------------------|\n| App name | The display name for the Chat app. | Up to 25 alphanumeric characters |\n| Avatar URL | The image that displays as your Chat app's avatar. | An HTTPS URL pointing to a square graphics image (PNG or JPEG). Recommended size is 256 by 256 pixels or more. |\n| Description | A brief description of the purpose of the Chat app. | Up to 40 alphanumeric characters |\n\nThe Chat app's name, avatar, and description are\ndisplayed to users in the Chat UI. For some Chat API\nwrite requests, Chat uses this information to attribute the\nactions that a Chat app takes in Chat.\n\nFor example, if you call the `spaces.create()` method, Chat\nincludes the name of the Chat app in the\ndescription of who created the space, as shown in the following image:\n**Figure 1** . The attribution message that Chat displays when the `spaces.create()` method is used to create a space on behalf of a user.\n\nTo interact with Chat apps, users can also see or use this\ninformation in the following ways:\n\n- Invoke the Chat app by @mentioning its name.\n- Find and start a direct message with the Chat app. In the **Apps** menu, direct messages display the Chat app's name and avatar.\n- From the compose bar, users can browse Chat apps and see their name, avatar, and description.\n\nConfigure your Chat app in the Google Cloud console\n---------------------------------------------------\n\nWhen you have your Chat app details, open your\nCloud project and configure the Chat API:\n\n1. In the Google Cloud console, go to the Chat API page and click the\n **Configuration** page:\n\n [Go to Chat API Configuration page](https://console.cloud.google.com/apis/api/chat.googleapis.com/hangouts-chat)\n2. Under **Application info** , fill out the **App name** , **Avatar URL** ,\n and **Description** fields.\n\n3. Under Interactive features, click the **Enable interactive features** toggle\n to the off position to disable interactive features for the\n Chat app. You can set this up later. To learn about\n configuring and building interactive features, see\n [Receive and respond to user interactions](/workspace/chat/receive-respond-interactions).\n\n4. Optional: Under **Logs** , select the **Log errors to Logging** checkbox to\n use Google Cloud Logging. For more information, see\n [Query error logs for Chat apps](/workspace/chat/query-logs).\n\n5. Click **Save**.\n\nGrant other people permission to configure the Chat API\n-------------------------------------------------------\n\nYou can\n[give specific users access](https://cloud.google.com/iam/docs/granting-changing-revoking-access#single-role)\nto the Chat app configuration page by granting them\nthe **Chat apps Owner** or **Chat apps Viewer**\n[Google Cloud Identity Access Management (IAM) role](https://cloud.google.com/iam/docs/understanding-roles#chat-roles).\nUsers with these roles can't navigate to the Chat apps\nconfiguration page by using the **APIs \\& Services** dashboard, but can\naccess the configuration page by navigating to the Google Cloud console for the\nChat app's host Cloud project as follows: \n\n```\nhttps://console.developers.google.com/apis/api/chat.googleapis.com/hangouts-chat?project=PROJECT_ID\n```\n\nWhere \u003cvar translate=\"no\"\u003ePROJECT_ID\u003c/var\u003e is the project ID of the\nGoogle Cloud project hosting the Chat app.\n| Users with **Project** roles can also access the app configuration page.\n|\n|\n| Users with custom roles containing the\n| `resourcemanager.projects.(get|update)` permissions cannot access\n| the Chat app configuration. For custom roles, use\n| the `chat.bots.(get|update)` permissions instead.\n\nRelated topics\n--------------\n\n- [Choose a Chat app architecture](/workspace/chat/structure)\n- To configure your Chat app for interactive features, see [Receive and respond to user interactions](/workspace/chat/receive-respond-interactions)"]]