
Ten przewodnik wyjaśnia, jak używać metody create() w zasobie Message interfejsu Google Chat API, aby wykonać dowolną z tych czynności:
- wysyłać wiadomości zawierające tekst, karty i interaktywne widżety;
- wysyłać wiadomości prywatne do konkretnego użytkownika Google Chat;
- rozpoczynać wątki wiadomości i odpowiadać na nie;
- Nadaj wiadomości nazwę, aby można było ją określić w innych żądaniach interfejsu Chat API.
Maksymalny rozmiar wiadomości (wraz z tekstem i kartami) to 32 000 bajtów. Aby wysłać wiadomość, która przekracza ten rozmiar, aplikacja Chat musi wysłać kilka wiadomości.
Oprócz wywoływania interfejsu Chat API w celu tworzenia wiadomości aplikacje do obsługi czatu mogą tworzyć i wysyłać wiadomości w odpowiedzi na interakcje użytkowników, np. publikować wiadomość powitalną po dodaniu aplikacji do obsługi czatu do pokoju. Podczas odpowiadania na interakcje aplikacje w Google Chat mogą korzystać z innych typów funkcji przesyłania wiadomości, w tym interaktywnych okien dialogowych i interfejsów podglądu linków. Aby odpowiedzieć użytkownikowi, aplikacja Chat zwraca wiadomość synchronicznie, bez wywoływania interfejsu Chat API. Więcej informacji o wysyłaniu wiadomości w odpowiedzi na interakcje znajdziesz w artykule Odbieranie interakcji z aplikacją Google Chat i odpowiadanie na nie.
Sposób wyświetlania i przypisywania wiadomości utworzonych za pomocą interfejsu Chat API
Możesz wywołać metodę create(), korzystając z uwierzytelniania aplikacji i uwierzytelniania użytkownika.
Chat przypisuje nadawcę wiadomości w różny sposób w zależności od typu uwierzytelniania, którego używasz.
Gdy uwierzytelnienie nastąpi w aplikacji Google Chat, wyśle ona wiadomość.

App.Gdy uwierzytelnisz się jako użytkownik, aplikacja Chat wyśle wiadomość w jego imieniu. Chat przypisuje też aplikację do obsługi czatu do wiadomości, wyświetlając jej nazwę.

Typ uwierzytelniania określa też, które funkcje i interfejsy wiadomości możesz uwzględnić w wiadomości. Dzięki uwierzytelnianiu aplikacji aplikacje do obsługi czatu mogą wysyłać wiadomości zawierające tekst sformatowany, interfejsy oparte na kartach i interaktywne widżety. Dzięki uwierzytelnianiu użytkowników możesz wysyłać SMS-y. W wersji przedpremierowej dla programistów możesz też wysyłać karty, jak opisano w artykule Tworzenie i aktualizowanie kart.
Więcej informacji o funkcjach przesyłania wiadomości dostępnych w interfejsie Chat API znajdziesz w przeglądzie wiadomości w Google Chat.
Z tego przewodnika dowiesz się, jak używać obu typów uwierzytelniania do wysyłania wiadomości za pomocą interfejsu Chat API.
Wymagania wstępne
Node.js
- Konto Google Workspace w wersji Business lub Enterprise z dostępem do Google Chat.
- Skonfiguruj środowisko:
- Utwórz projekt Google Cloud.
- Skonfiguruj ekran zgody OAuth.
- Włącz i skonfiguruj interfejs Google Chat API, podając nazwę, ikonę i opis aplikacji do obsługi czatu.
- Zainstaluj bibliotekę klienta Cloud Node.js.
- Utwórz dane logowania, które będą zależeć od sposobu uwierzytelniania w żądaniu do interfejsu Google Chat API:
- Aby uwierzytelnić się jako użytkownik Chatu, utwórz dane logowania identyfikatora klienta OAuth i zapisz je jako plik JSON o nazwie
credentials.jsonw katalogu lokalnym. - Aby uwierzytelnić się jako aplikacja w Chat, utwórz dane logowania konta usługi i zapisz je w pliku JSON o nazwie
credentials.json.
- Aby uwierzytelnić się jako użytkownik Chatu, utwórz dane logowania identyfikatora klienta OAuth i zapisz je jako plik JSON o nazwie
- Wybierz zakres autoryzacji w zależności od tego, czy chcesz uwierzytelnić się jako użytkownik, czy jako aplikacja do obsługi czatu.
- Pokój Google Chat, w którym uwierzytelniony użytkownik lub wywołująca aplikacja Chat jest członkiem. Aby uwierzytelnić się jako aplikacja do czatu, dodaj ją do pokoju.
Python
- Konto Google Workspace w wersji Business lub Enterprise z dostępem do Google Chat.
- Skonfiguruj środowisko:
- Utwórz projekt Google Cloud.
- Skonfiguruj ekran zgody OAuth.
- Włącz i skonfiguruj interfejs Google Chat API, podając nazwę, ikonę i opis aplikacji do obsługi czatu.
- Zainstaluj bibliotekę klienta Cloud w Pythonie.
- Utwórz dane logowania, które będą zależeć od sposobu uwierzytelniania w żądaniu do interfejsu Google Chat API:
- Aby uwierzytelnić się jako użytkownik Chatu, utwórz dane logowania identyfikatora klienta OAuth i zapisz je jako plik JSON o nazwie
credentials.jsonw katalogu lokalnym. - Aby uwierzytelnić się jako aplikacja w Chat, utwórz dane logowania konta usługi i zapisz je w pliku JSON o nazwie
credentials.json.
- Aby uwierzytelnić się jako użytkownik Chatu, utwórz dane logowania identyfikatora klienta OAuth i zapisz je jako plik JSON o nazwie
- Wybierz zakres autoryzacji w zależności od tego, czy chcesz uwierzytelnić się jako użytkownik, czy jako aplikacja do obsługi czatu.
- Pokój Google Chat, w którym uwierzytelniony użytkownik lub wywołująca aplikacja Chat jest członkiem. Aby uwierzytelnić się jako aplikacja do czatu, dodaj ją do pokoju.
Java
- Konto Google Workspace w wersji Business lub Enterprise z dostępem do Google Chat.
- Skonfiguruj środowisko:
- Utwórz projekt Google Cloud.
- Skonfiguruj ekran zgody OAuth.
- Włącz i skonfiguruj interfejs Google Chat API, podając nazwę, ikonę i opis aplikacji do obsługi czatu.
- Zainstaluj bibliotekę klienta Cloud w języku Java.
- Utwórz dane logowania, które będą zależeć od sposobu uwierzytelniania w żądaniu do interfejsu Google Chat API:
- Aby uwierzytelnić się jako użytkownik Chatu, utwórz dane logowania identyfikatora klienta OAuth i zapisz je jako plik JSON o nazwie
credentials.jsonw katalogu lokalnym. - Aby uwierzytelnić się jako aplikacja w Chat, utwórz dane logowania konta usługi i zapisz je w pliku JSON o nazwie
credentials.json.
- Aby uwierzytelnić się jako użytkownik Chatu, utwórz dane logowania identyfikatora klienta OAuth i zapisz je jako plik JSON o nazwie
- Wybierz zakres autoryzacji w zależności od tego, czy chcesz uwierzytelnić się jako użytkownik, czy jako aplikacja do obsługi czatu.
- Pokój Google Chat, w którym uwierzytelniony użytkownik lub wywołująca aplikacja Chat jest członkiem. Aby uwierzytelnić się jako aplikacja do czatu, dodaj ją do pokoju.
Google Apps Script
- Konto Google Workspace w wersji Business lub Enterprise z dostępem do Google Chat.
- Skonfiguruj środowisko:
- Utwórz projekt Google Cloud.
- Skonfiguruj ekran zgody OAuth.
- Włącz i skonfiguruj interfejs Google Chat API, podając nazwę, ikonę i opis aplikacji do obsługi czatu.
- Utwórz samodzielny projekt Apps Script i włącz zaawansowaną usługę czatu.
- W tym przewodniku musisz użyć uwierzytelniania użytkownika lub aplikacji. Aby uwierzytelnić się jako aplikacja do obsługi czatu, utwórz dane logowania konta usługi. Instrukcje znajdziesz w artykule Uwierzytelnianie i autoryzowanie jako aplikacja Google Chat.
- Wybierz zakres autoryzacji w zależności od tego, czy chcesz uwierzytelnić się jako użytkownik, czy jako aplikacja do obsługi czatu.
- Pokój Google Chat, w którym uwierzytelniony użytkownik lub wywołująca aplikacja Chat jest członkiem. Aby uwierzytelnić się jako aplikacja do czatu, dodaj ją do pokoju.
Wysyłanie wiadomości w aplikacji Google Chat
W tej sekcji dowiesz się, jak wysyłać wiadomości zawierające tekst, karty i interaktywne widżety akcesoriów za pomocą uwierzytelniania aplikacji.

Aby wywołać metodę CreateMessage() za pomocą uwierzytelniania aplikacji, musisz podać w żądaniu te pola:
chat.botZakres autoryzacji.- Zasób, w którym chcesz opublikować wiadomość.
SpaceAplikacja Chat musi być członkiem przestrzeni. - Zasób
Message, który ma zostać utworzony. Aby określić treść wiadomości, możesz dodać tekst sformatowany (text), co najmniej jeden interfejs karty (cardsV2) lub oba te elementy.
Opcjonalnie możesz dodać:
- Pole
accessoryWidgets, w którym można umieścić interaktywne przyciski u dołu wiadomości. - Pole
privateMessageViewer, aby wysłać wiadomość prywatnie do określonego użytkownika. - Pole
messageId, które umożliwia nadanie nazwy wiadomości do użycia w innych żądaniach do interfejsu API. - Pola
thread.threadKeyimessageReplyOption, aby rozpocząć wątek lub na niego odpowiedzieć. Jeśli przestrzeń nie korzysta z wątków, to pole jest ignorowane.
Poniższy kod pokazuje, jak aplikacja do obsługi czatu może wysłać wiadomość opublikowaną jako aplikacja do obsługi czatu, która zawiera tekst, kartę i klikany przycisk u dołu wiadomości:
Node.js
Python
Java
Google Apps Script
Aby uruchomić ten przykład, zastąp SPACE_NAME identyfikatorem z pola name przestrzeni. Możesz go uzyskać, wywołując metodę
ListSpaces()
lub z adresu URL pokoju.
Dodawanie interaktywnych widżetów u dołu wiadomości
W pierwszym przykładowym kodzie w tym przewodniku wiadomość aplikacji do Google Chat zawiera klikalny przycisk u dołu wiadomości, zwany widżetem dodatkowym. Widżety dodatkowe pojawiają się po tekście lub kartach w wiadomości. Za pomocą tych widżetów możesz zachęcać użytkowników do interakcji z wiadomością na wiele sposobów, m.in.:
- Oceń dokładność lub zadowolenie z wiadomości.
- Zgłoś problem z wiadomością lub aplikacją do obsługi czatu.
- Otwórz link do powiązanych treści, np. dokumentacji.
- Odrzucanie lub odkładanie podobnych wiadomości z aplikacji Chat na określony czas.
Aby dodać widżety akcesoriów, w treści żądania umieść pole
accessoryWidgets[]
i określ co najmniej 1 widżet, który chcesz uwzględnić.
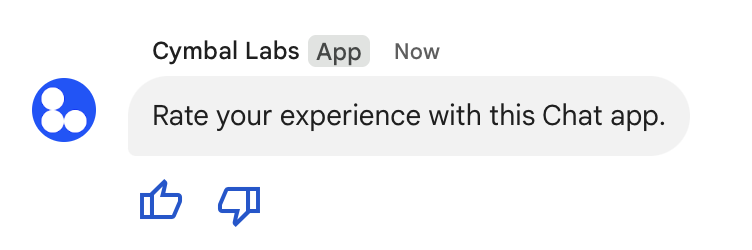
Obraz poniżej przedstawia aplikację Google Chat, która dołącza do wiadomości tekstowej widżety dodatkowe, aby użytkownicy mogli ocenić swoje wrażenia z korzystania z niej.
Poniżej przedstawiono treść żądania, które tworzy wiadomość tekstową z 2 przyciskami akcesoriów. Gdy użytkownik kliknie przycisk, odpowiednia funkcja (np. doUpvote) przetworzy interakcję:
{
  text: "Rate your experience with this Chat app.",
  accessoryWidgets: [{ buttonList: { buttons: [{
    icon: { material_icon: {
      name: "thumb_up"
    }},
    color: { red: 0, blue: 255, green: 0 },
    onClick: { action: {
      function: "doUpvote"
    }}
  }, {
    icon: { material_icon: {
      name: "thumb_down"
    }},
    color: { red: 0, blue: 255, green: 0 },
    onClick: { action: {
      function: "doDownvote"
    }}
  }]}}]
}
Wysyłanie wiadomości prywatnej
Aplikacje do obsługi czatu mogą wysyłać wiadomości prywatne, tak aby były one widoczne tylko dla określonego użytkownika w pokoju. Gdy aplikacja do czatowania wysyła wiadomość prywatną, wyświetla się etykieta informująca użytkownika, że wiadomość jest widoczna tylko dla niego.
Aby wysłać wiadomość prywatną za pomocą interfejsu Chat API, w treści żądania określ pole privateMessageViewer. Aby określić użytkownika, ustaw wartość na User, czyli zasób reprezentujący użytkownika Google Chat. Możesz też użyć pola name w zasobie User, jak pokazano w tym przykładzie:
{
  text: "Hello private world!",
  privateMessageViewer: {
    name: "users/USER_ID"
  }
}
Aby użyć tego przykładu, zastąp USER_IDunikalnym identyfikatorem użytkownika, np. 12345678987654321 lub hao@cymbalgroup.com. Więcej informacji o określaniu użytkowników znajdziesz w artykule Identyfikowanie i określanie użytkowników Google Chat.
Aby wysłać wiadomość prywatną, w żądaniu musisz pominąć te elementy:
Wysyłanie powiadomień wymuszonych lub wyciszonych wiadomości
Gdy aplikacja w Google Chat wysyła wiadomość, może powiadomić użytkowników na jeden z tych sposobów:
- Wymuś powiadomienie: Google Chat zawsze wysyła powiadomienie push do odbiorców, niezależnie od ich ustawień powiadomień lub statusu „Nie przeszkadzać”. W Google Chat wiadomość powoduje wyróżnienie i przesunięcie na początek listy odbiorców lub listy głównej oraz wyświetlenie plakietki.
- Wysyłanie cichej wiadomości: Chat nie wysyła powiadomień push do odbiorców. W Google Chat wiadomość nie powoduje pogrubienia ani przesunięcia na początek listy odbiorców lub listy głównej i nie wyświetla plakietki. Jeśli cicha wiadomość jest ostatnią wiadomością w rozmowie, jej treść nie jest wyświetlana we fragmencie na stronie głównej.
Niezależnie od tego, czy są wymuszone, czy ciche, wiadomości te zawierają wizualny wskaźnik, który informuje odbiorców o specjalnym sposobie działania powiadomienia.
Wymuszone powiadomienia i ciche wiadomości są dostępne tylko w przypadku aplikacji do obsługi czatu korzystających z uwierzytelniania aplikacji.
Wymuszone powiadomienia i ciche wiadomości mają te ograniczenia:
- Użytkownicy zewnętrzni: wymuszone powiadomienia i ciche wiadomości nie dotyczą użytkowników zewnętrznych (gości) w pokoju. Użytkownicy zewnętrzni otrzymują powiadomienia zgodnie z własnymi ustawieniami.
- Wzmianki: ciche wiadomości nie obsługują wzmianek o użytkownikach. Jeśli w cichej wiadomości użyjesz wzmianki, będzie ona traktowana jako zwykły tekst.
- Wątki: nie możesz rozpoczynać wątków ani odpowiadać w nich za pomocą cichych wiadomości.
- Typ pokoju: wymuszone powiadomienia i ciche wiadomości nie są obsługiwane w wiadomościach bezpośrednich ani w pokojach należących do osób, które nie mają konta Google Workspace.
- Powiadomienia e-mail: ciche wiadomości nie wywołują powiadomień e-mail. Wiadomości z wymuszonym powiadomieniem wywołują powiadomienia e-mail tylko wtedy, gdy zawierają też wzmiankę o konkretnym użytkowniku.
Aby wymusić powiadomienie lub wysłać cichą wiadomość, w żądaniu uwzględnij pole createMessageNotificationOptions i ustaw wartość notificationType na jedną z tych opcji:
| Wartość | Zachowanie |
|---|---|
NOTIFICATION_TYPE_FORCE_NOTIFY |
Wymusza powiadomienie. |
NOTIFICATION_TYPE_SILENT |
Wysyła wiadomość dyskretnie. |
Ten przykład pokazuje treść JSON żądania wysłania wiadomości z wymuszonym powiadomieniem:
{
  "text": "Critical update: the server is down!",
  "createMessageNotificationOptions": {
    "notificationType": "NOTIFICATION_TYPE_FORCE_NOTIFY"
  }
}
Wysyłanie SMS-a w imieniu użytkownika
W tej sekcji wyjaśniamy, jak wysyłać wiadomości w imieniu użytkownika za pomocą uwierzytelniania użytkownika. W przypadku uwierzytelniania użytkownika treść wiadomości może zawierać tylko tekst i nie może zawierać funkcji przesyłania wiadomości dostępnych tylko w aplikacjach do obsługi czatu, w tym interfejsów kart i interaktywnych widżetów. W wersji przedpremierowej dla programistów możesz tworzyć wiadomości z kartami w imieniu użytkownika. Więcej informacji znajdziesz w artykule Tworzenie i aktualizowanie kart.

Aby wywołać metodę CreateMessage() za pomocą uwierzytelniania użytkownika, musisz w żądaniu podać te pola:
- Zakres autoryzacji, który obsługuje uwierzytelnianie użytkownika w przypadku tej metody. W przykładzie poniżej użyto zakresu
chat.messages.create. - Zasób, w którym chcesz opublikować wiadomość.
SpaceUwierzytelniony użytkownik musi być członkiem pokoju. - Zasób
Message, który ma zostać utworzony. Aby zdefiniować treść wiadomości, musisz użyć polatext.
Opcjonalnie możesz dodać:
- Pole
createMessageNotificationOptions, aby wymusić powiadomienie lub wysłać wiadomość w trybie cichym. - Pole
messageId, które umożliwia nadanie nazwy wiadomości do użycia w innych żądaniach do interfejsu API. - Pola
thread.threadKeyimessageReplyOption, aby rozpocząć wątek lub na niego odpowiedzieć. Jeśli przestrzeń nie korzysta z wątków, to pole jest ignorowane.
Poniższy kod pokazuje, jak aplikacja Google Chat może wysłać wiadomość tekstową w danym pokoju w imieniu uwierzytelnionego użytkownika:
Node.js
Python
Java
Google Apps Script
Aby uruchomić ten przykład, zastąp SPACE_NAME identyfikatorem z pola name przestrzeni. Możesz go uzyskać, wywołując metodę
ListSpaces()
lub z adresu URL pokoju.
Rozpoczynanie wątku lub odpowiadanie w wątku
W przypadku pokoi, w których używane są wątki, możesz określić, czy nowa wiadomość rozpoczyna wątek, czy jest odpowiedzią na istniejący wątek.
Domyślnie wiadomości tworzone za pomocą interfejsu Chat API rozpoczynają nowy wątek. Aby ułatwić sobie późniejsze rozpoznanie wątku i odpowiedź na niego, możesz w żądaniu podać klucz wątku:
- W treści żądania określ pole
thread.threadKey. - Określ parametr zapytania
messageReplyOption, aby określić, co się stanie, jeśli klucz już istnieje.
Aby utworzyć wiadomość, która będzie odpowiedzią na istniejący wątek:
- W treści prośby umieść pole
thread. Jeśli jest ustawiony, możesz określić utworzony przez siebiethreadKey. W innym przypadku musisz użyćnamewątku. - Określ parametr zapytania
messageReplyOption.
Poniższy kod pokazuje przykład tego, jak aplikacja Google Chat może wysłać wiadomość tekstową, która rozpoczyna lub odpowiada na dany wątek zidentyfikowany przez klucz danego pokoju w imieniu uwierzytelnionego użytkownika:
Node.js
Python
Java
Google Apps Script
Aby uruchomić ten przykład, zastąp te elementy:
THREAD_KEY: klucz istniejącego wątku w przestrzeni lub, aby utworzyć nowy wątek, unikalna nazwa wątku.SPACE_NAME: identyfikator z polanamepokoju. Możesz go uzyskać, wywołując metodęListSpaces()lub z adresu URL pokoju.
Nadawanie nazwy wiadomości
Aby w przyszłych wywołaniach interfejsu API pobrać lub określić wiadomość, możesz ją nazwać, ustawiając w żądaniu pole messageId.
Nadanie nazwy wiadomości pozwala określić wiadomość bez konieczności przechowywania identyfikatora przypisanego przez system z nazwy zasobu wiadomości (reprezentowanego w polu name).
Na przykład, aby pobrać wiadomość za pomocą metody get(), użyj nazwy zasobu, aby określić, którą wiadomość chcesz pobrać. Nazwa zasobu ma format spaces/{space}/messages/{message}, gdzie {message} to identyfikator przypisany przez system lub nazwa niestandardowa ustawiona podczas tworzenia wiadomości.
Aby nazwać wiadomość, podczas jej tworzenia podaj niestandardowy identyfikator w polumessageId. Pole messageId ustawia wartość pola clientAssignedMessageId zasobu Message.
Wiadomość możesz nazwać tylko podczas jej tworzenia. Nie możesz nadawać ani modyfikować niestandardowego identyfikatora w przypadku istniejących wiadomości. Niestandardowy identyfikator musi spełniać te wymagania:
- Zaczyna się od
client-. Na przykładclient-custom-namejest prawidłowym identyfikatorem niestandardowym, alecustom-namejuż nie. - Zawiera maksymalnie 63 znaki, w tym tylko małe litery, cyfry i łączniki.
- Jest unikalny w obrębie przestrzeni. Aplikacja Google Chat nie może używać tego samego identyfikatora niestandardowego w przypadku różnych wiadomości.
Poniższy kod pokazuje, jak aplikacja do obsługi czatu może wysłać wiadomość tekstową z identyfikatorem do danego pokoju w imieniu uwierzytelnionego użytkownika:
Node.js
Python
Java
Google Apps Script
Aby uruchomić ten przykład, zastąp te elementy:
SPACE_NAME: identyfikator z polanamepokoju. Możesz go uzyskać, wywołując metodęListSpaces()lub z adresu URL pokoju.MESSAGE-ID: nazwę wiadomości, która zaczyna się odcustom-. Nie może się powtarzać z nazwami innych wiadomości utworzonych przez aplikację do obsługi czatu w określonym obszarze.
Cytowanie wiadomości
Możesz zacytować inną wiadomość, wywołując
CreateMessage()
(rpc,
rest)
i ustawiając quotedMessageMetadata
(rpc,
rest)
w żądaniu.
Możesz cytować wiadomości w wątku lub na czacie głównym, ale nie możesz cytować wiadomości z innego wątku.
Poniższy kod pokazuje, jak utworzyć wiadomość, która cytuje inną wiadomość:
Node.js
import {createClientWithUserCredentials} from './authentication-utils.js';

const USER_AUTH_OAUTH_SCOPES = ['https://www.googleapis.com/auth/chat.messages.create'];

// This sample shows how to create a message that quotes another message.
async function main() {

  // Create a client
  const chatClient = await createClientWithUserCredentials(USER_AUTH_OAUTH_SCOPES);

  // Initialize request argument(s)
  const request = {

    // TODO(developer): Replace SPACE_NAME .
    parent: 'spaces/SPACE_NAME',

    message: {
      text: 'I am responding to a quoted message!',

      // quotedMessageMetadata lets Chat apps respond to a message by quoting it.
      quotedMessageMetadata: {

        // TODO(developer): Replace QUOTED_MESSAGE_NAME
        // and QUOTED_MESSAGE_LAST_UPDATE_TIME.
        name: 'QUOTED_MESSAGE_NAME',
        lastUpdateTime: 'QUOTED_MESSAGE_LAST_UPDATE_TIME'
      }
    }
  };

  // Make the request
  const response = await chatClient.createMessage(request);

  // Handle the response
  console.log(response);
}

main().catch(console.error);
Python
from authentication_utils import create_client_with_user_credentials
from google.apps import chat_v1 as google_chat
from google.protobuf.timestamp_pb2 import Timestamp

SCOPES = ['https://www.googleapis.com/auth/chat.messages.create']

# This sample shows how to create a message that quotes another message.
def create_message_quote_message():
    '''Creates a message that quotes another message.'''

    # Create a client
    client = create_client_with_user_credentials(SCOPES)

    # Create a timestamp from the RFC-3339 string.
    # TODO(developer): Replace QUOTED_MESSAGE_LAST_UPDATE_TIME.
    last_update_time = Timestamp()
    last_update_time.FromJsonString('QUOTED_MESSAGE_LAST_UPDATE_TIME')

    # Initialize request argument(s)
    request = google_chat.CreateMessageRequest(

        # TODO(developer): Replace SPACE_NAME.
        parent='spaces/SPACE_NAME',

        # Create the message.
        message = google_chat.Message(
            text='I am responding to a quoted message!',

            # quotedMessageMetadata lets Chat apps respond to a message by quoting it.
            quoted_message_metadata=google_chat.QuotedMessageMetadata(

                name='QUOTED_MESSAGE_NAME',
                last_update_time=last_update_time
            )
        )
    )

    # Make the request
    response = client.create_message(request)

    # Handle the response
    print(response)

create_message_quote_message()
Java
import com.google.chat.v1.ChatServiceClient;
import com.google.chat.v1.CreateMessageRequest;
import com.google.chat.v1.Message;
import com.google.chat.v1.QuotedMessageMetadata;
import com.google.protobuf.util.Timestamps;
import com.google.workspace.api.chat.samples.utils.AuthenticationUtils;
import java.text.ParseException;

// This sample shows how to create a message that quotes another message.
public class CreateMessageQuoteMessage {
  public static void main(String[] args) throws Exception, ParseException {
    // Create a client.
    ChatServiceClient chatClient = AuthenticationUtils.createClientWithUserCredentials();

    // Initialize request argument(s).
    // TODO(developer): Replace SPACE_NAME, QUOTED_MESSAGE_NAME,
    // and QUOTED_MESSAGE_LAST_UPDATE_TIME here.
    String parent = "spaces/SPACE_NAME";
    String quotedMessageName = "QUOTED_MESSAGE_NAME";
    String lastUpdateTime = "QUOTED_MESSAGE_LAST_UPDATE_TIME";

    QuotedMessageMetadata quotedMessageMetadata =
        QuotedMessageMetadata.newBuilder()
            .setName(quotedMessageName)
            .setLastUpdateTime(Timestamps.parse(lastUpdateTime))
            .build();

    Message message = Message.newBuilder()
        .setText("I am responding to a quoted message!")
        .setQuotedMessageMetadata(quotedMessageMetadata)
        .build();

    CreateMessageRequest request =
        CreateMessageRequest.newBuilder()
            .setParent(parent)
            .setMessage(message)
            .build();

    // Make the request.
    Message response = chatClient.createMessage(request);

    // Handle the response.
    System.out.println(response);
  }
}
Google Apps Script
/**
 * Creates a message that quotes another message.
 *
 * Relies on the OAuth2 scope 'https://www.googleapis.com/auth/chat.messages.create'
 * referenced in the manifest file (appsscript.json).
 */
function createMessageQuoteMessage() {

  // Initialize request argument(s)
  // TODO(developer): Replace SPACE_NAME here.
  const parent = 'spaces/SPACE_NAME';

  const message = {

    // The text content of the message.
    text: 'I am responding to a quoted message!',

    // quotedMessageMetadata lets Chat apps respond to a message by quoting it.
    //
    // TODO(developer): Replace QUOTED_MESSAGE_NAME
    // and QUOTED_MESSAGE_LAST_UPDATE_TIME .
    quotedMessageMetadata: {
      name: 'QUOTED_MESSAGE_NAME',
      lastUpdateTime: 'QUOTED_MESSAGE_LAST_UPDATE_TIME',
    }
  };

  // Make the request
  const response = Chat.Spaces.Messages.create(message, parent);

  // Handle the response
  console.log(response);
}
Aby uruchomić ten przykład, zastąp te elementy:
SPACE_NAME: identyfikator z polanamepokoju. Identyfikator możesz uzyskać, wywołując metodęListSpaces()(rpc,rest) lub z adresu URL przestrzeni.QUOTED_MESSAGE_NAME: zasób wiadomościname(rpc,rest) wiadomości, która ma być cytowana, w formaciespaces/{space}/messages/{message}.QUOTED_MESSAGE_LAST_UPDATE_TIME: czas ostatniej aktualizacji wiadomości, którą chcesz zacytować. Jeśli wiadomość nigdy nie była edytowana, odpowiada to wartościcreateTime(rpc,rest). Jeśli wiadomość była edytowana, odpowiada to wartościlastUpdateTime(rpc,rest).
Rozwiązywanie problemów
Gdy aplikacja Google Chat lub karta zwraca błąd, w interfejsie Google Chat pojawia się komunikat „Coś poszło nie tak”. lub „Nie udało się przetworzyć Twojego żądania”. Czasami interfejs Google Chat nie wyświetla żadnego komunikatu o błędzie, ale aplikacja lub karta Google Chat daje nieoczekiwany wynik, np. wiadomość na karcie może się nie pojawić.
Chociaż w interfejsie czatu może nie wyświetlać się komunikat o błędzie, opisowe komunikaty o błędach i dane logowania są dostępne, aby pomóc w naprawieniu błędów, gdy rejestrowanie błędów w aplikacjach na czat jest włączone. Pomoc dotyczącą wyświetlania, debugowania i naprawiania błędów znajdziesz w artykule Rozwiązywanie problemów z Google Chat.
Powiązane artykuły
- Użyj narzędzia do tworzenia kart, aby projektować i wyświetlać podgląd wiadomości z kartami JSON dla aplikacji do obsługi czatu.
- Formatowanie wiadomości
- Wyświetlanie szczegółowych informacji o wiadomości
- Wyświetlanie listy wiadomości w pokoju
- Aktualizowanie wiadomości
- Usuwanie wiadomości
- Identyfikowanie użytkowników w wiadomościach w Google Chat
- Wysyłanie wiadomości do Google Chat za pomocą przychodzących webhooków