
Panduan ini menjelaskan cara menggunakan metode
create()
pada resource Message Google Chat API untuk melakukan salah satu hal berikut:
- Mengirim pesan yang berisi teks, kartu, dan widget interaktif.
- Mengirim pesan secara pribadi kepada pengguna Chat tertentu.
- Memulai atau membalas rangkaian pesan.
- Beri nama pesan, sehingga Anda dapat menentukannya dalam permintaan Chat API lainnya.
Ukuran pesan maksimum (termasuk teks atau kartu) adalah 32.000 byte. Untuk mengirim pesan yang melebihi ukuran ini, aplikasi Chat Anda harus mengirim beberapa pesan.
Selain memanggil Chat API untuk membuat pesan, aplikasi Chat dapat membuat dan mengirim pesan untuk membalas interaksi pengguna, seperti memposting pesan selamat datang setelah pengguna menambahkan aplikasi Chat ke ruang. Saat merespons interaksi, Aplikasi chat dapat menggunakan jenis fitur pesan lainnya, termasuk dialog interaktif dan antarmuka pratinjau link. Untuk membalas pengguna, aplikasi Chat menampilkan pesan secara sinkron, tanpa memanggil Chat API. Untuk mempelajari cara mengirim pesan untuk merespons interaksi, lihat Menerima dan merespons interaksi dengan aplikasi Google Chat Anda.
Cara Chat menampilkan dan mengatribusikan pesan yang dibuat dengan Chat API
Anda dapat memanggil metode create() menggunakan
autentikasi aplikasi
dan autentikasi pengguna.
Chat mengatribusikan pengirim pesan secara berbeda
bergantung pada jenis autentikasi yang Anda gunakan.
Saat Anda melakukan autentikasi sebagai aplikasi Chat, aplikasi Chat akan mengirimkan pesan.

App di samping namanya.Saat Anda mengautentikasi sebagai pengguna, aplikasi Chat akan mengirim pesan atas nama pengguna. Chat juga mengatribusikan aplikasi Chat ke pesan dengan menampilkan namanya.

Jenis autentikasi juga menentukan fitur dan antarmuka pesan yang dapat Anda sertakan dalam pesan. Dengan autentikasi aplikasi, aplikasi Chat dapat mengirim pesan yang berisi teks kaya, antarmuka berbasis kartu, dan widget interaktif. Dengan autentikasi pengguna, Anda dapat mengirim pesan teks. Di Developer Preview, Anda juga dapat mengirim kartu, seperti yang didokumentasikan di Membuat dan memperbarui kartu.
Untuk mempelajari lebih lanjut fitur pesan yang tersedia untuk Chat API, lihat Ringkasan pesan Google Chat.
Panduan ini menjelaskan cara menggunakan salah satu jenis autentikasi untuk mengirim pesan dengan Chat API.
Prasyarat
Node.js
- Akun Google Workspace Business atau Enterprise dengan akses ke Google Chat.
- Siapkan lingkungan Anda:
- Buat project Google Cloud.
- Konfigurasi layar izin OAuth.
- Aktifkan dan konfigurasi Google Chat API dengan nama, ikon, dan deskripsi untuk aplikasi Chat Anda.
- Instal Library Klien Cloud Node.js.
- Buat kredensial akses berdasarkan cara Anda ingin melakukan autentikasi dalam permintaan Google Chat API:
- Untuk melakukan autentikasi sebagai pengguna Chat,
buat kredensial
ID klien OAuth dan simpan kredensial tersebut sebagai file JSON bernama
credentials.jsonke direktori lokal Anda. - Untuk mengautentikasi sebagai aplikasi Chat,
buat kredensial
akun layanan dan simpan kredensial sebagai file JSON bernama
credentials.json.
- Untuk melakukan autentikasi sebagai pengguna Chat,
buat kredensial
ID klien OAuth dan simpan kredensial tersebut sebagai file JSON bernama
- Pilih cakupan otorisasi berdasarkan apakah Anda ingin mengautentikasi sebagai pengguna atau aplikasi Chat.
- Ruang Google Chat tempat pengguna yang diautentikasi atau aplikasi Chat yang memanggil menjadi anggota. Untuk mengautentikasi sebagai aplikasi Chat, tambahkan aplikasi Chat ke ruang.
Python
- Akun Google Workspace Business atau Enterprise dengan akses ke Google Chat.
- Siapkan lingkungan Anda:
- Buat project Google Cloud.
- Konfigurasi layar izin OAuth.
- Aktifkan dan konfigurasi Google Chat API dengan nama, ikon, dan deskripsi untuk aplikasi Chat Anda.
- Instal Python Cloud Client Library.
- Buat kredensial akses berdasarkan cara Anda ingin melakukan autentikasi dalam permintaan Google Chat API:
- Untuk melakukan autentikasi sebagai pengguna Chat,
buat kredensial
ID klien OAuth dan simpan kredensial tersebut sebagai file JSON bernama
credentials.jsonke direktori lokal Anda. - Untuk mengautentikasi sebagai aplikasi Chat,
buat kredensial
akun layanan dan simpan kredensial sebagai file JSON bernama
credentials.json.
- Untuk melakukan autentikasi sebagai pengguna Chat,
buat kredensial
ID klien OAuth dan simpan kredensial tersebut sebagai file JSON bernama
- Pilih cakupan otorisasi berdasarkan apakah Anda ingin mengautentikasi sebagai pengguna atau aplikasi Chat.
- Ruang Google Chat tempat pengguna yang diautentikasi atau aplikasi Chat yang memanggil menjadi anggota. Untuk mengautentikasi sebagai aplikasi Chat, tambahkan aplikasi Chat ke ruang.
Java
- Akun Google Workspace Business atau Enterprise dengan akses ke Google Chat.
- Siapkan lingkungan Anda:
- Buat project Google Cloud.
- Konfigurasi layar izin OAuth.
- Aktifkan dan konfigurasi Google Chat API dengan nama, ikon, dan deskripsi untuk aplikasi Chat Anda.
- Instal Java Cloud Client Library.
- Buat kredensial akses berdasarkan cara Anda ingin melakukan autentikasi dalam permintaan Google Chat API:
- Untuk melakukan autentikasi sebagai pengguna Chat,
buat kredensial
ID klien OAuth dan simpan kredensial tersebut sebagai file JSON bernama
credentials.jsonke direktori lokal Anda. - Untuk mengautentikasi sebagai aplikasi Chat,
buat kredensial
akun layanan dan simpan kredensial sebagai file JSON bernama
credentials.json.
- Untuk melakukan autentikasi sebagai pengguna Chat,
buat kredensial
ID klien OAuth dan simpan kredensial tersebut sebagai file JSON bernama
- Pilih cakupan otorisasi berdasarkan apakah Anda ingin mengautentikasi sebagai pengguna atau aplikasi Chat.
- Ruang Google Chat tempat pengguna yang diautentikasi atau aplikasi Chat yang memanggil menjadi anggota. Untuk mengautentikasi sebagai aplikasi Chat, tambahkan aplikasi Chat ke ruang.
Apps Script
- Akun Google Workspace Business atau Enterprise dengan akses ke Google Chat.
- Siapkan lingkungan Anda:
- Buat project Google Cloud.
- Konfigurasi layar izin OAuth.
- Aktifkan dan konfigurasi Google Chat API dengan nama, ikon, dan deskripsi untuk aplikasi Chat Anda.
- Buat project Apps Script mandiri, lalu aktifkan Advanced Chat Service.
- Dalam panduan ini, Anda harus menggunakan autentikasi pengguna atau aplikasi. Untuk melakukan autentikasi sebagai aplikasi Chat, buat kredensial akun layanan. Untuk mengetahui langkah-langkahnya, lihat Mengautentikasi dan memberi otorisasi sebagai aplikasi Google Chat.
- Pilih cakupan otorisasi berdasarkan apakah Anda ingin mengautentikasi sebagai pengguna atau aplikasi Chat.
- Ruang Google Chat tempat pengguna yang diautentikasi atau aplikasi Chat yang memanggil menjadi anggota. Untuk mengautentikasi sebagai aplikasi Chat, tambahkan aplikasi Chat ke ruang.
Mengirim pesan sebagai aplikasi Chat
Bagian ini menjelaskan cara mengirim pesan yang berisi teks, kartu, dan widget aksesori interaktif menggunakan autentikasi aplikasi.

Untuk memanggil metode CreateMessage()
menggunakan autentikasi aplikasi, Anda harus menentukan kolom berikut dalam
permintaan:
- Cakupan otorisasi
chat.bot. - Resource
Spacetempat Anda ingin memposting pesan. Aplikasi Chat harus menjadi anggota ruang. - Resource
Messageyang akan dibuat. Untuk menentukan konten pesan, Anda dapat menyertakan teks kaya (text), satu atau beberapa antarmuka kartu (cardsV2), atau keduanya.
Secara opsional, Anda dapat menyertakan hal berikut:
- Kolom
accessoryWidgetsuntuk menyertakan tombol interaktif di bagian bawah pesan. - Kolom
privateMessageVieweruntuk mengirim pesan secara pribadi kepada pengguna tertentu. - Kolom
messageId, yang memungkinkan Anda memberi nama pesan untuk digunakan dalam permintaan API lainnya. - Kolom
thread.threadKeydanmessageReplyOptionuntuk memulai atau membalas rangkaian pesan. Jika ruang tidak menggunakan rangkaian pesan, kolom ini akan diabaikan.
Kode berikut menunjukkan contoh cara aplikasi Chat dapat mengirim pesan yang diposting sebagai aplikasi Chat yang berisi teks, kartu, dan tombol yang dapat diklik di bagian bawah pesan:
Node.js
Python
Java
Apps Script
Untuk menjalankan contoh ini, ganti SPACE_NAME dengan ID dari
kolom
name
ruang. Anda bisa mendapatkan ID dengan memanggil metode
ListSpaces()
atau dari URL ruang.
Menambahkan widget interaktif di bagian bawah pesan
Dalam contoh kode pertama panduan ini, pesan aplikasi Chat menampilkan tombol yang dapat diklik di bagian bawah pesan, yang dikenal sebagai widget aksesori. Widget aksesori muncul setelah teks atau kartu apa pun dalam pesan. Anda dapat menggunakan widget ini untuk mendorong pengguna berinteraksi dengan pesan Anda dengan berbagai cara, termasuk:
- Menilai akurasi atau kepuasan pesan.
- Laporkan masalah terkait pesan atau aplikasi Chat.
- Buka link ke konten terkait, seperti dokumentasi.
- Menutup atau menunda pesan serupa dari aplikasi Chat selama jangka waktu tertentu.
Untuk menambahkan widget aksesori, sertakan kolom
accessoryWidgets[]
di isi permintaan Anda dan tentukan satu atau beberapa widget yang ingin
Anda sertakan.
Gambar berikut menunjukkan aplikasi Chat yang menambahkan pesan teks dengan widget aksesori sehingga pengguna dapat menilai pengalaman mereka dengan aplikasi Chat.
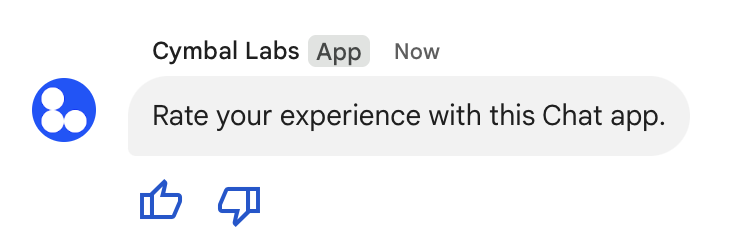
Berikut isi permintaan yang membuat pesan teks dengan
dua tombol aksesori. Saat pengguna mengklik tombol, fungsi yang sesuai (seperti doUpvote) akan memproses interaksi:
{
  text: "Rate your experience with this Chat app.",
  accessoryWidgets: [{ buttonList: { buttons: [{
    icon: { material_icon: {
      name: "thumb_up"
    }},
    color: { red: 0, blue: 255, green: 0 },
    onClick: { action: {
      function: "doUpvote"
    }}
  }, {
    icon: { material_icon: {
      name: "thumb_down"
    }},
    color: { red: 0, blue: 255, green: 0 },
    onClick: { action: {
      function: "doDownvote"
    }}
  }]}}]
}
Mengirim pesan secara pribadi
Aplikasi Chat dapat mengirim pesan secara pribadi sehingga pesan hanya dapat dilihat oleh pengguna tertentu di ruang. Saat aplikasi Chat mengirim pesan pribadi, pesan akan menampilkan label yang memberi tahu pengguna bahwa pesan hanya dapat dilihat olehnya.
Untuk mengirim pesan secara pribadi menggunakan Chat API, tentukan kolom
privateMessageViewer
di isi permintaan Anda. Untuk menentukan pengguna, Anda menetapkan nilai ke
resource
User
yang merepresentasikan pengguna Chat. Anda juga dapat menggunakan kolom
name
dari resource User, seperti yang ditunjukkan dalam contoh berikut:
{
  text: "Hello private world!",
  privateMessageViewer: {
    name: "users/USER_ID"
  }
}
Untuk menggunakan contoh ini, ganti USER_ID
dengan ID unik untuk pengguna, seperti 12345678987654321 atau
hao@cymbalgroup.com. Untuk mengetahui informasi selengkapnya tentang cara menentukan pengguna, lihat
Mengidentifikasi dan menentukan pengguna Google Chat.
Untuk mengirim pesan secara pribadi, Anda harus menghilangkan hal berikut dalam permintaan Anda:
Mengirim notifikasi paksa atau pesan senyap
Saat mengirim pesan, aplikasi Chat dapat menggunakan salah satu opsi berikut untuk memberi tahu pengguna:
- Memaksakan notifikasi: Chat selalu mengirimkan notifikasi push kepada penerima, terlepas dari setelan notifikasi atau status Jangan Ganggu (DND) mereka. Di dalam Chat, pesan akan memicu perilaku penebalan dan pengunggulan di daftar kontak atau daftar Beranda penerima, serta menampilkan badge.
- Mengirim pesan senyap: Chat menekan notifikasi push untuk penerima. Di dalam Chat, pesan tidak memicu perilaku penebalan atau pengunggulan dalam daftar anggota atau daftar Beranda penerima, dan tidak menampilkan badge. Jika pesan senyap adalah pesan terakhir dalam percakapan, kontennya tidak ditampilkan di cuplikan Beranda.
Baik dipaksakan maupun tanpa suara, pesan ini menyertakan indikator visual yang memberi tahu penerima tentang perilaku notifikasi khusus.
Notifikasi paksa dan pesan senyap hanya tersedia untuk aplikasi Chat yang menggunakan autentikasi aplikasi.
Notifikasi paksa dan pesan senyap memiliki batasan berikut:
- Pengguna eksternal: Notifikasi paksa dan pesan senyap tidak berlaku untuk pengguna eksternal (tamu) di ruang. Pengguna eksternal menerima notifikasi sesuai dengan setelan mereka sendiri.
- Penyebutan: Pesan senyap tidak mendukung penyebutan pengguna. Jika Anda menyertakan sebutan dalam pesan senyap, sebutan tersebut akan diperlakukan sebagai teks biasa.
- Rangkaian pesan: Anda tidak dapat memulai atau membalas rangkaian pesan dengan pesan senyap.
- Jenis ruang: Notifikasi paksa dan pesan senyap tidak didukung dalam pesan langsung (DM) atau ruang yang dimiliki oleh orang yang tidak memiliki akun Google Workspace.
- Notifikasi email: Pesan senyap tidak memicu notifikasi email. Pesan yang diberi notifikasi paksa hanya memicu notifikasi email jika juga menyertakan sebutan untuk pengguna tertentu.
Untuk memaksakan notifikasi atau mengirim pesan senyap, sertakan kolom
createMessageNotificationOptions
dalam permintaan Anda dan tetapkan notificationType ke salah satu nilai berikut:
| Nilai | Perilaku |
|---|---|
NOTIFICATION_TYPE_FORCE_NOTIFY |
Memaksa notifikasi. |
NOTIFICATION_TYPE_SILENT |
Mengirim pesan tanpa suara. |
Contoh berikut menunjukkan isi JSON permintaan untuk mengirim pesan dengan notifikasi paksa:
{
  "text": "Critical update: the server is down!",
  "createMessageNotificationOptions": {
    "notificationType": "NOTIFICATION_TYPE_FORCE_NOTIFY"
  }
}
Mengirim pesan teks atas nama pengguna
Bagian ini menjelaskan cara mengirim pesan atas nama pengguna menggunakan autentikasi pengguna. Dengan autentikasi pengguna, konten pesan hanya boleh berisi teks dan tidak boleh menyertakan fitur pesan yang hanya tersedia untuk aplikasi Chat, termasuk antarmuka kartu dan widget interaktif. Di Pratinjau Developer, Anda dapat membuat pesan dengan kartu atas nama pengguna. Untuk mengetahui detailnya, lihat bagian Membuat dan memperbarui kartu.

Untuk memanggil metode CreateMessage() menggunakan autentikasi pengguna, Anda harus menentukan
kolom berikut dalam permintaan:
- Cakupan otorisasi
yang mendukung autentikasi pengguna untuk metode ini. Contoh berikut menggunakan
cakupan
chat.messages.create. - Resource
Spacetempat Anda ingin memposting pesan. Pengguna yang diautentikasi harus menjadi anggota ruang. - Resource
Messageyang akan dibuat. Untuk menentukan konten pesan, Anda harus menyertakan kolomtext.
Secara opsional, Anda dapat menyertakan hal berikut:
- Kolom
createMessageNotificationOptionsuntuk memaksa notifikasi atau mengirim pesan secara diam-diam. - Kolom
messageId, yang memungkinkan Anda memberi nama pesan untuk digunakan dalam permintaan API lainnya. - Kolom
thread.threadKeydanmessageReplyOptionuntuk memulai atau membalas rangkaian pesan. Jika ruang tidak menggunakan rangkaian pesan, kolom ini akan diabaikan.
Kode berikut menunjukkan contoh cara aplikasi Chat dapat mengirim pesan teks di ruang tertentu atas nama pengguna yang diautentikasi:
Node.js
Python
Java
Apps Script
Untuk menjalankan contoh ini, ganti SPACE_NAME dengan ID dari
kolom
name
ruang. Anda bisa mendapatkan ID dengan memanggil metode
ListSpaces()
atau dari URL ruang.
Memulai atau membalas dalam rangkaian pesan
Untuk ruang yang menggunakan rangkaian pesan, Anda dapat menentukan apakah pesan baru memulai rangkaian pesan, atau membalas rangkaian pesan yang ada.
Secara default, pesan yang Anda buat menggunakan Chat API akan memulai rangkaian pesan baru. Untuk membantu Anda mengidentifikasi rangkaian pesan dan membalasnya nanti, Anda dapat menentukan kunci rangkaian pesan dalam permintaan Anda:
- Dalam isi permintaan, tentukan kolom
thread.threadKey. - Tentukan parameter kueri
messageReplyOptionuntuk menentukan apa yang terjadi jika kunci sudah ada.
Untuk membuat pesan yang membalas rangkaian pesan yang ada:
- Di isi permintaan, sertakan kolom
thread. Jika disetel, Anda dapat menentukanthreadKeyyang Anda buat. Jika tidak, Anda harus menggunakannamedari rangkaian pesan. - Tentukan parameter kueri
messageReplyOption.
Kode berikut menunjukkan contoh cara aplikasi Chat dapat mengirim pesan teks yang memulai atau membalas rangkaian pesan tertentu yang diidentifikasi oleh kunci ruang tertentu atas nama pengguna yang diautentikasi:
Node.js
Python
Java
Apps Script
Untuk menjalankan contoh ini, ganti kode berikut:
THREAD_KEY: kunci thread yang ada di ruang, atau untuk membuat thread baru, nama unik untuk thread.SPACE_NAME: ID dari kolomnameruang. Anda bisa mendapatkan ID dengan memanggil metodeListSpaces()atau dari URL ruang.
Memberi nama pesan
Untuk mengambil atau menentukan pesan dalam panggilan API mendatang, Anda dapat memberi nama pesan dengan menyetel kolom messageId dalam permintaan Anda.
Dengan memberi nama pesan, Anda dapat menentukan pesan tanpa perlu menyimpan
ID yang ditetapkan sistem dari nama resource pesan (ditampilkan di kolom
name).
Misalnya, untuk mengambil pesan menggunakan metode get(), Anda menggunakan
nama resource untuk menentukan pesan mana yang akan diambil. Nama resource diformat sebagai spaces/{space}/messages/{message}, dengan {message} merepresentasikan ID yang ditetapkan sistem atau nama kustom yang Anda tetapkan saat membuat pesan.
Untuk memberi nama pesan, tentukan ID kustom di kolom
messageId
saat Anda membuat pesan. Kolom messageId menetapkan nilai untuk kolom
clientAssignedMessageId
dari resource Message.
Anda hanya dapat menamai pesan saat membuat pesan. Anda tidak dapat memberi nama atau mengubah ID kustom untuk pesan yang sudah ada. ID kustom harus memenuhi persyaratan berikut:
- Dimulai dengan
client-. Misalnya,client-custom-nameadalah ID kustom yang valid, tetapicustom-nametidak. - Berisi hingga 63 karakter dan hanya huruf kecil, angka, dan tanda hubung.
- Bersifat unik dalam ruang. Aplikasi Chat tidak dapat menggunakan ID kustom yang sama untuk pesan yang berbeda.
Kode berikut menunjukkan contoh cara aplikasi Chat dapat mengirim pesan teks dengan ID ke ruang tertentu atas nama pengguna yang diautentikasi:
Node.js
Python
Java
Apps Script
Untuk menjalankan contoh ini, ganti kode berikut:
SPACE_NAME: ID dari kolomnameruang. Anda bisa mendapatkan ID dengan memanggil metodeListSpaces()atau dari URL ruang.MESSAGE-ID: nama untuk pesan yang diawali dengancustom-. Harus unik dari nama pesan lain yang dibuat oleh aplikasi Chat di ruang yang ditentukan.
Mengutip pesan
Anda dapat mengutip pesan lain dengan memanggil
CreateMessage()
(rpc,
rest)
dan menyetel quotedMessageMetadata
(rpc,
rest)
dalam permintaan.
Anda dapat mengutip pesan dalam rangkaian pesan atau di chat utama, tetapi Anda tidak dapat mengutip pesan dari rangkaian pesan yang berbeda.
Kode berikut menunjukkan cara membuat pesan yang mengutip pesan lain:
Node.js
import {createClientWithUserCredentials} from './authentication-utils.js';

const USER_AUTH_OAUTH_SCOPES = ['https://www.googleapis.com/auth/chat.messages.create'];

// This sample shows how to create a message that quotes another message.
async function main() {

  // Create a client
  const chatClient = await createClientWithUserCredentials(USER_AUTH_OAUTH_SCOPES);

  // Initialize request argument(s)
  const request = {

    // TODO(developer): Replace SPACE_NAME .
    parent: 'spaces/SPACE_NAME',

    message: {
      text: 'I am responding to a quoted message!',

      // quotedMessageMetadata lets Chat apps respond to a message by quoting it.
      quotedMessageMetadata: {

        // TODO(developer): Replace QUOTED_MESSAGE_NAME
        // and QUOTED_MESSAGE_LAST_UPDATE_TIME.
        name: 'QUOTED_MESSAGE_NAME',
        lastUpdateTime: 'QUOTED_MESSAGE_LAST_UPDATE_TIME'
      }
    }
  };

  // Make the request
  const response = await chatClient.createMessage(request);

  // Handle the response
  console.log(response);
}

main().catch(console.error);
Python
from authentication_utils import create_client_with_user_credentials
from google.apps import chat_v1 as google_chat
from google.protobuf.timestamp_pb2 import Timestamp

SCOPES = ['https://www.googleapis.com/auth/chat.messages.create']

# This sample shows how to create a message that quotes another message.
def create_message_quote_message():
    '''Creates a message that quotes another message.'''

    # Create a client
    client = create_client_with_user_credentials(SCOPES)

    # Create a timestamp from the RFC-3339 string.
    # TODO(developer): Replace QUOTED_MESSAGE_LAST_UPDATE_TIME.
    last_update_time = Timestamp()
    last_update_time.FromJsonString('QUOTED_MESSAGE_LAST_UPDATE_TIME')

    # Initialize request argument(s)
    request = google_chat.CreateMessageRequest(

        # TODO(developer): Replace SPACE_NAME.
        parent='spaces/SPACE_NAME',

        # Create the message.
        message = google_chat.Message(
            text='I am responding to a quoted message!',

            # quotedMessageMetadata lets Chat apps respond to a message by quoting it.
            quoted_message_metadata=google_chat.QuotedMessageMetadata(

                name='QUOTED_MESSAGE_NAME',
                last_update_time=last_update_time
            )
        )
    )

    # Make the request
    response = client.create_message(request)

    # Handle the response
    print(response)

create_message_quote_message()
Java
import com.google.chat.v1.ChatServiceClient;
import com.google.chat.v1.CreateMessageRequest;
import com.google.chat.v1.Message;
import com.google.chat.v1.QuotedMessageMetadata;
import com.google.protobuf.util.Timestamps;
import com.google.workspace.api.chat.samples.utils.AuthenticationUtils;
import java.text.ParseException;

// This sample shows how to create a message that quotes another message.
public class CreateMessageQuoteMessage {
  public static void main(String[] args) throws Exception, ParseException {
    // Create a client.
    ChatServiceClient chatClient = AuthenticationUtils.createClientWithUserCredentials();

    // Initialize request argument(s).
    // TODO(developer): Replace SPACE_NAME, QUOTED_MESSAGE_NAME,
    // and QUOTED_MESSAGE_LAST_UPDATE_TIME here.
    String parent = "spaces/SPACE_NAME";
    String quotedMessageName = "QUOTED_MESSAGE_NAME";
    String lastUpdateTime = "QUOTED_MESSAGE_LAST_UPDATE_TIME";

    QuotedMessageMetadata quotedMessageMetadata =
        QuotedMessageMetadata.newBuilder()
            .setName(quotedMessageName)
            .setLastUpdateTime(Timestamps.parse(lastUpdateTime))
            .build();

    Message message = Message.newBuilder()
        .setText("I am responding to a quoted message!")
        .setQuotedMessageMetadata(quotedMessageMetadata)
        .build();

    CreateMessageRequest request =
        CreateMessageRequest.newBuilder()
            .setParent(parent)
            .setMessage(message)
            .build();

    // Make the request.
    Message response = chatClient.createMessage(request);

    // Handle the response.
    System.out.println(response);
  }
}
Apps Script
/**
 * Creates a message that quotes another message.
 *
 * Relies on the OAuth2 scope 'https://www.googleapis.com/auth/chat.messages.create'
 * referenced in the manifest file (appsscript.json).
 */
function createMessageQuoteMessage() {

  // Initialize request argument(s)
  // TODO(developer): Replace SPACE_NAME here.
  const parent = 'spaces/SPACE_NAME';

  const message = {

    // The text content of the message.
    text: 'I am responding to a quoted message!',

    // quotedMessageMetadata lets Chat apps respond to a message by quoting it.
    //
    // TODO(developer): Replace QUOTED_MESSAGE_NAME
    // and QUOTED_MESSAGE_LAST_UPDATE_TIME .
    quotedMessageMetadata: {
      name: 'QUOTED_MESSAGE_NAME',
      lastUpdateTime: 'QUOTED_MESSAGE_LAST_UPDATE_TIME',
    }
  };

  // Make the request
  const response = Chat.Spaces.Messages.create(message, parent);

  // Handle the response
  console.log(response);
}
Untuk menjalankan contoh ini, ganti kode berikut:
SPACE_NAME: ID dari kolomnameruang. Anda bisa mendapatkan ID dengan memanggil metodeListSpaces()(rpc,rest) atau dari URL ruang.QUOTED_MESSAGE_NAME: resource pesanname(rpc,rest) dari pesan yang akan dikutip dalam formatspaces/{space}/messages/{message}.QUOTED_MESSAGE_LAST_UPDATE_TIME: waktu pembaruan terakhir pesan yang ingin Anda kutip. Jika pesan tidak pernah diedit, sesuai dengancreateTime(rpc,rest). Jika pesan diedit, sesuai denganlastUpdateTime(rpc,rest).
Memecahkan masalah
Saat aplikasi atau kartu Google Chat menampilkan error, antarmuka Chat akan menampilkan pesan yang mengatakan "Terjadi masalah". atau "Tidak dapat memproses permintaan Anda". Terkadang UI Chat tidak menampilkan pesan error apa pun, tetapi aplikasi atau kartu Chat menghasilkan hasil yang tidak terduga; misalnya, pesan kartu mungkin tidak muncul.
Meskipun pesan error mungkin tidak ditampilkan di UI Chat, pesan error deskriptif dan data log tersedia untuk membantu Anda memperbaiki error jika logging error untuk aplikasi Chat diaktifkan. Untuk mendapatkan bantuan dalam melihat, men-debug, dan memperbaiki error, lihat Memecahkan masalah dan memperbaiki error Google Chat.
Topik terkait
- Gunakan Pembuat Kartu untuk mendesain dan melihat pratinjau pesan kartu JSON untuk aplikasi Chat.
- Memformat pesan.
- Mendapatkan detail tentang pesan.
- Mencantumkan pesan dalam ruang.
- Memperbarui pesan.
- Menghapus pesan.
- Mengidentifikasi pengguna dalam pesan Google Chat.
- Mengirim pesan ke Google Chat dengan webhook masuk.