คู่มือนี้อธิบายวิธีที่แอป Google Chat สามารถรวบรวมและประมวลผลข้อมูล จากผู้ใช้โดยการสร้างอินพุตแบบฟอร์มในอินเทอร์เฟซแบบการ์ด


แอปใน Chat จะขอข้อมูลจากผู้ใช้เพื่อดำเนินการในหรือนอก Chat รวมถึงในลักษณะต่อไปนี้
- กำหนดการตั้งค่า เช่น เพื่อให้ผู้ใช้ปรับแต่งการตั้งค่าการแจ้งเตือน หรือกำหนดค่าและเพิ่มแอป Chat ลงในพื้นที่ทำงานอย่างน้อย 1 แห่ง
- สร้างหรืออัปเดตข้อมูลในแอปพลิเคชันอื่นๆ ของ Google Workspace เช่น อนุญาตให้ผู้ใช้สร้างกิจกรรมใน Google ปฏิทิน
- อนุญาตให้ผู้ใช้เข้าถึงและอัปเดตทรัพยากรในแอปหรือบริการบนเว็บอื่นๆ ตัวอย่างเช่น แอป Chat สามารถช่วยผู้ใช้อัปเดต สถานะของคำขอแจ้งปัญหาได้โดยตรงจากพื้นที่ทำงานใน Chat
ข้อกำหนดเบื้องต้น
Node.js
แอป Google Chat ที่รับและตอบสนองต่อเหตุการณ์การโต้ตอบ หากต้องการสร้างแอป Chat แบบอินเทอร์แอกทีฟโดยใช้บริการ HTTP ให้ทำตามการเริ่มต้นอย่างรวดเร็วนี้
Python
แอป Google Chat ที่รับและตอบสนองต่อเหตุการณ์การโต้ตอบ หากต้องการสร้างแอป Chat แบบอินเทอร์แอกทีฟโดยใช้บริการ HTTP ให้ทำตามการเริ่มต้นอย่างรวดเร็วนี้
Java
แอป Google Chat ที่รับและตอบสนองต่อเหตุการณ์การโต้ตอบ หากต้องการสร้างแอป Chat แบบอินเทอร์แอกทีฟโดยใช้บริการ HTTP ให้ทำตามการเริ่มต้นอย่างรวดเร็วนี้
Apps Script
แอป Google Chat ที่รับและตอบสนองต่อเหตุการณ์การโต้ตอบ หากต้องการสร้าง แอป Chat แบบอินเทอร์แอกทีฟใน Apps Script ให้ทำตามการเริ่มต้นอย่างรวดเร็วนี้
สร้างแบบฟอร์มโดยใช้การ์ด
แอปใน Chat จะออกแบบแบบฟอร์มและอินพุต และสร้างเป็นการ์ดเพื่อรวบรวมข้อมูล หากต้องการแสดงการ์ดต่อผู้ใช้ แอป Chat สามารถใช้อินเทอร์เฟซ Chat ต่อไปนี้
- ข้อความ ที่มีการ์ดอย่างน้อย 1 ใบ
- หน้าแรก ซึ่งเป็นการ์ดที่ปรากฏจากแท็บหน้าแรกในข้อความ ส่วนตัวด้วยแอป Chat
- กล่องโต้ตอบ ซึ่งเป็นการ์ดที่เปิดขึ้น ในหน้าต่างใหม่จากข้อความและหน้าแรก
แอปแชทสามารถสร้างการ์ดโดยใช้วิดเจ็ตต่อไปนี้
วิดเจ็ตอินพุตแบบฟอร์มที่ขอข้อมูลจากผู้ใช้ คุณสามารถ เพิ่มการตรวจสอบ ในวิดเจ็ตอินพุตของแบบฟอร์มได้ (ไม่บังคับ) เพื่อให้ผู้ใช้ป้อนและจัดรูปแบบข้อมูล อย่างถูกต้อง แอปแชทสามารถใช้เครื่องมืออินพุตแบบฟอร์มต่อไปนี้
- ข้อความที่ป้อน
(
textInput) สำหรับข้อความรูปแบบอิสระหรือข้อความที่แนะนำ - อินพุตการเลือก
(
selectionInput) คือองค์ประกอบ UI ที่เลือกได้ เช่น ช่องทำเครื่องหมาย ปุ่มตัวเลือก และเมนูแบบเลื่อนลง วิดเจ็ตอินพุตการเลือกยังสามารถ ป้อนข้อมูลรายการจากแหล่งข้อมูลแบบคงที่หรือแบบไดนามิกได้ด้วย เช่น ผู้ใช้สามารถ เลือกจากรายการพื้นที่ใน Chat ที่ตนเป็นสมาชิก - เครื่องมือเลือกวันที่และเวลา
(
dateTimePicker) สำหรับรายการวันที่และเวลา
- ข้อความที่ป้อน
(
วิดเจ็ตปุ่ม เพื่อให้ผู้ใช้ส่งค่าที่ป้อนในการ์ดได้ หลังจากผู้ใช้คลิกปุ่มแล้ว แอป Chat จะประมวลผลข้อมูลที่ได้รับ
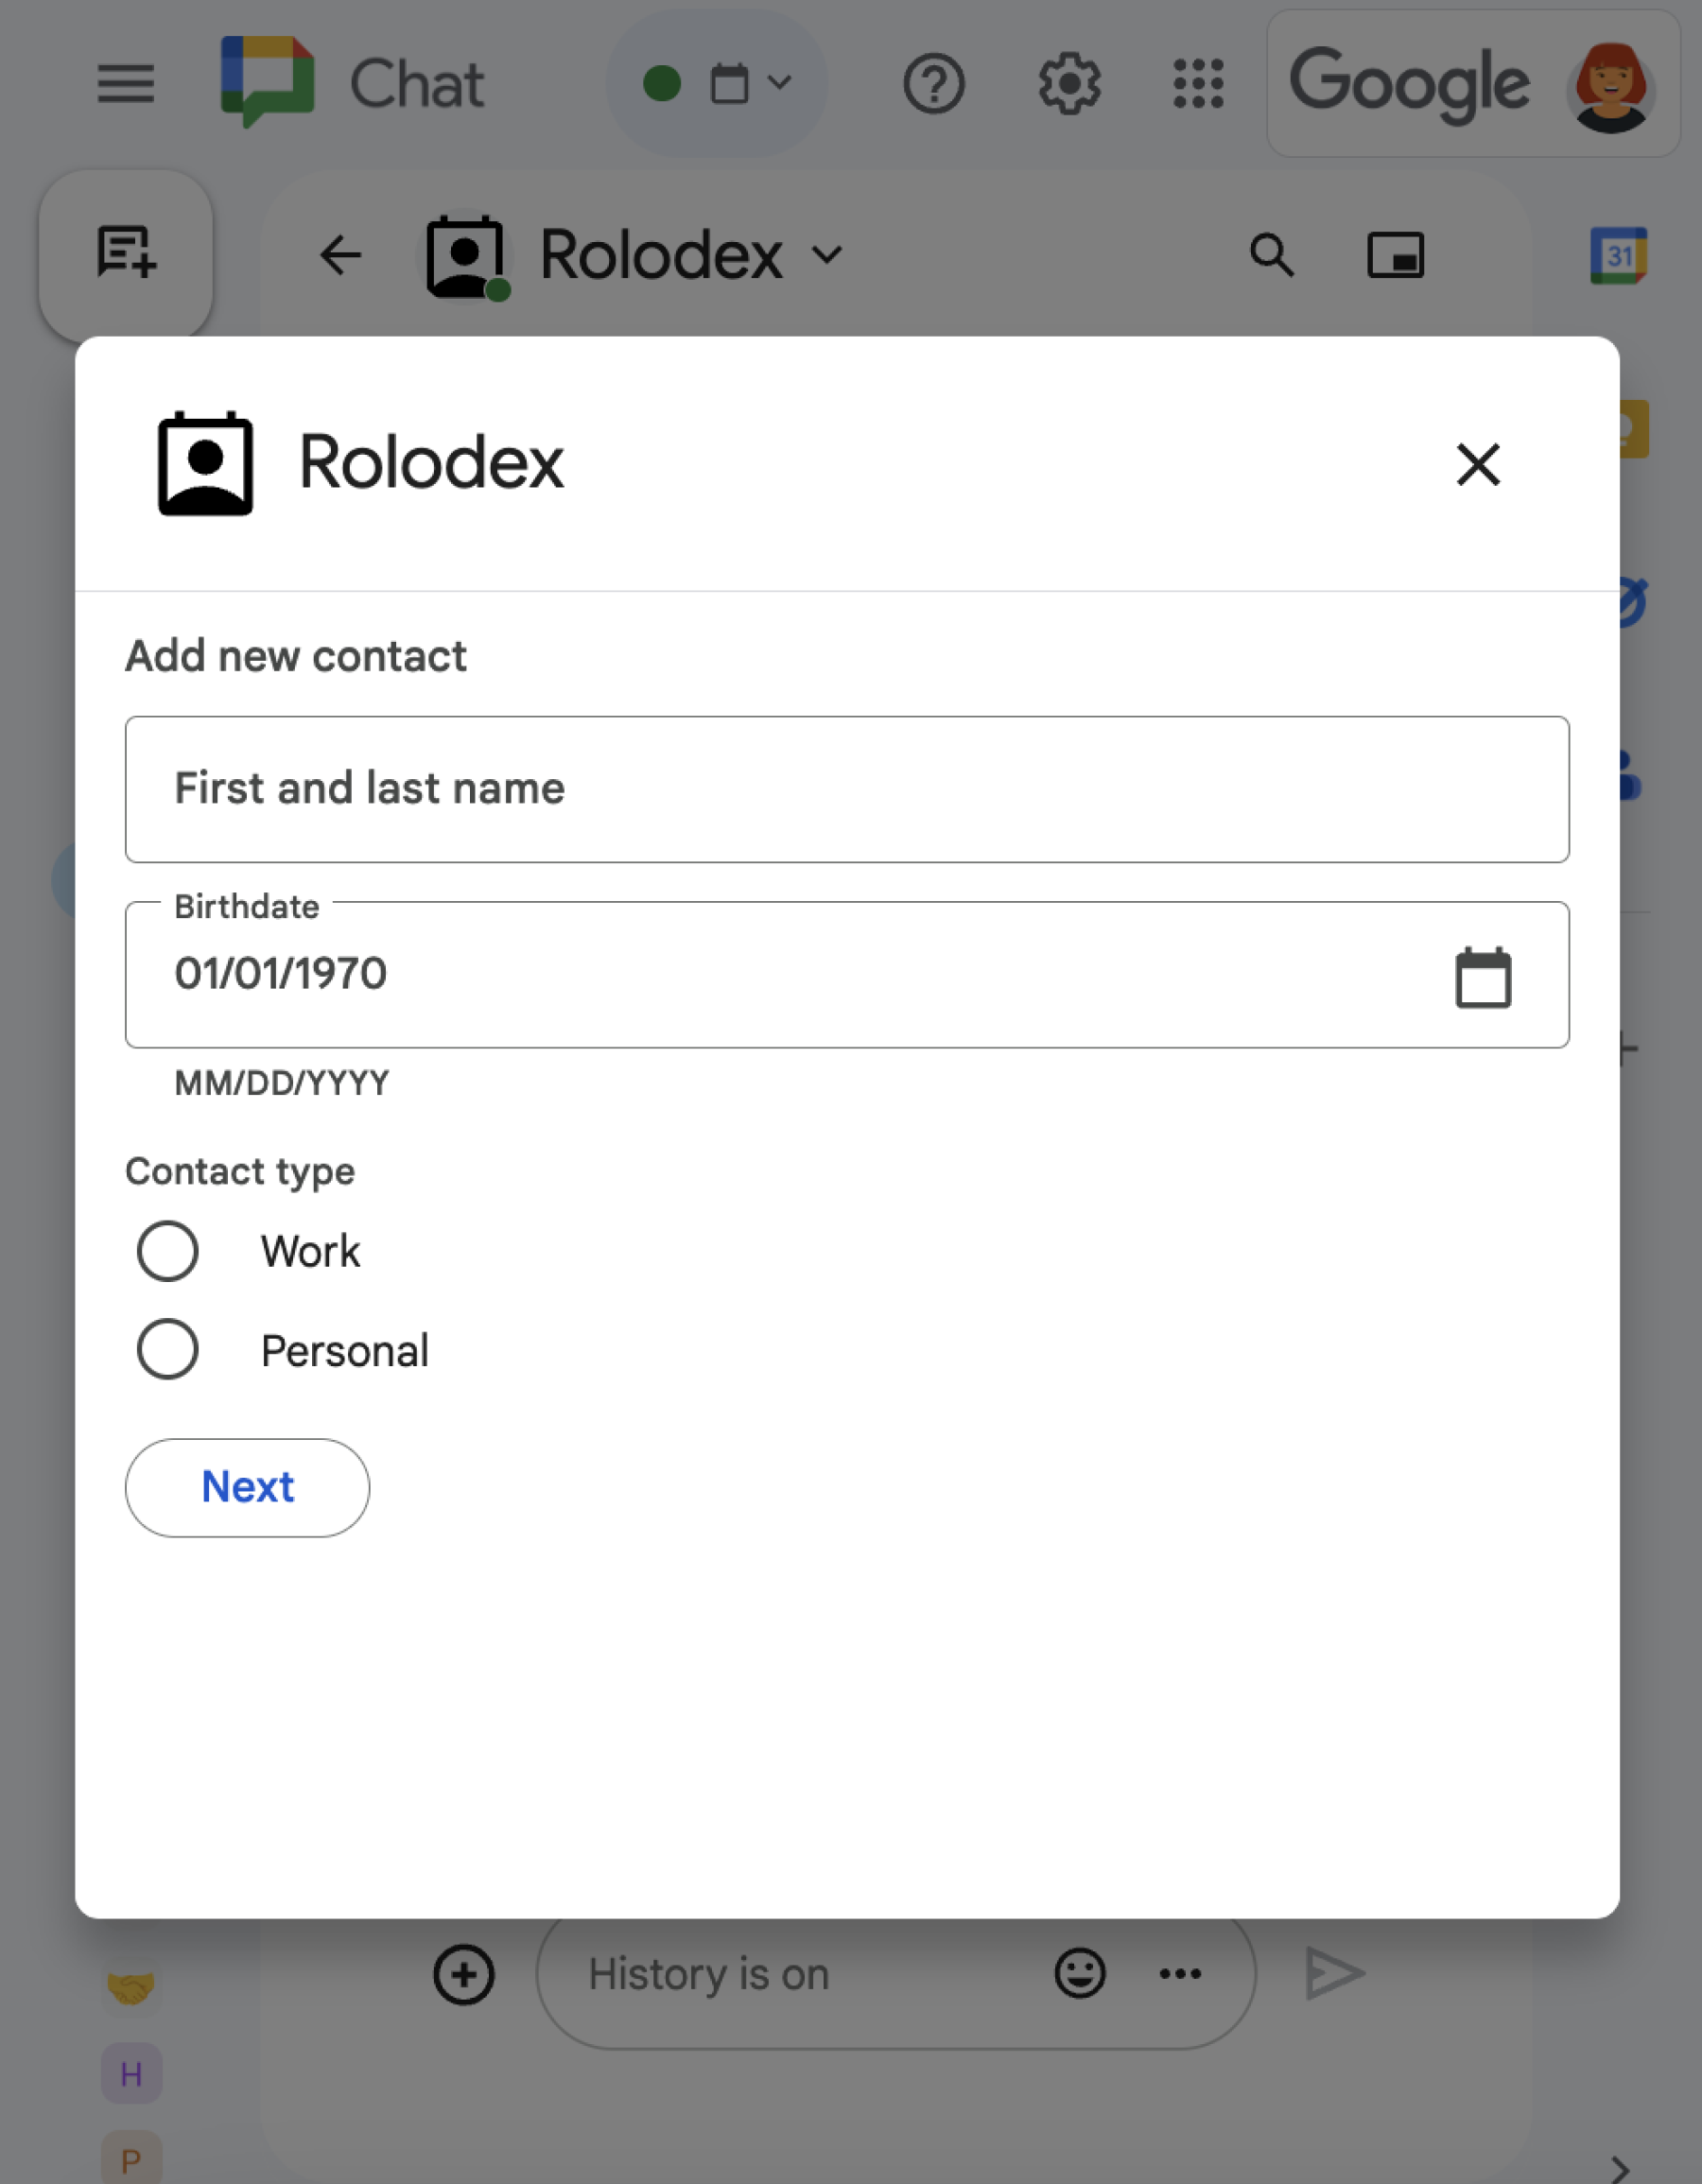
ในตัวอย่างต่อไปนี้ การ์ดจะรวบรวมข้อมูลติดต่อโดยใช้ช่องป้อนข้อความ ตัวเลือกวันที่และเวลา และตัวเลือกการเลือก
ดูตัวอย่างแอป Chat ที่ใช้แบบฟอร์มติดต่อนี้ได้ในโค้ดต่อไปนี้
Node.js
Python
Java
Apps Script
ดูตัวอย่างเพิ่มเติมของวิดเจ็ตแบบอินเทอร์แอกทีฟที่คุณใช้เพื่อรวบรวมข้อมูลได้ที่ ออกแบบการ์ดหรือกล่องโต้ตอบแบบอินเทอร์แอกทีฟ
รับข้อมูลจากวิดเจ็ตแบบอินเทอร์แอกทีฟ
เมื่อใดก็ตามที่ผู้ใช้คลิกปุ่ม แอปใน Chat จะได้รับเหตุการณ์การโต้ตอบ โดยขึ้นอยู่กับตำแหน่งของปุ่ม
หากปุ่มอยู่ในข้อความหรือกล่องโต้ตอบ แอป Chat จะได้รับ
CARD_CLICKEDเหตุการณ์การโต้ตอบ ที่มีข้อมูลเกี่ยวกับการโต้ตอบ เพย์โหลดของCARD_CLICKEDเหตุการณ์การโต้ตอบมีออบเจ็กต์common.formInputsที่มีค่าใดๆ ที่ผู้ใช้ป้อนคุณสามารถดึงค่าจากออบเจ็กต์
common.formInputs.WIDGET_NAMEซึ่ง WIDGET_NAME คือฟิลด์nameที่คุณระบุสำหรับวิดเจ็ต ระบบจะแสดงค่าเป็นประเภทข้อมูลที่เฉพาะเจาะจงสำหรับวิดเจ็ต (แสดงเป็นออบเจ็กต์Inputs)ต่อไปนี้แสดงส่วนหนึ่งของ
CARD_CLICKEDเหตุการณ์การโต้ตอบที่ผู้ใช้ป้อนค่าสําหรับวิดเจ็ตแต่ละรายการHTTP
{
  "type": "CARD_CLICKED",
  "common": { "formInputs": {
    "contactName": { "stringInputs": {
      "value": ["Kai 0"]
    }},
    "contactBirthdate": { "dateInput": {
      "msSinceEpoch": 1000425600000
    }},
    "contactType": { "stringInputs": {
      "value": ["Personal"]
    }}
  }}
}
Apps Script
{ "type": "CARD_CLICKED", "common": { "formInputs": { "contactName": { "": { "stringInputs": { "value": ["Kai 0"] }}}, "contactBirthdate": { "": { "dateInput": { "msSinceEpoch": 1000425600000 }}}, "contactType": { "": { "stringInputs": { "value": ["Personal"] }}} }} }หากปุ่มอยู่ในหน้าแรก แอปแชทจะได้รับ
SUBMIT_FORMเหตุการณ์การโต้ตอบ เพย์โหลดของเหตุการณ์การโต้ตอบมีออบเจ็กต์commonEventObject.formInputsที่มีค่าใดก็ได้ที่ผู้ใช้ป้อนคุณสามารถดึงค่าจากออบเจ็กต์
commonEventObject.formInputs.WIDGET_NAMEซึ่ง WIDGET_NAME คือฟิลด์nameที่คุณระบุสำหรับวิดเจ็ต ระบบจะแสดงค่าเป็นประเภทข้อมูลที่เฉพาะเจาะจงสำหรับวิดเจ็ต (แสดงเป็นออบเจ็กต์Inputs)ต่อไปนี้แสดงส่วนหนึ่งของ
SUBMIT_FORMเหตุการณ์การโต้ตอบที่ผู้ใช้ป้อนค่าสําหรับวิดเจ็ตแต่ละรายการHTTP
{
  "type": "SUBMIT_FORM",
  "commonEventObject": { "formInputs": {
    "contactName": { "stringInputs": {
      "value": ["Kai 0"]
    }},
    "contactBirthdate": { "dateInput": {
      "msSinceEpoch": 1000425600000
    }},
    "contactType": { "stringInputs": {
      "value": ["Personal"]
    }}
  }}
}
Apps Script
{
  "type": "SUBMIT_FORM",
  "commonEventObject": { "formInputs": {
    "contactName": { "": { "stringInputs": {
      "value": ["Kai 0"]
    }}},
    "contactBirthdate": { "": { "dateInput": {
      "msSinceEpoch": 1000425600000
    }}},
      "contactType": { "": { "stringInputs": {
      "value": ["Personal"]
    }}}
  }}
}
หากต้องการรับข้อมูล แอป Chat จะจัดการเหตุการณ์การโต้ตอบเพื่อรับค่าที่ผู้ใช้ป้อนลงในวิดเจ็ต ตารางต่อไปนี้แสดงวิธีรับค่าสำหรับวิดเจ็ตอินพุตแบบฟอร์มที่กำหนด สําหรับวิดเจ็ตแต่ละรายการ ตารางจะแสดงประเภทข้อมูลที่วิดเจ็ตยอมรับ ตําแหน่งที่จัดเก็บค่า ในเหตุการณ์การโต้ตอบ และค่าตัวอย่าง
| วิดเจ็ตอินพุตแบบฟอร์ม | ประเภทของข้อมูลอินพุต | ค่าอินพุตจากเหตุการณ์การโต้ตอบ | ค่าตัวอย่าง |
|---|---|---|---|
textInput |
stringInputs |
event.common.formInputs.contactName.stringInputs.value[0] |
Kai O |
selectionInput |
stringInputs |
หากต้องการรับค่าแรกหรือค่าเดียว ให้ใช้ event.common.formInputs.contactType.stringInputs.value[0] |
Personal |
dateTimePicker ที่ยอมรับเฉพาะวันที่ |
dateInput |
event.common.formInputs.contactBirthdate.dateInput.msSinceEpoch |
1000425600000 |
โอนข้อมูลไปยังบัตรอื่น
หลังจากที่ผู้ใช้ส่งข้อมูลจากบัตรแล้ว คุณอาจต้องส่งบัตรเพิ่มเติมเพื่อทำสิ่งต่อไปนี้
- ช่วยให้ผู้ใช้กรอกแบบฟอร์มที่ยาวขึ้นได้โดยการสร้างส่วนที่แตกต่างกัน
- ให้ผู้ใช้ดูตัวอย่างและยืนยันข้อมูลจากการ์ดเริ่มต้น เพื่อให้ผู้ใช้ตรวจสอบคำตอบก่อนส่งได้
- ป้อนข้อมูลส่วนที่เหลือของแบบฟอร์มแบบไดนามิก ตัวอย่างเช่น หากต้องการแจ้งให้ ผู้ใช้สร้างการนัดหมาย แอป Chat อาจ แสดงการ์ดเริ่มต้นที่ขอเหตุผลในการนัดหมาย และ จากนั้นจะแสดงการ์ดอีกใบที่ระบุเวลาที่ว่างตาม ประเภทการนัดหมาย
หากต้องการโอนข้อมูลที่ป้อนจากการ์ดเริ่มต้น คุณสามารถสร้างวิดเจ็ต button
ด้วย actionParameters
ที่มี name ของวิดเจ็ตและค่าที่ผู้ใช้ป้อน ดังที่แสดง
ในตัวอย่างต่อไปนี้
Node.js
Python
Java
Apps Script
เมื่อผู้ใช้คลิกปุ่ม แอป Chat จะได้รับCARD_CLICKEDเหตุการณ์การโต้ตอบที่คุณสามารถรับข้อมูลได้
ตอบกลับการส่งแบบฟอร์ม
หลังจากได้รับข้อมูลจากข้อความการ์ดหรือกล่องโต้ตอบแล้ว แอป Chat จะตอบกลับโดยการรับทราบการรับหรือ แสดงข้อผิดพลาด
ในตัวอย่างต่อไปนี้ แอป Chat จะส่งข้อความ เพื่อยืนยันว่าได้รับแบบฟอร์มที่ส่งจากกล่องโต้ตอบหรือข้อความ การ์ดเรียบร้อยแล้ว
Node.js
Python
Java
Apps Script
หากต้องการประมวลผลและปิดกล่องโต้ตอบ คุณต้องส่งคืนออบเจ็กต์
ActionResponse
ที่ระบุว่าคุณต้องการส่งข้อความยืนยัน อัปเดต
ข้อความหรือการ์ดเดิม หรือเพียงแค่ปิดกล่องโต้ตอบ ดูขั้นตอนได้ที่หัวข้อ
ปิดกล่องโต้ตอบ
แก้ปัญหา
เมื่อแอป Google Chat หรือการ์ดแสดงข้อผิดพลาด อินเทอร์เฟซของ Chat จะแสดงข้อความว่า "เกิดข้อผิดพลาด" หรือ "ดำเนินการตามคำขอของคุณไม่ได้" บางครั้ง UI ของ Chat อาจไม่แสดงข้อความแสดงข้อผิดพลาดใดๆ แต่แอปหรือการ์ด Chat อาจให้ผลลัพธ์ที่ไม่คาดคิด เช่น ข้อความในการ์ดอาจไม่ปรากฏ
แม้ว่าข้อความแสดงข้อผิดพลาดอาจไม่แสดงใน UI ของ Chat แต่ข้อความแสดงข้อผิดพลาดและข้อมูลบันทึกที่อธิบายไว้จะช่วยคุณแก้ไขข้อผิดพลาดได้เมื่อเปิดการบันทึกข้อผิดพลาดสำหรับแอป Chat หากต้องการความช่วยเหลือในการดู การแก้ไขข้อบกพร่อง และการแก้ไขข้อผิดพลาด โปรดดู แก้ปัญหาและแก้ไขข้อผิดพลาดของ Google Chat
หัวข้อที่เกี่ยวข้อง
- ดูตัวอย่าง Contact Manager ซึ่งเป็นแอป Chat ที่แจ้งให้ผู้ใช้กรอก แบบฟอร์มติดต่อจากข้อความในการ์ดและกล่องโต้ตอบ
- เปิดกล่องโต้ตอบแบบอินเทอร์แอกทีฟ
