在 Google Chat 中收集和管理联系人

本教程将展示如何构建一个 Google Chat 扩展应用,以帮助 Google Chat 用户管理个人和工作联系人。为了收集信息,Chat 扩展应用会提示用户在卡片消息和对话框中填写联系人表单。

请观看 Chat 扩展应用的实际运行情况:

  • 通过斜杠命令打开联系表单。
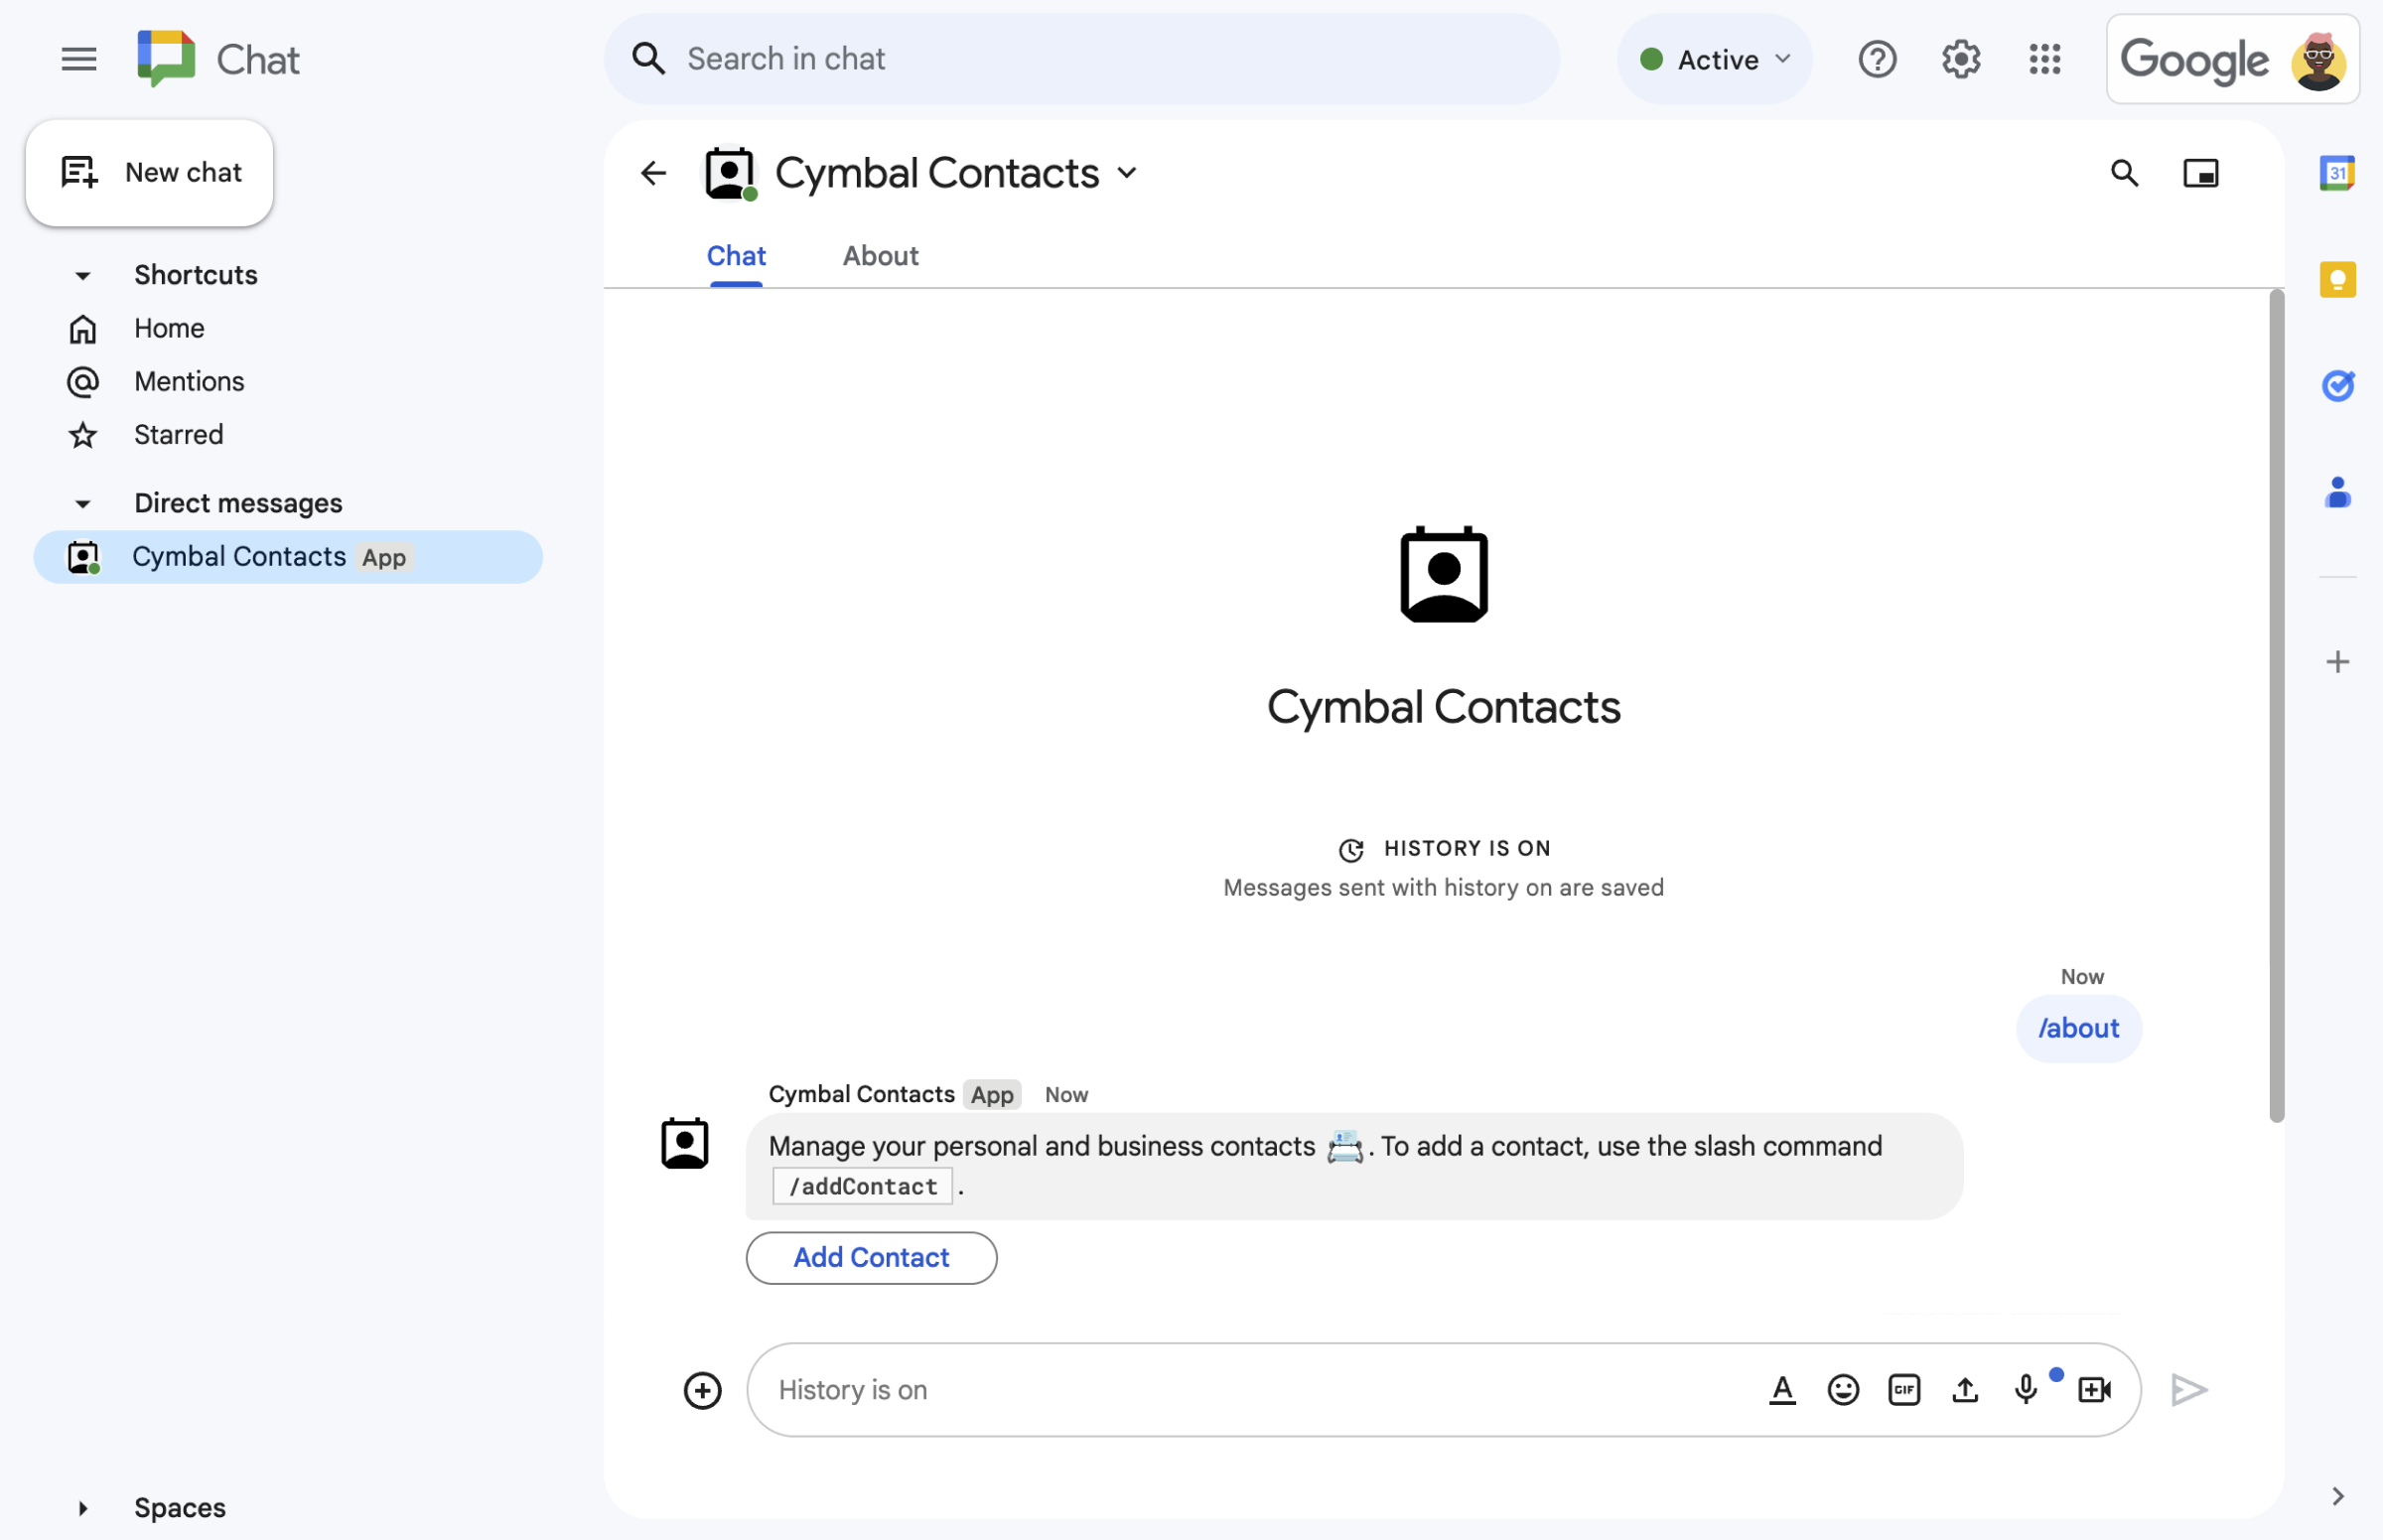
    图 1.Chat 扩展应用会使用文本消息和按钮来响应斜杠命令 /about,该按钮可打开联系人表单。
  • 对话框中的联系表单。
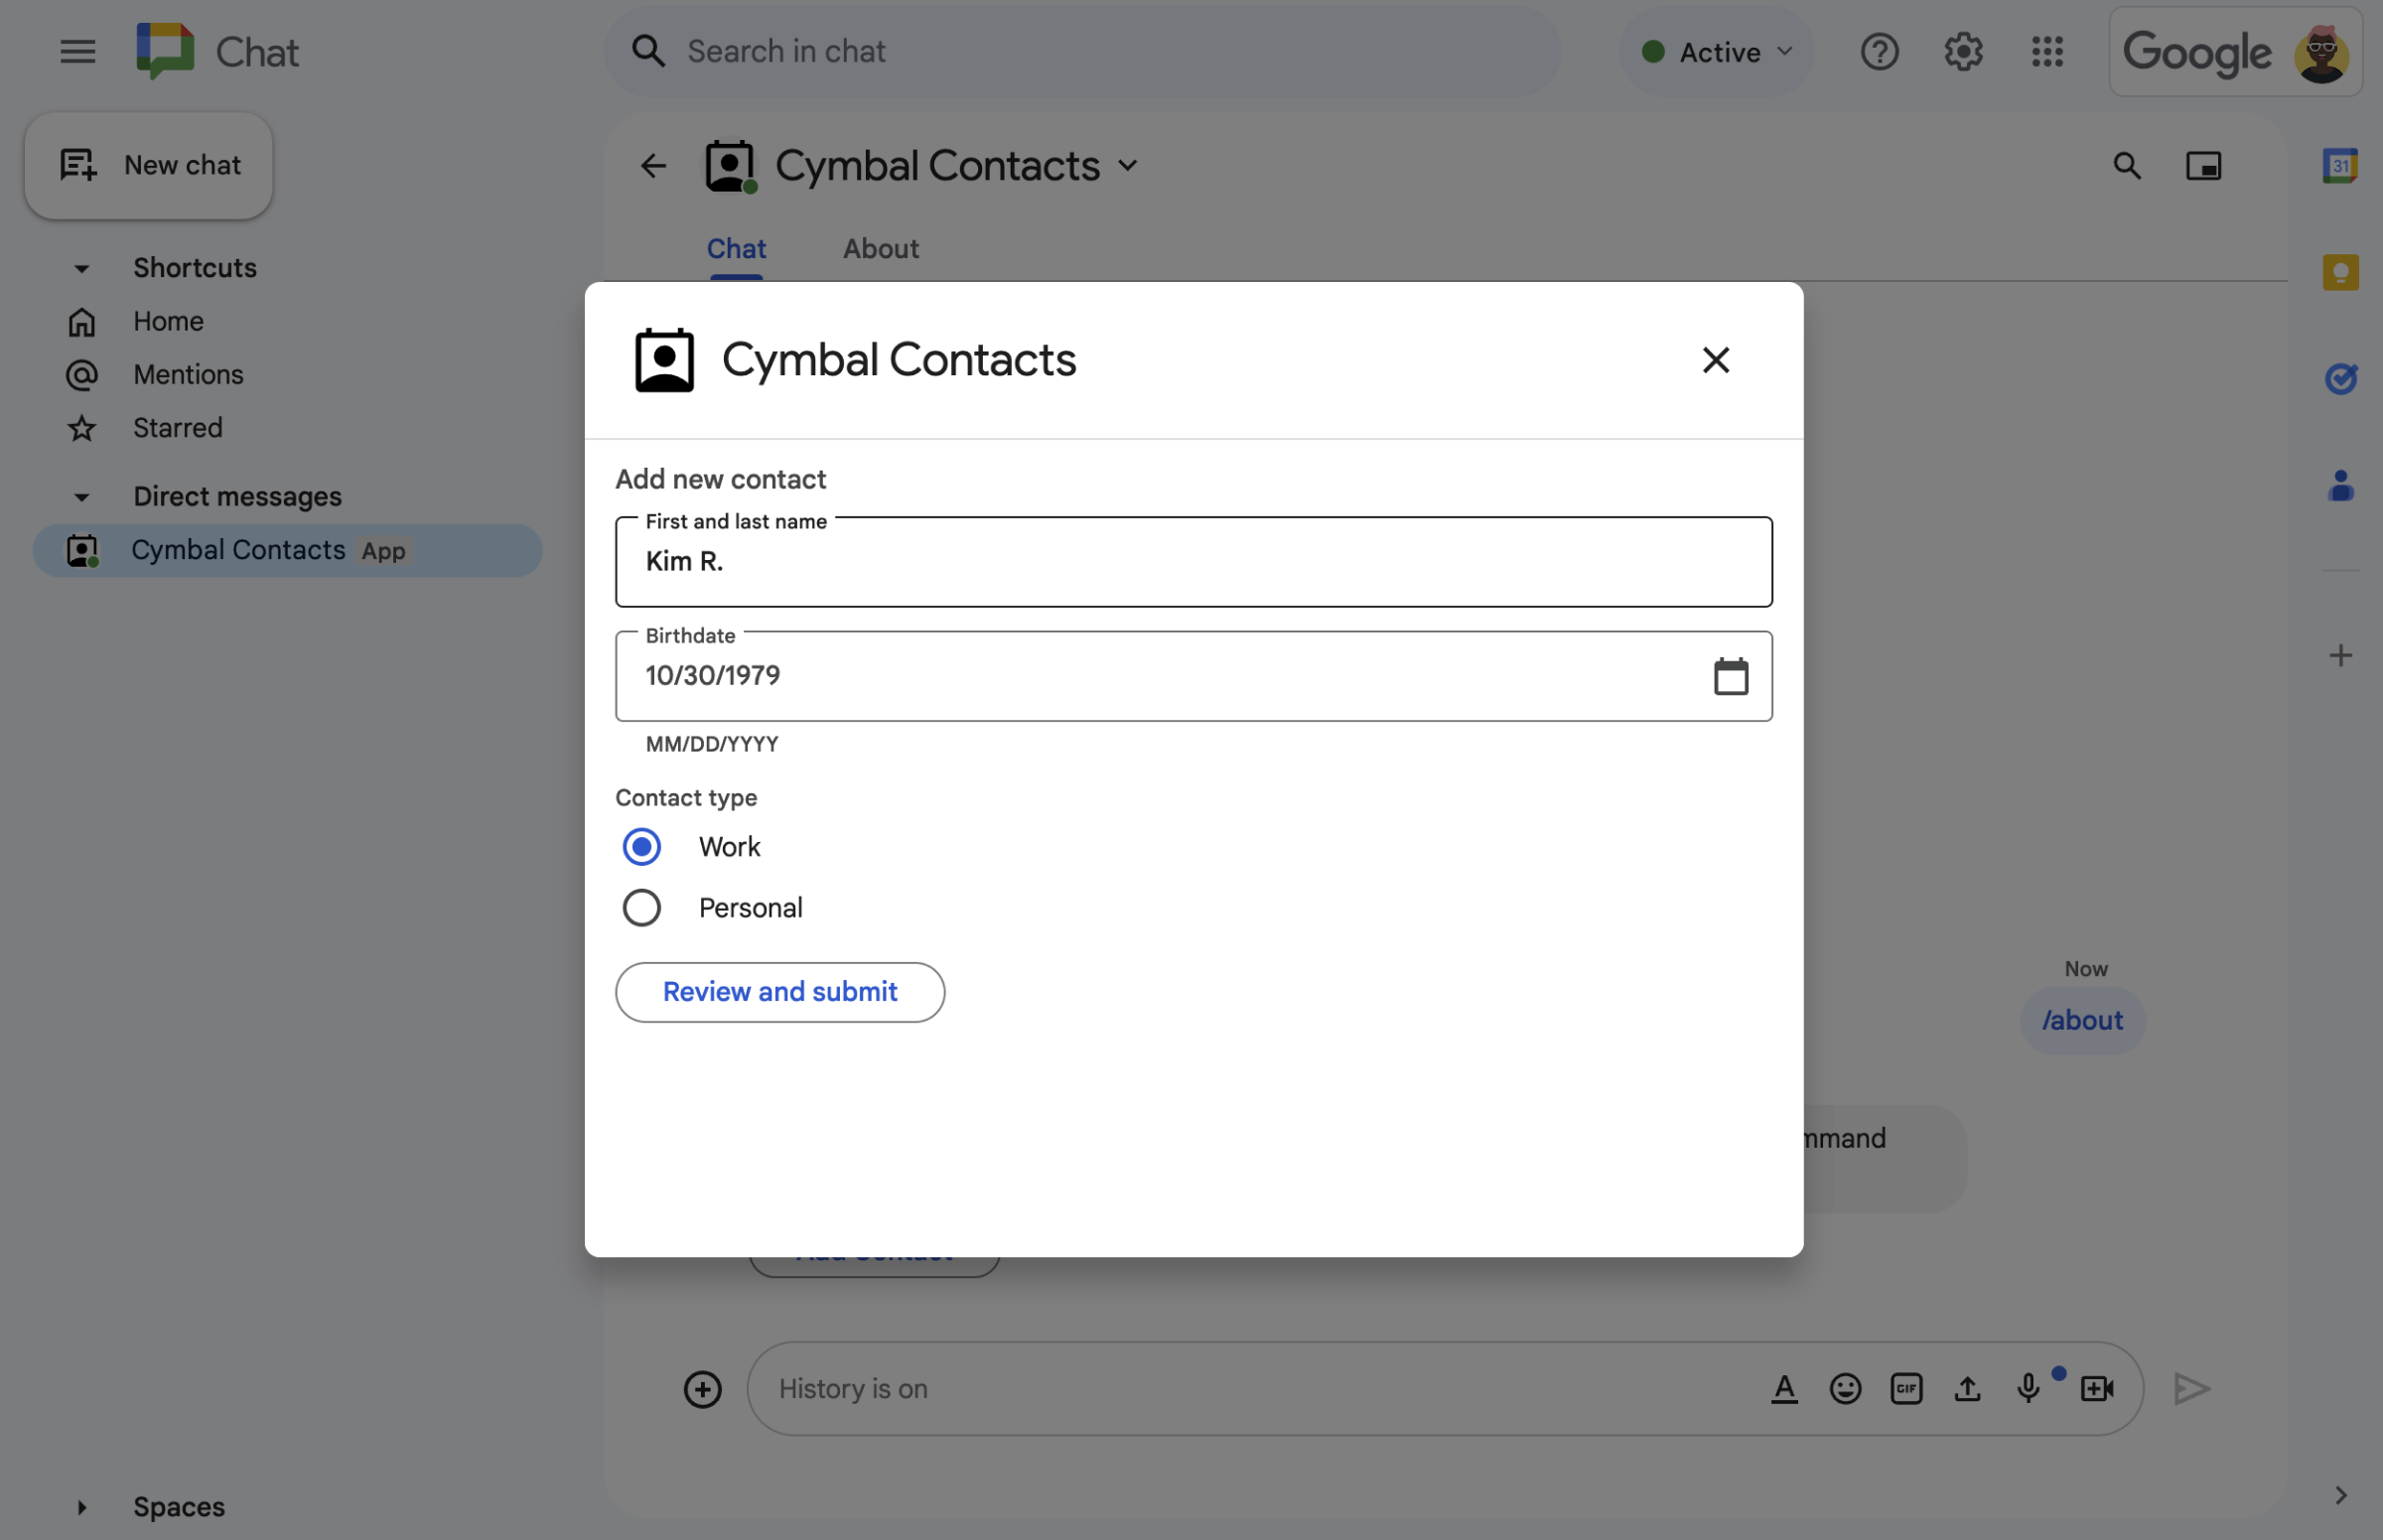
    图 2.Chat 扩展应用会打开一个对话框,用户可以在其中输入联系人的相关信息。
  • 确认和查看对话框。
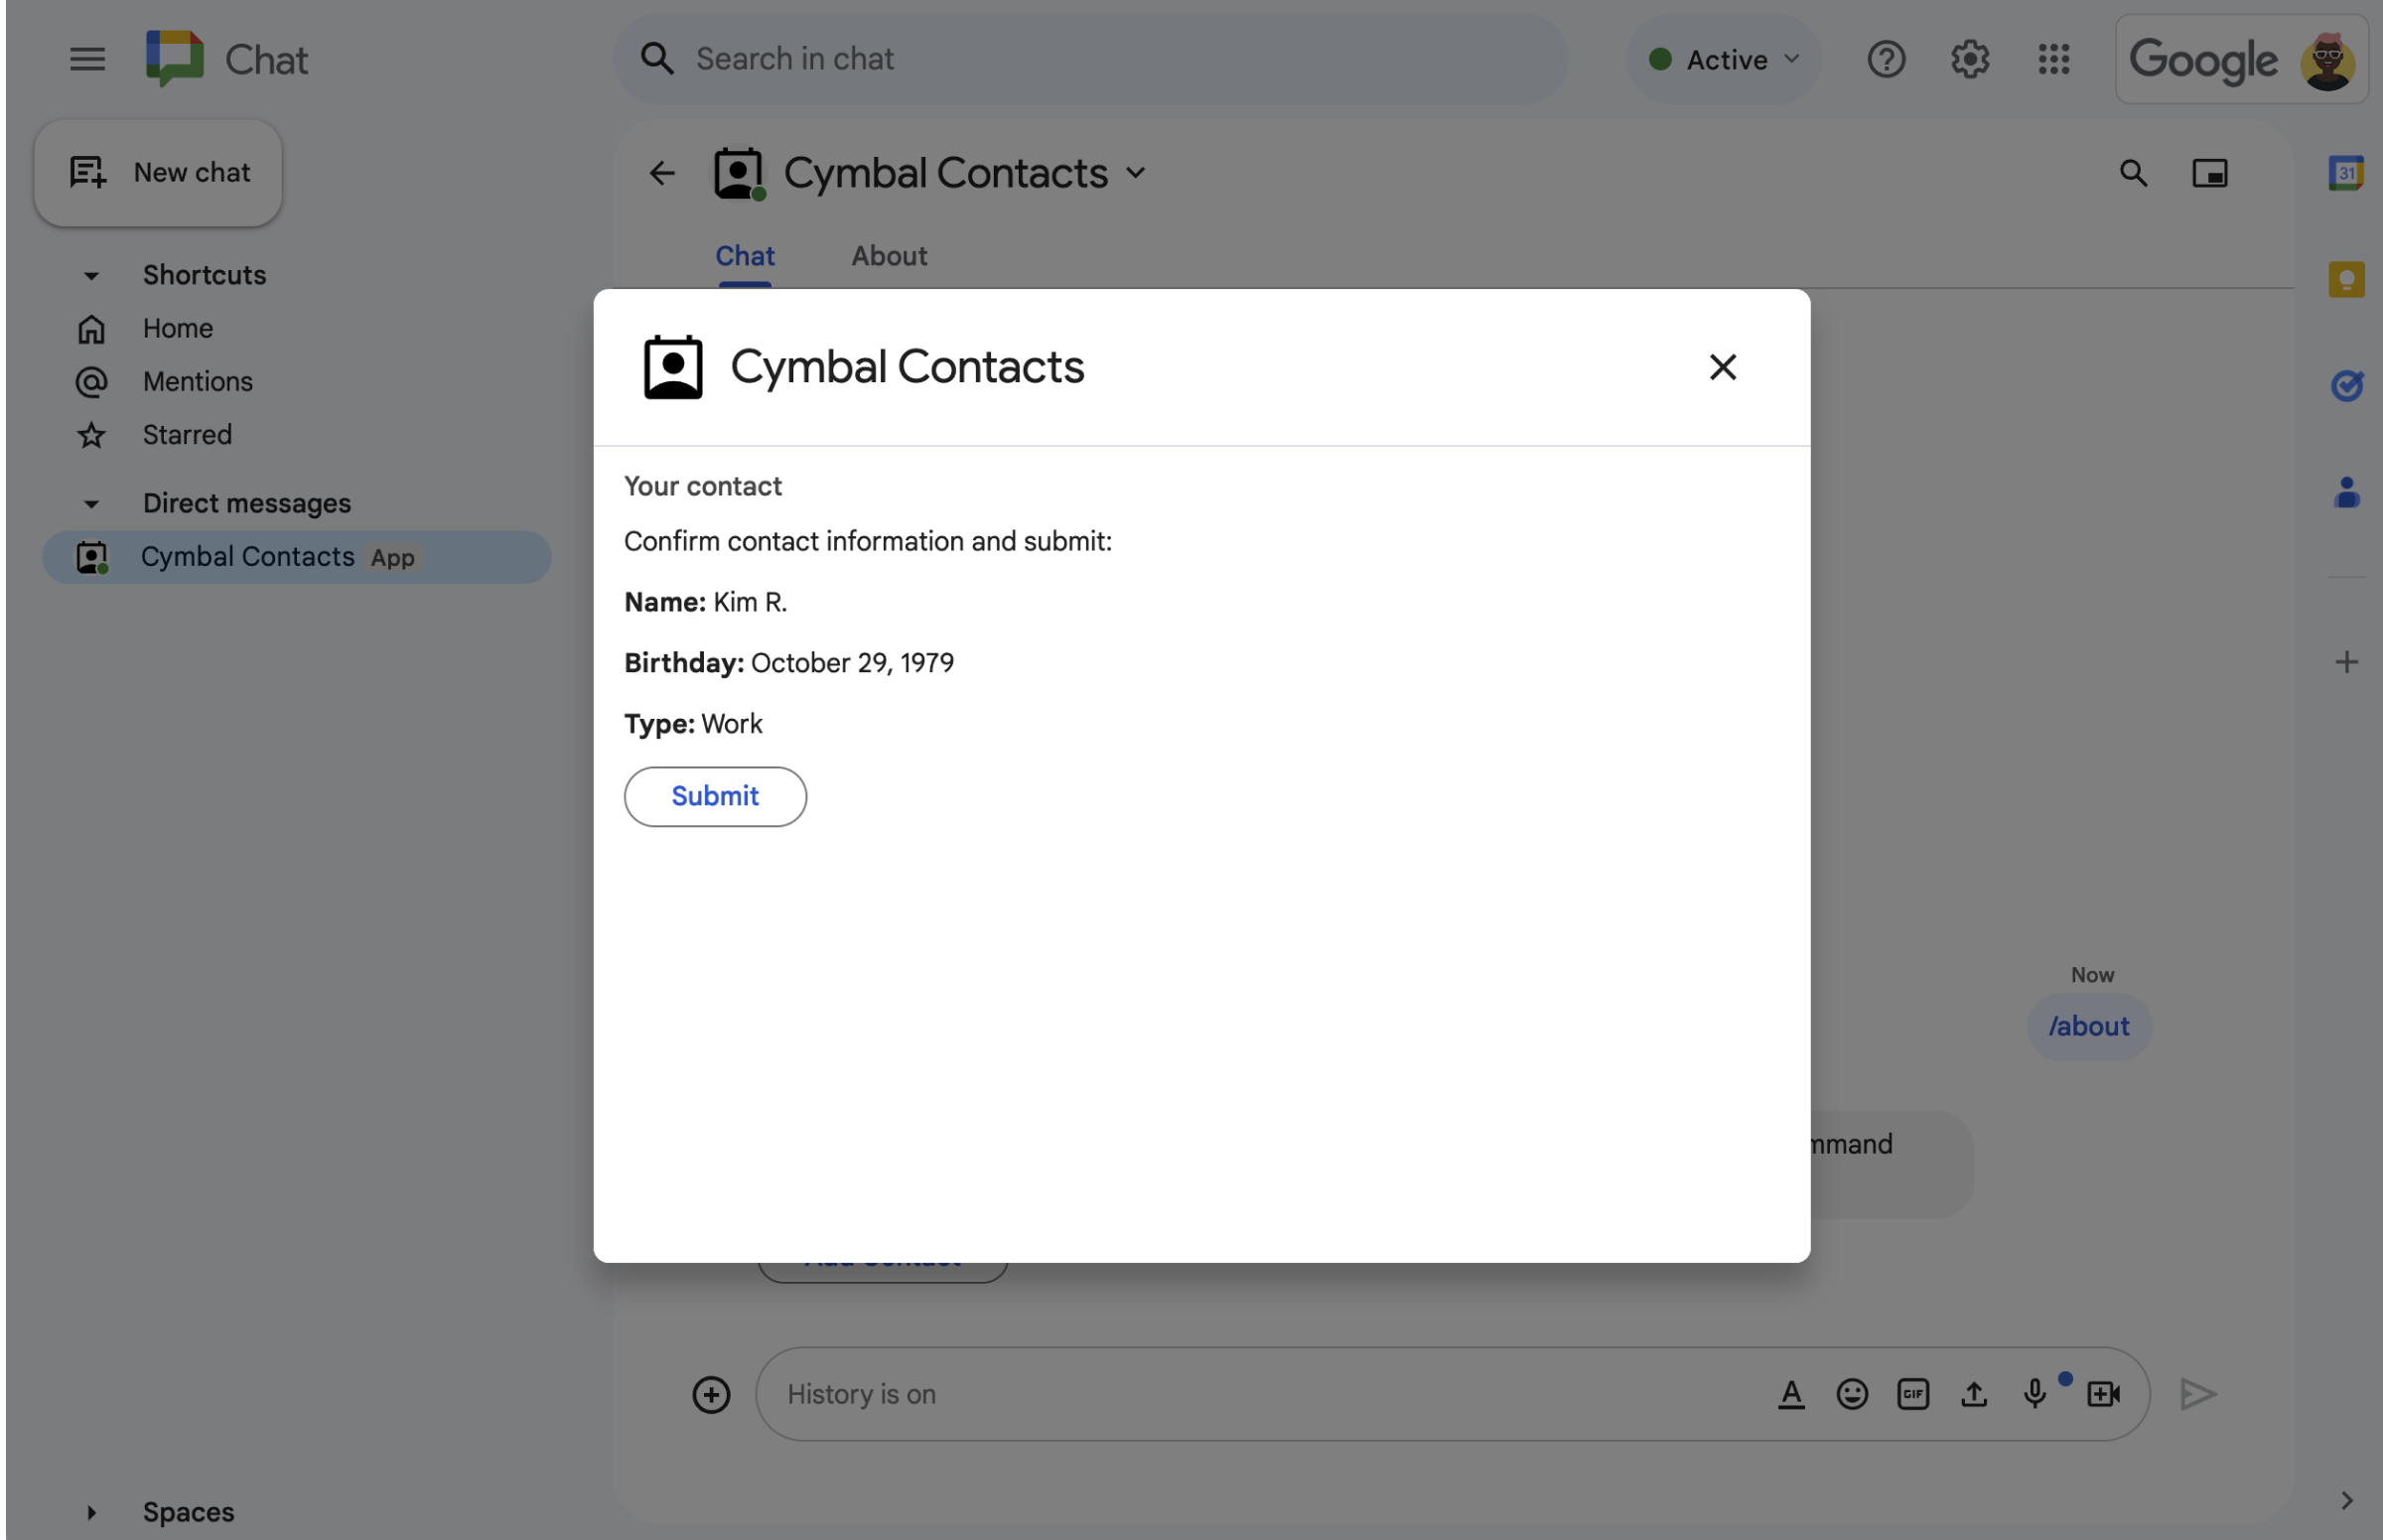
    图 3.Chat 扩展应用会返回一个确认对话框,以便用户在提交之前查看并确认信息。
  • 确认新联系人的短信。
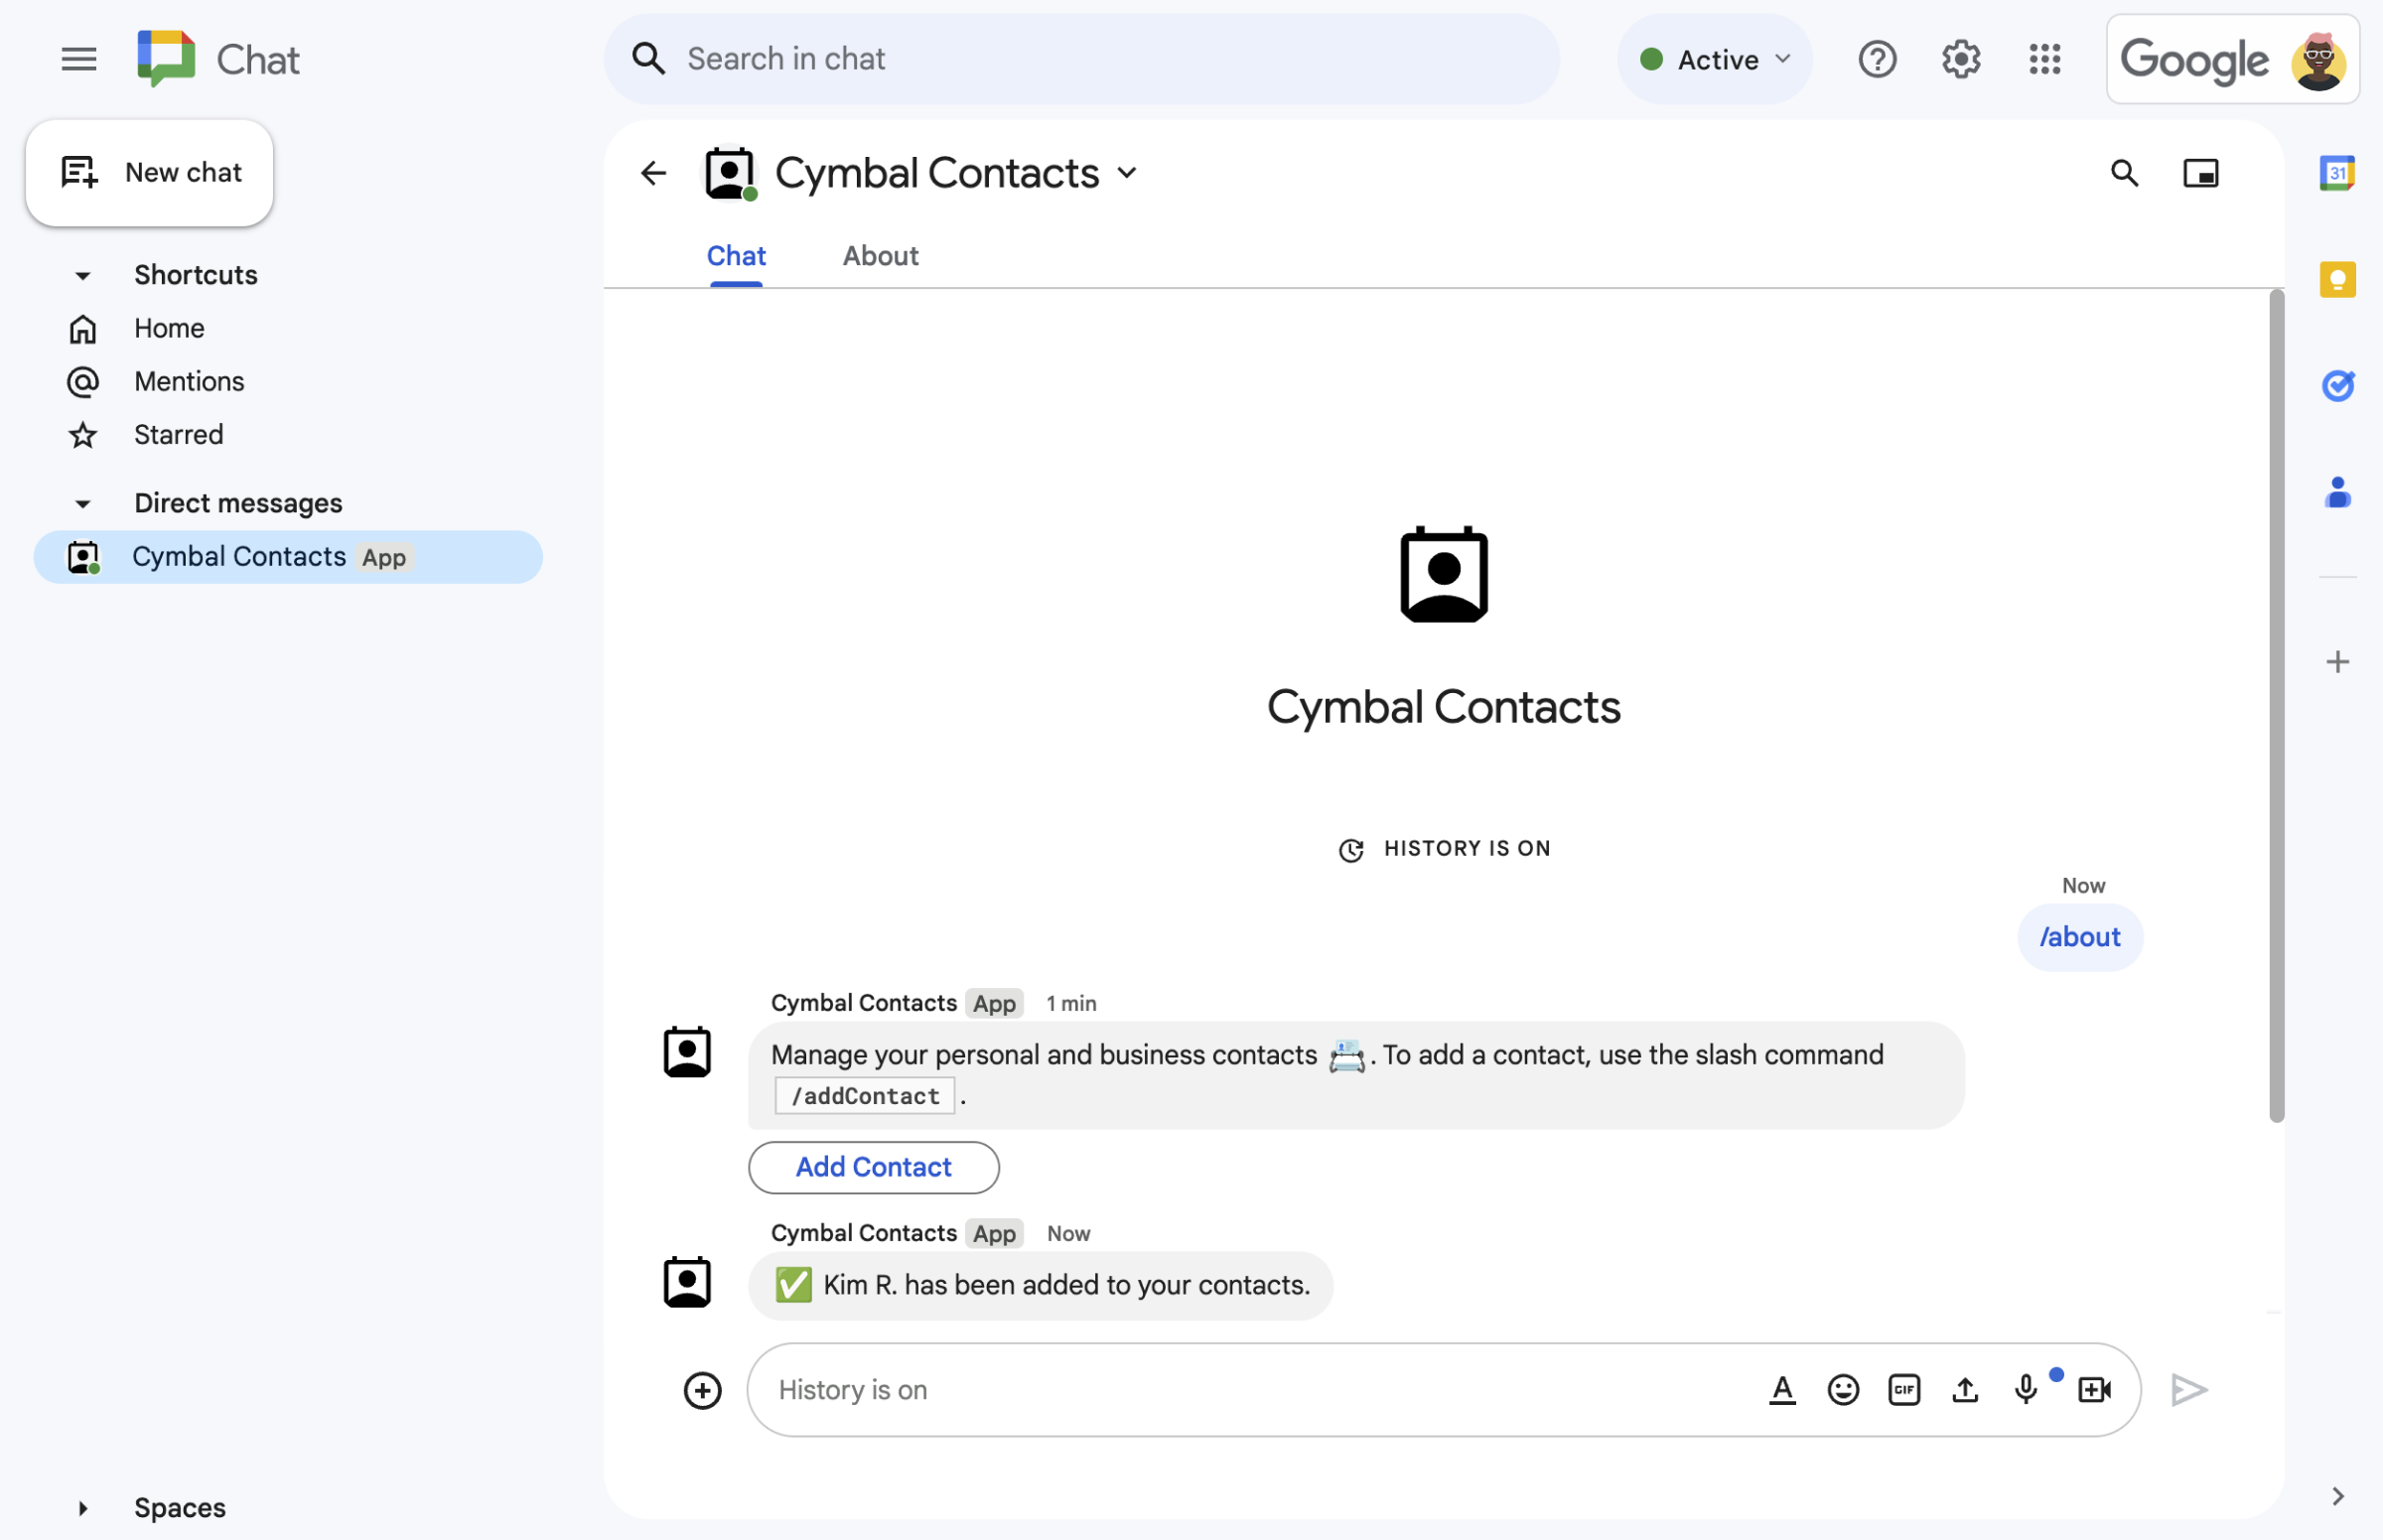
    图 4.用户提交表单后,Chat 扩展应用会发送一条私密文本消息来确认提交。
  • 卡片消息中的联系表单。
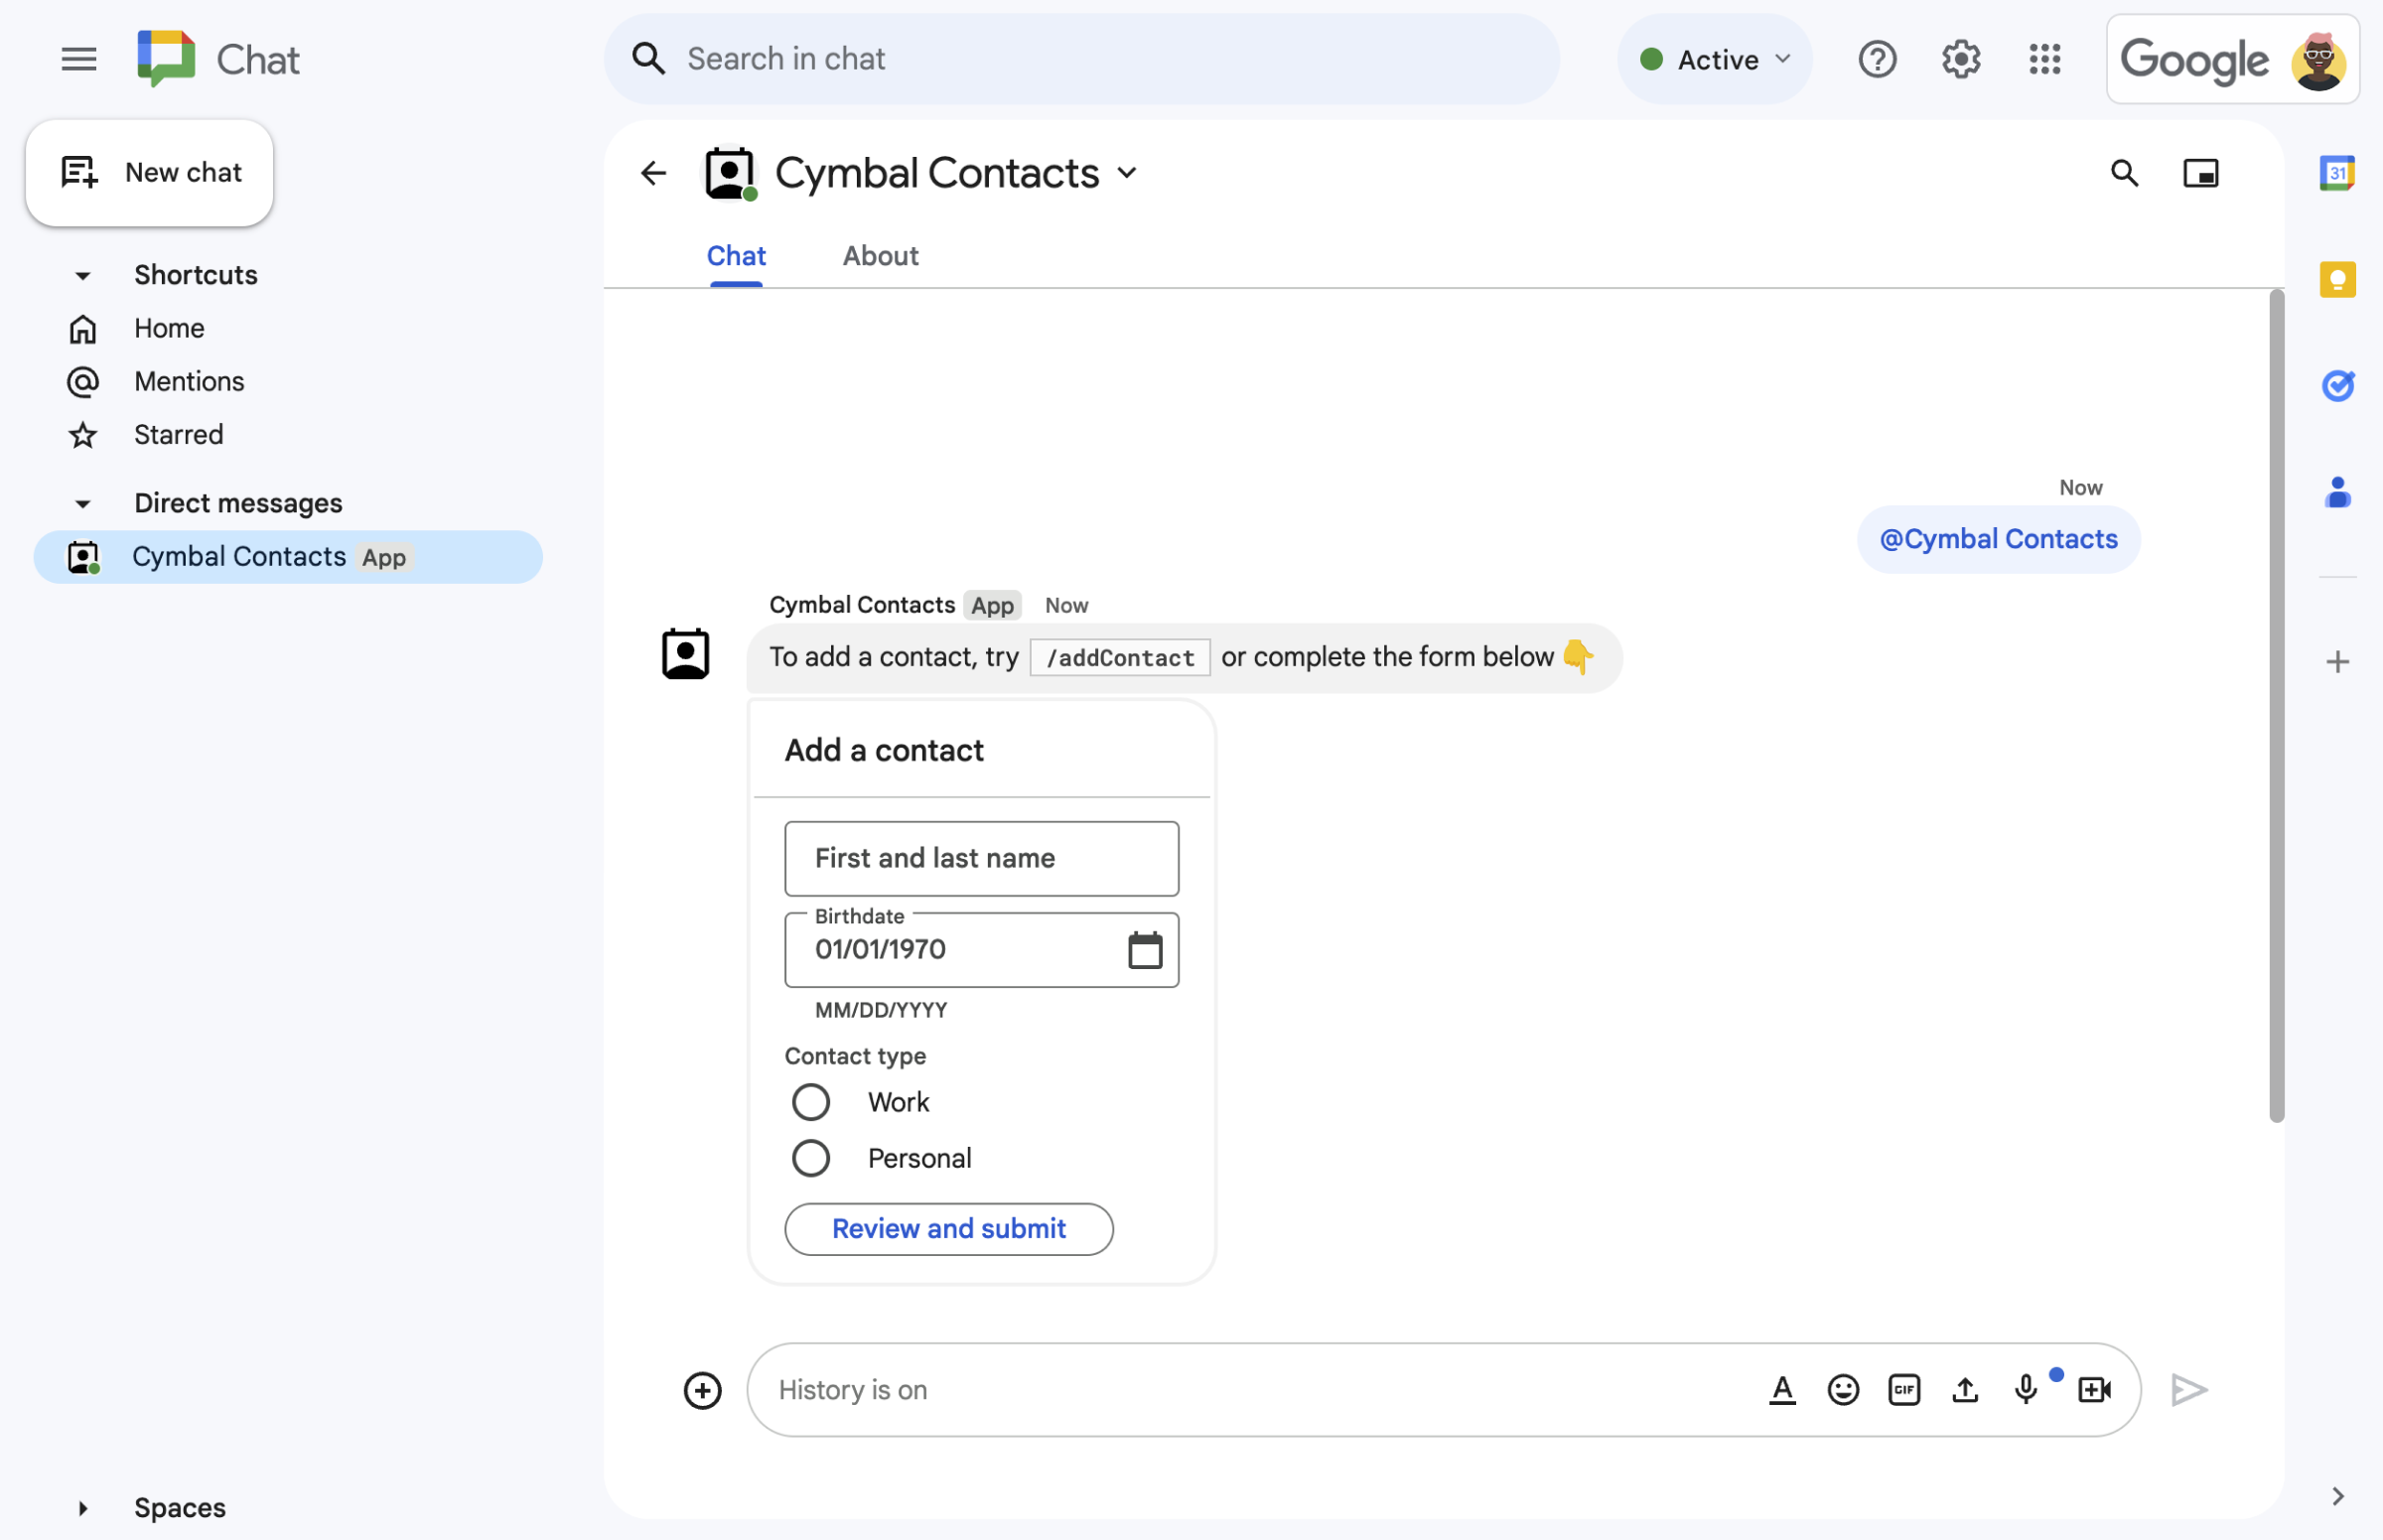
    图 5.Chat 扩展应用还会提示用户从消息中的卡片添加联系人。

前提条件

目标

架构

Chat 扩展应用是在 Google Apps 脚本中构建的,并使用 互动事件来处理 和响应 Chat 用户。

以下内容展示了用户通常如何与 Chat 扩展应用互动:

  1. 用户打开与 Chat 扩展应用的私信对话,或将 Chat 扩展应用添加到现有聊天室。

  2. Chat 扩展应用会构建并显示联系人表单作为 card 对象,以提示用户添加联系人。为了显示联系人表单,Chat 扩展应用会通过以下方式响应用户:

    • 使用包含联系人表单的卡片消息来响应 @提及和私信。
    • 通过打开包含联系人表单的对话框来响应斜杠命令 /addContact
    • 使用包含添加联系人 按钮的文本消息来响应斜杠命令 /about,用户可以点击该按钮来打开包含联系人表单的对话框。
  3. 当用户看到联系人表单时,会在以下字段和微件中输入联系人信息:

    • 名字和姓氏:一个 textInput 接受字符串的微件。
    • 出生日期:一个仅接受日期的 dateTimePicker 微件。
    • 联系人类型:一个 selectionInput 单选按钮微件,可让用户选择并提交单个字符串 值(PersonalWork)。
    • 查看并提交 按钮:一个 buttonList 包含 button 微件的 数组,用户点击该微件即可提交输入的值。
  4. Google Chat 扩展应用会处理 CARD_CLICKED 互动事件,以处理用户输入的值,并在确认卡片中显示这些值。

  5. 用户查看确认卡片,然后点击提交 按钮以最终确定联系人信息。

  6. Google Chat 应用会发送一条私密文本消息来确认提交。

准备环境

本部分将介绍如何为 Chat 应用配置 Google Cloud 项目。

在 Google API 控制台中打开云项目

如果尚未打开,请打开您打算用于此示例的 Cloud 项目:

  1. 在 Google API 控制台中,前往选择项目 页面。

    选择 Cloud 项目

  2. 选择您要使用的 Google Cloud 项目。或者,点击创建项目 ,然后按照屏幕上的说明操作。如果您创建了 Google Cloud 项目,可能需要为该项目启用结算功能

设置身份验证和授权

Google Chat 扩展应用要求您配置一 个 OAuth 权限请求页面,以便 用户可以在 Google Workspace 应用(包括 Google Chat)中授权您的应用。

在本教程中,您部署的 Chat 扩展应用仅用于测试和内部使用,因此可以使用占位符信息作为权限请求页面。在发布 Chat 扩展应用之前,请将所有占位符信息替换为真实信息。

  1. 在 Google API 控制台中,依次点击“菜单”图标 > Google Auth 平台 > 品牌宣传

    前往“品牌宣传”

  2. 如果您已配置 Google Auth 平台,则可以在 以下 OAuth 权限请求页面设置中配置 品牌宣传受众群体数据访问权限。 如果您看到一条消息,提示 尚未配置 Google Auth 平台, 请点击开始使用

    1. 应用信息 下的应用名称 中,输入 Contact Manager
    2. 用户支持邮箱 中,选择您的电子邮件地址或相应的 Google 群组。
    3. 点击下一步
    4. 受众群体 下,选择内部 。如果您无法选择 内部,请选择外部
    5. 点击下一步
    6. 联系信息下,输入一个电子邮件地址,以便在您的项目发生任何更改时 收到通知。
    7. 点击下一步
    8. 完成 下,查看 Google API 服务用户数据政策 ,如果您同意该政策,请选择 我同意 Google API 服务:用户数据政策
    9. 点击继续
    10. 点击创建
    11. 如果您为用户类型选择了外部 ,请添加测试用户:
      1. 点击受众群体
      2. 测试用户 下,点击 Add users (添加用户)。
      3. 输入您的电子邮件地址和任何其他已获授权的测试用户,然后点击保存

创建和部署 Chat 扩展应用

在以下部分中,您将复制并更新包含 Chat 扩展应用所需的所有应用代码的整个 Apps 脚本项目,因此无需复制和粘贴每个文件。

您还可以选择在 GitHub 上查看整个项目。

在 GitHub 上查看

以下是每个文件的概览:

main.gs

处理所有应用逻辑,包括用户何时向 Chat 应用发送消息、点击 Chat 应用消息中的按钮或打开和关闭对话框的相关互动事件。

查看 main.gs 代码

apps-script/contact-form-app/main.gs
/**
 * Copyright 2024 Google Inc.
 *
 * Licensed under the Apache License, Version 2.0 (the "License");
 * you may not use this file except in compliance with the License.
 * You may obtain a copy of the License at
 *
 * http://www.apache.org/licenses/LICENSE-2.0
 *
 * Unless required by applicable law or agreed to in writing, software
 * distributed under the License is distributed on an "AS IS" BASIS,
 * WITHOUT WARRANTIES OR CONDITIONS OF ANY KIND, either express or implied.
 * See the License for the specific language governing permissions and
 * limitations under the License.
 */

/**
 * Responds to a MESSAGE interaction event in Google Chat.
 *
 * @param {Object} event the MESSAGE interaction event from Chat API.
 * @return {Object} message response that opens a dialog or sends private
 *                          message with text and card.
 */
function onMessage(event) {
  if (event.message.slashCommand) {
    switch (event.message.slashCommand.commandId) {
      case 1:
        // If the slash command is "/about", responds with a text message and button
        // that opens a dialog.
        return {
          text: "Manage your personal and business contacts 📇. To add a " +
                  "contact, use the slash command `/addContact`.",
          accessoryWidgets: [{
            buttonList: { buttons: [{
              text: "Add Contact",
              onClick: { action: {
                function: "openInitialDialog",
                interaction: "OPEN_DIALOG"
              }}
            }]}
          }]
        }
      case 2:
        // If the slash command is "/addContact", opens a dialog.
        return openInitialDialog();
    }
  }

  // If user sends the Chat app a message without a slash command, the app responds
  // privately with a text and card to add a contact.
  return {
    privateMessageViewer: event.user,
    text: "To add a contact, try `/addContact` or complete the form below:",
    cardsV2: [{
      cardId: "addContactForm",
      card: {
        header: { title: "Add a contact" },
        sections:[{ widgets: CONTACT_FORM_WIDGETS.concat([{
          buttonList: { buttons: [{
            text: "Review and submit",
            onClick: { action: { function : "openConfirmation" }}
          }]}
        }])}]
      }
    }]
  };
}

/**
 * Responds to CARD_CLICKED interaction events in Google Chat.
 *
 * @param {Object} event the CARD_CLICKED interaction event from Google Chat.
 * @return {Object} message responses specific to the dialog handling.
 */
function onCardClick(event) {
  // Initial dialog form page
  if (event.common.invokedFunction === "openInitialDialog") {
    return openInitialDialog();
  // Confirmation dialog form page
  } else if (event.common.invokedFunction === "openConfirmation") {
    return openConfirmation(event);
  // Submission dialog form page
  } else if (event.common.invokedFunction === "submitForm") {
    return submitForm(event);
  }
}

/**
 * Opens the initial step of the dialog that lets users add contact details.
 *
 * @return {Object} a message with an action response to open a dialog.
 */
function openInitialDialog() {
  return { actionResponse: {
    type: "DIALOG",
    dialogAction: { dialog: { body: { sections: [{
      header: "Add new contact",
      widgets: CONTACT_FORM_WIDGETS.concat([{
        buttonList: { buttons: [{
          text: "Review and submit",
          onClick: { action: { function: "openConfirmation" }}
        }]}
      }])
    }]}}}
  }};
}

/**
 * Returns the second step as a dialog or card message that lets users confirm details.
 *
 * @param {Object} event the interactive event with form inputs.
 * @return {Object} returns a dialog or private card message.
 */
function openConfirmation(event) {
  const name = fetchFormValue(event, "contactName") ?? "";
  const birthdate = fetchFormValue(event, "contactBirthdate") ?? "";
  const type = fetchFormValue(event, "contactType") ?? "";
  const cardConfirmation = {
    header: "Your contact",
    widgets: [{
      textParagraph: { text: "Confirm contact information and submit:" }}, {
      textParagraph: { text: "<b>Name:</b> " + name }}, {
      textParagraph: {
        text: "<b>Birthday:</b> " + convertMillisToDateString(birthdate)
      }}, {
      textParagraph: { text: "<b>Type:</b> " + type }}, {
      buttonList: { buttons: [{
        text: "Submit",
        onClick: { action: {
          function: "submitForm",
          parameters: [{
            key: "contactName", value: name }, {
            key: "contactBirthdate", value: birthdate }, {
            key: "contactType", value: type
          }]
        }}
      }]}
    }]
  };

  // Returns a dialog with contact information that the user input.
  if (event.isDialogEvent) {
    return { action_response: {
      type: "DIALOG",
      dialogAction: { dialog: { body: { sections: [ cardConfirmation ]}}}
    }};
  }

  // Updates existing card message with contact information that the user input.
  return {
    actionResponse: { type: "UPDATE_MESSAGE" },
    privateMessageViewer: event.user,
    cardsV2: [{
      card: { sections: [cardConfirmation]}
    }]
  }
}

/**
  * Validates and submits information from a dialog or card message
  * and notifies status.
  *
  * @param {Object} event the interactive event with parameters.
  * @return {Object} a message response that opens a dialog or posts a private
  *                  message.
  */
function submitForm(event) {
  const contactName = event.common.parameters["contactName"];
  // Checks to make sure the user entered a contact name.
  // If no name value detected, returns an error message.
  const errorMessage = "Don't forget to name your new contact!";
  if (!contactName && event.dialogEventType === "SUBMIT_DIALOG") {
    return { actionResponse: {
      type: "DIALOG",
      dialogAction: { actionStatus: {
        statusCode: "INVALID_ARGUMENT",
        userFacingMessage: errorMessage
      }}
    }};
  }
  if (!contactName) {
    return {
      privateMessageViewer: event.user,
      text: errorMessage
    };
  }

  // The Chat app indicates that it received form data from the dialog or card.
  // Sends private text message that confirms submission.
  const confirmationMessage = "✅ " + contactName + " has been added to your contacts.";
  if (event.dialogEventType === "SUBMIT_DIALOG") {
    return {
      actionResponse: {
        type: "DIALOG",
        dialogAction: { actionStatus: {
          statusCode: "OK",
          userFacingMessage: "Success " + contactName
        }}
      }
    };
  }
  return {
    actionResponse: { type: "NEW_MESSAGE" },
    privateMessageViewer: event.user,
    text: confirmationMessage
  };
}

/**
 * Extracts form input value for a given widget.
 *
 * @param {Object} event the CARD_CLICKED interaction event from Google Chat.
 * @param {String} widgetName a unique ID for the widget, specified in the widget's name field.
 * @returns the value inputted by the user, null if no value can be found.
 */
function fetchFormValue(event, widgetName) {
  const formItem = event.common.formInputs[widgetName][""];
  // For widgets that receive StringInputs data, the value input by the user.
  if (formItem.hasOwnProperty("stringInputs")) {
    const stringInput = event.common.formInputs[widgetName][""].stringInputs.value[0];
    if (stringInput != null) {
      return stringInput;
    }
  // For widgets that receive dateInput data, the value input by the user.
  } else if (formItem.hasOwnProperty("dateInput")) {
    const dateInput = event.common.formInputs[widgetName][""].dateInput.msSinceEpoch;
     if (dateInput != null) {
       return dateInput;
     }
  }

  return null;
}

/**
 * Converts date in milliseconds since epoch to user-friendly string.
 *
 * @param {Object} millis the milliseconds since epoch time.
 * @return {string} Display-friend date (English US).
 */
function convertMillisToDateString(millis) {
  const date = new Date(millis);
  const options = { year: 'numeric', month: 'long', day: 'numeric' };
  return date.toLocaleDateString('en-US', options);
}
contactForm.gs

包含从用户那里接收表单数据的微件。这些表单输入微件显示在消息和对话框中显示的卡片中。

查看 contactForm.gs 代码

apps-script/contact-form-app/contactForm.gs
/**
 * Copyright 2024 Google Inc.
 *
 * Licensed under the Apache License, Version 2.0 (the "License");
 * you may not use this file except in compliance with the License.
 * You may obtain a copy of the License at
 *
 * http://www.apache.org/licenses/LICENSE-2.0
 *
 * Unless required by applicable law or agreed to in writing, software
 * distributed under the License is distributed on an "AS IS" BASIS,
 * WITHOUT WARRANTIES OR CONDITIONS OF ANY KIND, either express or implied.
 * See the License for the specific language governing permissions and
 * limitations under the License.
 */

/**
 * The section of the contact card that contains the form input widgets. Used in a dialog and card message.
 * To add and preview widgets, use the Card Builder: https://addons.gsuite.google.com/uikit/builder
 */
const CONTACT_FORM_WIDGETS = [
  {
    "textInput": {
      "name": "contactName",
      "label": "First and last name",
      "type": "SINGLE_LINE"
    }
  },
  {
    "dateTimePicker": {
      "name": "contactBirthdate",
      "label": "Birthdate",
      "type": "DATE_ONLY"
    }
  },
  {
    "selectionInput": {
      "name": "contactType",
      "label": "Contact type",
      "type": "RADIO_BUTTON",
      "items": [
        {
          "text": "Work",
          "value": "Work",
          "selected": false
        },
        {
          "text": "Personal",
          "value": "Personal",
          "selected": false
        }
      ]
    }
  }
];
appsscript.json

Apps 脚本清单 ,用于定义和配置 Chat 扩展应用的 Apps 脚本项目。

查看 appsscript.json 代码

apps-script/contact-form-app/appsscript.json
{
  "timeZone": "America/Los_Angeles",
  "dependencies": {},
  "exceptionLogging": "STACKDRIVER",
  "runtimeVersion": "V8",
  "chat": {}
}

创建 Apps 脚本项目

如需创建 Apps 脚本项目,请执行以下操作:

  1. 点击以下按钮,打开 Manage contacts in Google Chat (在 Google Chat 中管理联系人)Apps 脚本项目。
    打开项目
  2. 点击 概览
  3. 在概览页面上,点击 用于创建副本的图标 制作副本
  4. 为 Apps 脚本项目的副本命名:

    1. 点击 Copy of Manage contacts in Google Chat (在 Google Chat 中管理联系人的副本)。

    2. 项目标题中,输入Contact Manager - Google Chat app

    3. 点击重命名

将来,如果您想使用某些 Google API 或发布应用,则必须将云项目与 Apps 脚本项目相关联。对于本指南,您无需执行此操作。如需了解详情,请参阅Google Cloud 项目指南

创建 Apps 脚本部署

现在所有代码都已就位,接下来请部署 Apps 脚本项目。在 Google Cloud 中配置 Chat 扩展应用时,您将使用部署 ID。

  1. 在 Apps 脚本中,打开 Chat 扩展应用的项目。

    前往 Apps 脚本

  2. 依次点击部署 > 新建部署

  3. 如果尚未选择插件 ,请点击 选择类型 旁边的部署类型 项目设置的图标,然后选择插件

  4. 说明 中,为此版本输入说明,例如 Test of Contact Manager

  5. 点击部署 。Apps 脚本会报告部署成功,并提供部署 ID。

  6. 点击 复制 以复制 部署 ID,然后点击 完成

在 Google API 控制台中配置 Chat 扩展应用

本部分将介绍如何在 Google API 控制台中配置 Google Chat API,其中包含有关 Chat 扩展应用的信息,包括您刚刚从 Apps 脚本项目中创建的部署的 ID。

  1. 在 Google API 控制台中,依次点击菜单 > API 和服务 > 已启用的 API 和服务 > Google Chat API > 配置

    前往 Chat API 配置

  2. 清除将此 Chat 扩展应用构建为 Google Workspace 插件 。系统会打开一个对话框,要求您确认。在该对话框中,点击停用

  3. 应用名称 中,输入 Contact Manager

  4. 头像网址 中,输入 https://developers.google.com/chat/images/contact-icon.png

  5. 说明 中,输入 Manage your personal and business contacts

  6. 点击启用互动功能 切换开关,将其切换到开启位置。

  7. 功能 下,选择加入聊天室和群组对话

  8. 连接设置 下,选择 Apps 脚本

  9. 部署 ID中,粘贴您在上一部分创建 Apps 脚本部署时复制的 Apps 脚本部署 ID。

  10. 命令下,设置斜杠命令/about/addContact

    1. 点击 Add a slash command (添加斜杠命令)以设置第一个斜杠命令。
    2. 名称中,输入About
    3. 命令 ID 中,输入 1
    4. 说明 中,输入 Learn how to use this Chat app to manage your contacts
    5. 命令类型 下,选择 Slash command
    6. 斜杠命令的名称中,输入/about
    7. 选择打开对话框
    8. 点击完成
    9. 点击 Add a command (添加命令)以设置另一个斜杠命令。
    10. 名称 中,输入 Add a contact
    11. 命令 ID 中,输入 2
    12. 说明 中,输入 Submit information about a contact
    13. 命令类型 下,选择 Slash command
    14. 斜杠命令的名称中,输入/addContact
    15. 选择打开对话框
    16. 点击完成
  11. 可见性下,选中 面向 YOUR DOMAIN 中的特定人员和群组提供此 Chat 应用复选框,然后输入您的电子邮件地址。

  12. 日志 下,选择将错误记录到 Logging

  13. 点击保存 。系统会显示“配置已保存”消息。

Chat 扩展应用已准备就绪,可以在 Chat 中安装和测试。

测试 Chat 扩展应用

如需测试 Chat 扩展应用,请打开与 Chat 扩展应用的私信对话,然后发送一条消息:

  1. 使用您在将自己添加为受信任的测试人员时提供的 Google Workspace 账号打开 Google Chat。

    前往 Google Chat

  2. 点击 发起新聊天
  3. 添加 1 位或多位用户 字段中,输入 Chat 扩展应用的名称。
  4. 从结果中选择 Chat 扩展应用。系统会打开一条私信。

  1. 在与 Chat 扩展应用的新私信对话中, 输入 /addContact,然后按 enter

  2. 在打开的对话框中,输入联系人信息:

    1. 名字和姓氏 文本字段中,输入一个名称。
    2. 出生日期 日期选择器中,选择一个日期。
    3. 联系人类型 下,选择工作个人 单选按钮。
  3. 点击查看并提交

  4. 在确认对话框中,查看您提交的信息,然后点击提交 。Chat 扩展应用会回复一条文本 消息,内容为 CONTACT NAME has been added to your contacts.

  5. 您还可以选择通过以下方式测试和提交联系人表单:

    • 使用 /about 斜杠命令。Chat 扩展应用会回复一条文本消息和一个辅助微件按钮,内容为 Add a contact。您可以点击该按钮来打开包含联系人表单的对话框。
    • 向 Chat 扩展应用发送一条不带斜杠命令的私信,例如 Hello。Chat 扩展应用会回复一条文本消息和一张包含联系人表单的卡片。

清理

为避免因本教程中使用的 资源导致您的 Google Cloud 账号产生费用,我们建议您删除 云项目。

  1. 在 Google API 控制台中,前往管理资源 页面。依次点击 菜单 > IAM 和管理 > 管理资源

    前往 Resource Manager

  2. 在项目列表中,选择要删除的项目,然后点击 删除 .
  3. 在对话框中输入项目 ID,然后点击关停 以删除 项目。