Google Chat で連絡先を収集、管理する

このチュートリアルでは、Google Chat ユーザーが個人用とビジネス用の連絡先を管理するのに役立つ Google Chat アプリを作成する方法について説明します。情報を収集するために、Chat アプリはカード メッセージとダイアログで連絡先フォームへの入力を行うようユーザーに促します。

Chat アプリの動作は次のとおりです。
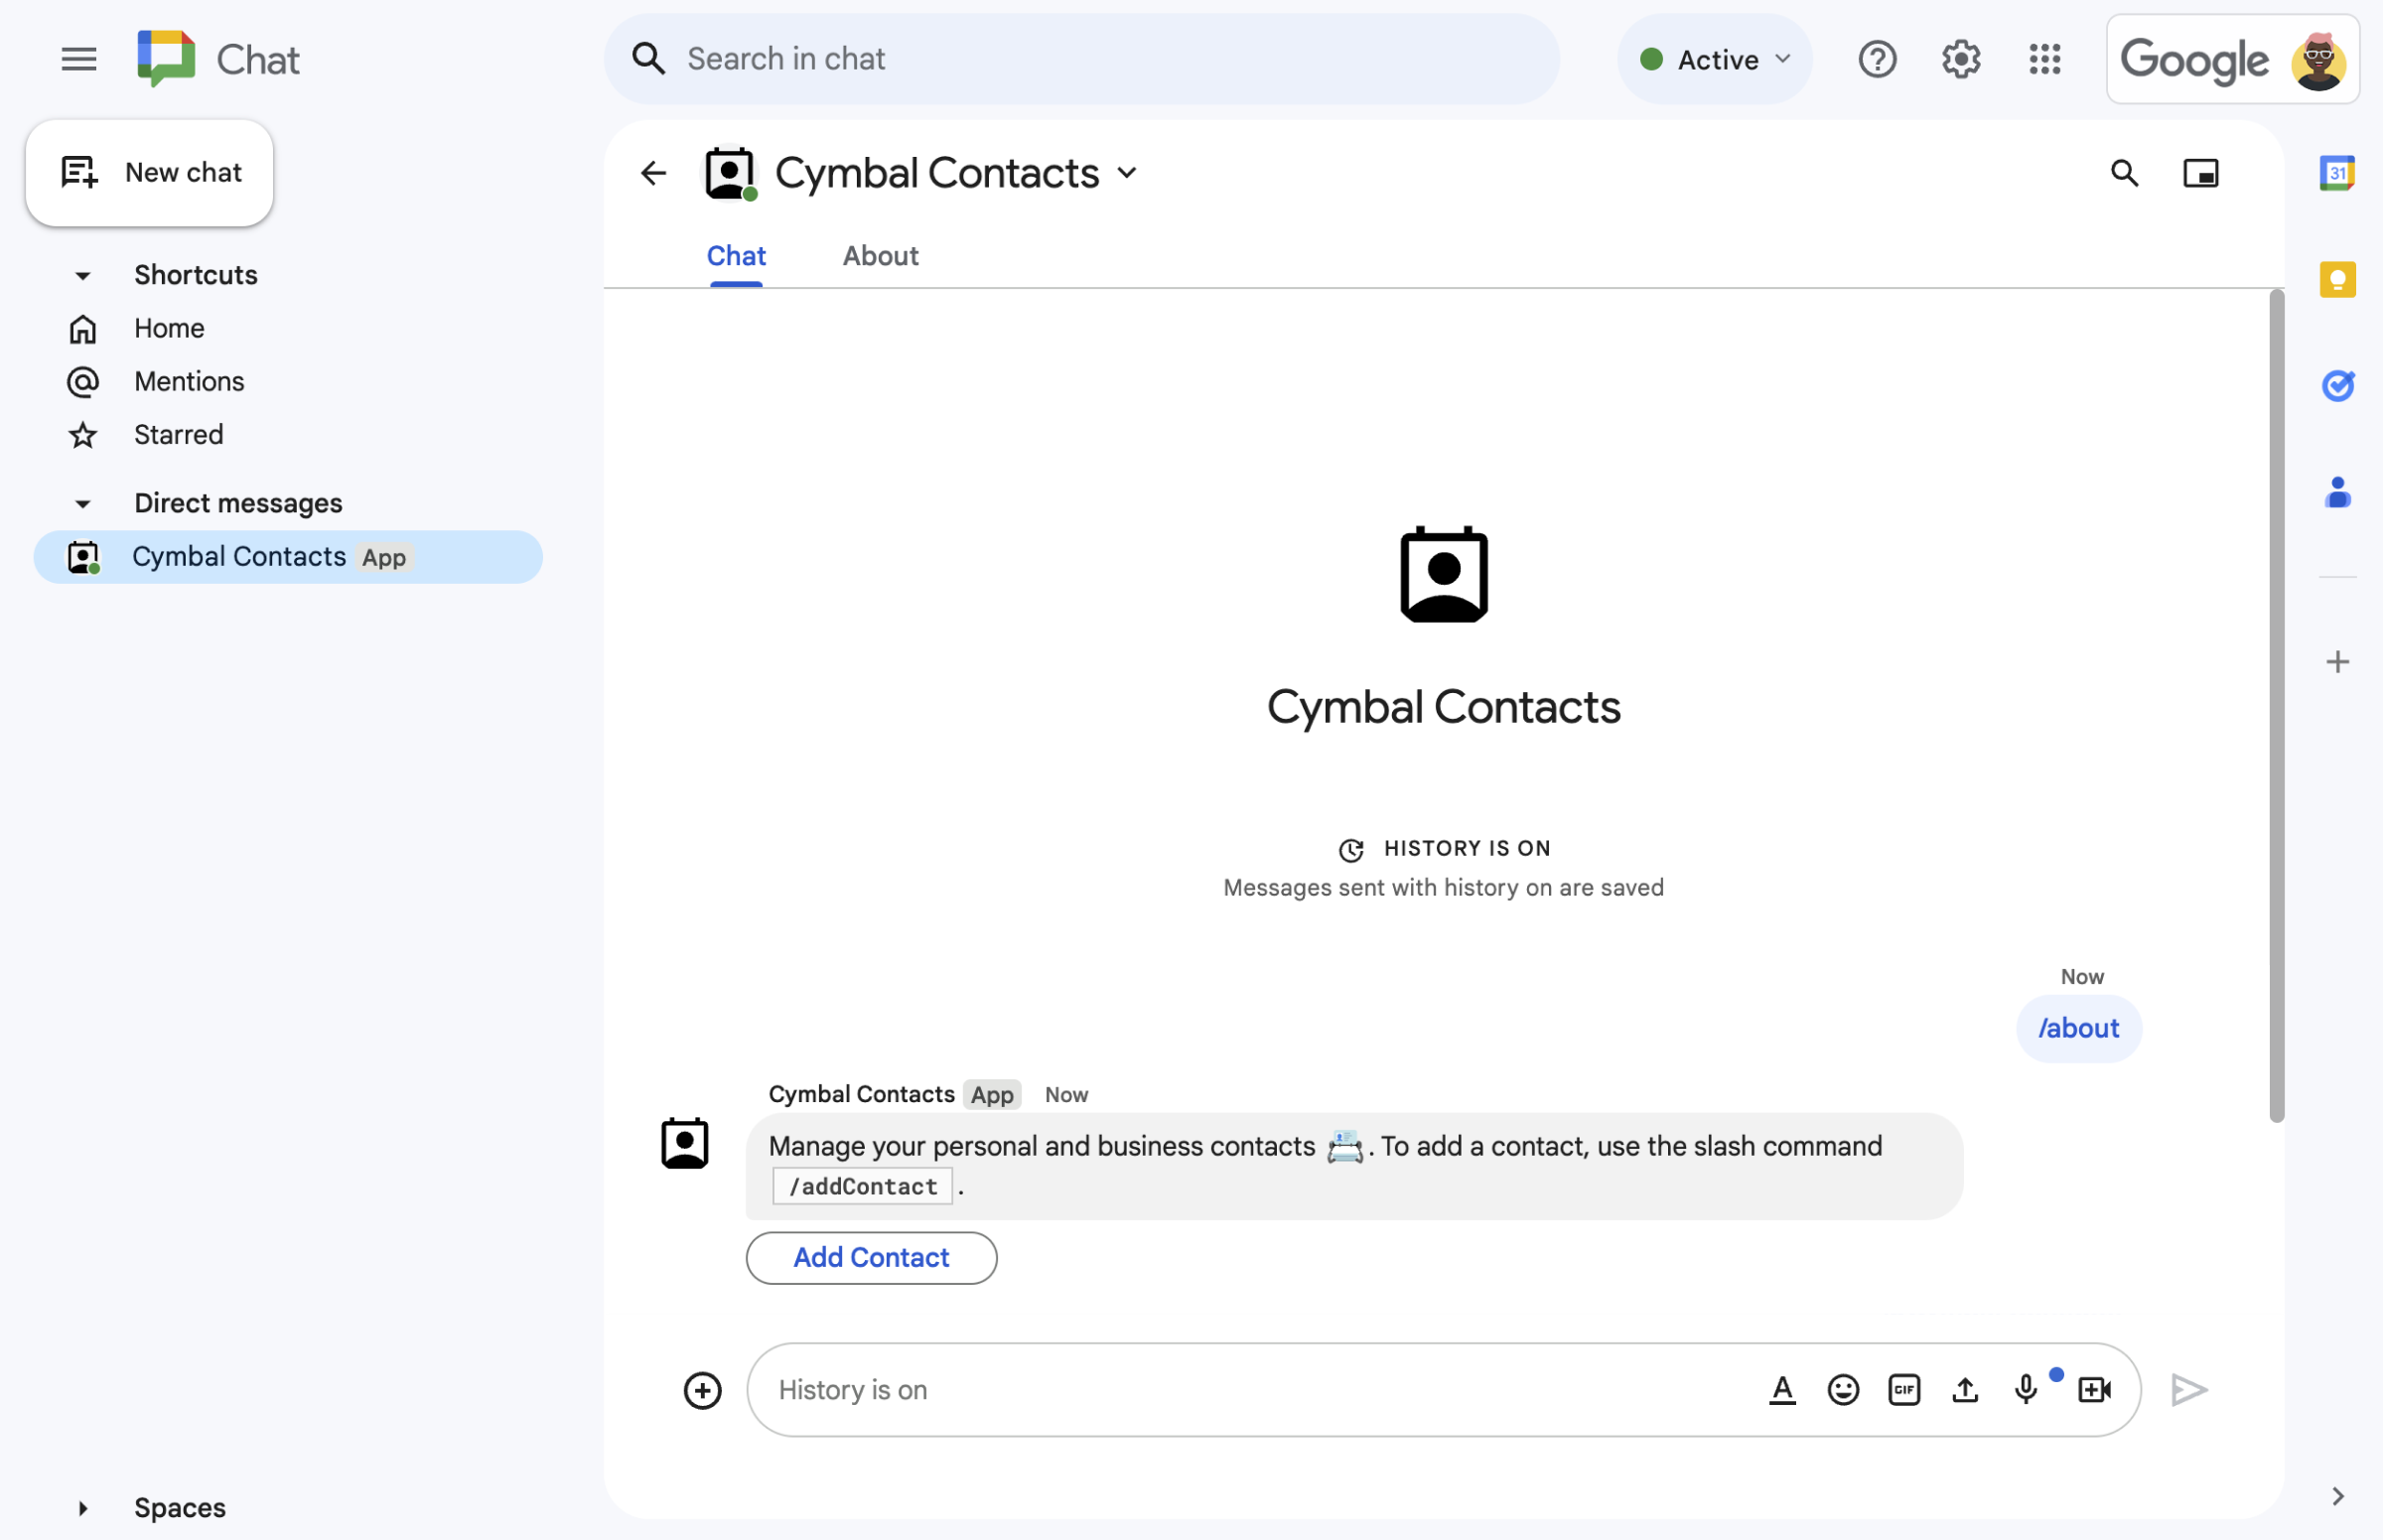
  • スラッシュ コマンドからのお問い合わせフォーム。
    図 1:Chat アプリは、スラッシュ コマンド /about に応答して、連絡先フォームを開くテキスト メッセージとボタンを表示します。
  • ダイアログのお問い合わせフォーム。
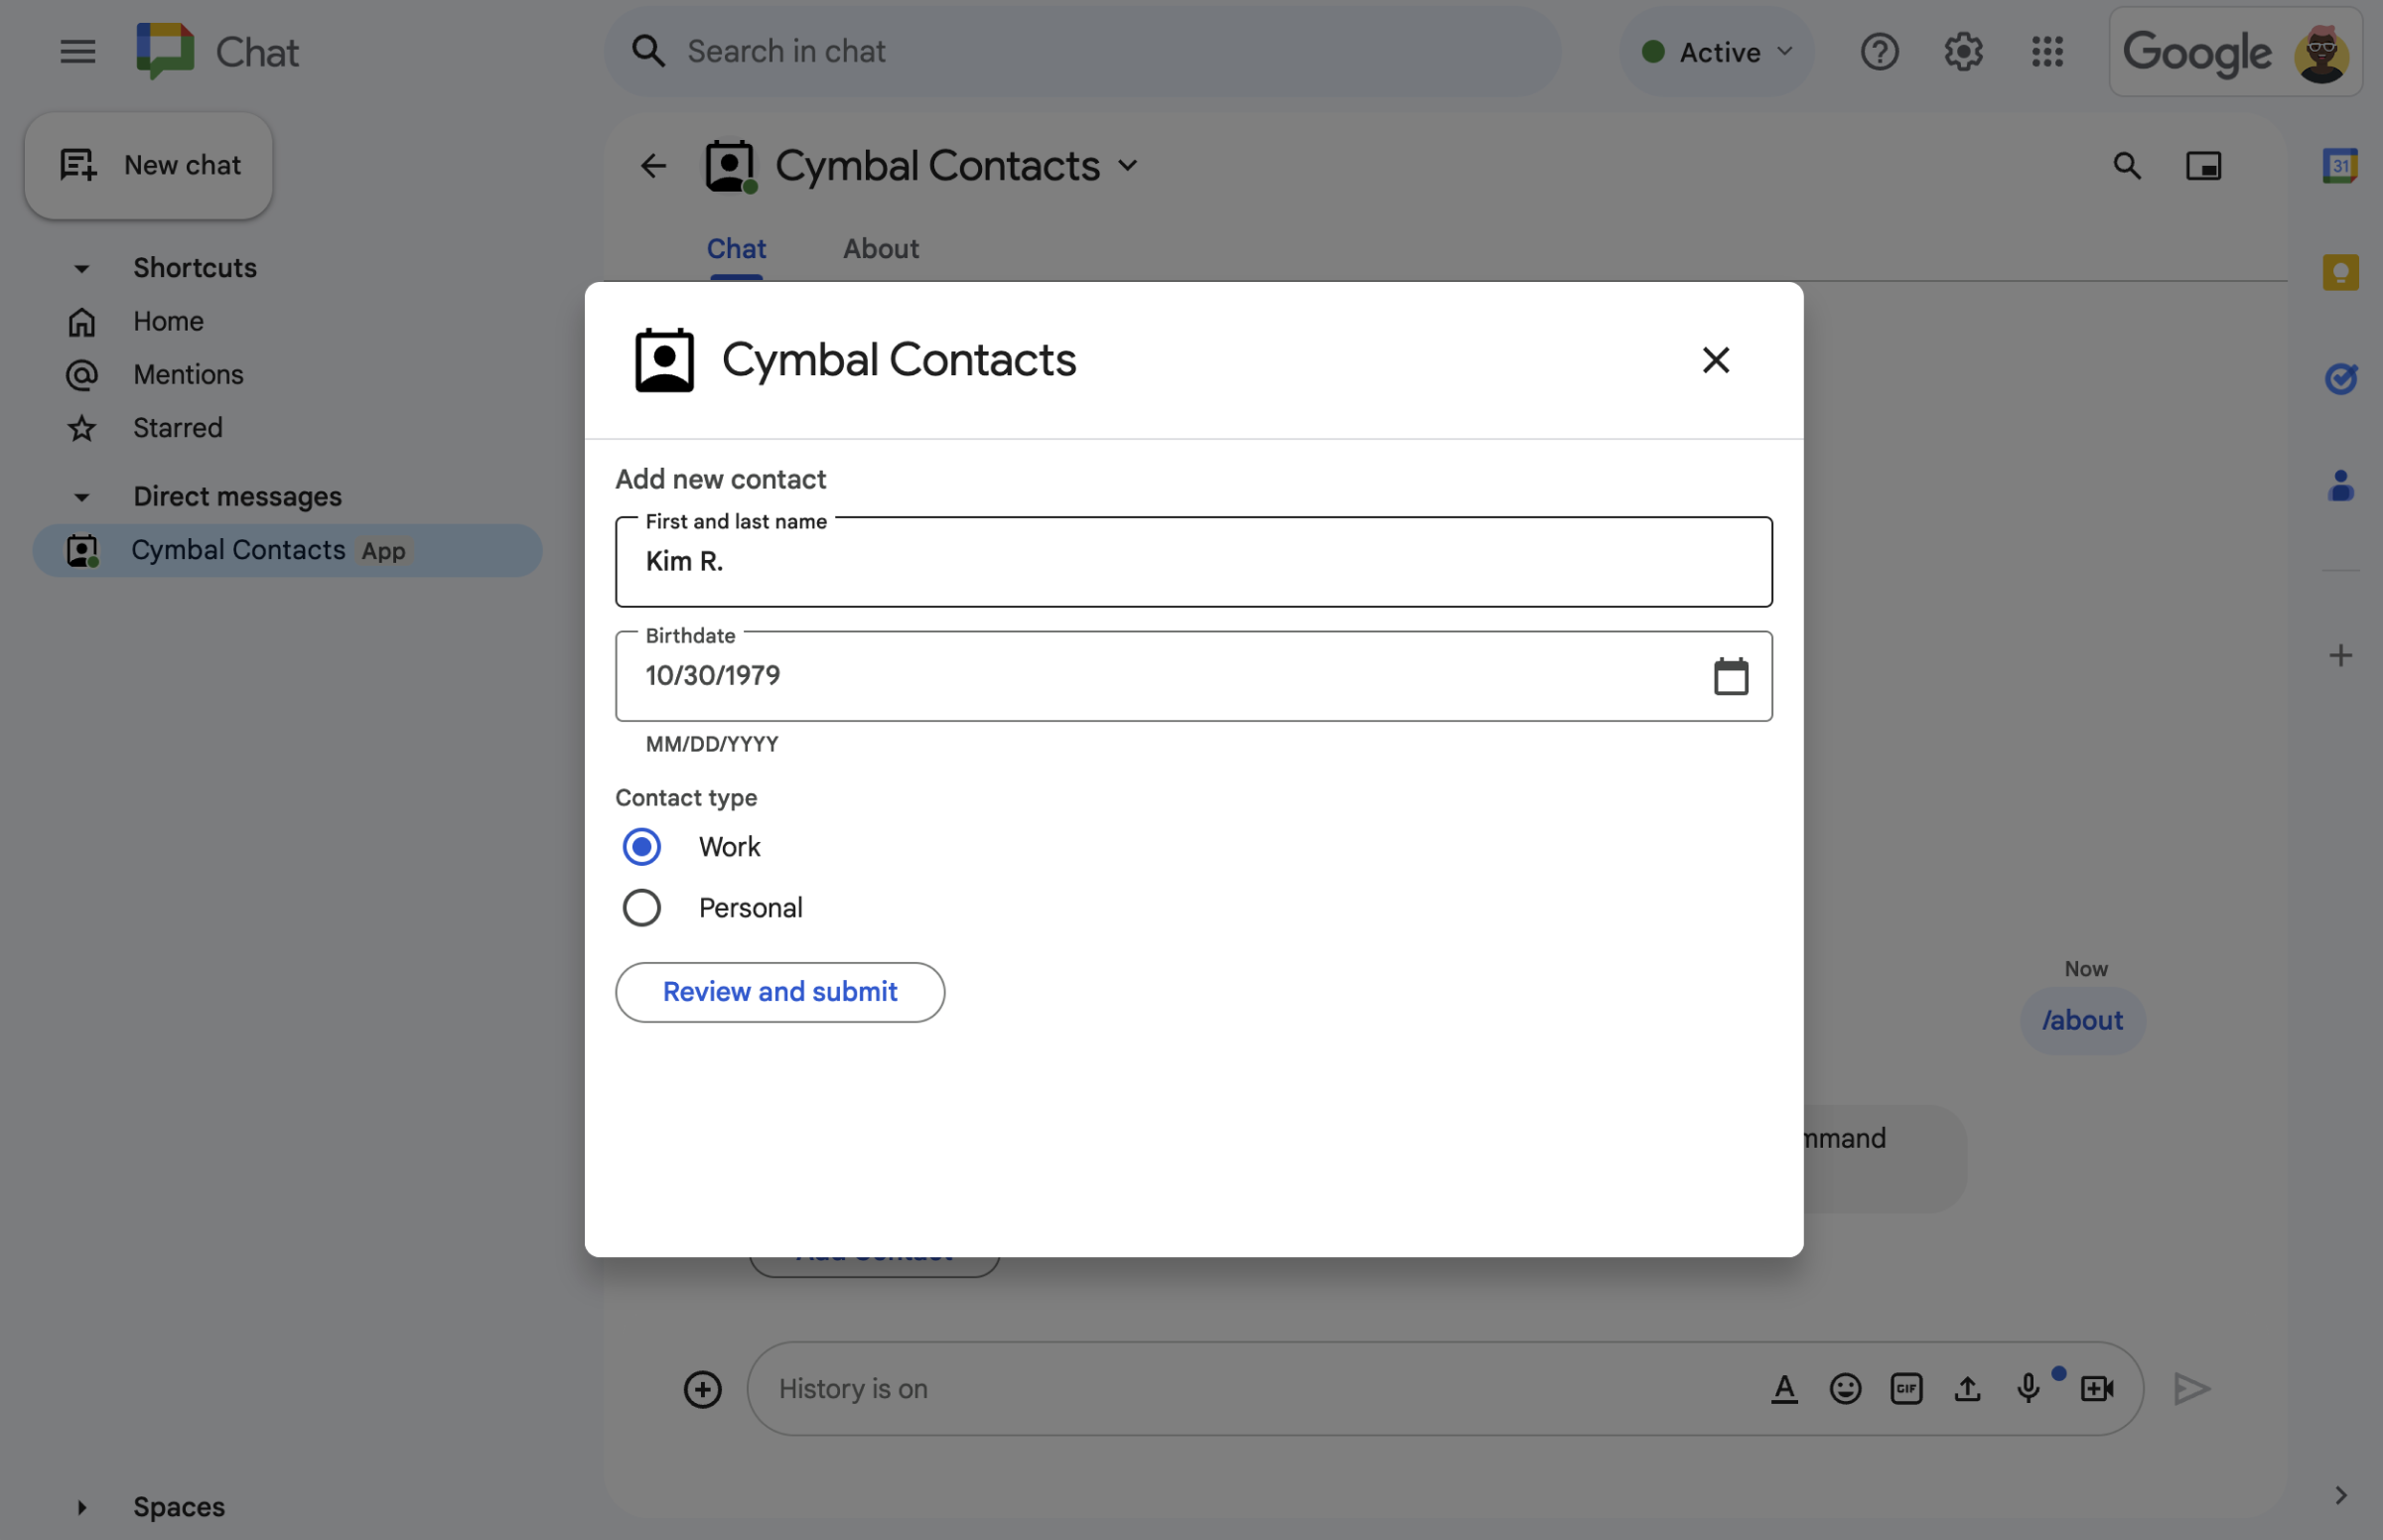
    図 2:Chat アプリは、ユーザーが連絡先に関する情報を入力できるダイアログを開きます。
  • 確認とレビューのダイアログ。
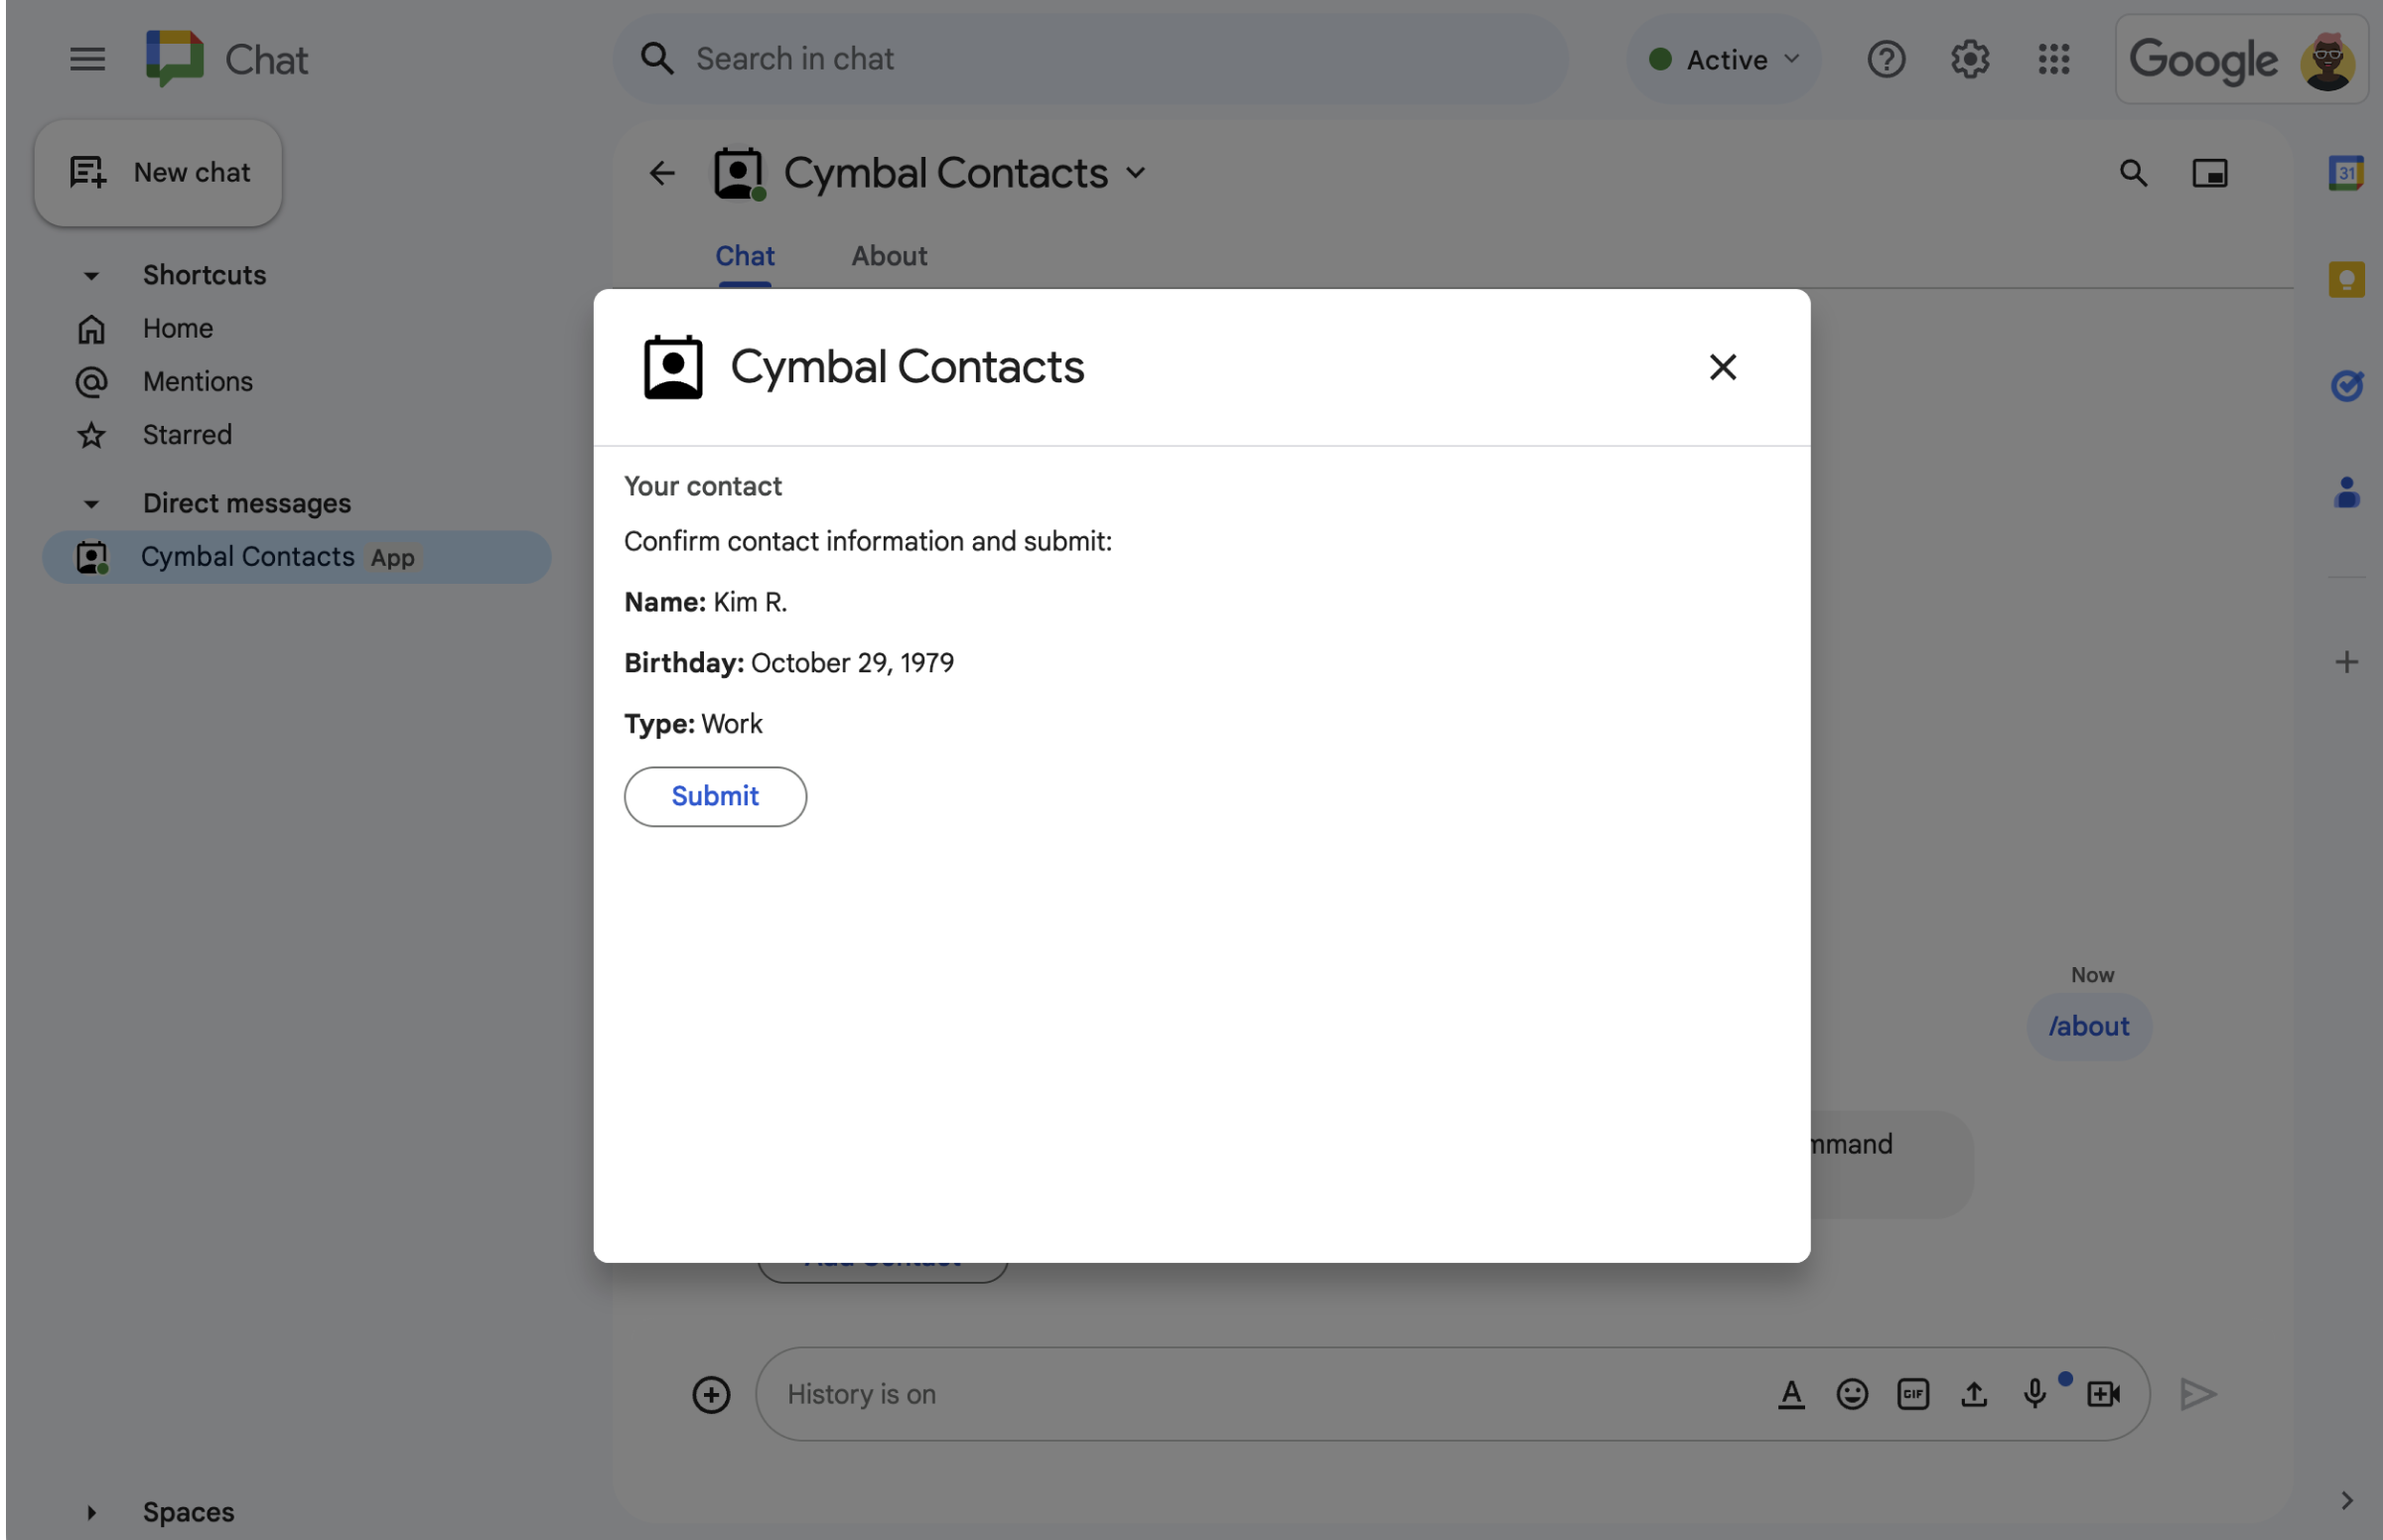
    図 3:Chat アプリは確認ダイアログを返して、ユーザーが情報を確認してから送信できるようにします。
  • 新しい連絡先を確認するテキスト メッセージ。
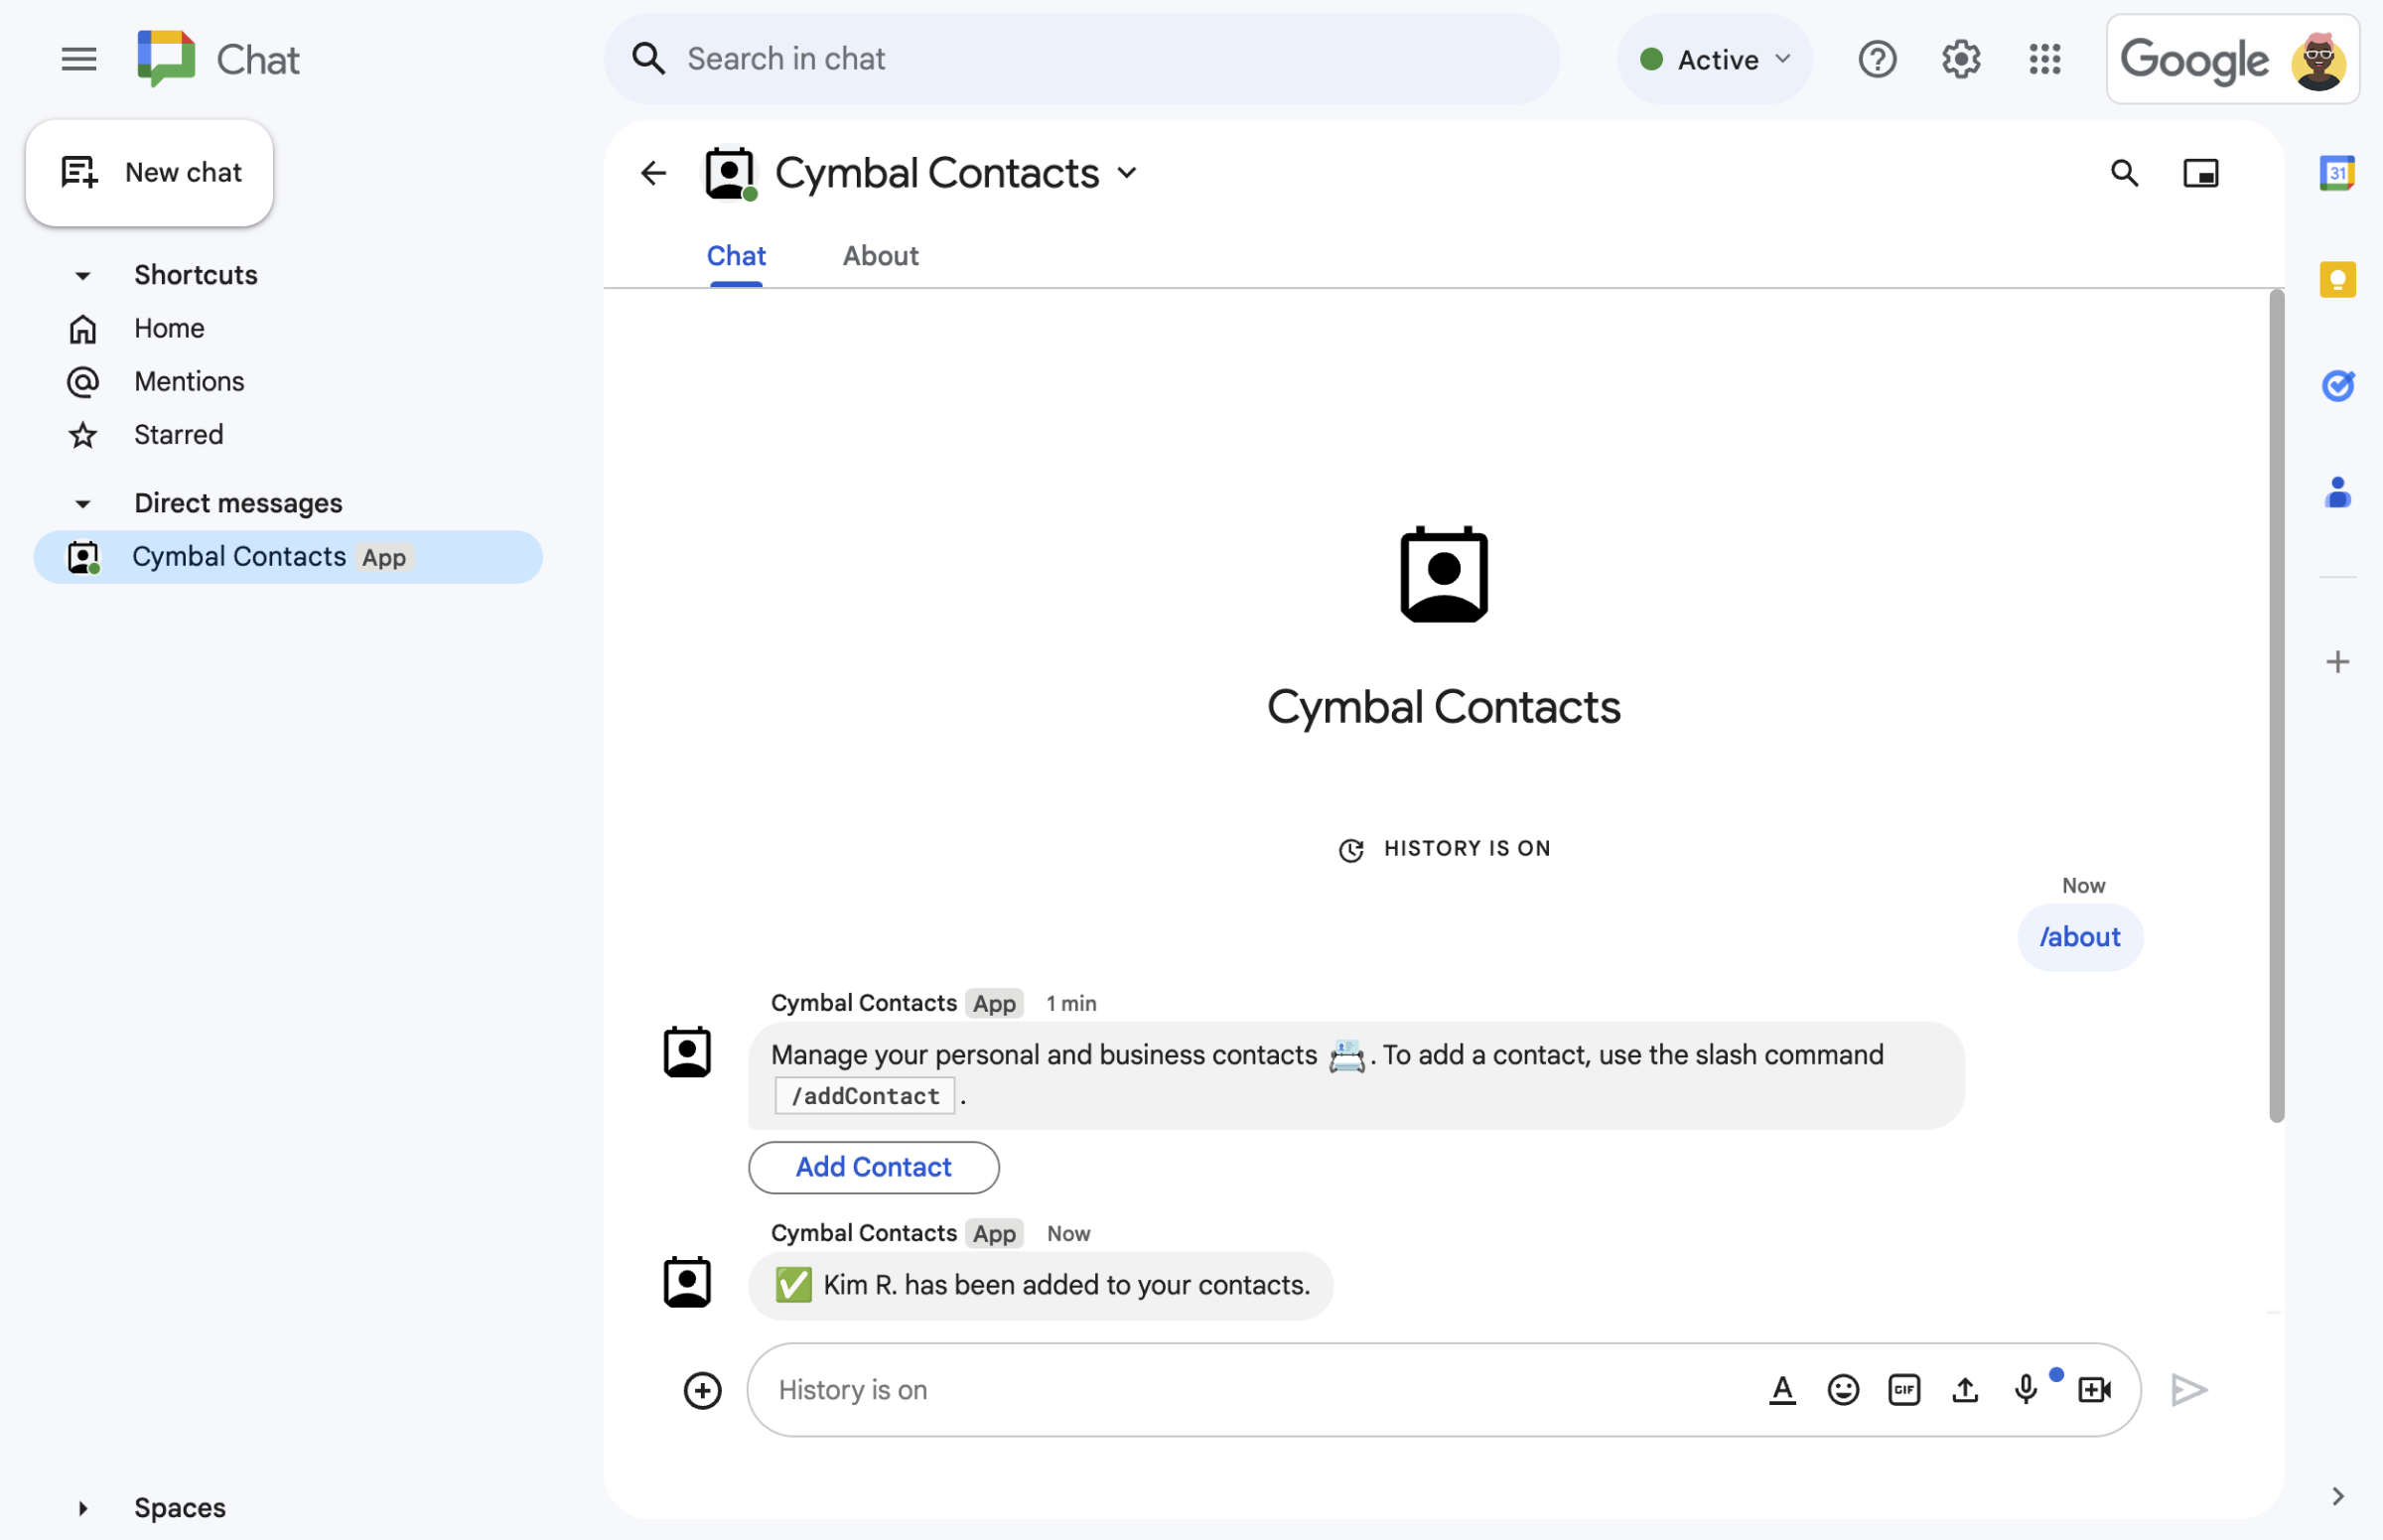
    図 4:ユーザーがフォームを送信すると、Chat アプリは送信を確認する限定公開のテキスト メッセージを送信します。
  • カード メッセージの問い合わせフォーム。
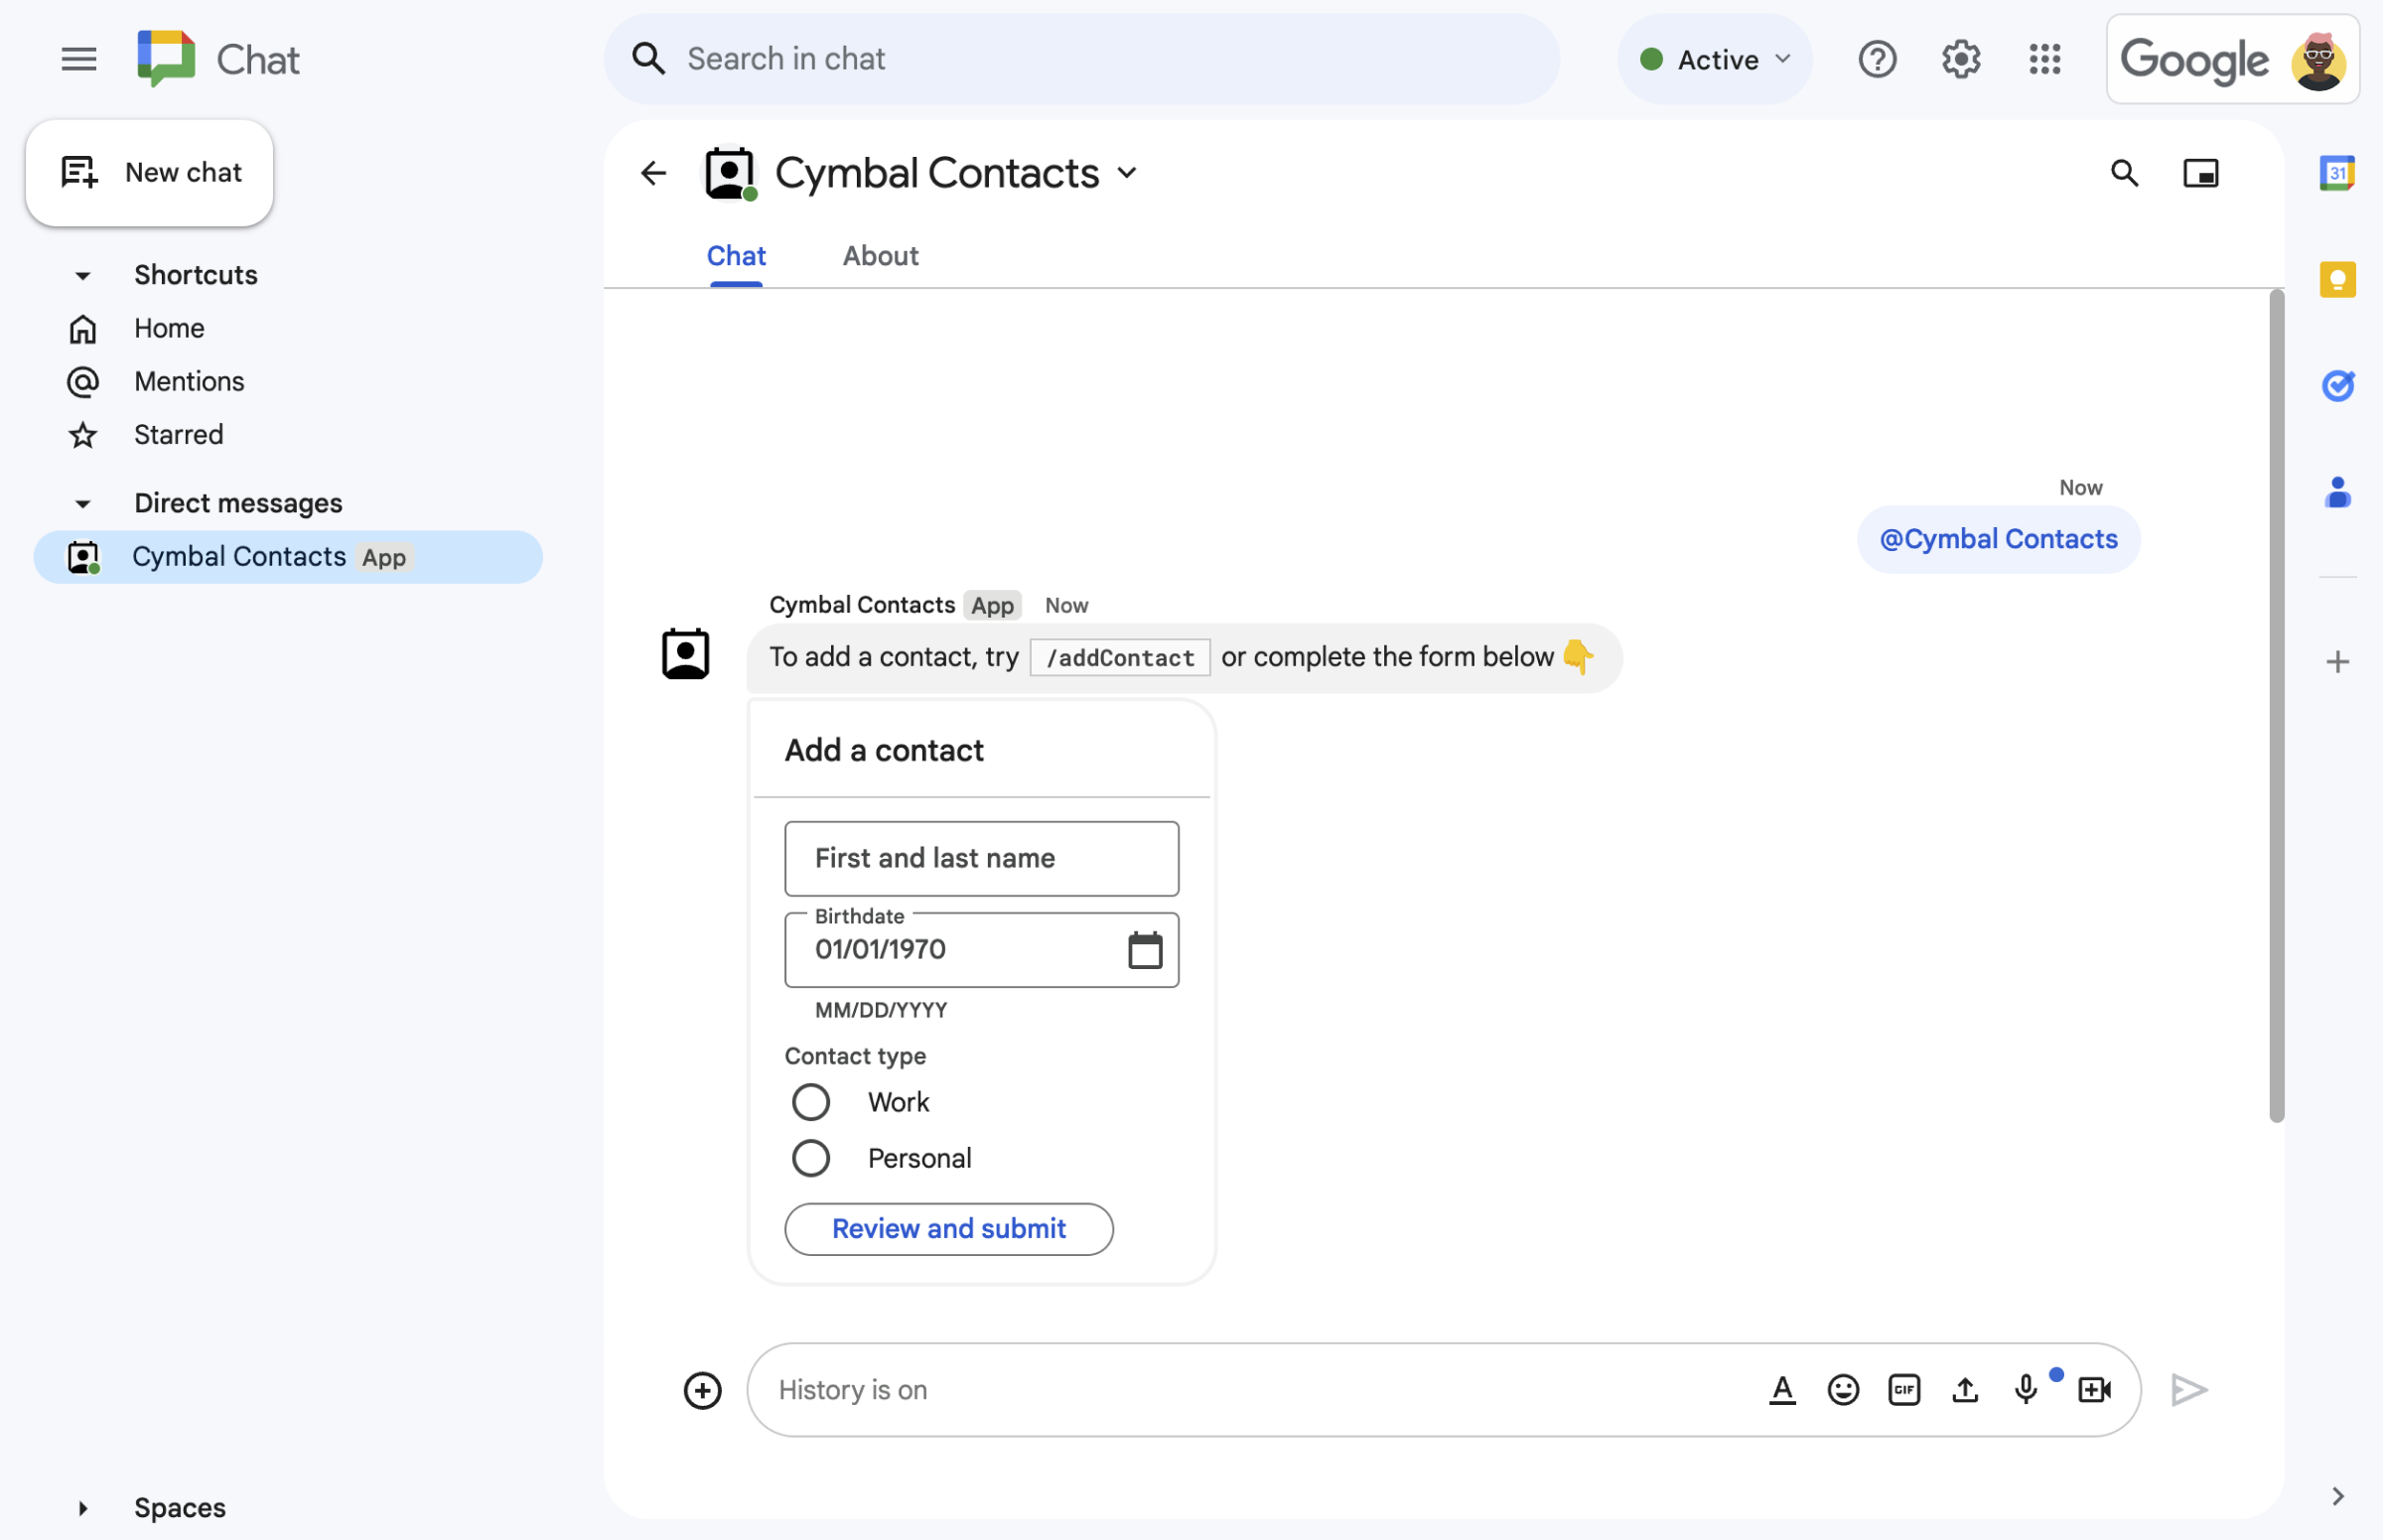
    図 5:Chat アプリは、メッセージ内のカードから連絡先を追加するようユーザーに促します。

前提条件

目標

アーキテクチャ

Chat アプリは Google Apps Script で構築され、 インタラクション イベントを使用して Chat ユーザーを処理 し、応答します。

ユーザーが Chat アプリとやり取りする一般的な方法を次に示します。

  1. ユーザーが Chat アプリとのダイレクト メッセージを開くか、既存のスペースに Chat アプリを追加します。

  2. Chat アプリは、連絡先フォームを 作成して表示し、連絡先を追加するようユーザーに促します。 card オブジェクトとして。連絡先フォームを表示するために、Chat アプリは次のようにユーザーに応答します。

    • @メンションとダイレクト メッセージに、連絡先フォームを含むカード メッセージで応答します。
    • スラッシュ コマンド /addContact に応答して、連絡先フォームを含むダイアログを開きます。
    • スラッシュ コマンド /about に応答して、[Add a contact] ボタンを含むテキスト メッセージを表示します。ユーザーがこのボタンをクリックすると、連絡先フォームを含むダイアログが開きます。
  3. 連絡先フォームが表示されたら、ユーザーは次のフィールドとウィジェットに連絡先情報を入力します。

  4. Google Chat アプリは CARD_CLICKED インタラクション イベントを処理して、ユーザーが入力した値を処理し、確認カードに表示します。

  5. ユーザーは確認カードを確認し、[送信] ボタンをクリックして連絡先情報を確定します。

  6. Google Chat アプリは、送信を確認する限定公開のテキスト メッセージを送信します。

環境を準備する

このセクションでは、Chat アプリ用に Google Cloud プロジェクトを構成する方法について説明します。

Google API Console でクラウド プロジェクトを開く

まだ開いていない場合は、このサンプルで使用するクラウド プロジェクトを開きます。

  1. Google API Console で、[プロジェクトの選択] ページに移動します。

    クラウド プロジェクトを選択する

  2. 使用する Google Cloud プロジェクトを選択します。または、[プロジェクトを作成] をクリックして、画面に表示される手順に沿って操作します。Google Cloud プロジェクトを作成する場合は、プロジェクトの課金を有効にする必要がある場合があります。

認証と権限付与の設定

Google Chat アプリでは、ユーザーが Google Chat などの Google Workspace アプリケーションでアプリを承認できるように、 OAuth 同意画面を構成する必要があります。

このチュートリアルでは、テストと社内使用のみを目的とした Chat アプリをデプロイするため、同意画面にプレースホルダ情報を使用しても問題ありません。Chat アプリを公開する前に、プレースホルダ情報を実際の情報に置き換えてください。

  1. Google API Console で、メニュー > [Google Auth platform] > [Branding] に移動します。

    [ブランディング] に移動

  2. Google Auth platform をすでに構成している場合は、 [ブランディング]、 [対象]、 および [データアクセス] で次の OAuth 同意画面の設定を構成できます。 [**Google Auth platform がまだ構成されていません**] というメッセージが表示されたら、[**スタートガイド**] をクリックします。

    1. [アプリ情報] の [アプリ名] に Contact Managerと入力します。
    2. [**ユーザー サポートメール**] で、メールアドレスまたは適切な Google グループを選択します。
    3. [次へ] をクリックします。
    4. [対象] で [社内] を選択します。[**社内**] を選択できない場合は、 [**社内**] を選択します。
    5. [次へ] をクリックします。
    6. [連絡先情報] で、プロジェクトに対する変更の通知を受け取れる [メールアドレス] を入力します。
    7. [次へ] をクリックします。
    8. [完了] で、 Google API サービスのユーザーデータに関するポリシー を確認し、同意する場合は [Google API サービス: ユーザーデータに関するポリシーに同意します] を選択します。
    9. [続行] をクリックします。
    10. [作成] をクリックします。
    11. ユーザータイプとして [外部] を選択した場合は、テストユーザーを追加します。
      1. [対象] をクリックします。
      2. [テストユーザー] で [ユーザーを追加] をクリックします。
      3. メールアドレスと他の承認済みテストユーザーを入力し、[保存] をクリックします。

Chat アプリを作成してデプロイする

次のセクションでは、Chat アプリに必要なすべてのアプリケーション コードを含む Apps Script プロジェクト全体をコピーして更新します。そのため、各ファイルをコピーして貼り付ける必要はありません。

必要に応じて、GitHub でプロジェクト全体を表示できます。

GitHub で表示

各ファイルの概要は次のとおりです。

main.gs

ユーザーが Chat アプリにメッセージを送信したとき、Chat アプリのメッセージからボタンをクリックしたとき、ダイアログを開閉したときなどのインタラクション イベントを含む、すべてのアプリロジックを処理します。

main.gs コードを表示する

apps-script/contact-form-app/main.gs
/**
 * Copyright 2024 Google Inc.
 *
 * Licensed under the Apache License, Version 2.0 (the "License");
 * you may not use this file except in compliance with the License.
 * You may obtain a copy of the License at
 *
 * http://www.apache.org/licenses/LICENSE-2.0
 *
 * Unless required by applicable law or agreed to in writing, software
 * distributed under the License is distributed on an "AS IS" BASIS,
 * WITHOUT WARRANTIES OR CONDITIONS OF ANY KIND, either express or implied.
 * See the License for the specific language governing permissions and
 * limitations under the License.
 */

/**
 * Responds to a MESSAGE interaction event in Google Chat.
 *
 * @param {Object} event the MESSAGE interaction event from Chat API.
 * @return {Object} message response that opens a dialog or sends private
 *                          message with text and card.
 */
function onMessage(event) {
  if (event.message.slashCommand) {
    switch (event.message.slashCommand.commandId) {
      case 1:
        // If the slash command is "/about", responds with a text message and button
        // that opens a dialog.
        return {
          text: "Manage your personal and business contacts 📇. To add a " +
                  "contact, use the slash command `/addContact`.",
          accessoryWidgets: [{
            buttonList: { buttons: [{
              text: "Add Contact",
              onClick: { action: {
                function: "openInitialDialog",
                interaction: "OPEN_DIALOG"
              }}
            }]}
          }]
        }
      case 2:
        // If the slash command is "/addContact", opens a dialog.
        return openInitialDialog();
    }
  }

  // If user sends the Chat app a message without a slash command, the app responds
  // privately with a text and card to add a contact.
  return {
    privateMessageViewer: event.user,
    text: "To add a contact, try `/addContact` or complete the form below:",
    cardsV2: [{
      cardId: "addContactForm",
      card: {
        header: { title: "Add a contact" },
        sections:[{ widgets: CONTACT_FORM_WIDGETS.concat([{
          buttonList: { buttons: [{
            text: "Review and submit",
            onClick: { action: { function : "openConfirmation" }}
          }]}
        }])}]
      }
    }]
  };
}

/**
 * Responds to CARD_CLICKED interaction events in Google Chat.
 *
 * @param {Object} event the CARD_CLICKED interaction event from Google Chat.
 * @return {Object} message responses specific to the dialog handling.
 */
function onCardClick(event) {
  // Initial dialog form page
  if (event.common.invokedFunction === "openInitialDialog") {
    return openInitialDialog();
  // Confirmation dialog form page
  } else if (event.common.invokedFunction === "openConfirmation") {
    return openConfirmation(event);
  // Submission dialog form page
  } else if (event.common.invokedFunction === "submitForm") {
    return submitForm(event);
  }
}

/**
 * Opens the initial step of the dialog that lets users add contact details.
 *
 * @return {Object} a message with an action response to open a dialog.
 */
function openInitialDialog() {
  return { actionResponse: {
    type: "DIALOG",
    dialogAction: { dialog: { body: { sections: [{
      header: "Add new contact",
      widgets: CONTACT_FORM_WIDGETS.concat([{
        buttonList: { buttons: [{
          text: "Review and submit",
          onClick: { action: { function: "openConfirmation" }}
        }]}
      }])
    }]}}}
  }};
}

/**
 * Returns the second step as a dialog or card message that lets users confirm details.
 *
 * @param {Object} event the interactive event with form inputs.
 * @return {Object} returns a dialog or private card message.
 */
function openConfirmation(event) {
  const name = fetchFormValue(event, "contactName") ?? "";
  const birthdate = fetchFormValue(event, "contactBirthdate") ?? "";
  const type = fetchFormValue(event, "contactType") ?? "";
  const cardConfirmation = {
    header: "Your contact",
    widgets: [{
      textParagraph: { text: "Confirm contact information and submit:" }}, {
      textParagraph: { text: "<b>Name:</b> " + name }}, {
      textParagraph: {
        text: "<b>Birthday:</b> " + convertMillisToDateString(birthdate)
      }}, {
      textParagraph: { text: "<b>Type:</b> " + type }}, {
      buttonList: { buttons: [{
        text: "Submit",
        onClick: { action: {
          function: "submitForm",
          parameters: [{
            key: "contactName", value: name }, {
            key: "contactBirthdate", value: birthdate }, {
            key: "contactType", value: type
          }]
        }}
      }]}
    }]
  };

  // Returns a dialog with contact information that the user input.
  if (event.isDialogEvent) {
    return { action_response: {
      type: "DIALOG",
      dialogAction: { dialog: { body: { sections: [ cardConfirmation ]}}}
    }};
  }

  // Updates existing card message with contact information that the user input.
  return {
    actionResponse: { type: "UPDATE_MESSAGE" },
    privateMessageViewer: event.user,
    cardsV2: [{
      card: { sections: [cardConfirmation]}
    }]
  }
}

/**
  * Validates and submits information from a dialog or card message
  * and notifies status.
  *
  * @param {Object} event the interactive event with parameters.
  * @return {Object} a message response that opens a dialog or posts a private
  *                  message.
  */
function submitForm(event) {
  const contactName = event.common.parameters["contactName"];
  // Checks to make sure the user entered a contact name.
  // If no name value detected, returns an error message.
  const errorMessage = "Don't forget to name your new contact!";
  if (!contactName && event.dialogEventType === "SUBMIT_DIALOG") {
    return { actionResponse: {
      type: "DIALOG",
      dialogAction: { actionStatus: {
        statusCode: "INVALID_ARGUMENT",
        userFacingMessage: errorMessage
      }}
    }};
  }
  if (!contactName) {
    return {
      privateMessageViewer: event.user,
      text: errorMessage
    };
  }

  // The Chat app indicates that it received form data from the dialog or card.
  // Sends private text message that confirms submission.
  const confirmationMessage = "✅ " + contactName + " has been added to your contacts.";
  if (event.dialogEventType === "SUBMIT_DIALOG") {
    return {
      actionResponse: {
        type: "DIALOG",
        dialogAction: { actionStatus: {
          statusCode: "OK",
          userFacingMessage: "Success " + contactName
        }}
      }
    };
  }
  return {
    actionResponse: { type: "NEW_MESSAGE" },
    privateMessageViewer: event.user,
    text: confirmationMessage
  };
}

/**
 * Extracts form input value for a given widget.
 *
 * @param {Object} event the CARD_CLICKED interaction event from Google Chat.
 * @param {String} widgetName a unique ID for the widget, specified in the widget's name field.
 * @returns the value inputted by the user, null if no value can be found.
 */
function fetchFormValue(event, widgetName) {
  const formItem = event.common.formInputs[widgetName][""];
  // For widgets that receive StringInputs data, the value input by the user.
  if (formItem.hasOwnProperty("stringInputs")) {
    const stringInput = event.common.formInputs[widgetName][""].stringInputs.value[0];
    if (stringInput != null) {
      return stringInput;
    }
  // For widgets that receive dateInput data, the value input by the user.
  } else if (formItem.hasOwnProperty("dateInput")) {
    const dateInput = event.common.formInputs[widgetName][""].dateInput.msSinceEpoch;
     if (dateInput != null) {
       return dateInput;
     }
  }

  return null;
}

/**
 * Converts date in milliseconds since epoch to user-friendly string.
 *
 * @param {Object} millis the milliseconds since epoch time.
 * @return {string} Display-friend date (English US).
 */
function convertMillisToDateString(millis) {
  const date = new Date(millis);
  const options = { year: 'numeric', month: 'long', day: 'numeric' };
  return date.toLocaleDateString('en-US', options);
}
contactForm.gs

ユーザーからフォームデータを受け取るウィジェットが含まれています。これらのフォーム入力ウィジェットは、メッセージとダイアログに表示されるカードに表示されます。

contactForm.gs コードを表示する

apps-script/contact-form-app/contactForm.gs
/**
 * Copyright 2024 Google Inc.
 *
 * Licensed under the Apache License, Version 2.0 (the "License");
 * you may not use this file except in compliance with the License.
 * You may obtain a copy of the License at
 *
 * http://www.apache.org/licenses/LICENSE-2.0
 *
 * Unless required by applicable law or agreed to in writing, software
 * distributed under the License is distributed on an "AS IS" BASIS,
 * WITHOUT WARRANTIES OR CONDITIONS OF ANY KIND, either express or implied.
 * See the License for the specific language governing permissions and
 * limitations under the License.
 */

/**
 * The section of the contact card that contains the form input widgets. Used in a dialog and card message.
 * To add and preview widgets, use the Card Builder: https://addons.gsuite.google.com/uikit/builder
 */
const CONTACT_FORM_WIDGETS = [
  {
    "textInput": {
      "name": "contactName",
      "label": "First and last name",
      "type": "SINGLE_LINE"
    }
  },
  {
    "dateTimePicker": {
      "name": "contactBirthdate",
      "label": "Birthdate",
      "type": "DATE_ONLY"
    }
  },
  {
    "selectionInput": {
      "name": "contactType",
      "label": "Contact type",
      "type": "RADIO_BUTTON",
      "items": [
        {
          "text": "Work",
          "value": "Work",
          "selected": false
        },
        {
          "text": "Personal",
          "value": "Personal",
          "selected": false
        }
      ]
    }
  }
];
appsscript.json

Chat アプリの Apps Script プロジェクトを定義して構成する Apps Script マニフェスト。

appsscript.json コードを表示する

apps-script/contact-form-app/appsscript.json
{
  "timeZone": "America/Los_Angeles",
  "dependencies": {},
  "exceptionLogging": "STACKDRIVER",
  "runtimeVersion": "V8",
  "chat": {}
}

Apps Script プロジェクトを作成する

Apps Script プロジェクトを作成するには:

  1. 次のボタンをクリックして、Google Chat で連絡先を管理する Apps Script プロジェクトを開きます。
    プロジェクトを開く
  2. [概要] をクリックします。
  3. 概要ページで、コピーを作成するためのアイコン [コピーを作成] をクリックします。
  4. Apps Script プロジェクトのコピーに名前を付けます。

    1. [Copy of Manage contacts in Google Chat] をクリックします。

    2. [プロジェクトのタイトル] に Contact Manager - Google Chat app と入力します。

    3. [名前を変更] をクリックします。

今後、特定の Google API を使用する場合やアプリを公開する場合は、Cloud プロジェクトを Apps Script プロジェクトに関連付ける必要があります。このガイドでは、その必要はありません。詳細については、Google Cloud プロジェクトのガイドをご覧ください。

Apps Script デプロイを作成する

すべてのコードが配置されたので、Apps Script プロジェクトをデプロイします。デプロイ ID は、Google Cloud で Chat アプリを構成するときに使用します。

  1. Apps Script で、Chat アプリのプロジェクトを開きます。

    Apps Script に移動

  2. [デプロイ] > [新しいデプロイ] をクリックします。

  3. If [Add-on] isn't already selected, next to [Select type], click deployment types プロジェクト設定のアイコン and select [Add-on].

  4. [説明] に、このバージョンの説明を入力します(例: Test of Contact Manager)。

  5. [デプロイ] をクリックします。Apps Script はデプロイが成功したことを報告し、デプロイ ID を提供します。

  6. [**コピー**] をクリックしてデプロイ ID をコピーし、[**完了**] をクリックします。

Google API Console で Chat アプリを構成する

このセクションでは、Apps Script プロジェクトから作成したデプロイの ID など、Chat アプリに関する情報を使用して、Google API Console で Google Chat API を構成する方法について説明します。

  1. Google API Console で、[メニュー] > [API とサービス] > [有効な API とサービス] > [Google Chat API] > [構成] をクリックします。

    Chat API の構成に移動

  2. [この Chat アプリを Google Workspace アドオンとしてビルドする] をオフにします。確認を求めるダイアログが開きます。ダイアログで [無効にする] をクリックします。

  3. [アプリ名] に Contact Manager と入力します。

  4. [アバターの URL] に https://developers.google.com/chat/images/contact-icon.png と入力します。

  5. [説明] に Manage your personal and business contacts と入力します。

  6. [Enable Interactive features] をクリックしてオンにします。

  7. [機能] で、[スペースとグループの会話に参加する] を選択します。

  8. [接続設定] で [Apps Script] を選択します。

  9. [**デプロイ ID**] に、Apps Script デプロイの作成時に前のセクションでコピーした Apps Script デプロイ ID を貼り付けます。

  10. [コマンド] で、スラッシュ コマンド /about/addContact を設定します。

    1. [スラッシュ コマンドを追加] をクリックして、最初のスラッシュ コマンドを設定します。
    2. [名前] に About と入力します。
    3. [**コマンド ID**] に「1」と入力します。
    4. [説明] に Learn how to use this Chat app to manage your contactsと入力します。
    5. [コマンドタイプ] で Slash command を選択します。
    6. [スラッシュ コマンド名] に「/about」と入力します。
    7. [ダイアログを開く] を選択します。
    8. [完了] をクリックします。
    9. [コマンドを追加] をクリックして、別のスラッシュ コマンドを設定します。
    10. [名前] に Add a contact と入力します。
    11. [Command ID] に「2」と入力します。
    12. [説明] に Submit information about a contactと入力します。
    13. [コマンドタイプ] で Slash command を選択します。
    14. [スラッシュ コマンド名] に「/addContact」と入力します。
    15. [ダイアログを開く] を選択します。
    16. [完了] をクリックします。
  11. [公開設定] で、 [特定のユーザーおよびグループにこの Chat 用アプリの利用を許可するYOUR DOMAIN] チェックボックスをオンにして、メールアドレスを入力します。

  12. [ログ] で [エラーを Logging に記録する] を選択します。

  13. [保存] をクリックします。構成が保存されたことを示すメッセージが表示されます。

Chat アプリを Chat にインストールしてテストする準備ができました。

Chat アプリをテストする

Chat アプリをテストするには、Chat アプリとのダイレクト メッセージ スペースを開いてメッセージを送信します。

  1. 信頼できるテスターとして追加したときに指定した Google Workspace アカウントを使用して Google Chat を開きます。

    Google Chat に移動

  2. [**チャットを新規作成**] をクリックします。
  3. [1 人以上のユーザーを追加] フィールドに、Chat アプリの名前を入力します。
  4. 結果から Chat アプリを選択します。ダイレクト メッセージが開きます。

  1. Chat アプリとの新しいダイレクト メッセージで、 「/addContact」と入力して enter を押します。

  2. 表示されるダイアログで、連絡先情報を入力します。

    1. [First and last name] テキスト フィールドに名前を入力します。
    2. [Birthdate] の日付選択ツールで日付を選択します。
    3. [Contact type] で、[Work] または [Personal] ラジオボタンを選択します。
  3. [Review and submit] をクリックします。

  4. 確認ダイアログで、送信した情報を確認し、[送信] をクリックします。Chat アプリは、テキスト メッセージで応答します。 CONTACT NAME has been added to your contacts.

  5. 必要に応じて、次の方法で連絡先フォームをテストして送信することもできます。

    • /about スラッシュ コマンドを使用します。Chat アプリは、テキスト メッセージと、Add a contact というアクセサリ ウィジェット ボタンで応答します。ボタンをクリックすると、連絡先フォームを含むダイアログが開きます。
    • スラッシュ コマンドなしで、Chat アプリにダイレクト メッセージを送信します(例: Hello)。Chat アプリは、連絡先フォームを含むテキストとカードで応答します。

クリーンアップ

このチュートリアルで使用したリソースについて、Google Cloud アカウントに課金されないようにするには、Cloud プロジェクトを削除することをおすすめします。

  1. Google API Console で、[リソースの管理] ページに移動します。 [Menu] > [IAM & Admin] > [Manage Resources] をクリックします。

    Resource Manager に移動

  2. プロジェクト リストで、削除するプロジェクトを選択し、 [Delete] . をクリックします。
  3. ダイアログでプロジェクト ID を入力し、[シャットダウン] をクリックしてプロジェクトを削除します。