Langkah-langkah yang dijelaskan di halaman ini menjelaskan cara membuat aplikasi iOS sederhana dengan cepat yang membuat permintaan ke YouTube Data API. Contoh ini menunjukkan cara mengambil data tentang channel YouTube GoogleDevelopers. Kode ini juga mencakup komentar yang menjelaskan cara mengubah kueri untuk mengambil data tentang channel YouTube pengguna saat ini.
Prasyarat
Untuk menjalankan quickstart ini, Anda memerlukan:
- Xcode 8.0 atau yang lebih baru.
- Pengelola dependensi CocoaPods.
- Akses ke internet dan browser web.
- Akun Google.
Langkah 1: Aktifkan YouTube Data API
-
Gunakan wizard ini untuk membuat atau memilih project di Konsol Google Developer dan mengaktifkan API secara otomatis. Klik Lanjutkan, lalu Buka kredensial.
-
Di halaman Buat kredensial, klik tombol Batal.
-
Di bagian atas halaman, pilih tab Layar persetujuan OAuth. Pilih Alamat email, masukkan Nama produk jika belum ditetapkan, lalu klik tombol Simpan.
-
Pilih tab Kredensial, klik tombol Buat kredensial, lalu pilih ID klien OAuth.
- Pilih jenis aplikasi iOS, masukkan nama "YouTube Data API
Quickstart", ID paket
com.example.QuickstartApp, lalu klik tombol Create.
Langkah 2: Siapkan ruang kerja
- Buka Xcode dan buat project baru:
- Klik File > New > Project, pilih template iOS > Application > Single View Application, lalu klik Next.
- Tetapkan Product Name ke "QuickstartApp", Organization Identifier
ke "com.example", dan Language ke
Objective-C.
Di bawah ID organisasi, Anda akan melihat Bundle Identifier yang dibuat dan cocok dengan iOS Bundle ID
(
com.example.QuickstartApp) yang Anda masukkan di langkah 1.b. - Klik Berikutnya.
- Pilih direktori tujuan untuk project, lalu klik Create.
- Tutup project dengan mengklik File > Close Project.
- Buka jendela Terminal dan buka direktori yang berisi file
QuickstartApp.xcodeprojyang baru saja Anda buat. Jalankan perintah berikut untuk membuat Podfile, menginstal library, dan membuka project XCode yang dihasilkan:
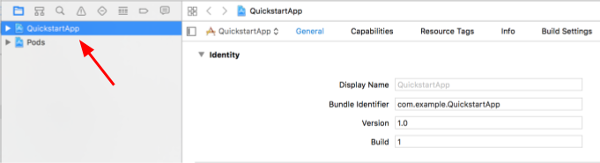
cat << EOF > Podfile &&
platform :ios, '8.0'
target 'QuickstartApp' do
    pod 'GoogleAPIClientForREST/YouTube', '~> 1.2.1'
    pod 'Google/SignIn', '~> 3.0.3'
end
EOF
pod install &&
open QuickstartApp.xcworkspace
Di XCode Project Navigator, pilih node project "QuickstartApp". Kemudian, klik item menu File > Add files to "QuickstartApp".
Temukan file
GoogleService-Info.plistyang didownload sebelumnya, lalu pilih file tersebut. Klik tombol Opsi.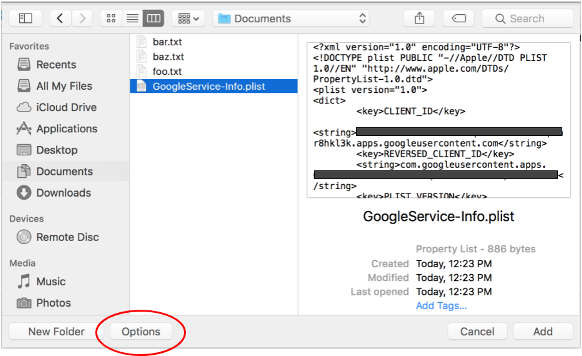
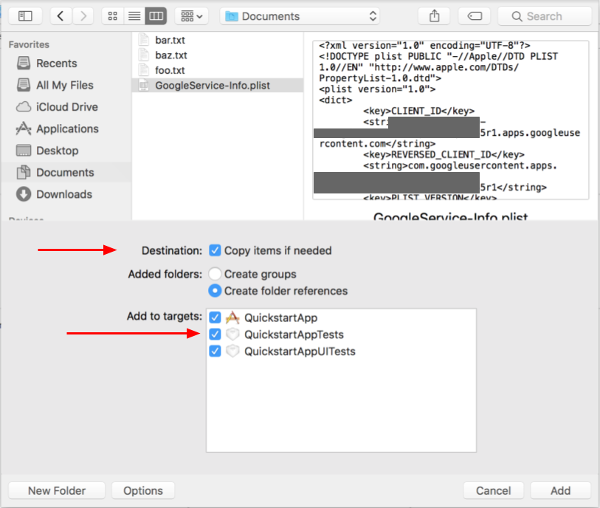
Buat pilihan berikut di jendela opsi, lalu klik tombol Tambahkan:
- Centang kotak Salin item jika perlu.
- Centang semua target yang tercantum di bagian Tambahkan ke target.
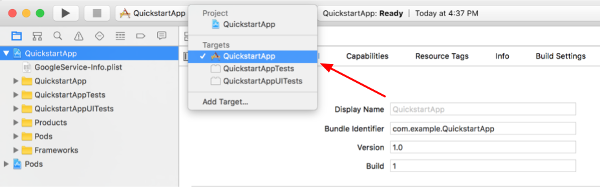
Dengan node project masih dipilih, pilih "QuickstartApp" di bagian TARGETS seperti yang ditunjukkan dalam dua gambar di bawah:
Klik area yang ditunjukkan dalam screenshot ini:
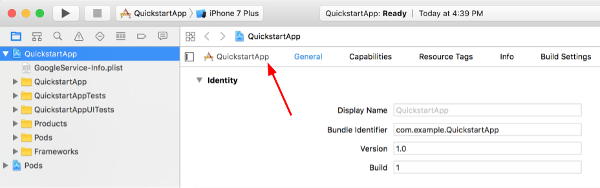
Kemudian pilih target yang tepat:
Pilih tab Info, lalu perluas bagian URL Types.
Klik tombol +, lalu tambahkan skema URL untuk ID klien terbalik Anda. Untuk menemukan nilai ini, buka file konfigurasi
GoogleService-Info.plistyang Anda pilih di langkah 2.f. Cari kunci REVERSED_CLIENT_ID. Salin nilai kunci tersebut, lalu tempelkan ke kotak URL Schemes di halaman konfigurasi. Biarkan kolom lainnya kosong.Bangun ulang project:
- Klik Product > Clean Build Folder (sambil menahan tombol option ).
- Klik Product > Build.
Langkah 3: Siapkan contoh
Ganti konten file berikut dengan kode yang diberikan:#import <UIKit/UIKit.h> @import GoogleSignIn; @interface AppDelegate : UIResponder <UIApplicationDelegate> @property (strong, nonatomic) UIWindow *window; @end
#import "AppDelegate.h"

@implementation AppDelegate

- (BOOL)application:(UIApplication *)application
didFinishLaunchingWithOptions:(NSDictionary *)launchOptions {
    // Initialize Google sign-in.
    [GIDSignIn sharedInstance].clientID = @"<YOUR_CLIENT_ID>";

    return YES;
}

- (BOOL)application:(UIApplication *)application
            openURL:(NSURL *)url
  sourceApplication:(NSString *)sourceApplication
         annotation:(id)annotation {
    return [[GIDSignIn sharedInstance] handleURL:url
                               sourceApplication:sourceApplication
                                      annotation:annotation];
}


@end
#import <UIKit/UIKit.h>
@import GoogleSignIn;
#import <GTLRYouTube.h>

@interface ViewController : UIViewController <GIDSignInDelegate, GIDSignInUIDelegate>

@property (nonatomic, strong) IBOutlet GIDSignInButton *signInButton;
@property (nonatomic, strong) UITextView *output;
@property (nonatomic, strong) GTLRYouTubeService *service;


@end
#import "ViewController.h"

@implementation ViewController

- (void)viewDidLoad {
    [super viewDidLoad];
    // Configure Google Sign-in.
    GIDSignIn* signIn = [GIDSignIn sharedInstance];
    signIn.delegate = self;
    signIn.uiDelegate = self;
    signIn.scopes = [NSArray arrayWithObjects:kGTLRAuthScopeYouTubeReadonly, nil];
    [signIn signInSilently];

    // Add the sign-in button.
    self.signInButton = [[GIDSignInButton alloc] init];
    [self.view addSubview:self.signInButton];

    // Create a UITextView to display output.
    self.output = [[UITextView alloc] initWithFrame:self.view.bounds];
    self.output.editable = false;
    self.output.contentInset = UIEdgeInsetsMake(20.0, 0.0, 20.0, 0.0);
    self.output.autoresizingMask = UIViewAutoresizingFlexibleHeight | UIViewAutoresizingFlexibleWidth;
    self.output.hidden = true;
    [self.view addSubview:self.output];

    // Initialize the service object.
    self.service = [[GTLRYouTubeService alloc] init];
}

- (void)signIn:(GIDSignIn *)signIn
didSignInForUser:(GIDGoogleUser *)user
     withError:(NSError *)error {
    if (error != nil) {
        [self showAlert:@"Authentication Error" message:error.localizedDescription];
        self.service.authorizer = nil;
    } else {
        self.signInButton.hidden = true;
        self.output.hidden = false;
        self.service.authorizer = user.authentication.fetcherAuthorizer;
        [self fetchChannelResource];
    }
}


// Construct a query and retrieve the channel resource for the GoogleDevelopers
// YouTube channel. Display the channel title, description, and view count.
- (void)fetchChannelResource {
    GTLRYouTubeQuery_ChannelsList *query =
    [GTLRYouTubeQuery_ChannelsList queryWithPart:@"snippet,statistics"];
  query.identifier = @"UC_x5XG1OV2P6uZZ5FSM9Ttw";
  // To retrieve data for the current user's channel, comment out the previous
  // line (query.identifier ...) and uncomment the next line (query.mine ...).
  // query.mine = true;

  [self.service executeQuery:query
                    delegate:self
           didFinishSelector:@selector(displayResultWithTicket:finishedWithObject:error:)];
}

// Process the response and display output
- (void)displayResultWithTicket:(GTLRServiceTicket *)ticket
             finishedWithObject:(GTLRYouTube_ChannelListResponse *)channels
                          error:(NSError *)error {
  if (error == nil) {
    NSMutableString *output = [[NSMutableString alloc] init];
    if (channels.items.count > 0) {
      [output appendString:@"Channel information:\n"];
      for (GTLRYouTube_Channel *channel in channels) {
        NSString *title = channel.snippet.title;
        NSString *description = channel.snippet.description;
        NSNumber *viewCount = channel.statistics.viewCount;
        [output appendFormat:@"Title: %@\nDescription: %@\nViewCount: %@\n", title, description, viewCount];
      }
    } else {
      [output appendString:@"Channel not found."];
    }
    self.output.text = output;
  } else {
    [self showAlert:@"Error" message:error.localizedDescription];
  }
}


// Helper for showing an alert
- (void)showAlert:(NSString *)title message:(NSString *)message {
    UIAlertController *alert =
    [UIAlertController alertControllerWithTitle:title
                                        message:message
                                 preferredStyle:UIAlertControllerStyleAlert];
    UIAlertAction *ok =
    [UIAlertAction actionWithTitle:@"OK"
                             style:UIAlertActionStyleDefault
                           handler:^(UIAlertAction * action)
     {
         [alert dismissViewControllerAnimated:YES completion:nil];
     }];
    [alert addAction:ok];
    [self presentViewController:alert animated:YES completion:nil];
}


@end
Langkah 4: Jalankan contoh
Beralih ke skema QuickstartApp dengan mengklik Product > Scheme > QuickstartApp dan jalankan contoh (Cmd+R) menggunakan simulator perangkat atau perangkat yang dikonfigurasi. Saat pertama kali dijalankan, contoh aplikasi akan meminta Anda untuk login ke Akun Google Anda dan mengizinkan akses.
Catatan
- Informasi otorisasi disimpan di Keychain Anda, sehingga eksekusi berikutnya tidak akan meminta otorisasi.