קל לארגן דפים בעזרת אוספים
אפשר לשמור ולסווג תוכן על סמך ההעדפות שלך.
במדריך הזה למתחילים מוסבר איך להגדיר אפליקציית שורת פקודה פשוטה ב-Java ששולחת בקשות אל YouTube Data API. במדריך הזה למתחילים מוסבר איך ליצור שתי בקשות API:
תשתמשו במפתח API שמזהה את האפליקציה שלכם כדי לאחזר מידע על ערוץ YouTube של GoogleDevelopers.
תשתמשו במזהה לקוח ב-OAuth 2.0 כדי לשלוח בקשה מאושרת לאחזור מידע על ערוץ YouTube שלכם.
יצירת מפתח API
תשתמשו במפתח ה-API כדי לשלוח בקשות API שלא דורשות הרשאת משתמש. לדוגמה, לא צריך הרשאת משתמש כדי לאחזר מידע על ערוץ YouTube ציבורי.
יוצרים מזהה לקוח ב-OAuth 2.0
מגדירים את סוג האפליקציה לאחר. צריך להשתמש בפרטי כניסה של OAuth 2.0 לבקשות שדורשות הרשאת משתמש. לדוגמה, צריך הרשאת משתמש כדי לאחזר מידע על ערוץ YouTube של המשתמש שאומת כרגע.
מורידים את קובץ ה-JSON שמכיל את פרטי הכניסה שלכם ב-OAuth 2.0. שם הקובץ הוא client_secret_CLIENTID.json, כאשר CLIENTID הוא מזהה הלקוח של הפרויקט.
שלב 2: הכנת הפרויקט
כדי להכין את פרויקט Gradle, מבצעים את השלבים הבאים:
בספריית העבודה, מריצים את הפקודות הבאות כדי ליצור מבנה פרויקט חדש:
מעבירים את קובץ ה-JSON שהורדתם אחרי שיצרתם את מזהה הלקוח ב-OAuth 2.0 לספרייה src/main/resources שמתחת לספריית העבודה, ומשנים את שם הקובץ ל-client_secret.json.
פותחים את הקובץ build.gradle בספריית העבודה ומחליפים את התוכן שלו בתוכן הבא:
בקובץ build.gradle, צריך להחליף את המשתנים REVISION ו-CL_VERSION בשני ערכים ממסמכי ספריית הלקוח של YouTube Data API. בצילום המסך שלמטה, שבו מוצגת התיעוד של YouTube Analytics API, אפשר לראות איפה מופיעים שני המשתנים בדף.
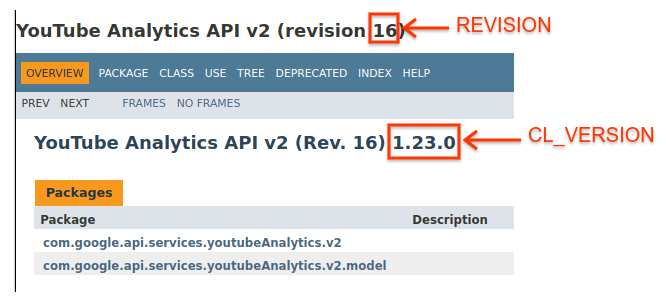
שלב 3: מגדירים ומריצים את הדוגמה
משתמשים בווידג'ט APIs Explorer בחלונית הצדדית כדי לקבל קוד לדוגמה לאחזור מידע על ערוץ YouTube של GoogleDevelopers. הבקשה הזו משתמשת במפתח API כדי לזהות את האפליקציה, והיא לא דורשת הרשאת משתמש או הרשאות מיוחדות מהמשתמש שמפעיל את הדוגמה.
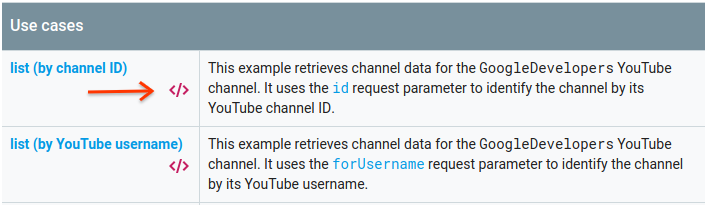
בקטע 'תרחישים נפוצים לדוגמה' בדף הזה יש טבלה עם הסברים על כמה דרכים נפוצות לשימוש בשיטה. הרישום הראשון בטבלה
מיועד לתוצאות של רישום לפי מזהה ערוץ.
לוחצים על סמל הקוד של הרישום הראשון כדי לפתוח את Google APIs Explorer ולמלא אותו.
בצד ימין של API Explorer במסך מלא מוצגים הדברים הבאים:
מתחת לכותרת Request parameters מופיעה רשימה של פרמטרים שהשיטה תומכת בהם. צריך להגדיר את ערכי הפרמטרים
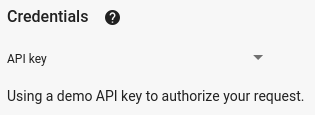
 part ו-id. ערך הפרמטר id, UC_x5XG1OV2P6uZZ5FSM9Ttw, הוא המזהה של ערוץ YouTube של GoogleDevelopers.
מתחת לפרמטרים, יש קטע בשם Credentials (פרטי כניסה). בתפריט הנפתח בקטע הזה אמור להופיע הערך API key. כברירת מחדל, הכלי APIs Explorer משתמש בפרטי כניסה להדגמה כדי שיהיה קל יותר להתחיל. אבל תצטרכו להשתמש במפתח API משלכם כדי להריץ את הדוגמה באופן מקומי.
בצד שמאל של API Explorer במסך המלא מוצגות כרטיסיות עם דוגמאות קוד בשפות שונות. בוחרים בכרטיסייה Java.
מעתיקים את הקוד לדוגמה ושומרים אותו בקובץ בשם src/main/java/ApiExample.java.
כל דוגמה משתמשת באותו שם מחלקה (ApiExample) כדי שלא תצטרכו לשנות את הקובץ build.gradle כדי להריץ דוגמאות שונות.
בדוגמה שהורדתם, מחפשים את המחרוזת YOUR_API_KEY ומחליפים אותה במפתח ה-API שיצרתם בשלב 1 של המדריך למתחילים.
מריצים את הדוגמה משורת הפקודה. בספריית העבודה, מריצים את הפקודה:
gradle -q run
הדוגמה צריכה להריץ את הבקשה ולהדפיס את התשובה ל-STDOUT.
שלב 4: מריצים בקשה מורשית
בשלב הזה, תשנו את דוגמת הקוד כך שבמקום לאחזר מידע על ערוץ YouTube של GoogleDevelopers, היא תאחזר מידע על ערוץ YouTube שלכם. הבקשה הזו מחייבת הרשאת משתמש.
חוזרים למאמרי העזרה של ה-API בנושא השיטה channels.list.
בקטע 'תרחישי שימוש נפוצים', לוחצים על סמל הקוד של הרשימה השלישית בטבלה. תרחיש השימוש הזה הוא קריאה לשיטה list עבור 'הערוץ שלי'.
שוב, בצד ימין של הכלי APIs Explorer במסך מלא, תופיע רשימה של פרמטרים ואחריה הקטע Credentials. עם זאת, יש שני שינויים מהדוגמה שבה אחזרתם מידע על הערוץ GoogleDevelopers:
בקטע הפרמטרים, במקום להגדיר את ערך הפרמטר
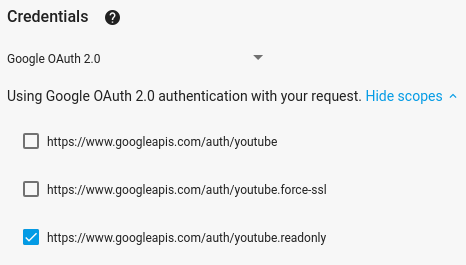
 id, צריך להגדיר את ערך הפרמטר mine ל-true. הפקודה הזו מורה לשרת ה-API לאחזר מידע על הערוץ של המשתמש שאומת כרגע.
[null,null,["עדכון אחרון: 2025-08-21 (שעון UTC)."],[[["\u003cp\u003eThis guide walks through setting up a Java command-line application to interact with the YouTube Data API.\u003c/p\u003e\n"],["\u003cp\u003eYou will learn to make API requests using both an API key for public data and OAuth 2.0 for accessing user-specific data.\u003c/p\u003e\n"],["\u003cp\u003eThe tutorial provides step-by-step instructions for project setup, credential configuration, and sample code execution using Gradle.\u003c/p\u003e\n"],["\u003cp\u003eYou'll use an API key to retrieve public information about the GoogleDevelopers YouTube channel and OAuth 2.0 credentials to access information about your own YouTube channel.\u003c/p\u003e\n"],["\u003cp\u003eThe guide covers how to configure your project, retrieve sample code, replace placeholders with your actual credentials, and execute the Java code to make API calls.\u003c/p\u003e\n"]]],["This guide demonstrates how to create a Java command-line application that interacts with the YouTube Data API. It involves two API requests: one using an API key to retrieve data about the GoogleDevelopers YouTube channel, and another using OAuth 2.0 to get information about the user's own channel. You will need to set up a project and enable the YouTube Data API in the Google API Console, creating both an API key and an OAuth 2.0 client ID. After that you need to prepare the gradle project and run the sample.\n"],null,["# Java Quickstart\n\nThis quickstart guide explains how to set up a simple, Java\ncommand-line application that makes requests to the YouTube Data API. This\nquickstart actually explains how to make two API requests:\n\n1. You will use an API key, which identifies your application, to retrieve information about the GoogleDevelopers YouTube channel.\n2. You will use an OAuth 2.0 client ID to submit an *authorized* request that retrieves information about your own YouTube channel.\n\n| **Note:** More generally, you can follow the instructions for the first example for any use case that uses an API key or the instructions for the second example for any use case that requires authorization using OAuth 2.0. See the [use cases and code samples tool](/youtube/v3/code_samples/code_snippets) for more examples.\n\nPrerequisites\n-------------\n\nTo run this quickstart, you'll need:\n\n- Java 1.7 or greater.\n- [Gradle 2.3 or greater](http://gradle.org/downloads).\n- Access to the internet and a web browser.\n- A Google account.\n\nStep 1: Set up your project and credentials\n-------------------------------------------\n\nCreate or select a project in the [API Console](https://console.cloud.google.com/). Complete the following tasks in the API Console for your project:\n\n1. In the [library panel](https://console.developers.google.com/apis/library),\n search for the YouTube Data API v3. Click into the listing for that API and\n make sure the API is enabled for your project.\n\n2. In the [credentials\n panel](https://console.developers.google.com/apis/credentials),\n create two credentials:\n\n 1. **Create an API key**\n You will use the API key to make API requests that do\n not require user authorization. For example, you do not need user\n authorization to retrieve information about a public YouTube channel.\n\n 2. **Create an OAuth 2.0 client ID**\n\n Set the application type to **Other**. You need to use OAuth 2.0\n credentials for requests that require user authorization. For example,\n you need user authorization to retrieve information about the currently\n authenticated user's YouTube channel.\n\n Download the JSON file that contains your OAuth 2.0 credentials. The\n file has a name like `client_secret_CLIENTID.json`, where `CLIENTID` is\n the client ID for your project.\n\nStep 2: Prepare the project\n---------------------------\n\nComplete the following steps to prepare your Gradle project:\n\n1. In your working directory, run the following commands to create a new\n project structure:\n\n $ gradle init --type basic\n $ mkdir -p src/main/java src/main/resources\n\n2. Move the JSON file that you downloaded after creating your OAuth 2.0 client\n ID to the `src/main/resources` directory below your working directory, and\n rename the file to `client_secret.json`.\n\n3. Open the `build.gradle` file in your working directory and replace its\n contents with the following:\n\n ```java\n apply plugin: 'java'\n apply plugin: 'application'\n\n mainClassName = 'ApiExample'\n sourceCompatibility = 1.7\n targetCompatibility = 1.7\n version = '1.0'\n\n repositories {\n mavenCentral()\n }\n\n dependencies {\n compile 'com.google.api-client:google-api-client:1.23.0'\n compile 'com.google.oauth-client:google-oauth-client-jetty:1.23.0'\n compile 'com.google.apis:google-api-services-youtube:v3-rev\u003cvar translate=\"no\"\u003eREVISION\u003c/var\u003e-CL_VERSION'\n }\n ```\n4. In the `build.gradle` file, you need to replace the\n \u003cvar translate=\"no\"\u003eREVISION\u003c/var\u003e and \u003cvar translate=\"no\"\u003eCL_VERSION\u003c/var\u003e variables with two values from\n the [client library\n documentation](https://developers.google.com/resources/api-libraries/documentation/youtube/v3/java/latest/)\n for the YouTube Data API. The screenshot below, which shows the\n documentation for the YouTube Analytics API, shows where the two variables\n appear on the page.\n\nStep 3: Set up and run the sample\n---------------------------------\n\nUse the APIs Explorer widget in the side panel to obtain sample code for\nretrieving information about the GoogleDevelopers YouTube channel. This request\nuses an API key to identify your application, and it does not require user\nauthorization or any special permissions from the user running the sample.\n\n1. Open the documentation for the API's [channels.list](/youtube/v3/docs/channels/list) method.\n2. On that page, the \"Common use cases\" section contains a table that explains\n several common ways that the method is used. The first listing in the table\n is for listing results by channel ID.\n\n Click the code symbol for the first listing to open and populate the\n fullscreen APIs Explorer.\n\n3. The left side of the fullscreen APIs Explorer shows the following:\n\n 1. Below the **Request parameters** header, there is a list of parameters\n that the method supports. The `part` and `id` parameter values should\n be set. The `id` parameter value, `UC_x5XG1OV2P6uZZ5FSM9Ttw`, is the\n ID for the GoogleDevelopers YouTube channel.\n\n 2. Below the parameters, there is a section named **Credentials** . The\n pulldown menu in that section should display the value **API key**. The\n APIs Explorer uses demo credentials by default to make it easier to get\n started. But you'll use your own API key to run the sample locally.\n\n4. The right side of the fullscreen APIs Explorer shows tabs with code samples\n in different languages. Select the **Java** tab.\n\n5. Copy the code sample and save it in a file named\n `src/main/java/ApiExample.java`.\n\n Every sample uses the same class name (`ApiExample`) so that you don't\n need to modify the `build.gradle` file to run different samples.\n\n6. In the sample that you downloaded, find the `YOUR_API_KEY` string and\n replace that with the API key that you created in step 1 of this quickstart.\n\n7. Run the sample from the command line. In your working directory, run:\n\n\n `gradle -q run`\n\n\n8. The sample should execute the request and print the response to `STDOUT`.\n\nStep 4: Run an authorized request\n---------------------------------\n\nIn this step, you'll modify your code sample so that instead of retrieving\ninformation about the GoogleDevelopers YouTube channel, it retrieves information\nabout *your* YouTube channel. This request does require user authorization.\n\n1. Go back to the documentation for the API's\n [channels.list](/youtube/v3/docs/channels/list) method.\n\n2. In the \"Common use cases\" section, click the code symbol for the third\n listing in the table. That use case is to call the `list` method for \"my\n channel.\"\n\n3. Again, in the left side of the fullscreen APIs Explorer, you will see a\n list of parameters followed by the **Credentials** section. However, there\n are two changes from the example where you retrieved information about the\n GoogleDevelopers channel:\n\n 1. In the parameters section, instead of the `id` parameter value being\n set, the `mine` parameter value should be set to `true`. This instructs\n the API server to retrieve information about the currently authenticated\n user's channel.\n\n 2. In the **Credentials** section, the pulldown menu should select the\n option for **Google OAuth 2.0**.\n\n In addition, if you click the **Show scopes** link, the\n **https://www.googleapis.com/auth/youtube.readonly** scope should be\n checked.\n\n4. As with the previous example, select the **Java** tab,\n copy the code sample, and save it to `src/main/java/ApiExample.java`.\n\n \u003cbr /\u003e\n\n5. Run the sample from the command line. In your working directory, run:\n\n\n `gradle -q run`\n\n\n6.\n The sample should attempt to open a new window or tab in your default\n browser. If this fails, copy the URL from the terminal and manually open it\n in your browser.\n\n \u003cbr /\u003e\n\n If you are not already logged into your Google account, you will be\n prompted to log in. If you are logged into multiple Google accounts, you\n will be asked to select one account to use for the authorization.\n7. Click the button to grant your application access to the scopes specified in\n your code sample.\n\n8.\n The sample will proceed automatically, and you may close the browser tab\n used for the auth flow.\n\n \u003cbr /\u003e\n\n The API response should again be printed to `STDOUT`.\n\nFurther reading\n---------------\n\n- [Google Developers Console help documentation](/console/help/new)\n- [Google APIs Client Library for Java documentation](/api-client-library/java)\n- [YouTube Data API Javadoc documentation](/resources/api-libraries/documentation/youtube/v3/java/latest)\n- [YouTube Data API reference documentation](/youtube/v3/docs)"]]