Authentication
コレクションでコンテンツを整理
必要に応じて、コンテンツの保存と分類を行います。
Google Ad Manager API の呼び出しはすべて、オープン スタンダードである OAuth2 を使って認証する必要があります。
ユーザーがサードパーティ アプリケーションに権限を付与できるため、
アプリケーションがユーザーに代わってウェブサービスとやり取りできます。OAuth2 により、
ユーザーのアド マネージャー アカウントにアクセスするための Ad Manager API クライアント アプリケーションから
ユーザーのユーザー名とパスワードの処理や保存の必要がありません。
OAuth2 認証情報を作成する
OAuth2 認証情報を生成する手順は次のとおりです。
1. 認証タイプを決定する
以下の表で、最適な認証タイプを確認してください
アド マネージャー API アプリケーションに:
OAuth2 認証タイプを選択する |
サービス アカウント |
自社のアド マネージャー データにのみアクセスする場合は、このオプションを選択します。
詳しくはこちらをご覧ください。
|
ウェブ アプリケーション |
Google アカウントへのアクセス権を付与するすべてのユーザーとして認証する場合は、これを選択します。
アド マネージャー データへのアクセス権限をアプリケーションに付与する必要があります。
詳しくはこちらをご覧ください。
|
2. OAuth2 認証情報を作成する
認証タイプを決定したら、対応するタブをクリックします。
にアクセスして、手順に沿って OAuth2 認証情報を生成します。
<ph type="x-smartling-placeholder">
</ph>
<ph type="x-smartling-placeholder"></ph>
- <ph type="x-smartling-placeholder"></ph>を開きます。
Google API Console の [認証情報] ページをご覧ください。
- プロジェクトのプルダウンで [新しいプロジェクトを作成] を選択し、名前を入力します。
指定し、必要に応じて、指定されたプロジェクト ID を編集します。[
作成:
- [認証情報] ページで [認証情報を作成] を選択し、
[Service account key] を選択します。
- [新しいサービス アカウント] を選択し、[JSON] を選択します。
- [Create] をクリックして、秘密鍵を含むファイルをダウンロードします。
で確認できます。
<ph type="x-smartling-placeholder"></ph>
- <ph type="x-smartling-placeholder"></ph>を開きます。
Google API Console の [認証情報] ページをご覧ください。
- プロジェクトのプルダウンで [新しいプロジェクトを作成] を選択し、名前を入力します。
(必要に応じてプロジェクト ID を編集します)、[
作成:
- [認証情報] ページで [認証情報を作成] を選択し、
[OAuth クライアント ID] を選択します。
- プロダクト名の設定を求められる場合があります。
同意画面ページ[同意画面を設定] をクリックします。
必要な情報を入力して [Save] をクリックすると、
[Credentials] ページ。
- [アプリケーションのタイプ] は [ウェブ アプリケーション] を選択します。詳しくは、
JavaScript 生成元、リダイレクト URI、またはその両方を入力します。
- [作成] をクリックします。
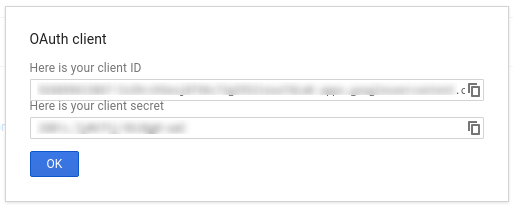
- 表示されたページで、クライアント ID とクライアント シークレットをコピーします。
クリップボードにコピーできます。クライアントの構成時に必要になります。
ライブラリです。
サードパーティのデベロッパーは、クライアントにこの設定を行わなければならない場合があります。
自動的に行われます。
<ph type="x-smartling-placeholder">
</ph>
<ph type="x-smartling-placeholder"></ph>
- アド マネージャー ネットワークに移動します。
- [管理者] タブをクリックします。
- [API アクセス] が有効になっていることを確認します。
- [サービス アカウント ユーザーを追加] ボタンをクリックします。
- サービス アカウントのメールアドレスを使用してフォームに入力します。「
そのサービス アカウントのユーザーに、サービス アカウントの
そのサービス アカウント ユーザーが Compute Engine の
できます。
- [Save] ボタンをクリックします。次の内容を確認するメッセージが表示されます。
サービスアカウントを追加できます
- [ユーザー] タブに移動して既存のサービス アカウント ユーザーを表示し、
[サービス アカウント] フィルタをクリックします。
で確認できます。
<ph type="x-smartling-placeholder"></ph>
- アド マネージャー ネットワークに移動します。
- [管理者] タブをクリックします。
- [API アクセス] が有効になっていることを確認します。
以下の適切なガイドに沿って、クライアント ライブラリの認証情報を使用します。
Google のクライアント ライブラリを使用しない場合は、実装する必要があります。
OAuth2 サービス アカウントまたはウェブ
ユーザー自身で行えます
舞台裏
以下で説明するように、クライアント ライブラリによって自動的に処理されます。
裏で行われていることに関心がある場合にのみ、以下をお読みください。
このセクションは、すでに使い慣れている上級ユーザーを対象としています。
OAuth2 仕様と
Google API で OAuth2 を使用する方法を確認する。
Ad Manager API に対するリクエストの HTTP ヘッダーには必ず、
次の形式にします。
Authorization: Bearer ACCESS_TOKEN
例:
POST … HTTP/1.1
Host: …
Authorization: Bearer 1/fFAGRNJru1FTz70BzhT3Zg
Content-Type: text/xml;charset=UTF-8
Content-Length: …
<?xml version="1.0"?>
<soap:Envelope xmlns:soap="http://www.w3.org/2001/12/soap-envelope">
…
</soap:Envelope>
範囲
1 つのアクセス トークンで複数の API にさまざまなレベルのアクセス権を付与できます。
scope
という変数パラメータが、リソースのセットを制御し、
アクセス トークンで許可される操作を制御します。アクセス トークンのリクエストの間、
scope
パラメータで 1 つ以上の値を送信する。
アド マネージャーのスコープは 1 つのみです。承認を受ける必要がある
ユーザーレベルで定義できます
範囲 |
権限 |
https://www.googleapis.com/auth/dfp |
アド マネージャーでキャンペーンを表示、管理します。 |
特に記載のない限り、このページのコンテンツはクリエイティブ・コモンズの表示 4.0 ライセンスにより使用許諾されます。コードサンプルは Apache 2.0 ライセンスにより使用許諾されます。詳しくは、Google Developers サイトのポリシーをご覧ください。Java は Oracle および関連会社の登録商標です。
最終更新日 2025-08-31 UTC。
[null,null,["最終更新日 2025-08-31 UTC。"],[[["\u003cp\u003eAll Google Ad Manager API calls require OAuth2 authorization for secure access to user data without storing sensitive login information.\u003c/p\u003e\n"],["\u003cp\u003eChoose between Service Account or Web Application authentication type based on your application's needs.\u003c/p\u003e\n"],["\u003cp\u003eGenerate OAuth2 credentials by following instructions for your chosen authentication type via the Google API Console.\u003c/p\u003e\n"],["\u003cp\u003eConfigure your Ad Manager network settings and client library according to provided guidelines for the specific authentication method and programming language.\u003c/p\u003e\n"],["\u003cp\u003eClient libraries handle most OAuth2 complexities but you can delve into the background details concerning HTTP headers and scopes if needed.\u003c/p\u003e\n"]]],["Google Ad Manager API access requires OAuth2 authorization. First, choose between \"Service account\" for personal data or \"Web application\" for user-authorized access. Then, create OAuth2 credentials via the Google API Console, either generating a JSON key for service accounts or a client ID and secret for web applications. Next, configure the Ad Manager network to allow API access, adding the service account email if applicable. Lastly, configure and use a client library, or implement the OAuth2 flow directly, including the access token in the HTTP header.\n"],null,["# Authentication\n\nAll Google Ad Manager API calls must be authorized through [OAuth2](http://oauth.net/2/) an open standard that\nallows users to grant permissions to third-party applications, so the\napplication can interact with web services on the user's behalf. OAuth2 enables\nyour Ad Manager API client application to access a user's Ad Manager account\nwithout having to handle or store the user's username or password.\n\nGenerate OAuth2 credentials\n---------------------------\n\nPerform the following steps to generate the OAuth2 credentials.\n\n### 1. Determine your authentication type\n\nCheck the table below to see which **authentication type** is most appropriate\nfor your Ad Manager API application:\n\n| Choose your OAuth2 authentication type ||\n|---------------------|-----------------------------------------------------------------------------------------------------------------------------------------------------------------------------------|\n| **Service account** | Choose this if you only need access to your own Ad Manager data. [Learn more.](/identity/protocols/OAuth2ServiceAccount) |\n| **Web application** | Choose this if you want to authenticate as any user who grants permission to your application to access their Ad Manager data. [Learn more.](/identity/protocols/OAuth2WebServer) |\n\n### 2. Create OAuth2 credentials\n\nOnce you've determined your authentication type, click the corresponding tab\nbelow and follow the instructions to generate the OAuth2 credentials:\nService Account\n\n1. Open the [Google API Console Credentials page](https://console.cloud.google.com/apis/credentials).\n2. From the project drop-down, choose **Create a new project** , enter a name for the project, and optionally, edit the provided Project ID. Click **Create**.\n3. On the Credentials page, select **Create credentials** , then select **Service account key**.\n4. Select [New service account](//console.developers.google.com/apis/credentials/serviceaccountkey), and select **JSON**.\n5. Click **Create** to download a file containing a private key.\nWeb application\n\n1. Open the [Google API Console Credentials page](https://console.cloud.google.com/apis/credentials).\n2. From the project drop-down, choose **Create a new project** , enter a name for the project (and optionally, edit the provided Project ID), and click **Create**.\n3. On the Credentials page, select **Create credentials** , then select **OAuth client ID**.\n4. You may be prompted to set a product name on the Consent Screen page; if so, click **Configure consent screen** , supply the requested information, and click **Save** to return to the Credentials page.\n5. Select **Web Application** for the **Application Type**. Follow the instructions to enter JavaScript origins, redirect URIs, or both.\n6. Click **Create**.\n7. On the page that appears, copy the **client ID** and **client secret** to your clipboard, as you will need them when you configure your client library.\n\n### 3. Configure your Ad Manager network\n\nIf you are a third-party developer, you may need to have your client do this\nstep for you.\nService Account\n\n1. Go to your [Ad Manager network](//admanager.google.com).\n2. Click the **Admin** tab.\n3. Ensure that **API access** is enabled.\n4. Click the **Add a service account user** button.\n5. Fill in the form using the service account email. The service account user must be granted with permissions to access the entities as if that service account user would access the entities on the UI.\n6. Click on the **Save** button. A message should appear, confirming the addition of your service account.\n7. View existing service account users by going to the Users tab and then clicking the **Service Account** filter.\nWeb application\n\n1. Go to your [Ad Manager network](//admanager.google.com).\n2. Click the **Admin** tab.\n3. Ensure that **API access** is enabled.\n\n### 4. Configure and use a client library\n\nFollow the appropriate guide below to use the credentials in your client library: \n\n### Java\n\n- [Service account flow](//github.com/googleads/googleads-java-lib/wiki/API-access-using-own-credentials-(server-to-server-flow)#step-2---setting-up-the-client-library)\n- [Web app flow](//github.com/googleads/googleads-java-lib/wiki/API-access-on-behalf-of-your-clients-(web-flow)#step-2---setting-up-the-client-library)\n\n### .NET\n\n- [Service account flow](//github.com/googleads/googleads-dotnet-lib/wiki/API-access-using-own-credentials-(server-to-server-flow)#step-2---setting-up-the-client-library)\n- [Web app flow](//github.com/googleads/googleads-dotnet-lib/wiki/API-access-on-behalf-of-your-clients-(web-flow)#step-2---setting-up-the-client-library)\n\n### Python\n\n- [Service account flow](//github.com/googleads/googleads-python-lib/wiki/API-access-using-own-credentials-(server-to-server-flow)#step-2---setting-up-the-client-library)\n- [Web app flow](//github.com/googleads/googleads-python-lib/wiki/API-access-on-behalf-of-your-clients-(web-flow)#step-2---setting-up-the-client-library)\n\n### PHP\n\n- [Service account flow](https://github.com/googleads/googleads-php-lib/wiki/API-access-using-own-credentials-(server-to-server-flow))\n- [Web app flow](https://github.com/googleads/googleads-php-lib/wiki/API-access-on-behalf-of-your-clients-(web-flow))\n\n### Ruby\n\n- [Service account flow](//github.com/googleads/google-api-ads-ruby/wiki/API-access-using-own-credentials-(server-to-server-flow)#step-2---setting-up-the-client-library)\n- [Web app flow](//github.com/googleads/google-api-ads-ruby/wiki/API-access-on-behalf-of-your-clients-(web-flow)#step-2---setting-up-the-client-library)\n\n\u003cbr /\u003e\n\nIf you choose not to use one of our client libraries, you'll need to implement\nthe OAuth2 [service account](/identity/protocols/OAuth2ServiceAccount) or [web\napp](/identity/protocols/OAuth2WebServer) flow yourself.\n\nBehind the scenes\n-----------------\n\nOur client libraries automatically take care of the details covered below so\nonly read on if you're interested in what's happening behind the scenes.\nThis section is intended for advanced users who are already familiar\nwith the [OAuth2 specification](http://tools.ietf.org/html/rfc6749) and\nknow how to [use OAuth2 with Google APIs](/accounts/docs/OAuth2).\n\n#### HTTP request header\n\nThe HTTP header in every request to the Ad Manager API must include an access\ntoken in this form: \n\n```actionscript-3\nAuthorization: Bearer ACCESS_TOKEN\n```\n\nFor example: \n\n```http\nPOST ... HTTP/1.1\nHost: ...\nAuthorization: Bearer 1/fFAGRNJru1FTz70BzhT3Zg\nContent-Type: text/xml;charset=UTF-8\nContent-Length: ...\n\n\u003c?xml version=\"1.0\"?\u003e\n\u003csoap:Envelope xmlns:soap=\"http://www.w3.org/2001/12/soap-envelope\"\u003e\n…\n\u003c/soap:Envelope\u003e\n```\n\n#### Scope\n\nA single access token can grant varying degrees of access to multiple APIs. A\nvariable parameter called `scope` controls the set of resources and\noperations that an access token permits. During the access token request, your\napplication sends one or more values in the `scope` parameter.\n\nAd Manager has only one scope, shown below. Authorization should be performed\nat the user level within the product.\n\n| Scope | Permissions |\n|---------------------------------------|-----------------------------------------------|\n| `https://www.googleapis.com/auth/dfp` | View and manage your campaigns on Ad Manager. |"]]