Authentication
จัดทุกอย่างให้เป็นระเบียบอยู่เสมอด้วยคอลเล็กชัน
บันทึกและจัดหมวดหมู่เนื้อหาตามค่ากำหนดของคุณ
การเรียก Google Ad Manager API ทั้งหมดต้องได้รับสิทธิ์ผ่าน OAuth2 ซึ่งเป็นมาตรฐานแบบเปิดที่
อนุญาตให้ผู้ใช้ให้สิทธิ์แก่แอปพลิเคชันของบุคคลที่สาม
แอปพลิเคชันสามารถโต้ตอบกับบริการทางเว็บในนามของผู้ใช้ได้ เปิดใช้ OAuth2
แอปพลิเคชันไคลเอ็นต์ Ad Manager API ของคุณในการเข้าถึงบัญชี Ad Manager ของผู้ใช้
โดยไม่ต้องจัดการหรือจัดเก็บชื่อผู้ใช้หรือรหัสผ่านของผู้ใช้
สร้างข้อมูลเข้าสู่ระบบ OAuth2
ทำตามขั้นตอนต่อไปนี้เพื่อสร้างข้อมูลเข้าสู่ระบบ OAuth2
1. ระบุประเภทการตรวจสอบสิทธิ์
โปรดดูตารางด้านล่างเพื่อดูว่าประเภทการตรวจสอบสิทธิ์ใดเหมาะสมที่สุด
สำหรับแอปพลิเคชัน Ad Manager API
เลือกประเภทการตรวจสอบสิทธิ์ OAuth2 |
บัญชีบริการ |
เลือกตัวเลือกนี้หากต้องการสิทธิ์เข้าถึงข้อมูล Ad Manager ของคุณเองเท่านั้น
ดูข้อมูลเพิ่มเติม
|
เว็บแอปพลิเคชัน |
เลือกตัวเลือกนี้หากต้องการตรวจสอบสิทธิ์เป็นผู้ใช้ใดก็ตามที่ให้สิทธิ์
สิทธิ์ในการเข้าถึงแอปพลิเคชันของคุณเพื่อเข้าถึงข้อมูล Ad Manager
ดูข้อมูลเพิ่มเติม
|
2. สร้างข้อมูลเข้าสู่ระบบ OAuth2
เมื่อคุณระบุประเภทการตรวจสอบสิทธิ์แล้ว ให้คลิกแท็บที่เกี่ยวข้อง
ด้านล่างและทำตามวิธีการเพื่อสร้างข้อมูลเข้าสู่ระบบ OAuth2
- เปิด
หน้าข้อมูลเข้าสู่ระบบคอนโซล Google API
- เลือกสร้างโปรเจ็กต์ใหม่จากเมนูแบบเลื่อนลงของโปรเจ็กต์ จากนั้นป้อนชื่อ
สำหรับโปรเจ็กต์และแก้ไขรหัสโปรเจ็กต์ที่ระบุ (ไม่บังคับ) คลิก
สร้าง
- ในหน้าข้อมูลเข้าสู่ระบบ ให้เลือกสร้างข้อมูลเข้าสู่ระบบ จากนั้นเลือก
ให้เลือกคีย์บัญชีบริการ
- เลือกบัญชีบริการใหม่ แล้วเลือก JSON
- คลิกสร้างเพื่อดาวน์โหลดไฟล์ที่มีคีย์ส่วนตัว
- เปิด
หน้าข้อมูลเข้าสู่ระบบคอนโซล Google API
- เลือกสร้างโปรเจ็กต์ใหม่จากเมนูแบบเลื่อนลงของโปรเจ็กต์ จากนั้นป้อนชื่อ
สำหรับโครงการ (และแก้ไขโค้ดโครงการที่ระบุหรือไม่ก็ได้) และคลิก
สร้าง
- ในหน้าข้อมูลเข้าสู่ระบบ ให้เลือกสร้างข้อมูลเข้าสู่ระบบ จากนั้นเลือก
เลือกรหัสไคลเอ็นต์ OAuth
- ระบบอาจแจ้งให้คุณตั้งชื่อผลิตภัณฑ์ใน
หน้าหน้าจอคำยินยอม หากมี ให้คลิกกำหนดค่าหน้าจอคำยินยอม
ให้ข้อมูลที่ขอ และคลิกบันทึกเพื่อกลับไปยัง
หน้าข้อมูลเข้าสู่ระบบ
- เลือกเว็บแอปพลิเคชันสำหรับประเภทแอปพลิเคชัน ทำตาม
วิธีการป้อนต้นทางของ JavaScript, เปลี่ยนเส้นทาง URI หรือทั้งสองอย่าง
- คลิกสร้าง
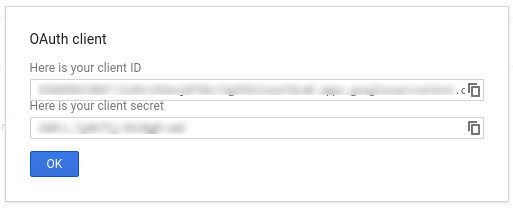
- ในหน้าที่ปรากฏขึ้น ให้คัดลอกรหัสไคลเอ็นต์และรหัสลับไคลเอ็นต์
ลงในคลิปบอร์ด เนื่องจากคุณจะต้องใช้ข้อมูลนี้เมื่อกำหนดค่าไคลเอ็นต์
ไลบรารี
หากคุณเป็นนักพัฒนาซอฟต์แวร์บุคคลที่สาม คุณอาจต้องให้ลูกค้าดำเนินการนี้
ให้คุณ
- ไปที่เครือข่าย Ad Manager
- คลิกแท็บผู้ดูแลระบบ
- ตรวจสอบว่าเปิดใช้การเข้าถึง API แล้ว
- คลิกปุ่มเพิ่มผู้ใช้บัญชีบริการ
- กรอกแบบฟอร์มโดยใช้อีเมลบัญชีบริการ
ผู้ใช้บัญชีบริการต้องได้รับสิทธิ์เข้าถึง
เสมือนว่าผู้ใช้บัญชีบริการรายดังกล่าวจะเข้าถึงเอนทิตีใน
UI
- คลิกปุ่มบันทึก ข้อความควรปรากฏขึ้นเพื่อยืนยัน
การเพิ่มบัญชีบริการ
- ดูผู้ใช้บัญชีบริการที่มีอยู่โดยไปที่แท็บ "ผู้ใช้" จากนั้น
คลิกตัวกรองบัญชีบริการ
- ไปที่เครือข่าย Ad Manager
- คลิกแท็บผู้ดูแลระบบ
- ตรวจสอบว่าเปิดใช้การเข้าถึง API แล้ว
ทำตามคำแนะนำที่เหมาะสมด้านล่างเพื่อใช้ข้อมูลเข้าสู่ระบบในไลบรารีของไคลเอ็นต์
หากคุณเลือกไม่ใช้ไลบรารีไคลเอ็นต์ของเรา คุณจะต้องใช้
บัญชีบริการหรือเว็บ OAuth2
ดำเนินการ ด้วยตัวคุณเอง
เบื้องหลัง
ไลบรารีของไคลเอ็นต์ของเราจะดูแลรายละเอียดต่างๆ ที่ระบุไว้ด้านล่างโดยอัตโนมัติ
อ่านต่อหากคุณสนใจสิ่งที่เกิดขึ้นเบื้องหลังเท่านั้น
ส่วนนี้มีไว้สำหรับผู้ใช้ขั้นสูงที่คุ้นเคยอยู่แล้ว
ที่เป็นไปตามข้อกำหนด OAuth2 และ
รู้วิธีใช้ OAuth2 กับ Google API
ส่วนหัว HTTP ในทุกคำขอที่ส่งไปยัง Ad Manager API ต้องมีสิทธิ์การเข้าถึง
โทเค็นในรูปแบบนี้
Authorization: Bearer ACCESS_TOKEN
เช่น
POST … HTTP/1.1
Host: …
Authorization: Bearer 1/fFAGRNJru1FTz70BzhT3Zg
Content-Type: text/xml;charset=UTF-8
Content-Length: …
<?xml version="1.0"?>
<soap:Envelope xmlns:soap="http://www.w3.org/2001/12/soap-envelope">
…
</soap:Envelope>
ขอบเขต
โทเค็นเพื่อการเข้าถึงรายการเดียวสามารถให้สิทธิ์เข้าถึง API หลายรายการได้ในระดับที่แตกต่างกัน ต
พารามิเตอร์ตัวแปรที่ชื่อ scope
จะควบคุมชุดทรัพยากรและ
การดำเนินการที่โทเค็นเพื่อการเข้าถึงอนุญาต ในระหว่างการขอโทเค็นเพื่อการเข้าถึง การดำเนินการ
แอปพลิเคชันจะส่งค่าอย่างน้อย 1 ค่าในพารามิเตอร์ scope
Ad Manager มีเพียง 1 ขอบเขตดังที่แสดงด้านล่าง ควรดำเนินการให้สิทธิ์
ที่ระดับผู้ใช้ภายในผลิตภัณฑ์
ขอบเขต |
สิทธิ์ |
https://www.googleapis.com/auth/dfp |
ดูและจัดการแคมเปญใน Ad Manager |
เนื้อหาของหน้าเว็บนี้ได้รับอนุญาตภายใต้ใบอนุญาตที่ต้องระบุที่มาของครีเอทีฟคอมมอนส์ 4.0 และตัวอย่างโค้ดได้รับอนุญาตภายใต้ใบอนุญาต Apache 2.0 เว้นแต่จะระบุไว้เป็นอย่างอื่น โปรดดูรายละเอียดที่นโยบายเว็บไซต์ Google Developers Java เป็นเครื่องหมายการค้าจดทะเบียนของ Oracle และ/หรือบริษัทในเครือ
อัปเดตล่าสุด 2025-08-31 UTC
[null,null,["อัปเดตล่าสุด 2025-08-31 UTC"],[[["\u003cp\u003eAll Google Ad Manager API calls require OAuth2 authorization for secure access to user data without storing sensitive login information.\u003c/p\u003e\n"],["\u003cp\u003eChoose between Service Account or Web Application authentication type based on your application's needs.\u003c/p\u003e\n"],["\u003cp\u003eGenerate OAuth2 credentials by following instructions for your chosen authentication type via the Google API Console.\u003c/p\u003e\n"],["\u003cp\u003eConfigure your Ad Manager network settings and client library according to provided guidelines for the specific authentication method and programming language.\u003c/p\u003e\n"],["\u003cp\u003eClient libraries handle most OAuth2 complexities but you can delve into the background details concerning HTTP headers and scopes if needed.\u003c/p\u003e\n"]]],["Google Ad Manager API access requires OAuth2 authorization. First, choose between \"Service account\" for personal data or \"Web application\" for user-authorized access. Then, create OAuth2 credentials via the Google API Console, either generating a JSON key for service accounts or a client ID and secret for web applications. Next, configure the Ad Manager network to allow API access, adding the service account email if applicable. Lastly, configure and use a client library, or implement the OAuth2 flow directly, including the access token in the HTTP header.\n"],null,["# Authentication\n\nAll Google Ad Manager API calls must be authorized through [OAuth2](http://oauth.net/2/) an open standard that\nallows users to grant permissions to third-party applications, so the\napplication can interact with web services on the user's behalf. OAuth2 enables\nyour Ad Manager API client application to access a user's Ad Manager account\nwithout having to handle or store the user's username or password.\n\nGenerate OAuth2 credentials\n---------------------------\n\nPerform the following steps to generate the OAuth2 credentials.\n\n### 1. Determine your authentication type\n\nCheck the table below to see which **authentication type** is most appropriate\nfor your Ad Manager API application:\n\n| Choose your OAuth2 authentication type ||\n|---------------------|-----------------------------------------------------------------------------------------------------------------------------------------------------------------------------------|\n| **Service account** | Choose this if you only need access to your own Ad Manager data. [Learn more.](/identity/protocols/OAuth2ServiceAccount) |\n| **Web application** | Choose this if you want to authenticate as any user who grants permission to your application to access their Ad Manager data. [Learn more.](/identity/protocols/OAuth2WebServer) |\n\n### 2. Create OAuth2 credentials\n\nOnce you've determined your authentication type, click the corresponding tab\nbelow and follow the instructions to generate the OAuth2 credentials:\nService Account\n\n1. Open the [Google API Console Credentials page](https://console.cloud.google.com/apis/credentials).\n2. From the project drop-down, choose **Create a new project** , enter a name for the project, and optionally, edit the provided Project ID. Click **Create**.\n3. On the Credentials page, select **Create credentials** , then select **Service account key**.\n4. Select [New service account](//console.developers.google.com/apis/credentials/serviceaccountkey), and select **JSON**.\n5. Click **Create** to download a file containing a private key.\nWeb application\n\n1. Open the [Google API Console Credentials page](https://console.cloud.google.com/apis/credentials).\n2. From the project drop-down, choose **Create a new project** , enter a name for the project (and optionally, edit the provided Project ID), and click **Create**.\n3. On the Credentials page, select **Create credentials** , then select **OAuth client ID**.\n4. You may be prompted to set a product name on the Consent Screen page; if so, click **Configure consent screen** , supply the requested information, and click **Save** to return to the Credentials page.\n5. Select **Web Application** for the **Application Type**. Follow the instructions to enter JavaScript origins, redirect URIs, or both.\n6. Click **Create**.\n7. On the page that appears, copy the **client ID** and **client secret** to your clipboard, as you will need them when you configure your client library.\n\n### 3. Configure your Ad Manager network\n\nIf you are a third-party developer, you may need to have your client do this\nstep for you.\nService Account\n\n1. Go to your [Ad Manager network](//admanager.google.com).\n2. Click the **Admin** tab.\n3. Ensure that **API access** is enabled.\n4. Click the **Add a service account user** button.\n5. Fill in the form using the service account email. The service account user must be granted with permissions to access the entities as if that service account user would access the entities on the UI.\n6. Click on the **Save** button. A message should appear, confirming the addition of your service account.\n7. View existing service account users by going to the Users tab and then clicking the **Service Account** filter.\nWeb application\n\n1. Go to your [Ad Manager network](//admanager.google.com).\n2. Click the **Admin** tab.\n3. Ensure that **API access** is enabled.\n\n### 4. Configure and use a client library\n\nFollow the appropriate guide below to use the credentials in your client library: \n\n### Java\n\n- [Service account flow](//github.com/googleads/googleads-java-lib/wiki/API-access-using-own-credentials-(server-to-server-flow)#step-2---setting-up-the-client-library)\n- [Web app flow](//github.com/googleads/googleads-java-lib/wiki/API-access-on-behalf-of-your-clients-(web-flow)#step-2---setting-up-the-client-library)\n\n### .NET\n\n- [Service account flow](//github.com/googleads/googleads-dotnet-lib/wiki/API-access-using-own-credentials-(server-to-server-flow)#step-2---setting-up-the-client-library)\n- [Web app flow](//github.com/googleads/googleads-dotnet-lib/wiki/API-access-on-behalf-of-your-clients-(web-flow)#step-2---setting-up-the-client-library)\n\n### Python\n\n- [Service account flow](//github.com/googleads/googleads-python-lib/wiki/API-access-using-own-credentials-(server-to-server-flow)#step-2---setting-up-the-client-library)\n- [Web app flow](//github.com/googleads/googleads-python-lib/wiki/API-access-on-behalf-of-your-clients-(web-flow)#step-2---setting-up-the-client-library)\n\n### PHP\n\n- [Service account flow](https://github.com/googleads/googleads-php-lib/wiki/API-access-using-own-credentials-(server-to-server-flow))\n- [Web app flow](https://github.com/googleads/googleads-php-lib/wiki/API-access-on-behalf-of-your-clients-(web-flow))\n\n### Ruby\n\n- [Service account flow](//github.com/googleads/google-api-ads-ruby/wiki/API-access-using-own-credentials-(server-to-server-flow)#step-2---setting-up-the-client-library)\n- [Web app flow](//github.com/googleads/google-api-ads-ruby/wiki/API-access-on-behalf-of-your-clients-(web-flow)#step-2---setting-up-the-client-library)\n\n\u003cbr /\u003e\n\nIf you choose not to use one of our client libraries, you'll need to implement\nthe OAuth2 [service account](/identity/protocols/OAuth2ServiceAccount) or [web\napp](/identity/protocols/OAuth2WebServer) flow yourself.\n\nBehind the scenes\n-----------------\n\nOur client libraries automatically take care of the details covered below so\nonly read on if you're interested in what's happening behind the scenes.\nThis section is intended for advanced users who are already familiar\nwith the [OAuth2 specification](http://tools.ietf.org/html/rfc6749) and\nknow how to [use OAuth2 with Google APIs](/accounts/docs/OAuth2).\n\n#### HTTP request header\n\nThe HTTP header in every request to the Ad Manager API must include an access\ntoken in this form: \n\n```actionscript-3\nAuthorization: Bearer ACCESS_TOKEN\n```\n\nFor example: \n\n```http\nPOST ... HTTP/1.1\nHost: ...\nAuthorization: Bearer 1/fFAGRNJru1FTz70BzhT3Zg\nContent-Type: text/xml;charset=UTF-8\nContent-Length: ...\n\n\u003c?xml version=\"1.0\"?\u003e\n\u003csoap:Envelope xmlns:soap=\"http://www.w3.org/2001/12/soap-envelope\"\u003e\n…\n\u003c/soap:Envelope\u003e\n```\n\n#### Scope\n\nA single access token can grant varying degrees of access to multiple APIs. A\nvariable parameter called `scope` controls the set of resources and\noperations that an access token permits. During the access token request, your\napplication sends one or more values in the `scope` parameter.\n\nAd Manager has only one scope, shown below. Authorization should be performed\nat the user level within the product.\n\n| Scope | Permissions |\n|---------------------------------------|-----------------------------------------------|\n| `https://www.googleapis.com/auth/dfp` | View and manage your campaigns on Ad Manager. |"]]