Authentication
تنظيم صفحاتك في مجموعات
يمكنك حفظ المحتوى وتصنيفه حسب إعداداتك المفضّلة.
يجب السماح لجميع طلبات البيانات من واجهة برمجة تطبيقات "مدير إعلانات Google" من خلال OAuth2، وهو معيار مفتوح
تتيح للمستخدمين منح أذونات لتطبيقات تابعة لجهات خارجية، وبالتالي
تطبيقك التفاعل مع خدمات الويب نيابةً عن المستخدم. يمكّن OAuth2
تطبيق العميل لواجهة برمجة تطبيقات "مدير الإعلانات" للوصول إلى حساب المستخدم على "مدير الإعلانات"
دون الحاجة إلى معالجة أو تخزين اسم المستخدم أو كلمة مرور المستخدم.
إنشاء بيانات اعتماد OAuth2
نفِّذ الخطوات التالية لإنشاء بيانات اعتماد OAuth2.
1. تحديد نوع المصادقة
راجِع الجدول أدناه لمعرفة نوع المصادقة الأنسب.
لتطبيق واجهة برمجة تطبيقات "مدير الإعلانات":
اختيار نوع مصادقة OAuth2 |
حساب الخدمة |
حدِّد هذا الخيار إذا كنت تريد الوصول إلى بياناتك على "مدير إعلانات Google" فقط.
مزيد من المعلومات
|
تطبيق الويب |
اختر هذا الخيار إذا كنت تريد المصادقة كأي مستخدم يمنح
إذنًا لتطبيقك للوصول إلى بياناته على "مدير إعلانات Google".
مزيد من المعلومات
|
2. إنشاء بيانات اعتماد OAuth2
بعد تحديد نوع المصادقة، انقر على علامة التبويب المقابلة
أدناه واتبع التعليمات لإنشاء بيانات اعتماد OAuth2:
- افتح
صفحة بيانات اعتماد وحدة تحكُّم Google API
- من القائمة المنسدلة للمشروع، اختَر إنشاء مشروع جديد وأدخِل اسمًا.
للمشروع، ويمكنك تعديل رقم تعريف المشروع المقدم. (يُرجى النقر.)
إنشاء:
- في صفحة Credentials (بيانات الاعتماد)، اختَر إنشاء بيانات اعتماد، ثم
اختَر مفتاح حساب الخدمة.
- اختَر حساب خدمة جديد، واختَر JSON.
- انقر على إنشاء لتنزيل ملف يحتوي على مفتاح خاص.
- افتح
صفحة بيانات اعتماد وحدة تحكُّم Google API
- من القائمة المنسدلة للمشروع، اختَر إنشاء مشروع جديد وأدخِل اسمًا.
للمشروع (ويمكنك اختياريًا تعديل رقم تعريف المشروع المقدم)، وانقر على
إنشاء:
- في صفحة Credentials (بيانات الاعتماد)، اختَر إنشاء بيانات اعتماد، ثم
اختَر معرِّف عميل OAuth.
- قد يُطلب منك تحديد اسم منتج على
صفحة "فحص الموافقة" إذا كان الأمر كذلك، انقر على ضبط شاشة الموافقة.
لتقديم المعلومات المطلوبة، ثم انقر على حفظ للعودة إلى
صفحة "بيانات الاعتماد"
- اختَر تطبيق الويب من أجل نوع التطبيق. اتّبِع
التعليمات لإدخال مصادر JavaScript أو عناوين URL لإعادة التوجيه أو كليهما.
- انقر على إنشاء.
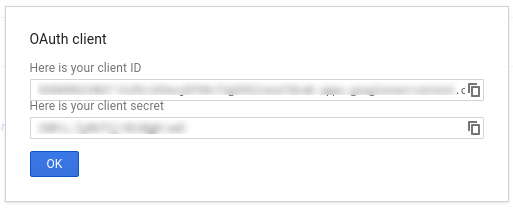
- في الصفحة التي تظهر، انسخ معرّف العميل وسر العميل.
إلى الحافظة، لأنك ستحتاج إليها عند تهيئة
المكتبة.
إذا كنت مطوِّر تطبيقات تابعًا لجهة خارجية، يجب أن تطلب من عميلك تنفيذ ذلك
خطوة مفيدة لك.
- انتقِل إلى شبكة "مدير إعلانات Google".
- انقر على علامة التبويب المدير.
- تأكَّد من تفعيل الوصول إلى واجهة برمجة التطبيقات.
- انقر على الزر إضافة مستخدم حساب الخدمة.
- املأ النموذج باستخدام عنوان البريد الإلكتروني لحساب الخدمة. تشير رسالة الأشكال البيانية
يجب منح مستخدم حساب الخدمة أذونات للوصول إلى
الكيانات كما لو كان مستخدم حساب الخدمة هذا سيصل إلى الكيانات الموجودة على
واجهة المستخدم.
- انقر على الزر حفظ. يُفترض أن تظهر رسالة تأكيد
إضافة حساب الخدمة.
- يمكنك الاطّلاع على مستخدمي حساب الخدمة الحاليين من خلال الانتقال إلى علامة التبويب "المستخدمون" ثم
النقر على فلتر حساب الخدمة.
- انتقِل إلى شبكة "مدير إعلانات Google".
- انقر على علامة التبويب المدير.
- تأكَّد من تفعيل الوصول إلى واجهة برمجة التطبيقات.
يُرجى اتّباع الدليل المناسب أدناه لاستخدام بيانات الاعتماد في مكتبة البرامج:
إذا اخترت عدم استخدام إحدى مكتبات العملاء، فعليك تنفيذ
حساب خدمة OAuth2 أو الويب
تطبيقك بنفسك.
وراء الكواليس
تعتني مكتبات العملاء تلقائيًا بالتفاصيل الواردة أدناه
يُرجى مواصلة القراءة فقط إذا كنت مهتمًا بما يحدث وراء الكواليس.
هذا القسم مخصّص للمستخدمين المتقدّمين الذين لديهم دراية مسبقة
مع مواصفات OAuth2
تعرَّف على كيفية استخدام OAuth2 مع Google APIs.
يجب أن يتضمن عنوان HTTP في كل طلب مُرسَل إلى واجهة برمجة تطبيقات "مدير الإعلانات" إمكانية وصول
في هذا النموذج:
Authorization: Bearer ACCESS_TOKEN
على سبيل المثال:
POST … HTTP/1.1
Host: …
Authorization: Bearer 1/fFAGRNJru1FTz70BzhT3Zg
Content-Type: text/xml;charset=UTF-8
Content-Length: …
<?xml version="1.0"?>
<soap:Envelope xmlns:soap="http://www.w3.org/2001/12/soap-envelope">
…
</soap:Envelope>
النطاق
يمكن لرمز الدخول الواحد أن يمنح درجات متفاوتة من الوصول إلى واجهات برمجة تطبيقات متعددة. حاسمة
تسمى متغيرة "scope
" التي تتحكم في مجموعة الموارد
العمليات التي يسمح بها رمز الدخول. أثناء طلب رمز الدخول، لا يتم تضمين
يرسل التطبيق قيمة واحدة أو أكثر في معلَمة scope
.
ويحتوي "مدير الإعلانات" على نطاق واحد فقط، كما هو موضّح أدناه. يجب تنفيذ التفويض.
على مستوى المستخدم داخل المنتج.
النطاق |
الأذونات |
https://www.googleapis.com/auth/dfp |
يمكنك الاطّلاع على حملاتك على "مدير إعلانات Google" وإدارتها. |
إنّ محتوى هذه الصفحة مرخّص بموجب ترخيص Creative Commons Attribution 4.0 ما لم يُنصّ على خلاف ذلك، ونماذج الرموز مرخّصة بموجب ترخيص Apache 2.0. للاطّلاع على التفاصيل، يُرجى مراجعة سياسات موقع Google Developers. إنّ Java هي علامة تجارية مسجَّلة لشركة Oracle و/أو شركائها التابعين.
تاريخ التعديل الأخير: 2025-08-31 (حسب التوقيت العالمي المتفَّق عليه)
[null,null,["تاريخ التعديل الأخير: 2025-08-31 (حسب التوقيت العالمي المتفَّق عليه)"],[[["\u003cp\u003eAll Google Ad Manager API calls require OAuth2 authorization for secure access to user data without storing sensitive login information.\u003c/p\u003e\n"],["\u003cp\u003eChoose between Service Account or Web Application authentication type based on your application's needs.\u003c/p\u003e\n"],["\u003cp\u003eGenerate OAuth2 credentials by following instructions for your chosen authentication type via the Google API Console.\u003c/p\u003e\n"],["\u003cp\u003eConfigure your Ad Manager network settings and client library according to provided guidelines for the specific authentication method and programming language.\u003c/p\u003e\n"],["\u003cp\u003eClient libraries handle most OAuth2 complexities but you can delve into the background details concerning HTTP headers and scopes if needed.\u003c/p\u003e\n"]]],["Google Ad Manager API access requires OAuth2 authorization. First, choose between \"Service account\" for personal data or \"Web application\" for user-authorized access. Then, create OAuth2 credentials via the Google API Console, either generating a JSON key for service accounts or a client ID and secret for web applications. Next, configure the Ad Manager network to allow API access, adding the service account email if applicable. Lastly, configure and use a client library, or implement the OAuth2 flow directly, including the access token in the HTTP header.\n"],null,["# Authentication\n\nAll Google Ad Manager API calls must be authorized through [OAuth2](http://oauth.net/2/) an open standard that\nallows users to grant permissions to third-party applications, so the\napplication can interact with web services on the user's behalf. OAuth2 enables\nyour Ad Manager API client application to access a user's Ad Manager account\nwithout having to handle or store the user's username or password.\n\nGenerate OAuth2 credentials\n---------------------------\n\nPerform the following steps to generate the OAuth2 credentials.\n\n### 1. Determine your authentication type\n\nCheck the table below to see which **authentication type** is most appropriate\nfor your Ad Manager API application:\n\n| Choose your OAuth2 authentication type ||\n|---------------------|-----------------------------------------------------------------------------------------------------------------------------------------------------------------------------------|\n| **Service account** | Choose this if you only need access to your own Ad Manager data. [Learn more.](/identity/protocols/OAuth2ServiceAccount) |\n| **Web application** | Choose this if you want to authenticate as any user who grants permission to your application to access their Ad Manager data. [Learn more.](/identity/protocols/OAuth2WebServer) |\n\n### 2. Create OAuth2 credentials\n\nOnce you've determined your authentication type, click the corresponding tab\nbelow and follow the instructions to generate the OAuth2 credentials:\nService Account\n\n1. Open the [Google API Console Credentials page](https://console.cloud.google.com/apis/credentials).\n2. From the project drop-down, choose **Create a new project** , enter a name for the project, and optionally, edit the provided Project ID. Click **Create**.\n3. On the Credentials page, select **Create credentials** , then select **Service account key**.\n4. Select [New service account](//console.developers.google.com/apis/credentials/serviceaccountkey), and select **JSON**.\n5. Click **Create** to download a file containing a private key.\nWeb application\n\n1. Open the [Google API Console Credentials page](https://console.cloud.google.com/apis/credentials).\n2. From the project drop-down, choose **Create a new project** , enter a name for the project (and optionally, edit the provided Project ID), and click **Create**.\n3. On the Credentials page, select **Create credentials** , then select **OAuth client ID**.\n4. You may be prompted to set a product name on the Consent Screen page; if so, click **Configure consent screen** , supply the requested information, and click **Save** to return to the Credentials page.\n5. Select **Web Application** for the **Application Type**. Follow the instructions to enter JavaScript origins, redirect URIs, or both.\n6. Click **Create**.\n7. On the page that appears, copy the **client ID** and **client secret** to your clipboard, as you will need them when you configure your client library.\n\n### 3. Configure your Ad Manager network\n\nIf you are a third-party developer, you may need to have your client do this\nstep for you.\nService Account\n\n1. Go to your [Ad Manager network](//admanager.google.com).\n2. Click the **Admin** tab.\n3. Ensure that **API access** is enabled.\n4. Click the **Add a service account user** button.\n5. Fill in the form using the service account email. The service account user must be granted with permissions to access the entities as if that service account user would access the entities on the UI.\n6. Click on the **Save** button. A message should appear, confirming the addition of your service account.\n7. View existing service account users by going to the Users tab and then clicking the **Service Account** filter.\nWeb application\n\n1. Go to your [Ad Manager network](//admanager.google.com).\n2. Click the **Admin** tab.\n3. Ensure that **API access** is enabled.\n\n### 4. Configure and use a client library\n\nFollow the appropriate guide below to use the credentials in your client library: \n\n### Java\n\n- [Service account flow](//github.com/googleads/googleads-java-lib/wiki/API-access-using-own-credentials-(server-to-server-flow)#step-2---setting-up-the-client-library)\n- [Web app flow](//github.com/googleads/googleads-java-lib/wiki/API-access-on-behalf-of-your-clients-(web-flow)#step-2---setting-up-the-client-library)\n\n### .NET\n\n- [Service account flow](//github.com/googleads/googleads-dotnet-lib/wiki/API-access-using-own-credentials-(server-to-server-flow)#step-2---setting-up-the-client-library)\n- [Web app flow](//github.com/googleads/googleads-dotnet-lib/wiki/API-access-on-behalf-of-your-clients-(web-flow)#step-2---setting-up-the-client-library)\n\n### Python\n\n- [Service account flow](//github.com/googleads/googleads-python-lib/wiki/API-access-using-own-credentials-(server-to-server-flow)#step-2---setting-up-the-client-library)\n- [Web app flow](//github.com/googleads/googleads-python-lib/wiki/API-access-on-behalf-of-your-clients-(web-flow)#step-2---setting-up-the-client-library)\n\n### PHP\n\n- [Service account flow](https://github.com/googleads/googleads-php-lib/wiki/API-access-using-own-credentials-(server-to-server-flow))\n- [Web app flow](https://github.com/googleads/googleads-php-lib/wiki/API-access-on-behalf-of-your-clients-(web-flow))\n\n### Ruby\n\n- [Service account flow](//github.com/googleads/google-api-ads-ruby/wiki/API-access-using-own-credentials-(server-to-server-flow)#step-2---setting-up-the-client-library)\n- [Web app flow](//github.com/googleads/google-api-ads-ruby/wiki/API-access-on-behalf-of-your-clients-(web-flow)#step-2---setting-up-the-client-library)\n\n\u003cbr /\u003e\n\nIf you choose not to use one of our client libraries, you'll need to implement\nthe OAuth2 [service account](/identity/protocols/OAuth2ServiceAccount) or [web\napp](/identity/protocols/OAuth2WebServer) flow yourself.\n\nBehind the scenes\n-----------------\n\nOur client libraries automatically take care of the details covered below so\nonly read on if you're interested in what's happening behind the scenes.\nThis section is intended for advanced users who are already familiar\nwith the [OAuth2 specification](http://tools.ietf.org/html/rfc6749) and\nknow how to [use OAuth2 with Google APIs](/accounts/docs/OAuth2).\n\n#### HTTP request header\n\nThe HTTP header in every request to the Ad Manager API must include an access\ntoken in this form: \n\n```actionscript-3\nAuthorization: Bearer ACCESS_TOKEN\n```\n\nFor example: \n\n```http\nPOST ... HTTP/1.1\nHost: ...\nAuthorization: Bearer 1/fFAGRNJru1FTz70BzhT3Zg\nContent-Type: text/xml;charset=UTF-8\nContent-Length: ...\n\n\u003c?xml version=\"1.0\"?\u003e\n\u003csoap:Envelope xmlns:soap=\"http://www.w3.org/2001/12/soap-envelope\"\u003e\n…\n\u003c/soap:Envelope\u003e\n```\n\n#### Scope\n\nA single access token can grant varying degrees of access to multiple APIs. A\nvariable parameter called `scope` controls the set of resources and\noperations that an access token permits. During the access token request, your\napplication sends one or more values in the `scope` parameter.\n\nAd Manager has only one scope, shown below. Authorization should be performed\nat the user level within the product.\n\n| Scope | Permissions |\n|---------------------------------------|-----------------------------------------------|\n| `https://www.googleapis.com/auth/dfp` | View and manage your campaigns on Ad Manager. |"]]