Koleksiyonlar ile düzeninizi koruyun
İçeriği tercihlerinize göre kaydedin ve kategorilere ayırın.
Actions projesi, tüm Actions'ınızı tek bir container'da paketler. Siz
Google Asistan'ın nasıl keşfedeceğini bilmesi için bu projeyi Actions on Google'da yayınlayın
ve konuşma deneyimlerinizi çağırın.
Şekil 1. Eylemler proje yapısı'nı inceleyin.
Actions projenizi oluşturmak için aşağıdaki alt düzey bileşenleri kullanırsınız:
Ayarlar ve kaynaklar proje meta verilerini tanımlar.
ve kaynaklar hakkında
bilgi edineceksiniz. Google bu bilgileri kullanarak
Kullanıcıların keşfetmeleri ve çağırmaları için Eylemlerinizi Asistan dizinine ekleyin
gerekir.
Amaçlar, gerçekleştirilecek bir görevi temsil eder. Örneğin
kullanıcı girişi veya işlenmesi gereken bir sistem olayını oluşturur. En yaygın olarak kullanılan
kullanıcının amaçlarıdır. Bu amaçlar, eğitimin nasıl
NLU (doğal dil anlama) tarafından doğal olarak genişletilen ifadeler
içeren bir arama motorudur. NLU, şunların toplanmasını kullanır:
Asistan'ın kullanıcıyı eşleştirmek için kullandığı bir dil modelini eğitmek için bu ifadeler
giriş. Görüşme sırasında bazı kullanıcı girişleri niyetin diliyle eşleşiyorsa
Asistan çalışma zamanı, niyeti İşleminize gönderir. Böylece
işleme koymalı ve kullanıcıya yanıt vermelidir.
Türler, kullanıcı girişinden yapılandırılmış verileri ayıklamanıza olanak tanır. Ölçüt
eğitim ifadelerini türlerle notlandırdıktan sonra, NLU,
verileri sizin için oluşturur, böylece açık uçlu girişi ayrıştırmak zorunda kalmazsınız.
Sahneler, amaçları işler ve öğelerin temel mantık yürütücüsüdür.
ve İşlemleriniz. Boşluk doldurma, koşullu mantığı değerlendirebilir,
hatta harici web hizmetlerini arayarak
iş mantığına dayanır. Sahneler, niyetlerle birlikte kullanıldığında
belirli kullanıcı girişlerini veya sistem olaylarını tespit edip bunlara karşılık gelen
mantığıyla başlayalım.
İstemler, daha önce kullandığınız statik veya dinamik yanıtları
yanıt verebilirsiniz.
Webhook'lar, web hizmetlerine ek işler için yetki vermenize olanak tanır
(ör. verileri doğrulama veya istem oluşturma). İşlemleriniz
JSON tabanlı bir webhook protokolü aracılığıyla sipariş karşılama ile iletişim kurun.
Etkileşimli Tuval, zengin olanaklar oluşturmanıza olanak tanır.
ve sürükleyici bir deneyim sunar.
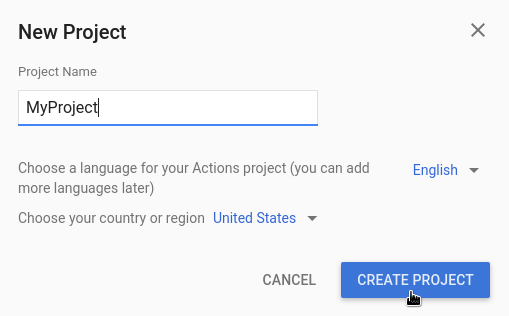
Proje oluşturma
Actions Console'da bir proje oluşturmanız gerekir
Google Asistan Proje oluşturmak için:
Projeniz için bir ad girin ve Proje Oluştur'u tıklayın.
Ne tür bir İşlem oluşturmak istiyorsunuz? ekranında
projenizi en iyi temsil eden kategoriyi seçin ve İleri'yi tıklayın.
Nasıl oluşturmak istiyorsunuz? ekranında bir derleme yöntemi seçin.
Oluşturmaya başla'yı tıklayın. Örneğin, boş bir
veya örneklem kullanabilirsiniz.
ziyaret edin.
Proje bilgilerini tanımlama
Projenizin ayarları ve kaynakları, projenizle ilgili şu tür bilgileri tanımlar:
desteklenen yerel ayarlar, görünen ad, açıklama, özellik ve yüzey desteği
ve daha fazlası. Aşağıdaki tabloda ana ayarlar ve kaynaklar açıklanmıştır.
gösterir. Actions on Google bunu kullanır
ve uygulama bilgilerinizi Asistan'a dağıtabilirsiniz.
dizinine ekleyin.
Ad
Açıklama
Dizin bilgileri
Actions on Google'ın sizinle iletişime geçebilmesi için
projeyi Asistan dizinine ekleyin. Meta veri ve ayrıntılandırmaları içerir
logolar ve banner resimleri için projeniz ve görüntü kaynaklarınız hakkında bilgi verin.
Yer hedefleme
Actions'ınızın kullanılabildiği yerel ayarları yapılandırır.
Ekstra avantajlar elde etmek için sahibi olduğunuz bir web sitesini veya Android uygulamasını bağlayın
ayrılmış çağrı adları ve İşlemlerinizdeki web sitesi bağlantıları gibi.
Serbest bırak
İşleminiz için farklı test ve üretim sürümlerini yapılandırır
test ve üretim için kullanıyor.
Asistan bağlantıları
Kullanıcıların İşlemlerlerinizi web mülklerinizden çağırmasına izin verin.
Proje bilgilerini tanımlamak için:
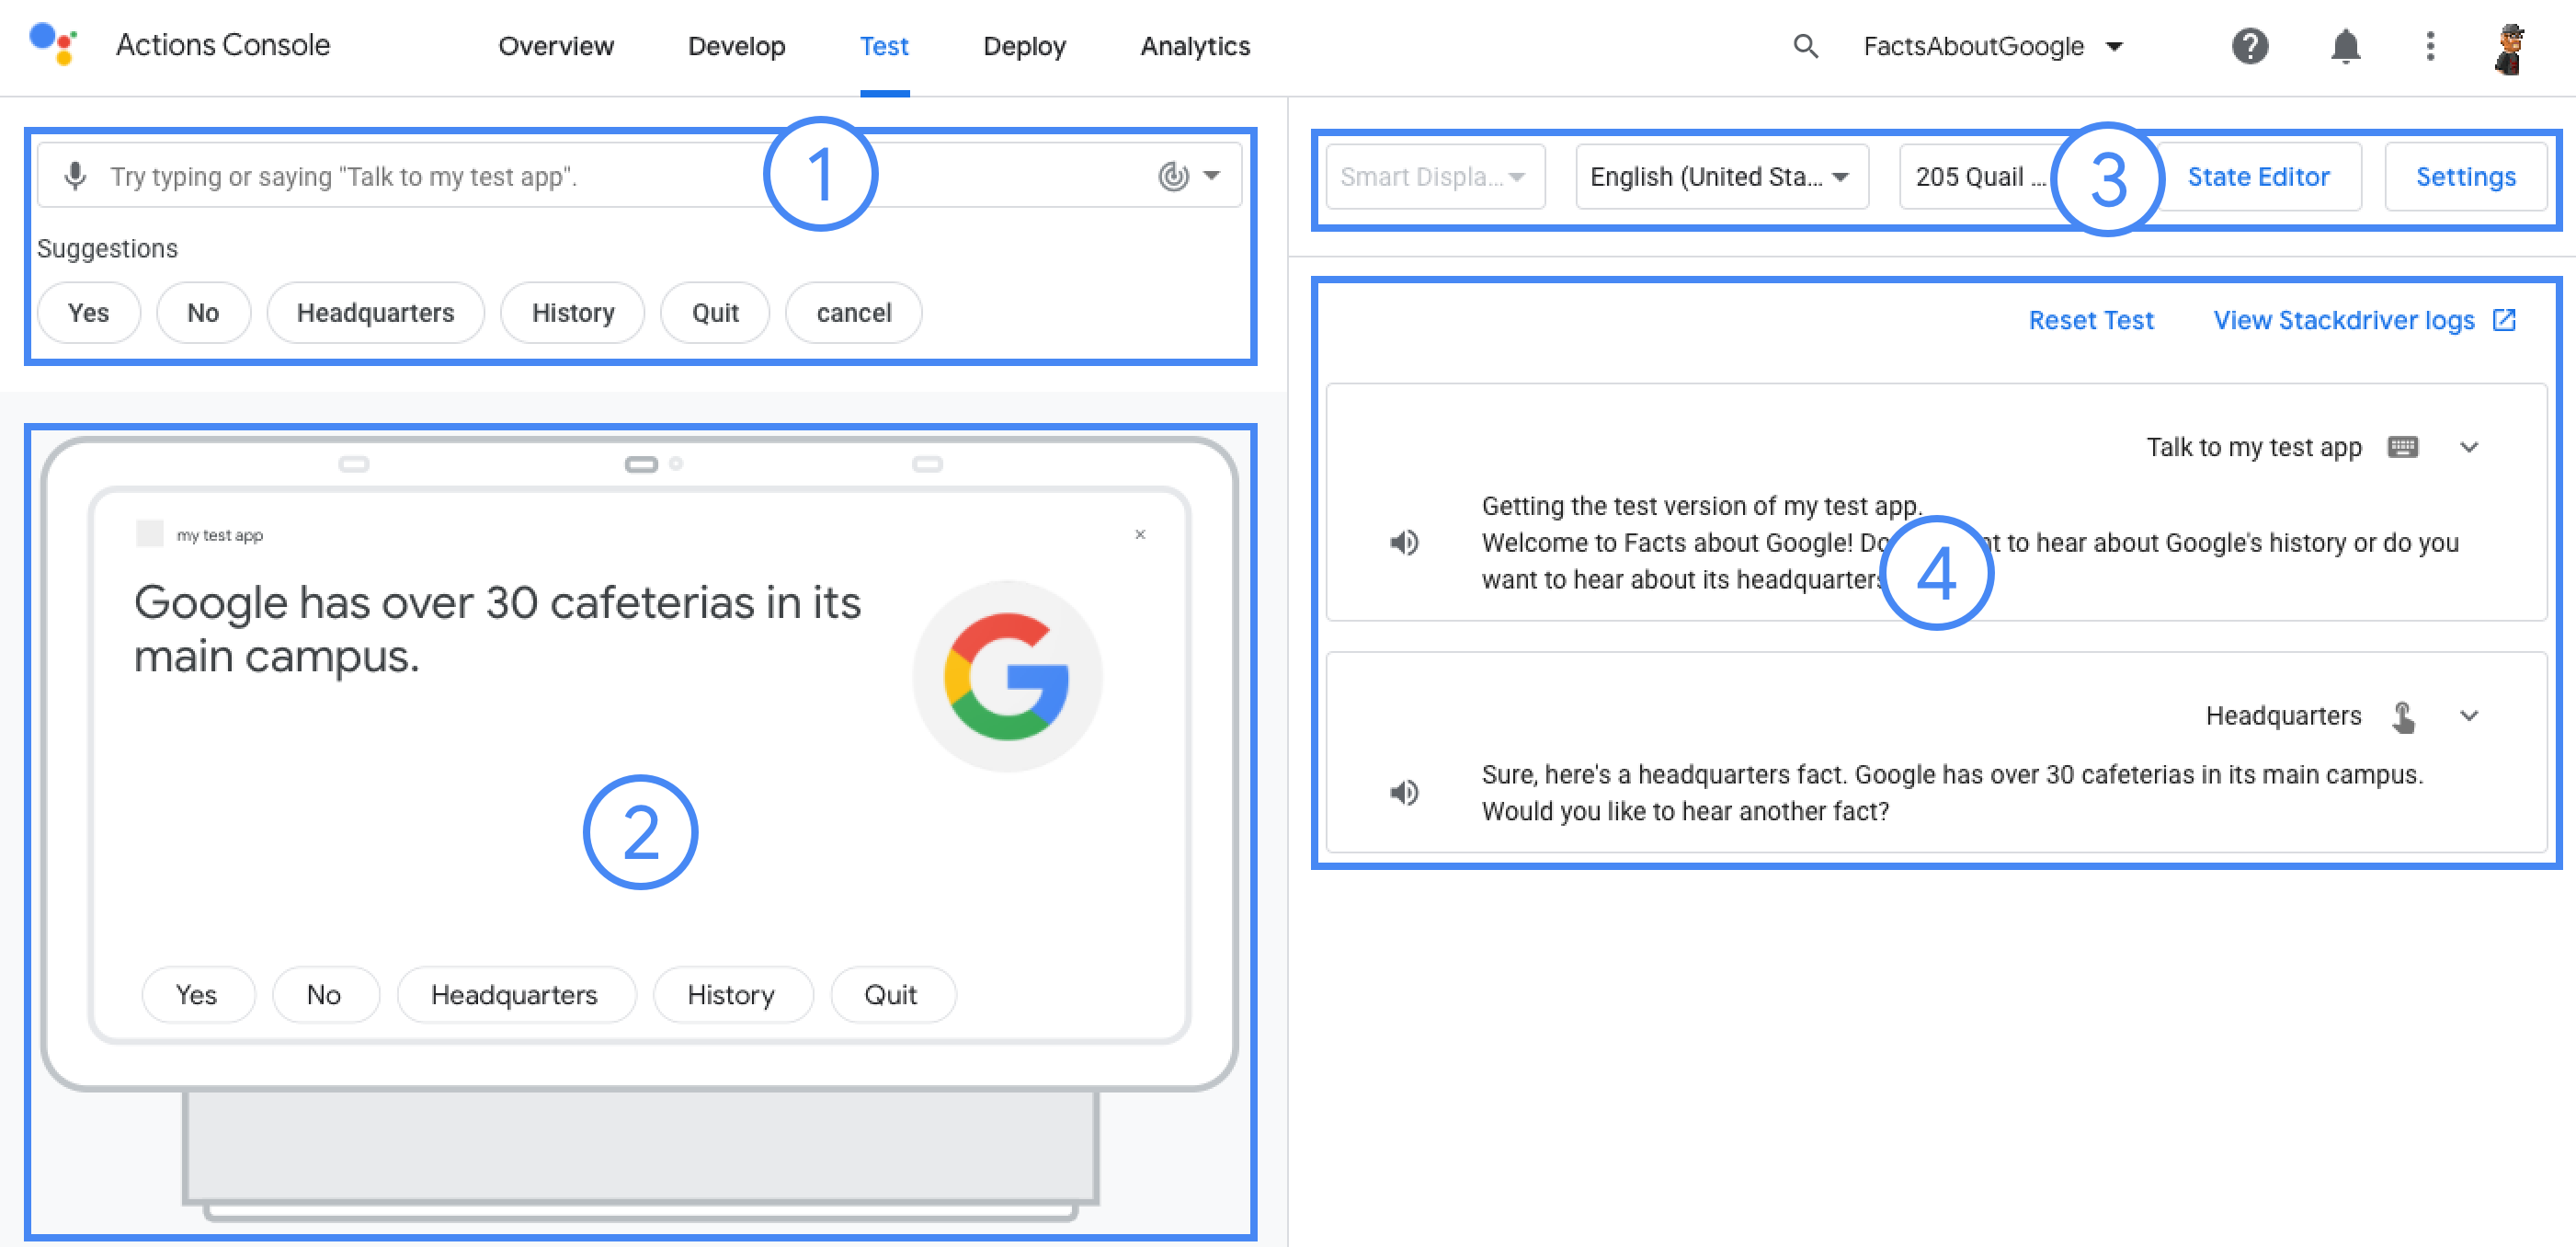
Simülatörde projeleri test etme
Actions konsolu, Eylemlerinizi önizlemek için bir simülasyon aracı sağlar. İlgili içeriği oluşturmak için kullanılan
simülatörü kullanarak hata ayıklama bilgilerini görebilir, cihaz özelliklerini ayarlayabilir,
yerel ayar ve daha fazlası.
Şekil 3. Simülatörün ana alanları: (1) kullanıcı girişi,
(2) cihaz görünümü, (3) seçenekler ve ayarlar ve (4) sohbet günlüğü.
[null,null,["Son güncelleme tarihi: 2025-07-26 UTC."],[[["\u003cp\u003eAn Actions project enables the creation of conversational experiences for Google Assistant by packaging all actions into a single container for publishing.\u003c/p\u003e\n"],["\u003cp\u003eBuilding an Actions project involves utilizing components such as intents, types, scenes, prompts, webhooks and more for defining user interactions and logic.\u003c/p\u003e\n"],["\u003cp\u003eDefining project information in the Actions console, including directory information, locales and surfaces, is crucial for publishing and deploying to the Assistant directory.\u003c/p\u003e\n"],["\u003cp\u003eThe Actions console simulator provides a comprehensive environment for testing projects with features such as debugging, device settings, and locale simulation.\u003c/p\u003e\n"]]],[],null,["# Build projects\n\nActions Builder Actions SDK \n\nAn Actions project packages all of your Actions into a single container. You\npublish this project to Actions on Google so Google Assistant knows how to discover\nand invoke your conversational experiences.\n**Figure 1**. Actions project structure\n\nYou use the following low-level components to build your Actions project:\n\n- [**Settings and resources**](#define_project_information) define project metadata\n and resources like project icons. Google uses this information to publish\n your Actions to the Assistant directory, so that users can discover and invoke\n them.\n\n- [**Intents**](../intents) represent a task to be carried out, such as some\n user input or a system event that needs processing. The most common type of\n intent you'll use are user intents. These intents let you declare training\n phrases that are naturally expanded by the NLU (natural language understanding)\n engine to include many more, similar phrases. The NLU uses the aggregation of\n these phrases to train a language model that the Assistant uses to match user\n input. During a conversation, if some user input matches the intent's language\n model, the Assistant runtime sends the intent to your Action, so that it can\n process it and respond to the user.\n\n- [**Types**](../types) let you extract structured data from user input. By\n annotating training phrases with types, the NLU can extract relevant, structured\n data for you, so you don't have to parse open-ended input.\n\n- [**Scenes**](../scenes) process intents and are the main logic executors for\n your Actions. They can do slot-filling, evaluate conditional logic, return\n prompts to the user, and even call on external web services to carry out\n business logic. In combination with intents, scenes give you a powerful way to\n detect specific user input or system events and to carry out corresponding\n logic.\n\n- [**Prompts**](../prompts) define static or dynamic responses that you use to\n respond back to users.\n\n- [**Webhooks**](../webhooks) let you delegate extra work to web services\n (fulfillment), such as validating data or generating prompts. Your Actions\n communicate with your fulfillment through a JSON-based, webhook protocol.\n\n- [**Interactive Canvas**](/assistant/interactivecanvas) lets you create rich\n and immersive experiences with web apps that utilize HTML, CSS, and JavaScript.\n\nCreate a project\n----------------\n\nYou must create a project in the Actions console before you can develop for\nGoogle Assistant. To create a project:\n\n1. Go to the [Actions console](//console.actions.google.com/).\n2. Click **New project**.\n3. Enter a name for your project and click **Create Project** .\n4. In the **What kind of Action do you want to build?** screen, select a category that best represents your project and click **Next**.\n5. In the **How do you want to build it** screen, select a way to build and click **Start building**. For example, you can start with an empty project or with a sample.\n\n| **Key Point:** If you are building for Interactive Canvas, follow these additional steps:\n|\n| 1. If you did not select the **Game** card on the **What type of Action\n| do you want to build?** screen, click **Deploy** in the top navigation. Under **Additional Information** , select the **Games \\& fun** category. Click **Save**.\n| 2. Click **Develop** in the top navigation of the Actions console.\n| 3. Click **Interactive Canvas** in the left navigation.\n| 4. Under **Does your Action use Interactive Canvas?** , select **Yes**.\n| 5. **Optional** : Enter your web app URL into the **Set your default web app URL** field. This action adds a default `Canvas` response with the URL field to your Main invocation.\n| 6. Click **Save**.\n\n\u003cbr /\u003e\n\nDefine project information\n--------------------------\n\n| **Note:** See the [Directory information](/assistant/console/directory-information) documentation for more details on how to manage project information.\n\nYour project's settings and resources define information about your project like\nfeature and surface support, supported locales, display name, description,\nlogos, and more. The following table describes the main settings and resources\nyou provide. Actions on Google uses this\ninformation to deploy and publish your project to the [Assistant\ndirectory](//assistant.google.com/explore).\n\n| Name | Description |\n|-----------------------|-------------------------------------------------------------------------------------------------------------------------------------------------------------------------------------------------------------|\n| Directory information | Provides information so that Actions on Google can publish your project to the Assistant directory. Includes metadata and desecriptions about your project and image resources for logos and banner images. |\n| Location targeting | Configures the locales that your Actions are available in. |\n| Surface capabilities | Configures the surfaces that your Actions are available on. |\n| Company details | Specifies contact information for your company. |\n| Brand verification | Connect a website or Android app that you own to gain extra benefits such as reserved invocation names and website linking within your Actions. |\n| Release | Configures different testing and production releases for your Action for testing and production. |\n| Assistant links | Let users invoke your Actions from your web properties. |\n\nTo define project information:\n\nTest projects in the simulator\n------------------------------\n\n| **Note:** See the [Actions simulator](/assistant/console/simulator) documentation for complete information about testing your projects.\n\nThe Actions console provides a simulator to preview your Actions in. The\nsimulator lets you see debug information, set device capabilities, simulate\nlocale, and more.\n**Figure 3.** The main areas of the simulator: (1) user input, (2) device view, (3) options and settings, and (4) conversation log.\n\nTo test a project:"]]