Tetap teratur dengan koleksi
Simpan dan kategorikan konten berdasarkan preferensi Anda.
Project Action mengemas semua Action Anda ke dalam satu container. Anda
memublikasikan project ini ke Actions on Google agar Asisten Google tahu cara menemukan
dan memanggil pengalaman percakapan Anda.
Gambar 1. Struktur project Actions
Anda menggunakan komponen tingkat rendah berikut untuk membuat project Action:
Setelan dan resource menentukan metadata project
dan sumber daya seperti ikon proyek. Google menggunakan informasi ini untuk memublikasikan
Action Anda ke direktori Asisten, sehingga pengguna dapat menemukan dan memanggil
mereka.
Intent mewakili tugas yang harus dilakukan, seperti beberapa
input pengguna atau peristiwa
sistem yang perlu diproses. Jenis yang paling umum dari
yang akan Anda gunakan adalah intent pengguna. Intent ini memungkinkan Anda mendeklarasikan pelatihan
frasa yang diperluas secara alami oleh NLU (natural language understanding)
mesin telusur untuk menyertakan lebih banyak frasa serupa. NLU menggunakan agregasi dari
frasa ini untuk melatih model bahasa yang digunakan Asisten untuk mencocokkan pengguna
input teks. Selama percakapan, jika beberapa input pengguna cocok dengan bahasa intent
khusus, runtime Asisten akan mengirimkan intent ke Action Anda, sehingga
memprosesnya dan
menanggapi pengguna.
Jenis memungkinkan Anda mengekstrak data terstruktur dari input pengguna. Menurut
menganotasi frasa pelatihan dengan jenis, NLU dapat mengekstrak yang relevan, terstruktur
data untuk Anda, sehingga Anda tidak perlu
menguraikan input terbuka.
Scene memproses intent dan merupakan eksekutor logika utama untuk
Actions Anda. Mereka dapat melakukan pengisian slot, mengevaluasi logika bersyarat, menampilkan
kepada pengguna, dan bahkan memanggil
layanan web eksternal untuk melakukan
logika bisnis. Dikombinasikan dengan intent, scene memberi Anda cara ampuh untuk
mendeteksi input pengguna atau kejadian sistem tertentu dan untuk melakukan
logika.
Perintah menentukan respons statis atau dinamis yang Anda gunakan untuk
menanggapi pengguna.
Webhook memungkinkan Anda mendelegasikan pekerjaan tambahan ke layanan web
(fulfillment), seperti memvalidasi data atau membuat prompt. Tindakan Anda
berkomunikasi dengan fulfillment Anda melalui protokol webhook berbasis JSON.
Kanvas Interaktif memungkinkan Anda membuat konten kaya
dan pengalaman imersif dengan aplikasi web yang menggunakan HTML, CSS, dan JavaScript.
Membuat project
Anda harus membuat project di konsol Actions sebelum dapat mengembangkan
Asisten Google. Untuk membuat project:
Masukkan nama untuk project Anda, lalu klik Create Project.
Di layar What types of Action do you want to build?, pilih
kategori yang paling mewakili project Anda, lalu klik Next.
Di layar How do you want to build it, pilih cara untuk membuat
dan klik Mulai membuat. Misalnya, Anda dapat memulai dengan
proyek atau dengan suatu sampel.
Mendefinisikan informasi project
Pengaturan dan sumber daya proyek menentukan informasi tentang proyek seperti
dukungan fitur dan platform, lokalitas yang didukung, nama tampilan, deskripsi,
logo, dan lain-lain. Tabel berikut menjelaskan setelan dan resource utama
yang Anda sediakan. Actions on Google menggunakan data
informasi untuk men-deploy dan memublikasikan project Anda ke Asisten
direktori.
Nama
Deskripsi
Informasi direktori
Memberikan informasi agar Actions on Google dapat memublikasikan
project ke direktori Assistant. Termasuk metadata dan pencemaran nama baik
tentang project dan resource gambar Anda untuk gambar logo dan banner.
Penargetan lokasi
Mengonfigurasi lokalitas tempat Action Anda tersedia.
Kemampuan permukaan
Mengonfigurasi platform tempat Action Anda tersedia.
Detail perusahaan
Menentukan informasi kontak untuk perusahaan Anda.
Verifikasi merek
Hubungkan situs atau aplikasi Android milik Anda untuk mendapatkan manfaat tambahan
seperti nama panggilan yang dicadangkan dan penautan situs dalam Action Anda.
Rilis
Mengonfigurasi berbagai rilis pengujian dan produksi untuk Action Anda
untuk pengujian dan produksi.
Link Asisten
Izinkan pengguna memanggil Actions dari properti web Anda.
Untuk mendefinisikan informasi proyek:
Menguji project di simulator
Konsol Actions menyediakan simulator untuk melihat pratinjau Actions Anda. Tujuan
memungkinkan Anda melihat informasi debug, menyetel kemampuan perangkat, menyimulasikan
lokal, dan lainnya.
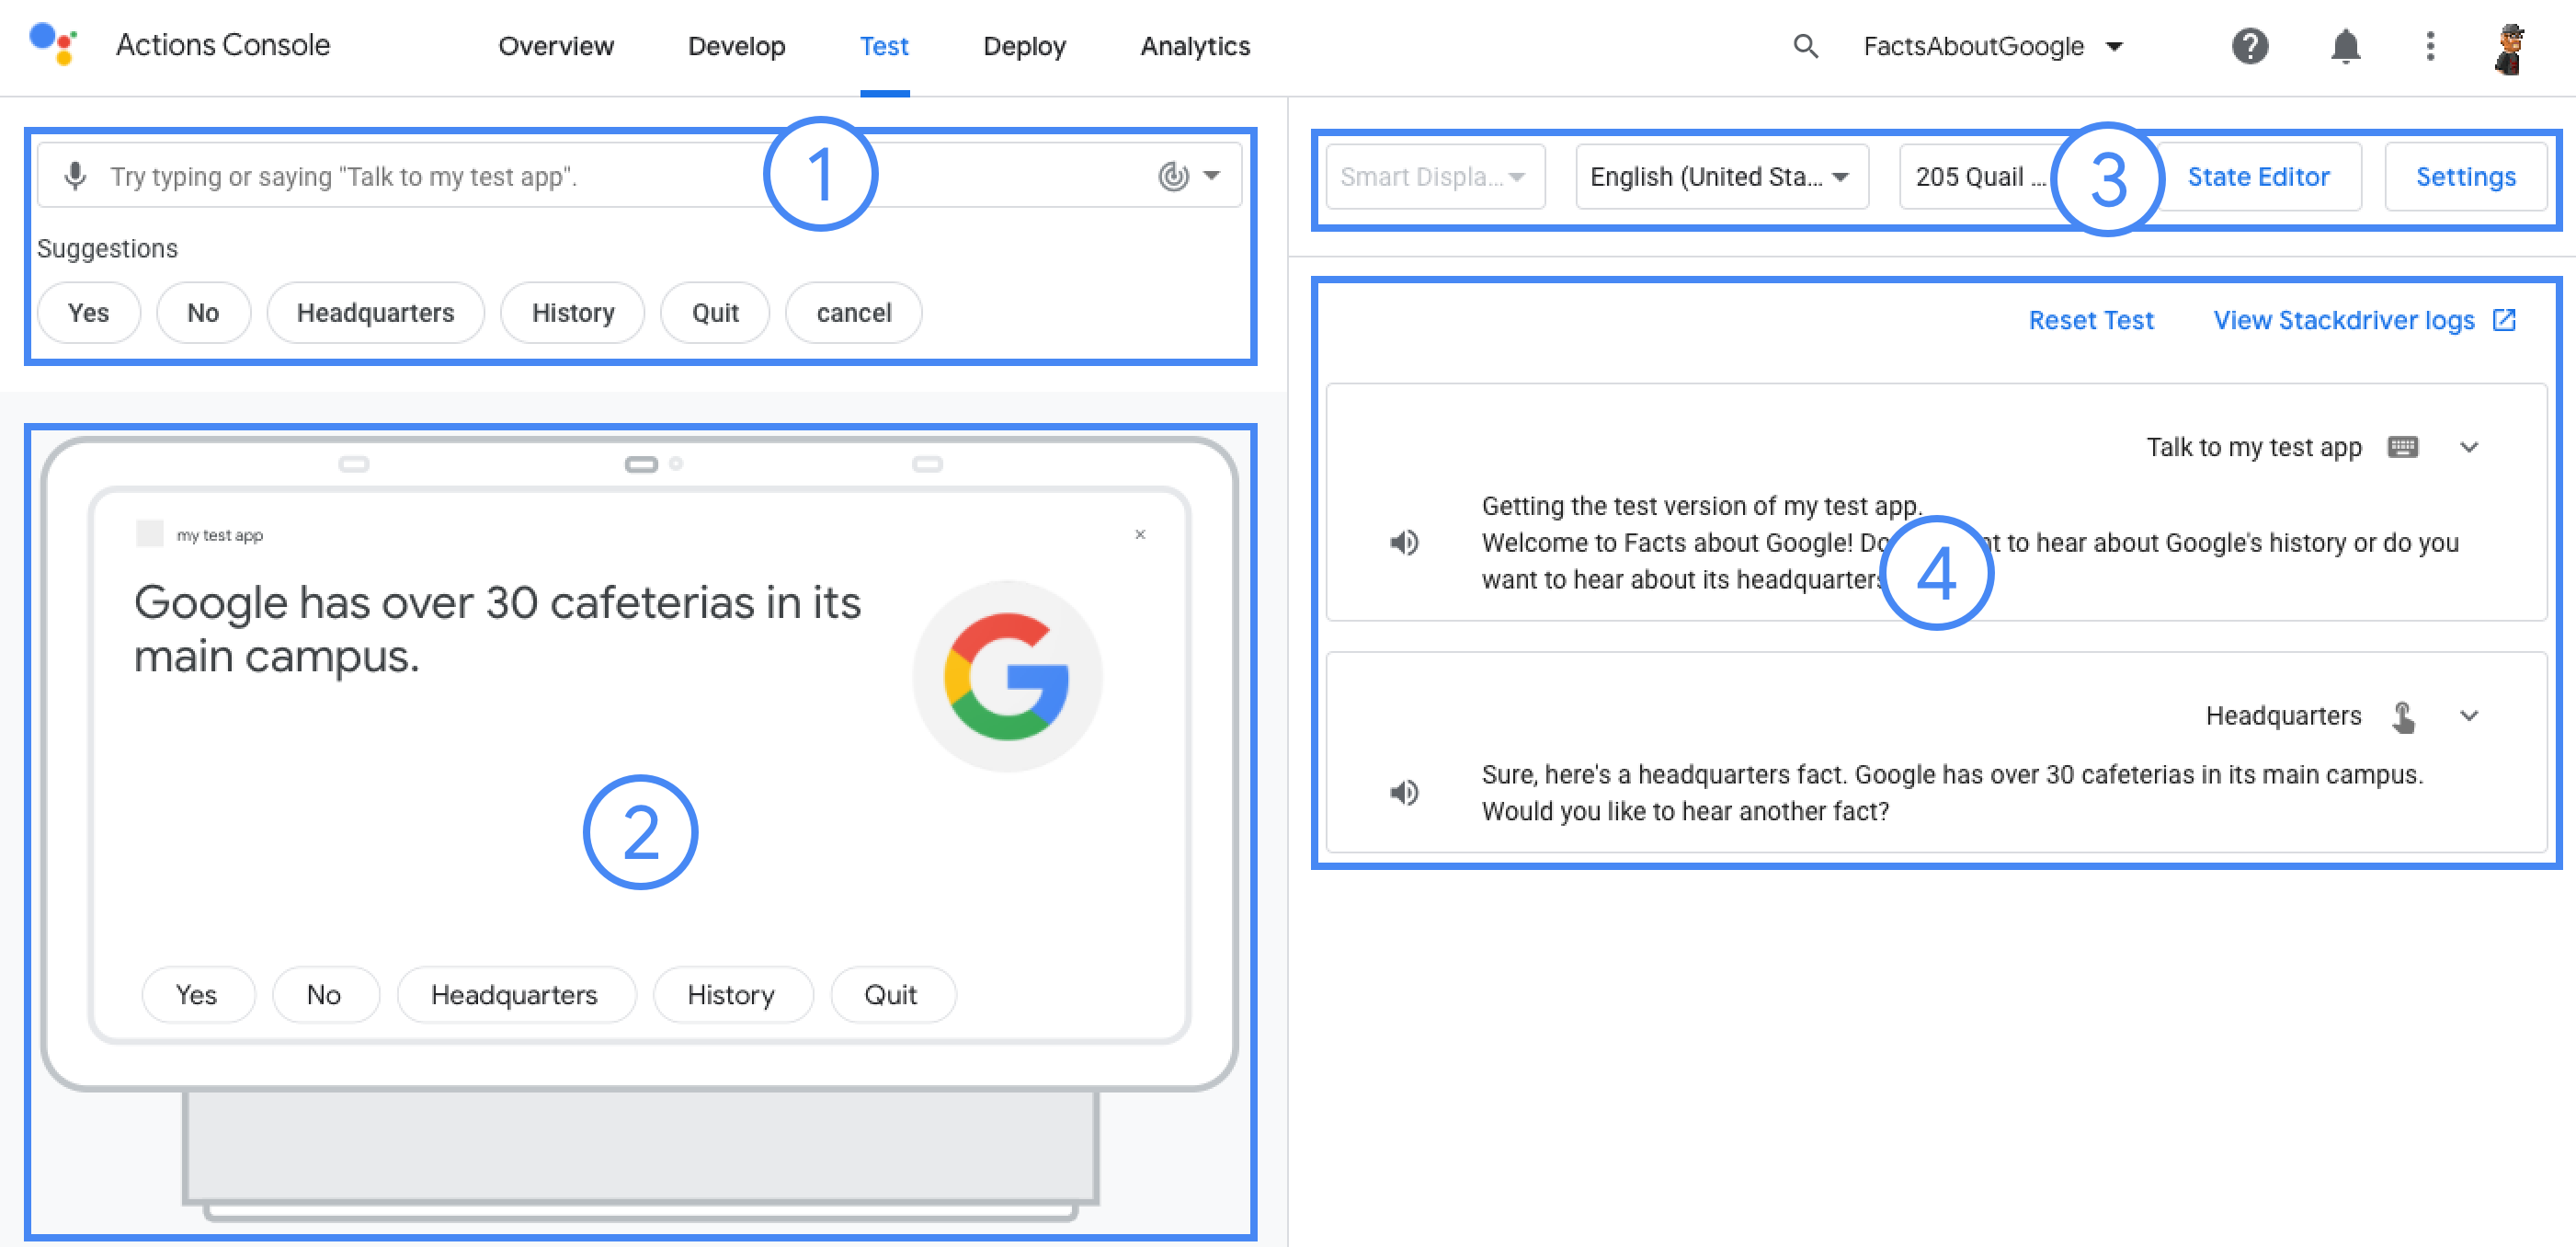
Gambar 3. Area utama dari simulator: (1) input pengguna,
(2) tampilan perangkat, (3) opsi dan setelan, serta (4) log percakapan.
[null,null,["Terakhir diperbarui pada 2025-07-26 UTC."],[[["\u003cp\u003eAn Actions project enables the creation of conversational experiences for Google Assistant by packaging all actions into a single container for publishing.\u003c/p\u003e\n"],["\u003cp\u003eBuilding an Actions project involves utilizing components such as intents, types, scenes, prompts, webhooks and more for defining user interactions and logic.\u003c/p\u003e\n"],["\u003cp\u003eDefining project information in the Actions console, including directory information, locales and surfaces, is crucial for publishing and deploying to the Assistant directory.\u003c/p\u003e\n"],["\u003cp\u003eThe Actions console simulator provides a comprehensive environment for testing projects with features such as debugging, device settings, and locale simulation.\u003c/p\u003e\n"]]],[],null,["# Build projects\n\nActions Builder Actions SDK \n\nAn Actions project packages all of your Actions into a single container. You\npublish this project to Actions on Google so Google Assistant knows how to discover\nand invoke your conversational experiences.\n**Figure 1**. Actions project structure\n\nYou use the following low-level components to build your Actions project:\n\n- [**Settings and resources**](#define_project_information) define project metadata\n and resources like project icons. Google uses this information to publish\n your Actions to the Assistant directory, so that users can discover and invoke\n them.\n\n- [**Intents**](../intents) represent a task to be carried out, such as some\n user input or a system event that needs processing. The most common type of\n intent you'll use are user intents. These intents let you declare training\n phrases that are naturally expanded by the NLU (natural language understanding)\n engine to include many more, similar phrases. The NLU uses the aggregation of\n these phrases to train a language model that the Assistant uses to match user\n input. During a conversation, if some user input matches the intent's language\n model, the Assistant runtime sends the intent to your Action, so that it can\n process it and respond to the user.\n\n- [**Types**](../types) let you extract structured data from user input. By\n annotating training phrases with types, the NLU can extract relevant, structured\n data for you, so you don't have to parse open-ended input.\n\n- [**Scenes**](../scenes) process intents and are the main logic executors for\n your Actions. They can do slot-filling, evaluate conditional logic, return\n prompts to the user, and even call on external web services to carry out\n business logic. In combination with intents, scenes give you a powerful way to\n detect specific user input or system events and to carry out corresponding\n logic.\n\n- [**Prompts**](../prompts) define static or dynamic responses that you use to\n respond back to users.\n\n- [**Webhooks**](../webhooks) let you delegate extra work to web services\n (fulfillment), such as validating data or generating prompts. Your Actions\n communicate with your fulfillment through a JSON-based, webhook protocol.\n\n- [**Interactive Canvas**](/assistant/interactivecanvas) lets you create rich\n and immersive experiences with web apps that utilize HTML, CSS, and JavaScript.\n\nCreate a project\n----------------\n\nYou must create a project in the Actions console before you can develop for\nGoogle Assistant. To create a project:\n\n1. Go to the [Actions console](//console.actions.google.com/).\n2. Click **New project**.\n3. Enter a name for your project and click **Create Project** .\n4. In the **What kind of Action do you want to build?** screen, select a category that best represents your project and click **Next**.\n5. In the **How do you want to build it** screen, select a way to build and click **Start building**. For example, you can start with an empty project or with a sample.\n\n| **Key Point:** If you are building for Interactive Canvas, follow these additional steps:\n|\n| 1. If you did not select the **Game** card on the **What type of Action\n| do you want to build?** screen, click **Deploy** in the top navigation. Under **Additional Information** , select the **Games \\& fun** category. Click **Save**.\n| 2. Click **Develop** in the top navigation of the Actions console.\n| 3. Click **Interactive Canvas** in the left navigation.\n| 4. Under **Does your Action use Interactive Canvas?** , select **Yes**.\n| 5. **Optional** : Enter your web app URL into the **Set your default web app URL** field. This action adds a default `Canvas` response with the URL field to your Main invocation.\n| 6. Click **Save**.\n\n\u003cbr /\u003e\n\nDefine project information\n--------------------------\n\n| **Note:** See the [Directory information](/assistant/console/directory-information) documentation for more details on how to manage project information.\n\nYour project's settings and resources define information about your project like\nfeature and surface support, supported locales, display name, description,\nlogos, and more. The following table describes the main settings and resources\nyou provide. Actions on Google uses this\ninformation to deploy and publish your project to the [Assistant\ndirectory](//assistant.google.com/explore).\n\n| Name | Description |\n|-----------------------|-------------------------------------------------------------------------------------------------------------------------------------------------------------------------------------------------------------|\n| Directory information | Provides information so that Actions on Google can publish your project to the Assistant directory. Includes metadata and desecriptions about your project and image resources for logos and banner images. |\n| Location targeting | Configures the locales that your Actions are available in. |\n| Surface capabilities | Configures the surfaces that your Actions are available on. |\n| Company details | Specifies contact information for your company. |\n| Brand verification | Connect a website or Android app that you own to gain extra benefits such as reserved invocation names and website linking within your Actions. |\n| Release | Configures different testing and production releases for your Action for testing and production. |\n| Assistant links | Let users invoke your Actions from your web properties. |\n\nTo define project information:\n\nTest projects in the simulator\n------------------------------\n\n| **Note:** See the [Actions simulator](/assistant/console/simulator) documentation for complete information about testing your projects.\n\nThe Actions console provides a simulator to preview your Actions in. The\nsimulator lets you see debug information, set device capabilities, simulate\nlocale, and more.\n**Figure 3.** The main areas of the simulator: (1) user input, (2) device view, (3) options and settings, and (4) conversation log.\n\nTo test a project:"]]