Guía de inicio rápido del SDK de Actions y el Builder
Organiza tus páginas con colecciones
Guarda y categoriza el contenido según tus preferencias.
En esta guía, se explica cómo configurar tu entorno para compilar acciones usando
el SDK de Actions y el compilador de Actions. Realizarás las siguientes tareas:
Instala Node.js: Necesitas este entorno de ejecución para usar Node.js.
biblioteca de entregas.
Instala Firebase CLI: Esta herramienta de línea de comandos te permite desarrollar y
implementarás dependencias de Firebase, como las apps web para Interactive Canvas, para
Firebase Hosting
Instala la herramienta de línea de comandos gactions cuando realices desarrollos con las acciones.
SDK, usarás esta herramienta para crear, administrar e implementar el paquete
tu Acción.
Crea un proyecto de acciones: Un proyecto de acciones es el contenedor lógico.
para tus acciones de conversación. Debes crear una en la Consola de Actions antes de
puedan empezar a desarrollarse.
Inicializa e implementa una muestra: en esta muestra simple, se indica cómo obtener
y comenzamos a crear Actions con tecnología de Interactive Canvas.
Una vez que completes esta guía de inicio rápido, podrás sincronizar tu proyecto de acciones entre
el entorno de desarrollo local
y la experiencia web de Actions Builder.
Instala Node.js y Firebase CLI
Descarga e instala Node.js de acuerdo con la biblioteca de Node.js
documentación para usar nuestra biblioteca de entregas. La instalación de Node.js también
te permite instalar Firebase CLI con npm y, luego, ejecutar tu
implementación de entrega conversacional a nivel local.
Instala y configura Firebase CLI según corresponda.
consulta la documentación de Firebase. Firebase CLI te permite implementar una interfaz
App web de Canvas en Firebase Hosting y, de ser necesario, implementarla manualmente
entrega a Cloud Functions para Firebase.
Instala la herramienta de línea de comandos gactions
Instala la herramienta de la interfaz de línea de comandos (CLI) de gactions. Para ello, descarga un
del paquete de instalación, desempaquetarlo y configurar la ruta de ejecución.
Para instalar y configurar gactions, sigue estos pasos:
Descarga el paquete adecuado para tu sistema operativo:
Extrae el paquete en la ubicación que desees y agrega el objeto binario a tu
variable PATH del entorno. Como alternativa, extrae el paquete en un
ubicación que ya está en tu variable PATH (por ejemplo, /usr/local/bin).
En Linux y Mac, habilita los permisos de ejecución si es necesario:
chmod +x PATH_TO/gactions
Ejecuta el siguiente comando para autenticar la CLI. Este comando
inicia un flujo de autenticación y requiere un navegador web:
gactions login
Cuando se completa el flujo, la CLI se autentica automáticamente.
Crea y configura un proyecto
Antes de poder usar la herramienta de línea de comandos gactions, debes crear un proyecto en
la Consola de Actions y otorgar acceso a gactions al proyecto. Para crear y configurar
un proyecto, haz lo siguiente:
Haz clic en Proyecto nuevo, ingresa un nombre para el proyecto y haz clic en Crear proyecto.
Selecciona una categoría y haz clic en Siguiente.
Selecciona Proyecto en blanco y haz clic en Comenzar compilación.
Habilita la API de Actions en la consola de Google Cloud de la siguiente manera:
las instrucciones en Cómo habilitar e inhabilitar
APIs.
Esto permite que gactions interactúen con tu proyecto.
Obtén la muestra de Hello World
En la muestra interactiva de Hello World, se indica cómo compilar un objeto Actions simple.
con una sola acción impulsada por Interactive Canvas.
Crea un directorio vacío y, luego, inicializa la muestra de Interactive Canvas en
a ese directorio. Por ejemplo, el siguiente código inicializa la muestra en un
interactive-canvas-sample/, que se usa como ejemplo
a lo largo de este documento:
Abre el archivo interactive-canvas-sample/sdk/settings/settings.yaml y
Cambia el valor del campo projectId por el ID de tu proyecto.
Implementa y prueba la muestra
Después de configurar la muestra, puedes implementar la app web de Interactive Canvas y
tu proyecto de Acciones. Este proceso crea una versión de borrador de tus Acciones.
que puedes implementar en el simulador de Actions para obtener una vista previa y realizar pruebas:
Desde el directorio interactive-canvas-sample/, ejecuta el siguiente comando:
para implementar la app web de Interactive Canvas (el contenido de public/
directorio).
Puedes ver una versión procesada de la aplicación web en la URL que devuelve el
Firebase CLI en un navegador:
https://PROJECT_ID.web.app
Abre el archivo interactive-canvas-sample/sdk/webhooks/ActionsOnGoogleFulfillment/index.js y
Cambia el valor de la variable CANVAS_URL por la URL de la app web de tu proyecto.
const CANVAS_URL = 'https://PROJECT_ID.web.app';
Desde el directorio interactive-canvas-sample/sdk/, ejecuta el siguiente comando:
para enviar la versión local de tu proyecto de acciones a la consola como una
versión de borrador:
gactions push
Desde el directorio interactive-canvas-sample/sdk/, ejecuta el siguiente comando:
para probar tu proyecto de acciones en el simulador:
gactions deploy preview
Abre el vínculo que muestra la herramienta de línea de comandos para ir al simulador.
En el simulador, ingresa "Talk to Interactive canvas sample" para iniciar la acción. Tú
debería ver un triángulo giratorio con la tecnología de la aplicación web implementada en
https://PROJECT_ID.web.app
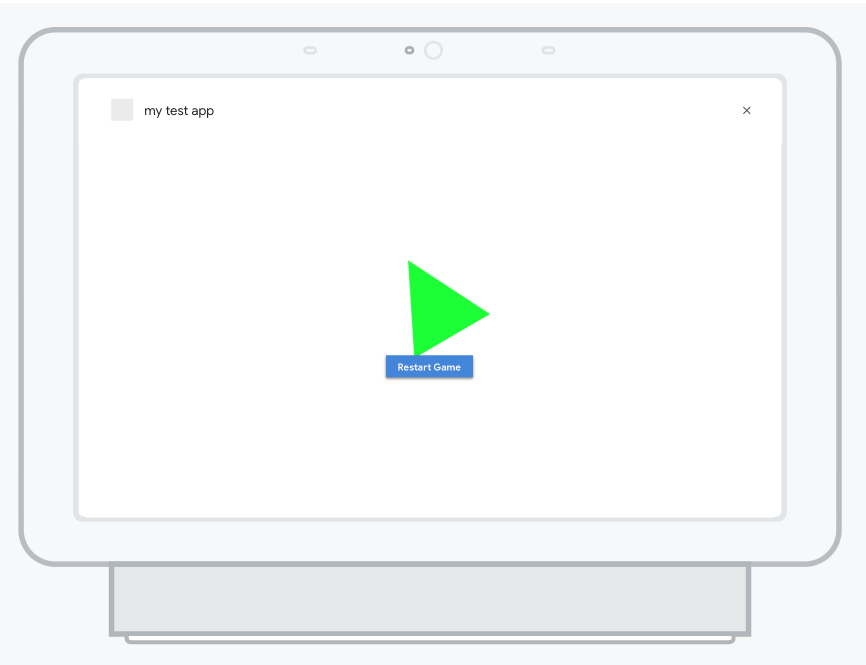
Figura 1: El simulador obtiene una vista previa del proyecto de acciones
[null,null,["Última actualización: 2025-07-26 (UTC)"],[[["\u003cp\u003eThis guide helps you set up your environment for building Google Actions using the Actions SDK and Actions Builder.\u003c/p\u003e\n"],["\u003cp\u003eYou'll install necessary tools like Node.js, Firebase CLI, and the \u003ccode\u003egactions\u003c/code\u003e command-line tool.\u003c/p\u003e\n"],["\u003cp\u003eThe guide includes steps to create an Actions project, initialize a sample, and deploy it for testing in the Actions simulator.\u003c/p\u003e\n"],["\u003cp\u003eYou'll learn to deploy the Interactive Canvas web app to Firebase Hosting and push your local Actions project to the console.\u003c/p\u003e\n"],["\u003cp\u003eAfter completing the setup, you can preview and test your Action in the Actions simulator by invoking it with a specific phrase.\u003c/p\u003e\n"]]],["To set up for building Actions, install Node.js and the Firebase CLI for fulfillment and web app deployment. Install the `gactions` CLI by downloading and configuring the appropriate package, then authenticate using `gactions login`. In the Actions console, create a new project, enable the Actions API, and use `gactions init` to set up the Interactive Canvas sample. Deploy the web app with `firebase deploy`, update the `CANVAS_URL` and push the Action using `gactions push`. Finally, preview and test the action in the simulator using `gactions deploy preview`.\n"],null,["# Actions SDK and Builder quick start guide\n\nThis guide walks you through setting up your environment to build Actions using\nboth the Actions SDK and Actions Builder. You'll carry out the following tasks:\n\n- **Install Node.js:** You need this runtime environment to use our Node.js fulfillment library.\n- **Install the Firebase CLI:** This command-line tool lets you develop and deploy Firebase dependencies, such as web apps for [Interactive Canvas](/assistant/interactivecanvas), to Firebase Hosting.\n- **Install the gactions command-line tool:** When developing with the Actions SDK, you use this tool to create, manage, and deploy the Action package for your Action.\n- **Create an Actions project:** An [Actions project](/assistant/conversational/build/projects) is the logical container for your Conversational Actions. You have to create one in the Actions console before you can start building.\n- **Initialize and deploy a sample:** This simple sample shows you how to get started building Actions powered by Interactive Canvas.\n\nOnce you complete this quick start, you can sync your Actions project between\nyour local development environment and the web experience of Actions Builder.\n\nInstall Node.js and the Firebase CLI\n------------------------------------\n\nDownload and install [Node.js](https://nodejs.org/) according to the Node.js\ndocumentation to use our fulfillment library. Your installation of Node.js also\nallows you to install the Firebase CLI with [npm](https://www.npmjs.com/), and later, to run your\nconversational fulfillment implementation locally.\n\nInstall and set up the [Firebase CLI](https://firebase.google.com/docs/cli#setup_update_cli) according\nto the Firebase documentation. The Firebase CLI lets you deploy an Interactive\nCanvas web app to Firebase Hosting and, if necessary, manually deploy\nfulfillment to Cloud Functions for Firebase.\n\nInstall the gactions command-line tool\n--------------------------------------\n\nInstall the gactions command line interface (CLI) tool by downloading an\ninstallation package, unpacking it, and configuring your execution path.\n\nTo install and configure gactions, follow these steps:\n\n1. Download the appropriate package for your operating system:\n\n | Platform | Package | Checksum |\n |----------|----------------------------------------------------------------------------------|---------------------------------------------------------------------------------------|\n | Windows | [Download](https://dl.google.com/gactions/v3/release/gactions-sdk_windows.zip) | [SHA256](https://dl.google.com/gactions/v3/release/gactions-sdk_windows.zip.sha256) |\n | Linux | [Download](https://dl.google.com/gactions/v3/release/gactions-sdk_linux.tar.gz) | [SHA256](https://dl.google.com/gactions/v3/release/gactions-sdk_linux.tar.gz.sha256) |\n | Mac OS | [Download](https://dl.google.com/gactions/v3/release/gactions-sdk_darwin.tar.gz) | [SHA256](https://dl.google.com/gactions/v3/release/gactions-sdk_darwin.tar.gz.sha256) |\n\n2. Extract the package to a location of your choice and add the binary to your\n environment's `PATH` variable. Alternatively, extract the package to a\n location that's already in your `PATH` variable (for example, `/usr/local/bin`).\n\n3. On Linux and Mac, enable execute permissions if necessary:\n\n ```scdoc\n chmod +x PATH_TO/gactions\n ```\n4. Run the following command to authenticate the CLI. This command\n starts an authentication flow and requires a web browser:\n\n ```text\n gactions login\n ```\n\n When the flow is complete, the CLI automatically authenticates.\n\nCreate and set up a project\n---------------------------\n\n| **Note:** Actions project creation is not supported in the gactions CLI.\n\nBefore you can use the gactions command-line tool, you must create a project in\nthe Actions console and give gactions access to the project. To create and set\nup a project, do the following:\n\n1. Go to the [Actions console](https://console.actions.google.com).\n2. Click **New project** , enter a project name, and click **Create project**.\n3. Select a category and click **Next**.\n4. Select **Blank project** and click **Start building**.\n5. Enable the **Actions API** in the Google Cloud console by following the instructions in [Enable and disable\n APIs](https://support.google.com/googleapi/answer/6158841). This allows gactions to interact with your project.\n\nGet the hello world sample\n--------------------------\n\nThe hello world interactive sample shows you how to build a simple Actions\nproject with a single Action powered by Interactive Canvas.\n\n1. Create an empty directory and initialize the Interactive Canvas sample in\n that directory. For example, the following code initializes the sample in an\n `interactive-canvas-sample/` directory, which is used as an example\n throughout this document:\n\n gactions init interactive-canvas --dest interactive-canvas-sample\n cd interactive-canvas-sample\n\n2. Open the `interactive-canvas-sample/sdk/settings/settings.yaml` file and\n change the value of the `projectId` field to your project's ID.\n\n | **Note:** To get your project's ID, first open your project in the Actions console and click the more *more_vert* icon. Then, select **Project settings** and copy the string in the **Project ID** field.\n\nDeploy and test the sample\n--------------------------\n\nAfter you set up the sample, you can deploy the Interactive Canvas web app and\nyour Actions project. This process creates a draft version of your Actions\nproject that you can deploy to the Actions simulator for previewing and testing:\n\n1. From the `interactive-canvas-sample/` directory, run the following command\n to deploy the Interactive Canvas web app (the contents of the `public/`\n directory).\n\n firebase deploy --project \u003cvar translate=\"no\"\u003ePROJECT_ID\u003c/var\u003e --only hosting\n\n You can see a rendered version of the web app at the URL returned by the\n Firebase CLI in a browser:\n `https://`\u003cvar translate=\"no\"\u003ePROJECT_ID\u003c/var\u003e`.web.app`.\n2. Open the `interactive-canvas-sample/sdk/webhooks/ActionsOnGoogleFulfillment/index.js` file and\n change the value of the `CANVAS_URL` variable to your project's web app URL.\n\n const CANVAS_URL = 'https://\u003cvar translate=\"no\"\u003ePROJECT_ID\u003c/var\u003e.web.app';\n\n3. From the `interactive-canvas-sample/sdk/` directory, run the following\n command to push the local version of your Actions project to the console as a\n draft version:\n\n gactions push\n\n | **Note:** You'll see some warnings related to not having some project settings and resources defined. You can safely ignore them or now.\n4. From the `interactive-canvas-sample/sdk/` directory, run the following\n command to test your Actions project in the simulator:\n\n gactions deploy preview\n\n | **Note:** If you are using a new project, you need to enable the [Cloud Functions\n | API](https://console.cloud.google.com/apis/library/cloudfunctions.googleapis.com) and associate a billing account with your project in Google Cloud. You can enable the Cloud Functions API by visiting the [Cloud Console](https://console.cloud.google.com/billing).\n5. Open the link that the command-line tool returns to go to the simulator.\n\n6. In the simulator, enter *\"Talk to Interactive canvas sample\"* to start the Action. You\n should see a spinning triangle powered by the web app deployed at\n `https://`\u003cvar translate=\"no\"\u003ePROJECT_ID\u003c/var\u003e`.web.app`\n\n **Figure 1**. The simulator previewing the Actions project"]]