Guide de démarrage rapide pour les SDK Actions et Builder
Restez organisé à l'aide des collections
Enregistrez et classez les contenus selon vos préférences.
Ce guide vous explique comment configurer votre environnement pour créer des actions à l'aide de
le SDK Actions et le générateur d'actions. Vous allez effectuer les tâches suivantes:
Installez Node.js:vous avez besoin de cet environnement d'exécution pour utiliser notre environnement
bibliothèque fulfillment.
Installer la CLI Firebase:cet outil de ligne de commande vous permet de développer
déployer des dépendances Firebase, telles que des applications Web pour Interactive Canvas, pour
Firebase Hosting.
Installer l'outil de ligne de commande gactions:lors du développement avec les actions
SDK, utilisez cet outil pour créer, gérer et déployer le package Action pour
votre action.
Créez un projet Actions:le projet Actions est le conteneur logique.
pour vos actions de conversation. Vous devez en créer un dans la console Actions avant de
pouvez commencer à construire.
Initialiser et déployer un exemple:cet exemple simple vous montre comment
ont commencé à créer des actions optimisées par Interactive Canvas.
Une fois ce démarrage rapide terminé, vous pourrez synchroniser votre projet Actions entre
votre environnement de développement local et l'expérience Web d'Actions Builder.
Installer Node.js et la CLI Firebase
Téléchargez et installez Node.js en respectant la syntaxe
pour utiliser notre bibliothèque de fulfillment. Votre installation de Node.js s'effectue également
vous permet d'installer la CLI Firebase avec npm, puis une version ultérieure, pour exécuter votre
l'implémentation locale
du traitement conversationnel.
Installez et configurez la CLI Firebase en suivant les instructions
à la documentation Firebase. La CLI Firebase vous permet de déployer
Application Web Canvas à Firebase Hosting et, si nécessaire, déploiement manuel
le fulfillment à Cloud Functions for Firebase.
Installer l'outil de ligne de commande gactions
Installez l'outil d'interface de ligne de commande (CLI) gactions en téléchargeant un
d’installation, de le décompresser et
de configurer votre chemin d’exécution.
Pour installer et configurer des gactions, procédez comme suit:
Téléchargez le package correspondant à votre système d'exploitation:
Extrayez le package à l'emplacement de votre choix et ajoutez le binaire à votre
la variable PATH de l'environnement. Vous pouvez aussi extraire le package
emplacement figurant déjà dans votre variable PATH (par exemple, /usr/local/bin).
Sous Linux et Mac, activez les autorisations d'exécution si nécessaire:
chmod +x PATH_TO/gactions
Exécutez la commande suivante pour authentifier la CLI. Cette commande
démarre un flux d'authentification et nécessite un navigateur Web:
gactions login
Une fois le flux terminé, la CLI s'authentifie automatiquement.
Créer et configurer un projet
Avant de pouvoir utiliser l'outil de ligne de commande gactions, vous devez créer un projet dans
la console Actions et donner accès au projet à gactions. Pour créer et définir
configurer un projet, procédez comme suit:
Cliquez sur Nouveau projet, saisissez un nom de projet, puis cliquez sur Créer un projet.
Sélectionnez une catégorie, puis cliquez sur Suivant.
Sélectionnez Projet vide, puis cliquez sur Commencer à créer.
Activez l'API Actions dans la console Google Cloud en procédant comme suit :
les instructions de la section Activer et désactiver
API.
Cela permet aux gactions d'interagir avec votre projet.
Obtenir l'exemple Hello World
L'exemple interactif "Hello World" vous montre comment créer une action simple
avec une seule action optimisée par Interactive Canvas.
Créez un répertoire vide et initialisez l'exemple Interactive Canvas dans
dans ce répertoire. Par exemple, le code suivant initialise l'exemple dans une
Répertoire interactive-canvas-sample/, utilisé comme exemple
tout au long de ce document:
Ouvrez le fichier interactive-canvas-sample/sdk/settings/settings.yaml et
Remplacez la valeur du champ projectId par l'ID de votre projet.
Déployer et tester l'exemple
Après avoir configuré l'exemple, vous pouvez déployer l'application Web Interactive Canvas et
votre projet Actions. Ce processus crée une version brouillon de vos actions
projet que vous pouvez déployer dans le simulateur Actions pour les prévisualiser et les tester:
À partir du répertoire interactive-canvas-sample/, exécutez la commande suivante :
pour déployer l'application Web Interactive Canvas (le contenu du fichier public/
du répertoire d'utilisateurs).
Vous pouvez voir une version affichée de l'application Web au niveau de l'URL renvoyée par la
CLI Firebase dans un navigateur:
https://PROJECT_ID.web.app
Ouvrez le fichier interactive-canvas-sample/sdk/webhooks/ActionsOnGoogleFulfillment/index.js et
Remplacez la valeur de la variable CANVAS_URL par l'URL de l'application Web de votre projet.
const CANVAS_URL = 'https://PROJECT_ID.web.app';
À partir du répertoire interactive-canvas-sample/sdk/, exécutez la commande suivante :
pour transférer la version locale de votre projet Actions vers la console en tant que
version brouillon:
gactions push
À partir du répertoire interactive-canvas-sample/sdk/, exécutez la commande suivante :
pour tester votre projet Actions dans le simulateur:
gactions deploy preview
Ouvrez le lien renvoyé par l'outil de ligne de commande pour accéder au simulateur.
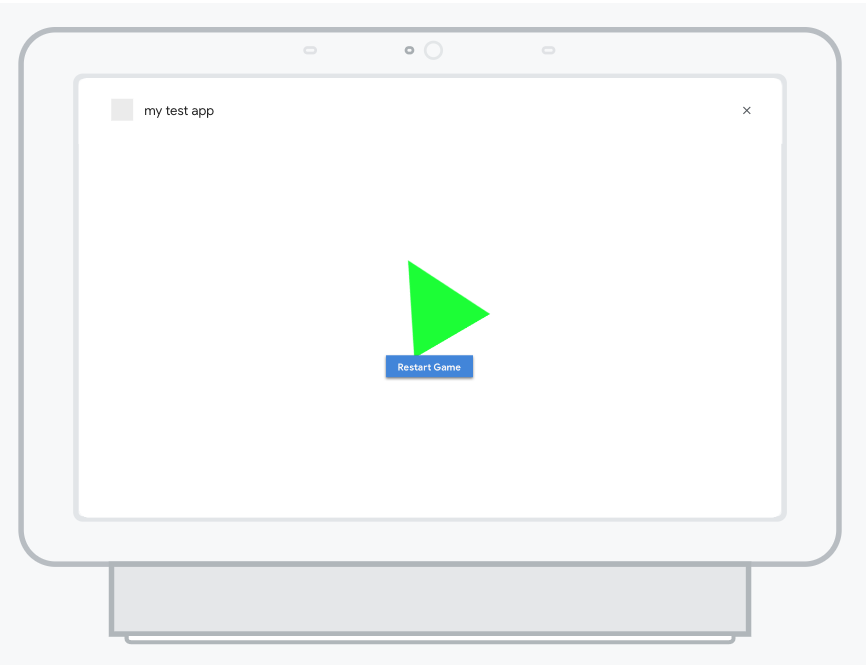
Dans le simulateur, saisissez Talk to Interactive canevas sample pour lancer l'action. Toi
un triangle en rotation alimenté par l'application Web déployée
https://PROJECT_ID.web.app
<ph type="x-smartling-placeholder"></ph>
Figure 1. Simulateur prévisualisant le projet Actions
Sauf indication contraire, le contenu de cette page est régi par une licence Creative Commons Attribution 4.0, et les échantillons de code sont régis par une licence Apache 2.0. Pour en savoir plus, consultez les Règles du site Google Developers. Java est une marque déposée d'Oracle et/ou de ses sociétés affiliées.
Dernière mise à jour le 2025/07/26 (UTC).
[null,null,["Dernière mise à jour le 2025/07/26 (UTC)."],[[["\u003cp\u003eThis guide helps you set up your environment for building Google Actions using the Actions SDK and Actions Builder.\u003c/p\u003e\n"],["\u003cp\u003eYou'll install necessary tools like Node.js, Firebase CLI, and the \u003ccode\u003egactions\u003c/code\u003e command-line tool.\u003c/p\u003e\n"],["\u003cp\u003eThe guide includes steps to create an Actions project, initialize a sample, and deploy it for testing in the Actions simulator.\u003c/p\u003e\n"],["\u003cp\u003eYou'll learn to deploy the Interactive Canvas web app to Firebase Hosting and push your local Actions project to the console.\u003c/p\u003e\n"],["\u003cp\u003eAfter completing the setup, you can preview and test your Action in the Actions simulator by invoking it with a specific phrase.\u003c/p\u003e\n"]]],["To set up for building Actions, install Node.js and the Firebase CLI for fulfillment and web app deployment. Install the `gactions` CLI by downloading and configuring the appropriate package, then authenticate using `gactions login`. In the Actions console, create a new project, enable the Actions API, and use `gactions init` to set up the Interactive Canvas sample. Deploy the web app with `firebase deploy`, update the `CANVAS_URL` and push the Action using `gactions push`. Finally, preview and test the action in the simulator using `gactions deploy preview`.\n"],null,["# Actions SDK and Builder quick start guide\n\nThis guide walks you through setting up your environment to build Actions using\nboth the Actions SDK and Actions Builder. You'll carry out the following tasks:\n\n- **Install Node.js:** You need this runtime environment to use our Node.js fulfillment library.\n- **Install the Firebase CLI:** This command-line tool lets you develop and deploy Firebase dependencies, such as web apps for [Interactive Canvas](/assistant/interactivecanvas), to Firebase Hosting.\n- **Install the gactions command-line tool:** When developing with the Actions SDK, you use this tool to create, manage, and deploy the Action package for your Action.\n- **Create an Actions project:** An [Actions project](/assistant/conversational/build/projects) is the logical container for your Conversational Actions. You have to create one in the Actions console before you can start building.\n- **Initialize and deploy a sample:** This simple sample shows you how to get started building Actions powered by Interactive Canvas.\n\nOnce you complete this quick start, you can sync your Actions project between\nyour local development environment and the web experience of Actions Builder.\n\nInstall Node.js and the Firebase CLI\n------------------------------------\n\nDownload and install [Node.js](https://nodejs.org/) according to the Node.js\ndocumentation to use our fulfillment library. Your installation of Node.js also\nallows you to install the Firebase CLI with [npm](https://www.npmjs.com/), and later, to run your\nconversational fulfillment implementation locally.\n\nInstall and set up the [Firebase CLI](https://firebase.google.com/docs/cli#setup_update_cli) according\nto the Firebase documentation. The Firebase CLI lets you deploy an Interactive\nCanvas web app to Firebase Hosting and, if necessary, manually deploy\nfulfillment to Cloud Functions for Firebase.\n\nInstall the gactions command-line tool\n--------------------------------------\n\nInstall the gactions command line interface (CLI) tool by downloading an\ninstallation package, unpacking it, and configuring your execution path.\n\nTo install and configure gactions, follow these steps:\n\n1. Download the appropriate package for your operating system:\n\n | Platform | Package | Checksum |\n |----------|----------------------------------------------------------------------------------|---------------------------------------------------------------------------------------|\n | Windows | [Download](https://dl.google.com/gactions/v3/release/gactions-sdk_windows.zip) | [SHA256](https://dl.google.com/gactions/v3/release/gactions-sdk_windows.zip.sha256) |\n | Linux | [Download](https://dl.google.com/gactions/v3/release/gactions-sdk_linux.tar.gz) | [SHA256](https://dl.google.com/gactions/v3/release/gactions-sdk_linux.tar.gz.sha256) |\n | Mac OS | [Download](https://dl.google.com/gactions/v3/release/gactions-sdk_darwin.tar.gz) | [SHA256](https://dl.google.com/gactions/v3/release/gactions-sdk_darwin.tar.gz.sha256) |\n\n2. Extract the package to a location of your choice and add the binary to your\n environment's `PATH` variable. Alternatively, extract the package to a\n location that's already in your `PATH` variable (for example, `/usr/local/bin`).\n\n3. On Linux and Mac, enable execute permissions if necessary:\n\n ```scdoc\n chmod +x PATH_TO/gactions\n ```\n4. Run the following command to authenticate the CLI. This command\n starts an authentication flow and requires a web browser:\n\n ```text\n gactions login\n ```\n\n When the flow is complete, the CLI automatically authenticates.\n\nCreate and set up a project\n---------------------------\n\n| **Note:** Actions project creation is not supported in the gactions CLI.\n\nBefore you can use the gactions command-line tool, you must create a project in\nthe Actions console and give gactions access to the project. To create and set\nup a project, do the following:\n\n1. Go to the [Actions console](https://console.actions.google.com).\n2. Click **New project** , enter a project name, and click **Create project**.\n3. Select a category and click **Next**.\n4. Select **Blank project** and click **Start building**.\n5. Enable the **Actions API** in the Google Cloud console by following the instructions in [Enable and disable\n APIs](https://support.google.com/googleapi/answer/6158841). This allows gactions to interact with your project.\n\nGet the hello world sample\n--------------------------\n\nThe hello world interactive sample shows you how to build a simple Actions\nproject with a single Action powered by Interactive Canvas.\n\n1. Create an empty directory and initialize the Interactive Canvas sample in\n that directory. For example, the following code initializes the sample in an\n `interactive-canvas-sample/` directory, which is used as an example\n throughout this document:\n\n gactions init interactive-canvas --dest interactive-canvas-sample\n cd interactive-canvas-sample\n\n2. Open the `interactive-canvas-sample/sdk/settings/settings.yaml` file and\n change the value of the `projectId` field to your project's ID.\n\n | **Note:** To get your project's ID, first open your project in the Actions console and click the more *more_vert* icon. Then, select **Project settings** and copy the string in the **Project ID** field.\n\nDeploy and test the sample\n--------------------------\n\nAfter you set up the sample, you can deploy the Interactive Canvas web app and\nyour Actions project. This process creates a draft version of your Actions\nproject that you can deploy to the Actions simulator for previewing and testing:\n\n1. From the `interactive-canvas-sample/` directory, run the following command\n to deploy the Interactive Canvas web app (the contents of the `public/`\n directory).\n\n firebase deploy --project \u003cvar translate=\"no\"\u003ePROJECT_ID\u003c/var\u003e --only hosting\n\n You can see a rendered version of the web app at the URL returned by the\n Firebase CLI in a browser:\n `https://`\u003cvar translate=\"no\"\u003ePROJECT_ID\u003c/var\u003e`.web.app`.\n2. Open the `interactive-canvas-sample/sdk/webhooks/ActionsOnGoogleFulfillment/index.js` file and\n change the value of the `CANVAS_URL` variable to your project's web app URL.\n\n const CANVAS_URL = 'https://\u003cvar translate=\"no\"\u003ePROJECT_ID\u003c/var\u003e.web.app';\n\n3. From the `interactive-canvas-sample/sdk/` directory, run the following\n command to push the local version of your Actions project to the console as a\n draft version:\n\n gactions push\n\n | **Note:** You'll see some warnings related to not having some project settings and resources defined. You can safely ignore them or now.\n4. From the `interactive-canvas-sample/sdk/` directory, run the following\n command to test your Actions project in the simulator:\n\n gactions deploy preview\n\n | **Note:** If you are using a new project, you need to enable the [Cloud Functions\n | API](https://console.cloud.google.com/apis/library/cloudfunctions.googleapis.com) and associate a billing account with your project in Google Cloud. You can enable the Cloud Functions API by visiting the [Cloud Console](https://console.cloud.google.com/billing).\n5. Open the link that the command-line tool returns to go to the simulator.\n\n6. In the simulator, enter *\"Talk to Interactive canvas sample\"* to start the Action. You\n should see a spinning triangle powered by the web app deployed at\n `https://`\u003cvar translate=\"no\"\u003ePROJECT_ID\u003c/var\u003e`.web.app`\n\n **Figure 1**. The simulator previewing the Actions project"]]