
OAuth और 'Google साइन-इन' लिंकिंग टाइप, OAuth के आधार पर Google साइन-इन को सबसे ऊपर जोड़ता है खाता लिंक करने की सुविधा. इससे Google उपयोगकर्ताओं को आसानी से आवाज़ के आधार पर लिंक करने की सुविधा मिलती है साथ ही, आपने अपनी सेवा के लिए रजिस्टर करने वाले लोगों के लिए खाता लिंक करने की सुविधा चालू की है जो Google से बाहर की है.
लिंक करने का यह टाइप 'Google साइन-इन' से शुरू होता है. इससे यह पता लगाया जा सकता है कि उपयोगकर्ता ने Google प्रोफ़ाइल की जानकारी आपके सिस्टम में मौजूद होती है. अगर उपयोगकर्ता की जानकारी जो आपके सिस्टम में नहीं मिला, तो स्टैंडर्ड OAuth फ़्लो शुरू हो जाता है. उपयोगकर्ता यह काम भी कर सकता है: अपनी Google प्रोफ़ाइल की जानकारी का इस्तेमाल करके नया खाता बनाने का विकल्प चुन सकते हैं.
OAuth और 'Google साइन-इन' की मदद से खाता लिंक करने के लिए, यहां दिए गए सामान्य निर्देशों का पालन करें चरण:
- सबसे पहले, उपयोगकर्ता से Google पर अपनी प्रोफ़ाइल को ऐक्सेस करने की सहमति मांगें.
- उपयोगकर्ता की पहचान करने के लिए, उनकी प्रोफ़ाइल में दी गई जानकारी का इस्तेमाल करें.
- अगर आपको अपने पुष्टि करने वाले सिस्टम में, Google उपयोगकर्ता के लिए कोई मैच नहीं मिलता है, तो
आपने Actions प्रोजेक्ट को कॉन्फ़िगर किया है या नहीं, इसके हिसाब से फ़्लो आगे बढ़ता है
का इस्तेमाल करके या सिर्फ़ बोलकर उपयोगकर्ता खाता बनाने के लिए, Actions कंसोल में जाकर
आपकी वेबसाइट पर आते हैं.
- अगर आपने बोलकर खाता बनाने की अनुमति दी है, तो आईडी की पुष्टि करें Google से मिला टोकन. इसके बाद, इस आधार पर उपयोगकर्ता बनाया जा सकता है: आईडी टोकन में मौजूद प्रोफ़ाइल जानकारी.
- अगर आपने बोलकर खाता बनाने की अनुमति नहीं दी है, तो उपयोगकर्ता को ऐसा ब्राउज़र होता है जहां वे आपके अनुमति देने वाले पेज को लोड कर सकते हैं और बनाने की प्रोसेस पर जाएं.
बोलकर खाता बनाने की सुविधा
अगर आप आवाज़ से उपयोगकर्ता खाता बनाने की अनुमति देते हैं, तो Assistant उपयोगकर्ता से पूछती है कि क्या वे नीचे दिए गए काम करना चाहते हैं:
- बच्चे के Google खाते की जानकारी का इस्तेमाल करके, उसे अपने सिस्टम पर नया खाता बनाएं या
- अपने पुष्टि करने वाले सिस्टम में किसी दूसरे खाते से साइन इन करें, अगर उसके पास कोई आपका मौजूदा गैर-Google खाता.
अगर आपको अपनी रिपोर्ट को छोटा करना है, तो बोलकर खाता बनाने की अनुमति देने का सुझाव दिया जाता है खाता बनाने के फ़्लो में आने वाली परेशानी. उपयोगकर्ता को सिर्फ़ वॉइस फ़्लो छोड़ना होगा अगर वे Google से बाहर के किसी मौजूदा खाते से साइन इन करना चाहें.
बोलकर खाता बनाने की अनुमति न दें
अगर आपने आवाज़ का इस्तेमाल करके उपयोगकर्ता खाता बनाने की अनुमति नहीं दी है, तो Assistant वह वेबसाइट जिसे आपने उपयोगकर्ता की पुष्टि करने के लिए उपलब्ध कराया था. अगर इंटरैक्शन हो रहा है बिना स्क्रीन वाले डिवाइस में Assistant, उपयोगकर्ता को किसी फ़ोन पर भेजती है खाता लिंक करने का फ़्लो जारी रखने के लिए.
बनाने की अनुमति तब दी जाती है, जब:
जिन उपयोगकर्ताओं के पास Google से बाहर का खाता है उन्हें नया खाता बनाने की अनुमति नहीं देनी चाहिए उपयोगकर्ता खाते और उन्हें अपने मौजूदा उपयोगकर्ता खातों से लिंक करना है, तो पुष्टि करने की ज़रूरत नहीं है. उदाहरण के लिए, अगर आपने लॉयल्टी प्रोग्राम ऑफ़र किया है, तो यह पक्का करना चाहें कि उपयोगकर्ता को मिलने वाले पॉइंट न मिटें मौजूदा खाता है.
आपके पास खाता बनाने की प्रोसेस का पूरा कंट्रोल होना चाहिए. उदाहरण के लिए, आपके पास ये विकल्प हैं बनाने की अनुमति नहीं दें, अगर आपको इस दौरान उपयोगकर्ता को अपनी सेवा की शर्तें दिखानी हैं, तो खाता बनाना.
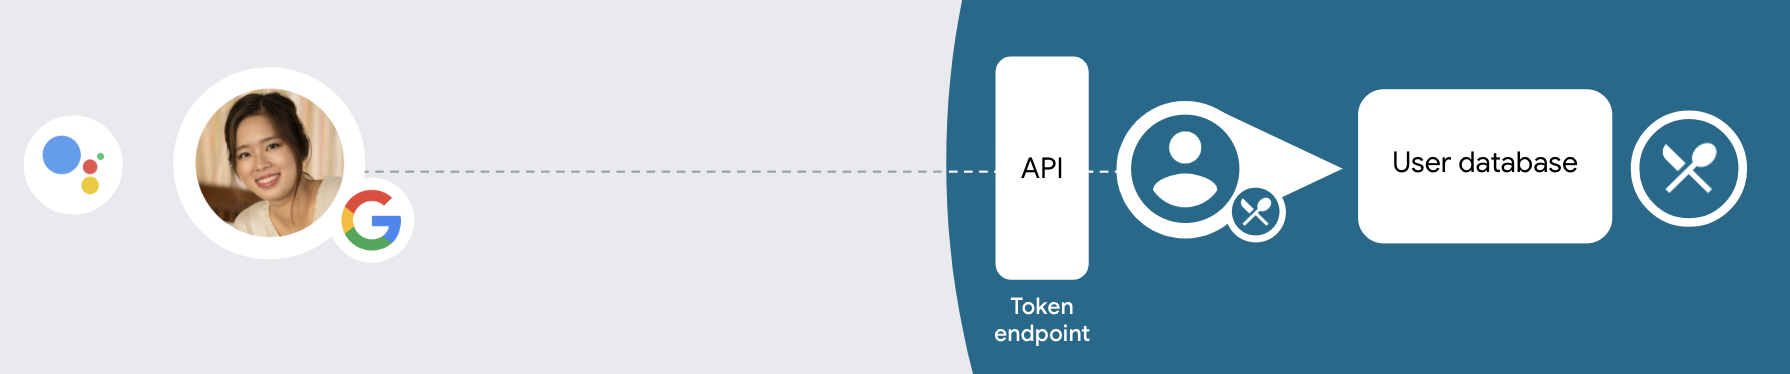
OAuth और 'Google साइन-इन' खाता लिंक करना लागू करना
खाते, इंडस्ट्री स्टैंडर्ड OAuth 2.0 फ़्लो से लिंक हैं. Actions on Google, इंप्लिसिट और ऑथराइज़ेशन कोड फ़्लो के साथ काम करता है.
इंप्लिसिट कोड फ़्लो में, Google, उपयोगकर्ता के ब्राउज़र में ऑथराइज़ेशन एंडपॉइंट दिखाता है. साइन इन करने के बाद, Google को लंबे समय तक चलने वाला ऐक्सेस टोकन दिखाया जाता है. यह ऐक्सेस टोकन अब Assistant से आपकी कार्रवाई को किए गए हर अनुरोध में शामिल किया गया है.
ऑथराइज़ेशन कोड फ़्लो में, आपको दो एंडपॉइंट की ज़रूरत होगी:
- ऑथराइज़ेशन एंडपॉइंट, जो उन उपयोगकर्ताओं के साइन-इन यूज़र इंटरफ़ेस (यूआई) को दिखाने के लिए ज़िम्मेदार है जिन्होंने पहले से साइन इन नहीं किया है. साथ ही, उपयोगकर्ता को कुछ समय तक इस्तेमाल किए जाने वाले ऑथराइज़ेशन कोड के तौर पर ऐक्सेस का अनुरोध करने के लिए सहमति लेनी होती है.
- टोकन एक्सचेंज एंडपॉइंट, दो तरह के एक्सचेंज के लिए ज़िम्मेदार है:
- लंबे समय तक चलने वाले रीफ़्रेश टोकन और कुछ समय तक चलने वाले ऐक्सेस टोकन के लिए ऑथराइज़ेशन कोड बदलता है. यह एक्सचेंज तब होता है, जब उपयोगकर्ता, खाता जोड़ने के फ़्लो से गुज़रता है.
- वह कम समय तक चलने वाले ऐक्सेस टोकन के लिए, लंबे समय तक चलने वाले रीफ़्रेश टोकन की अदला-बदली करता है. यह ऐसा तब होता है, जब Google को नए ऐक्सेस टोकन की ज़रूरत होती है, क्योंकि उसकी समयसीमा खत्म हो चुकी होती है.
इंप्लिसिट कोड फ़्लो को लागू करना आसान है. हालांकि, Google का सुझाव है कि इंप्लिसिट फ़्लो का इस्तेमाल करके जारी किए गए ऐक्सेस टोकन की समयसीमा कभी खत्म न हो. ऐसा इसलिए, क्योंकि इंप्लिसिट फ़्लो वाले टोकन एंडपॉइंट का इस्तेमाल करने से, उपयोगकर्ता को अपने खाते को फिर से जोड़ने के लिए मजबूर कर दिया जाता है. अगर आपको सुरक्षा से जुड़ी वजहों से टोकन की समयसीमा खत्म होने की ज़रूरत है, तो आपको इसके बजाय ऑथराइज़ेशन कोड फ़्लो का इस्तेमाल करना चाहिए.
प्रोजेक्ट कॉन्फ़िगर करें
OAuth और 'Google साइन-इन' खाते का इस्तेमाल करने के लिए अपने प्रोजेक्ट को कॉन्फ़िगर करने के लिए लिंक करने के बाद, यह तरीका अपनाएं:
- Actions कंसोल खोलें और वह प्रोजेक्ट चुनें जिसका आप इस्तेमाल करना चाहते हैं.
- डेवलप करें टैब पर क्लिक करें और खाता लिंक करना चुनें.
- खाता लिंक करना के बगल में मौजूद स्विच को चालू करें.
- खाता बनाएं सेक्शन में, हां चुनें.
लिंकिंग प्रकार में, OAuth &चुनें Google साइन इन और इंप्लिसिट.
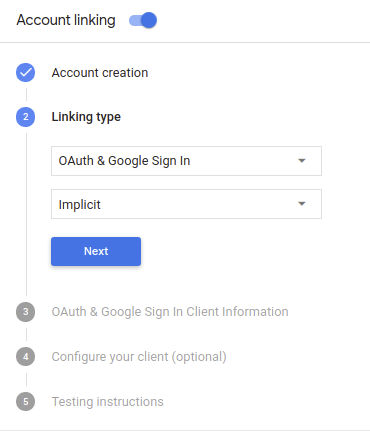
क्लाइंट की जानकारी में ये काम करें:
- Google को की जाने वाली आपकी कार्रवाइयों के ज़रिए जारी किए गए Client-ID को कोई मान असाइन करें, ताकि तो Google से मिलने वाले अनुरोधों को पूरा नहीं करता है.
- ऑथराइज़ेशन और टोकन एक्सचेंज एंडपॉइंट के लिए, यूआरएल डालें.
सेव करें पर क्लिक करें.
अपना OAuth सर्वर लागू करना
OAuth 2.0 इंप्लिसिट फ़्लो के साथ काम करने के लिए, आपकी सेवा अनुमति देती है एंडपॉइंट, एचटीटीपीएस से उपलब्ध है. यह एंडपॉइंट, पुष्टि करने और डेटा ऐक्सेस करने के लिए उपयोगकर्ताओं की सहमति लेना. ऑथराइज़ेशन एंडपॉइंट यह आपके उन उपयोगकर्ताओं को साइन इन करने का यूज़र इंटरफ़ेस (यूआई) दिखाता है जिन्होंने पहले से साइन इन नहीं किया है. यह यूज़र इंटरफ़ेस (यूआई) दिखाता है. के लिए अनुरोध किया गया है.
जब आपकी सेट की गई कार्रवाई को, सेवा के अनुमति वाले किसी एपीआई को कॉल करने की ज़रूरत होती है, तो Google यह एंडपॉइंट आपके उपयोगकर्ताओं से इन एपीआई को कॉल करने की अनुमति लेता है: की ओर से.
Google के शुरू किए गए किसी आम OAuth 2.0 इंप्लिसिट फ़्लो सेशन में नया फ़्लो:
- Google, उपयोगकर्ता के ब्राउज़र में आपका ऑथराइज़ेशन एंडपॉइंट खोलता है. कॉन्टेंट बनाने अगर उपयोगकर्ता ने पहले से साइन इन नहीं किया हुआ है, तो वह साइन इन करता है और Google को आपके एपीआई के साथ अपना डेटा सबमिट कर सकता है, अगर उसने पहले से अनुमति नहीं दी है.
- आपकी सेवा एक ऐक्सेस टोकन बनाती है और उसे वापस भेजती है Google, उपयोगकर्ता के ब्राउज़र को ऐक्सेस टोकन के साथ Google पर वापस रीडायरेक्ट करता है अनुरोध के साथ अटैच की गई है.
- Google आपकी सेवा के एपीआई को कॉल करता है और ऐक्सेस टोकन को हर अनुरोध के साथ किया जा सकता है. आपकी सेवा इस बात की पुष्टि करती है कि ऐक्सेस टोकन, Google को अनुमति देता है या नहीं की अनुमति देता है और फिर एपीआई कॉल को पूरा करता है.
अनुमति देने के अनुरोधों को मैनेज करना
जब आपके Action को OAuth2 इंप्लिसिट फ़्लो के ज़रिए खाता जोड़ना हो, Google, उपयोगकर्ता को एक अनुरोध के साथ आपके ऑथराइज़ेशन एंडपॉइंट पर भेजता है, जिसमें यह शामिल होता है नीचे दिए पैरामीटर:
| ऑथराइज़ेशन एंडपॉइंट पैरामीटर | |
|---|---|
client_id |
वह क्लाइंट आईडी जिसे आपने Google को असाइन किया है. |
redirect_uri |
वह यूआरएल जिस पर आपने इस अनुरोध का जवाब भेजा है. |
state |
हिसाब-किताब की ऐसी वैल्यू जो Google को वापस पास की जाती है. हालांकि, इसमें कोई बदलाव नहीं होता रीडायरेक्ट यूआरआई. |
response_type |
रिस्पॉन्स में दी जाने वाली वैल्यू का टाइप. OAuth 2.0 इंप्लिसिट के लिए
फ़्लो के लिए, रिस्पॉन्स का टाइप हमेशा token होता है. |
उदाहरण के लिए, अगर आपका ऑथराइज़ेशन एंडपॉइंट https://myservice.example.com/auth पर उपलब्ध है,
अनुरोध ऐसा दिख सकता है:
GET https://myservice.example.com/auth?client_id=GOOGLE_CLIENT_ID&redirect_uri=REDIRECT_URI&state=STATE_STRING&response_type=token
आपके ऑथराइज़ेशन एंडपॉइंट से साइन-इन करने के अनुरोध मैनेज किए जा सकें, इसके लिए यह तरीका अपनाएं:
इसके लिए,
client_idऔरredirect_uriवैल्यू की पुष्टि करें अनचाहे या गलत तरीके से कॉन्फ़िगर किए गए क्लाइंट ऐप्लिकेशन का ऐक्सेस देने से रोकें:- पुष्टि करें कि
client_idआपके क्लाइंट आईडी से मेल खाता है असाइन किया गया है. - पुष्टि करें कि
redirect_uriमें बताया गया यूआरएल पैरामीटर का यह रूप होता है:https://oauth-redirect.googleusercontent.com/r/YOUR_PROJECT_ID
- पुष्टि करें कि
देखें कि उपयोगकर्ता ने आपकी सेवा में साइन इन किया है या नहीं. अगर उपयोगकर्ता ने साइन इन नहीं किया है में जाएं, तो अपनी सेवा का साइन-इन या साइन-अप फ़्लो पूरा करें.
ऐक्सेस टोकन जनरेट करें. Google इसका इस्तेमाल करके, आपके एपीआई को ऐक्सेस करेगा. कॉन्टेंट बनाने ऐक्सेस टोकन कोई भी स्ट्रिंग वैल्यू हो सकता है, लेकिन यह टोकन जिस उपयोगकर्ता और क्लाइंट के लिए है, वह अनुमान लगाने लायक नहीं होना चाहिए.
ऐसा एचटीटीपी रिस्पॉन्स भेजें जो उपयोगकर्ता के ब्राउज़र को यूआरएल पर रीडायरेक्ट करे
redirect_uriपैरामीटर से तय होता है. सभी को शामिल करें यूआरएल फ़्रैगमेंट में ये पैरामीटर होना चाहिए:access_token: वह ऐक्सेस टोकन जिसे आपने अभी-अभी जनरेट किया हैtoken_type: स्ट्रिंगbearerstate: मूल वैल्यू से, बिना बदलाव की गई स्थिति की वैल्यू अनुरोध इससे बनने वाले यूआरएल का एक उदाहरण नीचे दिया गया है:https://oauth-redirect.googleusercontent.com/r/YOUR_PROJECT_ID#access_token=ACCESS_TOKEN&token_type=bearer&state=STATE_STRING
Google के OAuth 2.0 रीडायरेक्ट हैंडलर को ऐक्सेस टोकन मिलेगा और इसकी पुष्टि की जाएगी
state की वैल्यू में कोई बदलाव नहीं हुआ है. Google के पास
ऐक्सेस टोकन नहीं देते हैं, तो Google बाद में किए जाने वाले कॉल के लिए टोकन को अटैच करेगा
AppRequest के हिस्से के तौर पर, आपकी सेट की गई कार्रवाई में जोड़े गए हैं.
अपने-आप लिंक होने की सुविधा मैनेज करना
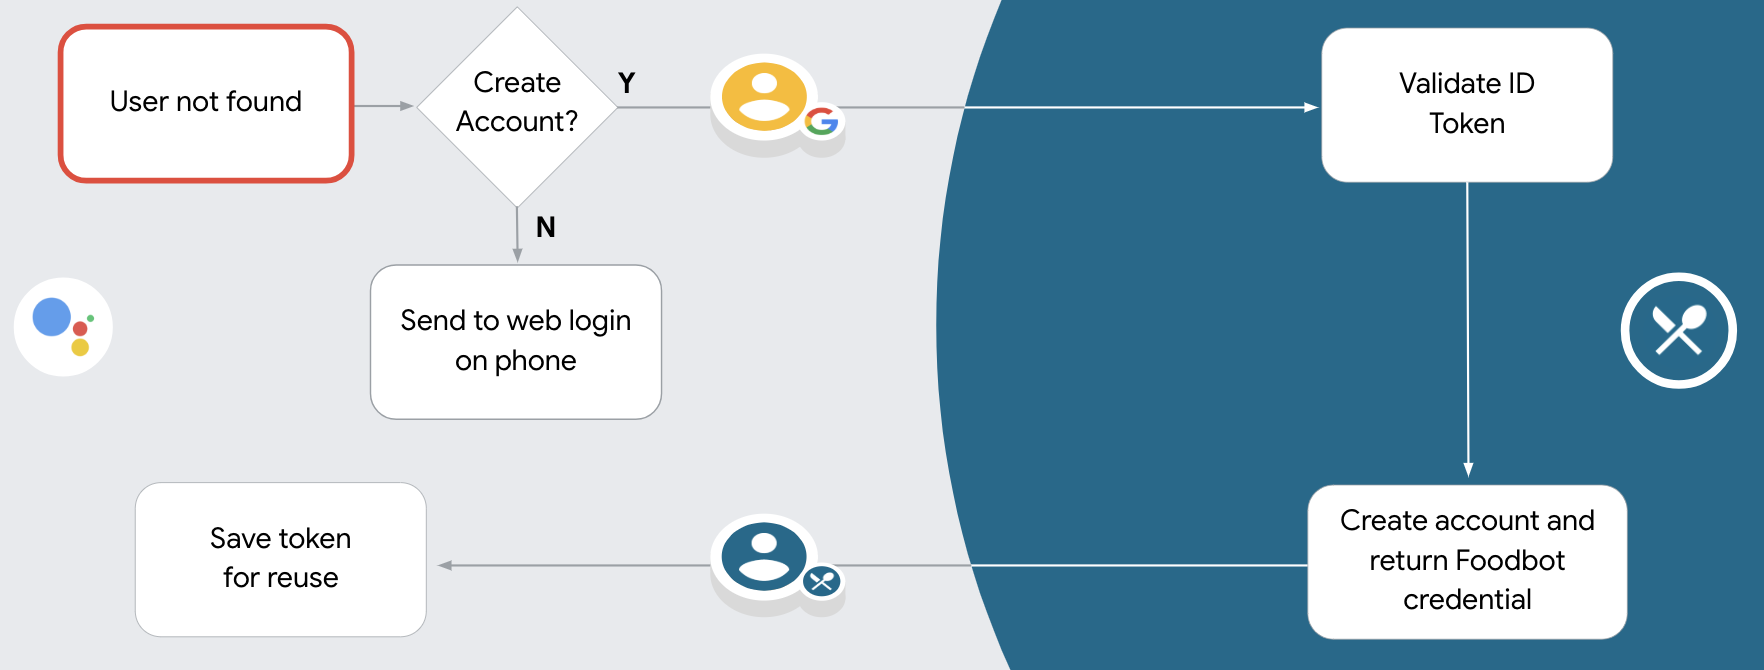
जब उपयोगकर्ता अपनी Google प्रोफ़ाइल को ऐक्सेस करने के लिए आपकी कार्रवाई की सहमति देता है, तो Google एक अनुरोध भेजता है जिसमें Google उपयोगकर्ता की पहचान का हस्ताक्षर किया गया दावा होता है. दावे में ऐसी जानकारी शामिल है जिसमें उपयोगकर्ता का Google खाता आईडी, नाम, और ईमेल पता होता है. आपके प्रोजेक्ट हैंडल के लिए कॉन्फ़िगर किया गया टोकन एक्सचेंज एंडपॉइंट उस अनुरोध को पूरा नहीं करेगा.
अगर इससे जुड़ा Google खाता पहले से ही आपके पुष्टि करने वाले सिस्टम में मौजूद है,
आपका टोकन एक्सचेंज एंडपॉइंट, उपयोगकर्ता के लिए टोकन दिखाता है. अगर Google खाते में
किसी मौजूदा उपयोगकर्ता से मैच करने पर, आपका टोकन एक्सचेंज एंडपॉइंट, user_not_found गड़बड़ी दिखाता है.
अनुरोध में यह फ़ॉर्म मौजूद है:
POST /token HTTP/1.1
Host: oauth2.example.com
Content-Type: application/x-www-form-urlencoded

grant_type=urn:ietf:params:oauth:grant-type:jwt-bearer&intent=get&assertion=JWT&consent_code=CONSENT_CODE&scope=SCOPES
यह ज़रूरी है कि आपका टोकन एक्सचेंज एंडपॉइंट इन पैरामीटर को मैनेज कर सके:
| टोकन एंडपॉइंट पैरामीटर | |
|---|---|
grant_type |
किस टाइप के टोकन की अदला-बदली की जा रही है. इन अनुरोधों के लिए, यह
पैरामीटर की वैल्यू urn:ietf:params:oauth:grant-type:jwt-bearer है. |
intent |
इन अनुरोधों के लिए, इस पैरामीटर की वैल्यू `get` है. |
assertion |
JSON Web Token (JWT), जो Google का हस्ताक्षर किया गया दावा उपलब्ध कराता है उपयोगकर्ता की पहचान होती है. JWT में ऐसी जानकारी होती है जिसमें उपयोगकर्ता का Google खाता आईडी, नाम, और ईमेल पता. |
consent_code |
ज़रूरी नहीं: एक बार इस्तेमाल होने वाला कोड मौजूद होने पर, यह बताता है कि उपयोगकर्ता ने आपकी सेट की गई कार्रवाई को, बताए गए दायरे को ऐक्सेस करने की सहमति दी है. |
scope |
ज़रूरी नहीं: ऐसे सभी दायरे जिन्हें आपने उपयोगकर्ताओं से अनुरोध करने के लिए, Google को कॉन्फ़िगर किया था. |
जब आपके टोकन एक्सचेंज एंडपॉइंट को लिंक करने का अनुरोध मिलता है, तब यह: फ़ॉलो किया जा रहा है:
JWT के दावे की पुष्टि करना और उसे डिकोड करना
अपनी भाषा के लिए JWT-डिकोडिंग लाइब्रेरी का इस्तेमाल करके, JWT के दावे की पुष्टि की जा सकती है और उन्हें डिकोड किया जा सकता है. Google की सार्वजनिक कुंजियों (JWK में उपलब्ध) का इस्तेमाल करें या PEM फ़ॉर्मैट में भी दिखेगा. इससे टोकन की पुष्टि की जा सकेगी हस्ताक्षर करें.
डिकोड किए जाने पर, JWT के दावे का उदाहरण यहां दिया गया है:
{
  "sub": 1234567890,        // The unique ID of the user's Google Account
  "iss": "https://accounts.google.com",        // The assertion's issuer
  "aud": "123-abc.apps.googleusercontent.com", // Your server's client ID
  "iat": 233366400,         // Unix timestamp of the assertion's creation time
  "exp": 233370000,         // Unix timestamp of the assertion's expiration time
  "name": "Jan Jansen",
  "given_name": "Jan",
  "family_name": "Jansen",
  "email": "jan@gmail.com", // If present, the user's email address
  "locale": "en_US"
}
टोकन के हस्ताक्षर की पुष्टि करने के अलावा, यह भी पुष्टि करें कि दावा करने वाला
(iss फ़ील्ड) https://accounts.google.com है और ऑडियंस (aud फ़ील्ड)
आपकी कार्रवाई को असाइन किया गया क्लाइंट आईडी है.
देखें कि आपके पुष्टि करने वाले सिस्टम में Google खाता पहले से मौजूद है या नहीं
देखें कि इनमें से कोई एक शर्त सही है या नहीं:
- दावे के
subफ़ील्ड में मौजूद Google खाता आईडी, आपके उपयोगकर्ता डेटाबेस में मौजूद है. - दावे में दिया गया ईमेल पता, आपके उपयोगकर्ता डेटाबेस के किसी उपयोगकर्ता से मेल खाता है.
अगर दोनों में से कोई भी शर्त सही है, तो इसका मतलब है कि उपयोगकर्ता ने पहले ही साइन अप कर लिया है. ऐसे में, आपके पास ऐक्सेस टोकन.
अगर Google खाता आईडी और दावे में बताया गया ईमेल पता, दोनों में से कोई भी नहीं है
आपके डेटाबेस के किसी उपयोगकर्ता से मैच करता है, तो उपयोगकर्ता ने अभी तक साइन अप नहीं किया है. इस मामले में, आपके
टोकन एक्सचेंज एंडपॉइंट को एचटीटीपी 401 गड़बड़ी के साथ जवाब देना चाहिए, जिससे error=user_not_found के बारे में पता चलता है,
जैसा कि नीचे दिए गए उदाहरण में बताया गया है:
HTTP/1.1 401 Unauthorized
Content-Type: application/json;charset=UTF-8

{
  "error":"user_not_found",
}
user_not_found गड़बड़ी के साथ 401 गड़बड़ी वाला मैसेज मिलता है, तो Google
intent पैरामीटर की वैल्यू के साथ आपके टोकन एक्सचेंज एंडपॉइंट को कॉल करता है
उपयोगकर्ता की प्रोफ़ाइल जानकारी वाला आईडी टोकन भेजने और बनाने के लिए सेट किया गया है
पर जाकर संपर्क फ़ॉर्म भरें और उसमें दूसरे साइट की जानकारी शामिल करें.
'Google साइन इन' के ज़रिए खाता बनाने को मैनेज करना
जब किसी उपयोगकर्ता को आपकी सेवा पर खाता बनाने की ज़रूरत होती है, तो Google
अपने टोकन एक्सचेंज एंडपॉइंट को अनुरोध भेजें, जो
intent=create, जैसा कि इस उदाहरण में दिखाया गया है:
POST /token HTTP/1.1
Host: oauth2.example.com
Content-Type: application/x-www-form-urlencoded

response_type=token&grant_type=urn:ietf:params:oauth:grant-type:jwt-bearer&scope=SCOPES&intent=create&consent_code=CONSENT_CODE&assertion=JWT[&NEW_ACCOUNT_INFO]
assertion पैरामीटर में एक JSON वेब टोकन (JWT) होता है, जो
Google उपयोगकर्ता की पहचान का हस्ताक्षर किया गया दावा. JWT में जानकारी होती है
जिसमें उपयोगकर्ता का Google खाता आईडी, नाम, और ईमेल पता शामिल है. इसका इस्तेमाल किया जा सकता है
पर क्लिक करें.
खाता बनाने के अनुरोधों का जवाब देने के लिए, अपने टोकन एक्सचेंज एंडपॉइंट को यह काम करना चाहिए निम्न:
JWT के दावे की पुष्टि करना और उसे डिकोड करना
अपनी भाषा के लिए JWT-डिकोडिंग लाइब्रेरी का इस्तेमाल करके, JWT के दावे की पुष्टि की जा सकती है और उन्हें डिकोड किया जा सकता है. Google की सार्वजनिक कुंजियों (JWK में उपलब्ध) का इस्तेमाल करें या PEM फ़ॉर्मैट में भी दिखेगा. इससे टोकन की पुष्टि की जा सकेगी हस्ताक्षर करें.
डिकोड किए जाने पर, JWT के दावे का उदाहरण यहां दिया गया है:
{
  "sub": 1234567890,        // The unique ID of the user's Google Account
  "iss": "https://accounts.google.com",        // The assertion's issuer
  "aud": "123-abc.apps.googleusercontent.com", // Your server's client ID
  "iat": 233366400,         // Unix timestamp of the assertion's creation time
  "exp": 233370000,         // Unix timestamp of the assertion's expiration time
  "name": "Jan Jansen",
  "given_name": "Jan",
  "family_name": "Jansen",
  "email": "jan@gmail.com", // If present, the user's email address
  "locale": "en_US"
}
टोकन के हस्ताक्षर की पुष्टि करने के अलावा, यह भी पुष्टि करें कि दावा करने वाला
(iss फ़ील्ड) https://accounts.google.com है और ऑडियंस (aud फ़ील्ड)
आपकी कार्रवाई को असाइन किया गया क्लाइंट आईडी है.
उपयोगकर्ता जानकारी की पुष्टि करें और नया खाता बनाएं
देखें कि इनमें से कोई एक शर्त सही है या नहीं:
- दावे के
subफ़ील्ड में मौजूद Google खाता आईडी, आपके उपयोगकर्ता डेटाबेस में मौजूद है. - दावे में दिया गया ईमेल पता, आपके उपयोगकर्ता डेटाबेस के किसी उपयोगकर्ता से मेल खाता है.
अगर दोनों में से कोई भी शर्त सही है, तो उपयोगकर्ता को उनके मौजूदा खाते को
वे अपने Google खाते से, एचटीटीपी 401 गड़बड़ी वाले अनुरोध का जवाब देकर,
error=linking_error और उपयोगकर्ता का ईमेल पता, जैसे कि login_hint
नीचे दिया गया उदाहरण:
HTTP/1.1 401 Unauthorized
Content-Type: application/json;charset=UTF-8

{
  "error":"linking_error",
  "login_hint":"foo@bar.com"
}
अगर कोई भी शर्त सही नहीं होती है, तो जानकारी का इस्तेमाल करके एक नया उपयोगकर्ता खाता बनाएं में दी गई जानकारी होती है. नए खातों में आम तौर पर पासवर्ड सेट नहीं होता है. हां हमारा सुझाव है कि आप अन्य प्लैटफ़ॉर्म में 'Google साइन इन' को जोड़ें, ताकि उपयोगकर्ता लॉग इन कर सकें का इस्तेमाल करें. इसके अलावा, आपके पास ये विकल्प हैं उपयोगकर्ता को वह लिंक ईमेल करें जो उपयोगकर्ता को सेट करने की अनुमति देने के लिए आपका पासवर्ड वापस पाने का फ़्लो शुरू करता है दूसरे प्लैटफ़ॉर्म पर साइन इन करने के लिए पासवर्ड.
कॉन्टेंट बनाने के बाद, ऐक्सेस टोकन जारी करें और JSON ऑब्जेक्ट में वैल्यू आपके एचटीटीपीएस रिस्पॉन्स का मुख्य हिस्सा, जैसा कि नीचे दिए गए उदाहरण में दिखाया गया है:
{
  "token_type": "Bearer",
  "access_token": "ACCESS_TOKEN",

  "expires_in": SECONDS_TO_EXPIRATION
}
पुष्टि करने की प्रोसेस शुरू करना
खाते में साइन इन करने के लिए हेल्पर इंटेंट का इस्तेमाल करें पुष्टि करने की प्रोसेस शुरू करने के लिए.
const app = dialogflow({
  // REPLACE THE PLACEHOLDER WITH THE CLIENT_ID OF YOUR ACTIONS PROJECT
  clientId: CLIENT_ID,
})

// Intent that starts the account linking flow.
app.intent('Start Signin', conv => {
  conv.ask(new SignIn('To get your account details'))
})
private String clientId = "<your_client_id>";

@ForIntent("Start Signin")
public ActionResponse text(ActionRequest request) {
  ResponseBuilder rb = getResponseBuilder(request);
  return rb.add(new SignIn().setContext("To get your account details")).build();
}
const app = actionssdk({
  clientId: CLIENT_ID,
})

app.intent('Start Signin', conv => {
  conv.ask(new SignIn('To get your account details'))
})
private String clientId = "<your_client_id>";

@ForIntent("actions.intent.TEXT")
public ActionResponse text(ActionRequest request) {
  ResponseBuilder rb = getResponseBuilder(request);
  return rb.add(new SignIn().setContext("To get your account details")).build();
}
डेटा को ऐक्सेस करने के अनुरोधों को मैनेज करना
अगर Assistant के अनुरोध में कोई ऐक्सेस टोकन मौजूद है, पहले जांच लें कि ऐक्सेस टोकन मान्य है और उसकी समयसीमा खत्म नहीं हुई है. इसके बाद, अपने उपयोगकर्ता खाते का डेटाबेस, टोकन से जुड़े उपयोगकर्ता खाते का होता है.