

Тип связи OAuth и вход с аккаунтом Google добавляет вход с аккаунтом Google к связи аккаунтов на основе OAuth. Это позволяет пользователям Google легко связывать аккаунты с помощью голосовых команд, а также дает возможность связать аккаунты пользователям, которые зарегистрировались в вашем сервисе не через Google.
Этот тип связывания начинается со входа с аккаунтом Google, который позволяет проверить, есть ли в вашей системе информация из профиля Google пользователя. Если информация о пользователе не найдена в вашей системе, начинается стандартный процесс OAuth. Пользователь также может создать новый аккаунт, используя данные профиля Google.
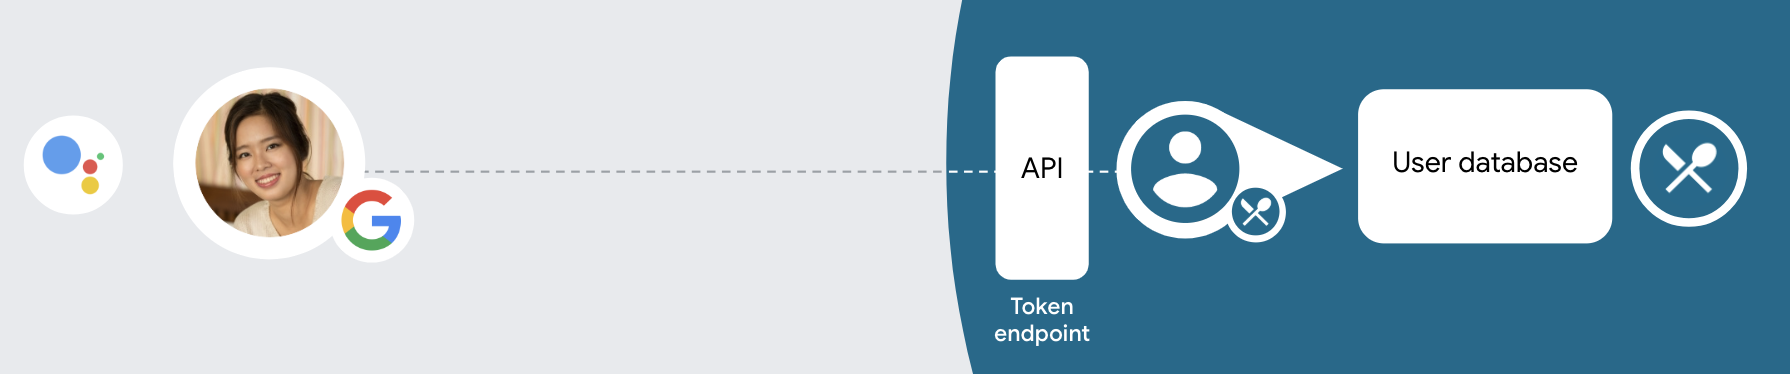
Чтобы связать аккаунты с помощью OAuth и входа с аккаунтом Google, выполните следующие действия:
- Сначала попросите пользователя предоставить доступ к его профилю Google.
- Используйте информацию в профиле, чтобы идентифицировать пользователя.
- Если вы не можете найти совпадение для пользователя Google в своей системе аутентификации, дальнейшие действия зависят от того, разрешили ли вы в консоли Actions создавать аккаунты пользователей с помощью голосовых команд или только на своем сайте.
- Если вы разрешаете создавать аккаунты с помощью голосовых команд, подтвердите токен идентификатора, полученный от Google. Затем вы можете создать пользователя на основе информации профиля, содержащейся в токене идентификатора.
- Если вы не разрешаете создавать аккаунты с помощью голосовых команд, пользователь будет перенаправлен в браузер, где сможет загрузить вашу страницу авторизации и завершить процесс создания аккаунта.
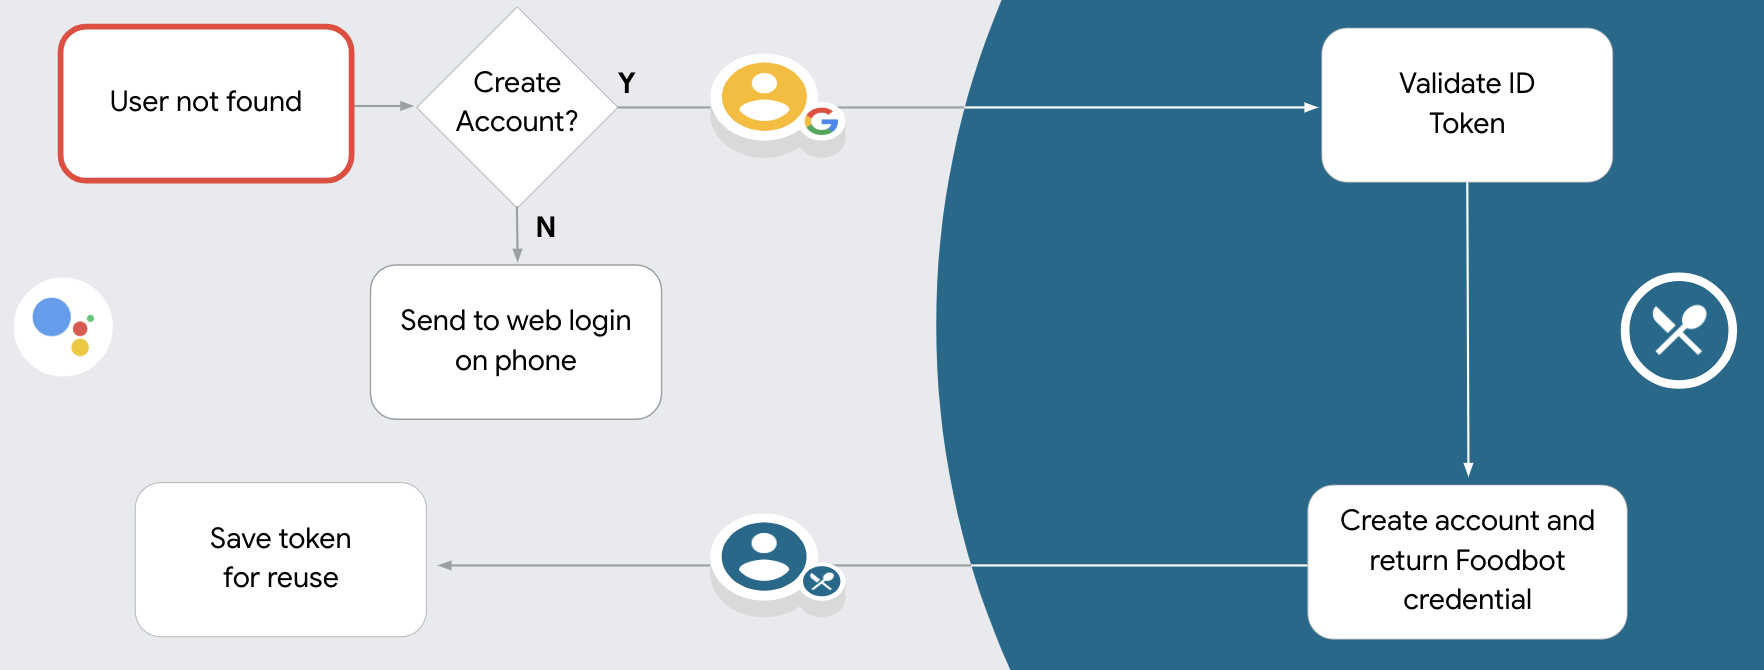
Поддержка создания аккаунта с помощью голосовых команд
Если вы разрешите создавать аккаунты с помощью голосовых команд, Ассистент будет спрашивать у пользователей, хотят ли они:
- создать новый аккаунт в вашей системе, используя данные аккаунта Google;
- Войти в систему аутентификации с другим аккаунтом, если у них есть аккаунт, не связанный с аккаунтом Google.
Рекомендуем разрешить создание аккаунта с помощью голосовых команд, чтобы упростить этот процесс. Пользователю нужно выйти из голосового интерфейса, только если он хочет войти в существующий аккаунт, не связанный с Google.
Запретить создание аккаунта с помощью голосовых команд
Если вы запретили создавать аккаунты с помощью голосовых команд, Ассистент откроет URL сайта, который вы указали для аутентификации пользователей. Если взаимодействие происходит на устройстве без экрана, Ассистент предлагает пользователю продолжить связывание аккаунтов на телефоне.
Запретить создание рекомендуется в следующих случаях:
Вы не хотите разрешать пользователям, у которых нет аккаунта Google, создавать новый аккаунт пользователя, а хотите, чтобы они связали его с существующим аккаунтом пользователя в вашей системе аутентификации. Например, если у вас есть программа лояльности, вы можете захотеть, чтобы пользователь не потерял баллы, накопленные в существующем аккаунте.
У вас должен быть полный контроль над процессом создания аккаунта. Например, вы можете запретить создание аккаунта, если вам нужно показать пользователю условия использования во время создания аккаунта.
Как реализовать связь аккаунтов с помощью OAuth и входа с аккаунтом Google
Аккаунты связываются с помощью отраслевых стандартных процессов OAuth 2.0. Actions on Google поддерживает неявный поток и поток кода авторизации.
在隐式代码流程中,Google 会在用户浏览器中打开您的授权端点。成功登录后,系统会向 Google 返回长期访问令牌。现在,从 Google 助理向你的 Action 发送的每个请求中都包含此访问令牌。
在授权代码流程中,您需要两个端点:
- 授权端点,该端点负责向尚未登录的用户显示登录界面,并以短期授权代码的形式记录所请求的访问。
- 令牌交换端点,负责两种类型的交换:
- 将授权代码交换为长期刷新令牌和短期访问令牌。用户完成帐号关联流程后,系统会进行这种交换。
- 将长期刷新令牌换成短期访问令牌。Google 需要新访问令牌时,由于此令牌已过期,因此会进行此交换。
虽然隐式代码流程的实现更简单,但 Google 建议通过隐式流程发出的访问令牌永远不会过期,因为将令牌过期与隐式流程一起使用会强制用户再次关联其帐号。如果出于安全考虑需要令牌到期,强烈建议您考虑使用身份验证代码流程。
Настройте проект
Чтобы настроить проект для использования OAuth и связывания аккаунтов с помощью входа с аккаунтом Google, выполните следующие действия:
- Откройте консоль Actions и выберите нужный проект.
- Перейдите на вкладку Develop (Разработка) и выберите Account linking (Связывание аккаунтов).
- Установите переключатель Связывание аккаунтов в положение "включено".
- В разделе Создание аккаунта выберите Да.
В разделе Linking type (Тип связывания) выберите OAuth & Google Sign In (OAuth и вход с аккаунтом Google) и Implicit (Неявный).
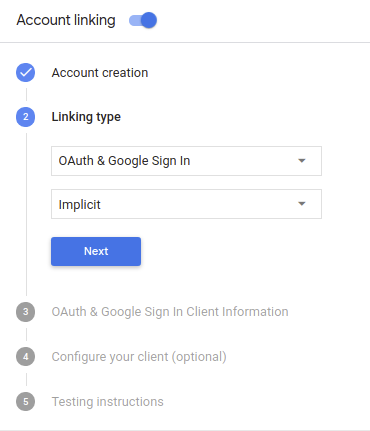
В разделе Client Information (Информация о клиенте) выполните следующие действия:
- Присвойте значение полю Идентификатор клиента, выданный вашим проектом Actions on Google, чтобы идентифицировать запросы, поступающие от Google.
- Укажите URL конечных точек авторизации и обмена токенами.
Нажмите Сохранить.
Как реализовать сервер OAuth
To support the OAuth 2.0 implicit flow, your service makes an authorization endpoint available by HTTPS. This endpoint is responsible for authenticating and obtaining consent from users for data access. The authorization endpoint presents a sign-in UI to your users that aren't already signed in and records consent to the requested access.
When your Action needs to call one of your service's authorized APIs, Google uses this endpoint to get permission from your users to call these APIs on their behalf.
A typical OAuth 2.0 implicit flow session initiated by Google has the following flow:
- Google opens your authorization endpoint in the user's browser. The user signs in if not signed in already, and grants Google permission to access their data with your API if they haven't already granted permission.
- Your service creates an access token and returns it to Google by redirecting the user's browser back to Google with the access token attached to the request.
- Google calls your service's APIs, and attaches the access token with each request. Your service verifies that the access token grants Google authorization to access the API and then completes the API call.
Handle authorization requests
When your Action needs to perform account linking via an OAuth2 implicit flow, Google sends the user to your authorization endpoint with a request that includes the following parameters:
| Authorization endpoint parameters | |
|---|---|
client_id |
The client ID you assigned to Google. |
redirect_uri |
The URL to which you send the response to this request. |
state |
A bookkeeping value that is passed back to Google unchanged in the redirect URI. |
response_type |
The type of value to return in the response. For the OAuth 2.0 implicit
flow, the response type is always token. |
For example, if your authorization endpoint is available at https://myservice.example.com/auth,
a request might look like:
GET https://myservice.example.com/auth?client_id=GOOGLE_CLIENT_ID&redirect_uri=REDIRECT_URI&state=STATE_STRING&response_type=token
For your authorization endpoint to handle sign-in requests, do the following steps:
Verify the
client_idandredirect_urivalues to prevent granting access to unintended or misconfigured client apps:- Confirm that the
client_idmatches the client ID you assigned to Google. - Confirm that the URL specified by the
redirect_uriparameter has the following form:https://oauth-redirect.googleusercontent.com/r/YOUR_PROJECT_ID
- Confirm that the
Check if the user is signed in to your service. If the user isn't signed in, complete your service's sign-in or sign-up flow.
Generate an access token that Google will use to access your API. The access token can be any string value, but it must uniquely represent the user and the client the token is for and must not be guessable.
Send an HTTP response that redirects the user's browser to the URL specified by the
redirect_uriparameter. Include all of the following parameters in the URL fragment:access_token: the access token you just generatedtoken_type: the stringbearerstate: the unmodified state value from the original request The following is an example of the resulting URL:https://oauth-redirect.googleusercontent.com/r/YOUR_PROJECT_ID#access_token=ACCESS_TOKEN&token_type=bearer&state=STATE_STRING
Google's OAuth 2.0 redirect handler will receive the access token and confirm
that the state value hasn't changed. After Google has obtained an
access token for your service, Google will attach the token to subsequent calls
to your Action as part of the AppRequest.
处理自动关联
在用户同意你的 Action 访问他们的 Google 个人资料后,Google 发送请求,其中包含 Google 用户身份的已签名断言。 该断言包含的信息包括用户的 Google 账号 ID、姓名、 和电子邮件地址。为项目配置的令牌交换端点处理 请求。
如果您的身份验证系统中已经存在相应的 Google 账号,
您的令牌交换端点为用户返回令牌。如果 Google 账号没有
匹配现有用户,您的令牌交换端点会返回 user_not_found 错误。
请求的格式如下:
POST /token HTTP/1.1
Host: oauth2.example.com
Content-Type: application/x-www-form-urlencoded

grant_type=urn:ietf:params:oauth:grant-type:jwt-bearer&intent=get&assertion=JWT&consent_code=CONSENT_CODE&scope=SCOPES
您的令牌交换端点必须能够处理以下参数:
| 令牌端点参数 | |
|---|---|
grant_type |
所交换的令牌的类型。对于这类请求
参数的值为 urn:ietf:params:oauth:grant-type:jwt-bearer。 |
intent |
对于这些请求,此参数的值为 `get`。 |
assertion |
一个 JSON Web 令牌 (JWT),提供 Google 用户身份。JWT 包含的信息包括 账号 ID、名称和电子邮件地址。 |
consent_code |
可选:一个一次性代码(如果存在)用于表明 用户已同意你的 Action 访问指定范围。 |
scope |
可选:您配置 Google 向用户请求的任何范围。 |
当您的令牌交换端点收到关联请求时,它应该 以下:
Проверка и декодирование утверждения JWT
Вы можете проверить и декодировать утверждение JWT, используя библиотеку JWT-декодирования для вашего языка . Используйте открытые ключи Google (доступные в формате JWK или PEM ) для проверки подписи токена.
В декодированном виде утверждение JWT выглядит следующим образом:
{
  "sub": 1234567890,        // The unique ID of the user's Google Account
  "iss": "https://accounts.google.com",        // The assertion's issuer
  "aud": "123-abc.apps.googleusercontent.com", // Your server's client ID
  "iat": 233366400,         // Unix timestamp of the assertion's creation time
  "exp": 233370000,         // Unix timestamp of the assertion's expiration time
  "name": "Jan Jansen",
  "given_name": "Jan",
  "family_name": "Jansen",
  "email": "jan@gmail.com", // If present, the user's email address
  "locale": "en_US"
}
Помимо проверки подписи токена, убедитесь, что эмитент утверждения (поле iss ) — https://accounts.google.com , а аудитория (поле aud ) — это идентификатор клиента, назначенный вашему действию.
检查您的身份验证系统中是否已存在该 Google 账号
请检查以下任一条件是否成立:
- Google 账号 ID 可在断言的
sub字段中找到,也可位于您的用户数据库中。 - 断言中的电子邮件地址与用户数据库中的用户匹配。
如果满足上述任一条件,则表明用户已经注册,您可以发出 访问令牌。
如果断言中指定的 Google 账号 ID 和电子邮件地址都没有
与您数据库中的用户匹配,表示该用户尚未注册。在这种情况下,您的
令牌交换端点应回复 HTTP 401 错误,指定 error=user_not_found,
如以下示例中所示:
HTTP/1.1 401 Unauthorized
Content-Type: application/json;charset=UTF-8

{
  "error":"user_not_found",
}
user_not_found 错误的 401 错误响应时,
使用 intent 参数的值调用您的令牌交换端点
设置为 create 并发送包含用户个人资料信息的 ID 令牌
一起发送。
Handle account creation via Google Sign-In
When a user needs to create an account on your service, Google makes a
request to your token exchange endpoint that specifies
intent=create, as in the following example:
POST /token HTTP/1.1
Host: oauth2.example.com
Content-Type: application/x-www-form-urlencoded

response_type=token&grant_type=urn:ietf:params:oauth:grant-type:jwt-bearer&scope=SCOPES&intent=create&consent_code=CONSENT_CODE&assertion=JWT[&NEW_ACCOUNT_INFO]
The assertion parameter contains A JSON Web Token (JWT) that provides
a signed assertion of the Google user's identity. The JWT contains information
that includes the user's Google Account ID, name, and email address, which you can use
to create a new account on your service.
To respond to account creation requests, your token exchange endpoint must do the following:
Проверка и декодирование утверждения JWT
Вы можете проверить и декодировать утверждение JWT, используя библиотеку JWT-декодирования для вашего языка . Используйте открытые ключи Google (доступные в формате JWK или PEM ) для проверки подписи токена.
В декодированном виде утверждение JWT выглядит следующим образом:
{
  "sub": 1234567890,        // The unique ID of the user's Google Account
  "iss": "https://accounts.google.com",        // The assertion's issuer
  "aud": "123-abc.apps.googleusercontent.com", // Your server's client ID
  "iat": 233366400,         // Unix timestamp of the assertion's creation time
  "exp": 233370000,         // Unix timestamp of the assertion's expiration time
  "name": "Jan Jansen",
  "given_name": "Jan",
  "family_name": "Jansen",
  "email": "jan@gmail.com", // If present, the user's email address
  "locale": "en_US"
}
Помимо проверки подписи токена, убедитесь, что эмитент утверждения (поле iss ) — https://accounts.google.com , а аудитория (поле aud ) — это идентификатор клиента, назначенный вашему действию.
Validate user information and create new account
Check whether either of the following conditions are true:
- The Google Account ID, found in the assertion's
subfield, is in your user database. - The email address in the assertion matches a user in your user database.
If either condition is true, prompt the user to link their existing account with
their Google Account by responding to the request with an HTTP 401 error, specifying
error=linking_error and the user's email address as the login_hint, as in the
following example:
HTTP/1.1 401 Unauthorized
Content-Type: application/json;charset=UTF-8

{
  "error":"linking_error",
  "login_hint":"foo@bar.com"
}
If neither condition is true, create a new user account using the information provided in the JWT. New accounts do not typically have a password set. It is recommended that you add Google Sign In to other platforms to enable users to log in via Google across the surfaces of your application. Alternatively, you can email the user a link that starts your password recovery flow to allow the user to set a password for signing in on other platforms.
When the creation is completed, issue an access token and return the values in a JSON object in the body of your HTTPS response, like in the following example:
{
  "token_type": "Bearer",
  "access_token": "ACCESS_TOKEN",

  "expires_in": SECONDS_TO_EXPIRATION
}
Начать аутентификацию
Используйте намерение помощника по входу в аккаунт, чтобы запустить процесс аутентификации.
const app = dialogflow({
  // REPLACE THE PLACEHOLDER WITH THE CLIENT_ID OF YOUR ACTIONS PROJECT
  clientId: CLIENT_ID,
})

// Intent that starts the account linking flow.
app.intent('Start Signin', conv => {
  conv.ask(new SignIn('To get your account details'))
})
private String clientId = "<your_client_id>";

@ForIntent("Start Signin")
public ActionResponse text(ActionRequest request) {
  ResponseBuilder rb = getResponseBuilder(request);
  return rb.add(new SignIn().setContext("To get your account details")).build();
}
const app = actionssdk({
  clientId: CLIENT_ID,
})

app.intent('Start Signin', conv => {
  conv.ask(new SignIn('To get your account details'))
})
private String clientId = "<your_client_id>";

@ForIntent("actions.intent.TEXT")
public ActionResponse text(ActionRequest request) {
  ResponseBuilder rb = getResponseBuilder(request);
  return rb.add(new SignIn().setContext("To get your account details")).build();
}
Как обрабатывать запросы на доступ к данным
Если запрос Ассистента содержит токен доступа, сначала проверьте, действителен ли он и не истек ли срок его действия. Затем найдите в базе данных аккаунт пользователя, связанный с токеном.