
يمكن أن يدفع الإجراء الخاص بك إشعارات إلى المستخدمين كلما كان ذلك مناسبًا، مثل إرسال تذكير عند اقتراب تاريخ إنجاز المهمة.
يوضِّح هذا الدليل طريقة إعداد الإشعارات الفورية في الإجراء الخاص بك.
مساحات العرض المتوافقة
تتوفّر الإشعارات الفورية على أجهزة Android وiOS (يجب أن يكون تطبيق "مساعد Google" مثبّتًا على أجهزة iOS لتلقّي الإشعارات الفورية). ولا يمكن استخدامها حاليًا على مكبّرات الصوت أو الشاشات الذكية أو الأسطح الأخرى التي تفعِّل بالصوت.
المتطلبات الأساسية
يجب أن يتضمّن مشروعك هدفًا عالميًا واحدًا على الأقل، ويتم استدعاؤه عندما ينقر المستخدم على إشعار فوري تمّ استلامه من "مساعد Google".
البدء
توضّح الأقسام التالية كيفية إعداد الإشعارات الفورية في الإجراء الخاص بك.
إنشاء نية للتحفيز
الغرض الذي تنشئه في هذا القسم يؤدي إلى تدفق الإشعارات. لإنشاء هذا الغرض، اتبع الخطوات التالية:
- انتقِل إلى وحدة تحكّم الإجراءات وانقر على تطوير في القائمة العلوية.
- انقر على الأهداف في القائمة اليمنى لتوسيع القسم.
- انقر على في أسفل القائمة وأدخِل اسمًا للغرض الجديد.
- اضغط على
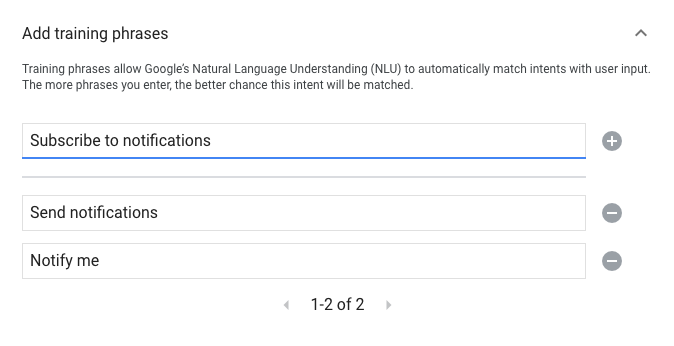
Enter/Returnلإنشاء الغرض الجديد. يمكنك إضافة عبارات تدريب لتفعيل مسار الإشعارات. تشمل بعض الأمثلة:
Notify meSend notificationsSubscribe to notifications
انقر على حفظ.
الانتقال إلى هدف النظام
لإعداد الانتقال إلى مشهد النظام Notifications، يُرجى اتّباع الخطوات التالية:
- ضمن المَشاهد في القائمة اليمنى، انقر على المشهد الذي تريد إضافة مسار الاشتراك في الإشعارات إليه.
- ضمن القسم معالجة نية المستخدم في المشهد، انقر على + لإضافة معالج هدف جديد.
- ضمن الغرض، اختَر الغرض الذي أنشأته في القسم السابق.
ضمن الانتقال، اختَر مشهد النظام الإشعارات.
انقر على حفظ.
![]()
ضبط مشهد النظام
لضبط مشهد النظام Notifications، يُرجى اتّباع الخطوات التالية:
- ضمن المَشاهد في القائمة اليمنى، اختَر مشهد النظام الإشعارات الجديد.
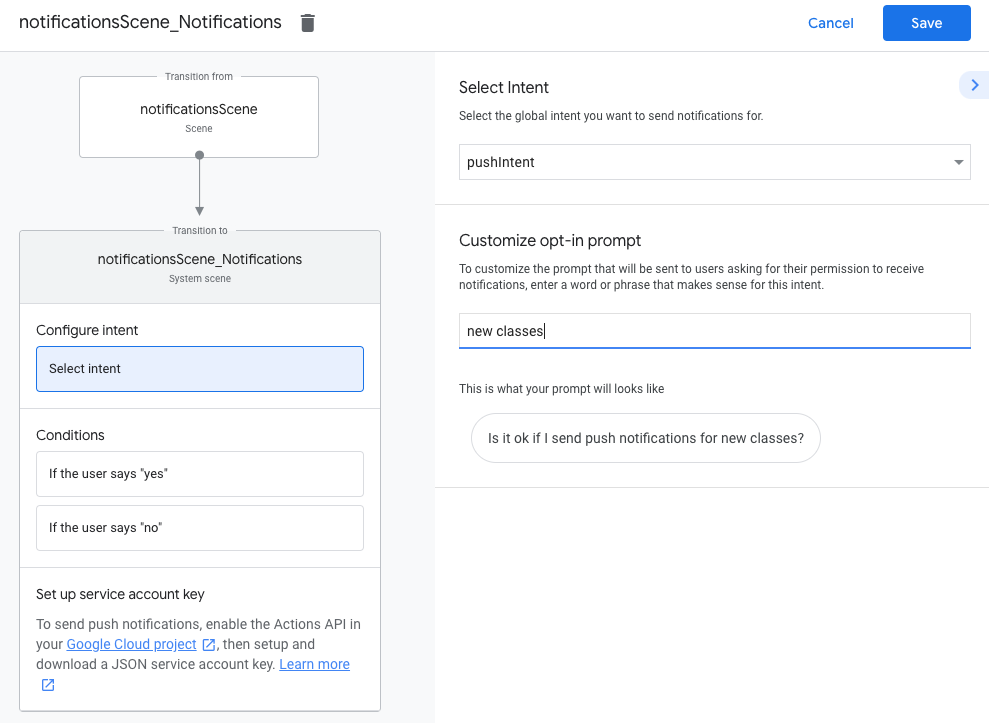
- ضمن قسم ضبط النية، انقر على اختيار هدف.
ضمن القسم اختيار النية، اختَر الهدف الذي تريد مطابقته عندما ينقر المستخدم على إشعار فوري.
ضمن تخصيص طلب الموافقة، أدخِل طلبًا يظهر للمستخدمين عندما يُطلب منهم الاشتراك في ميزة الإشعارات الفورية. يكون الطلب على الشكل التالي: "هل يمكنني إرسال إشعارات فورية بشأن طلب $prompt؟"
انقر على حفظ.
ضبط الموافقة
لضبط تفعيل ميزة الإشعارات الفورية، يمكنك اتّباع الخطوات التالية:
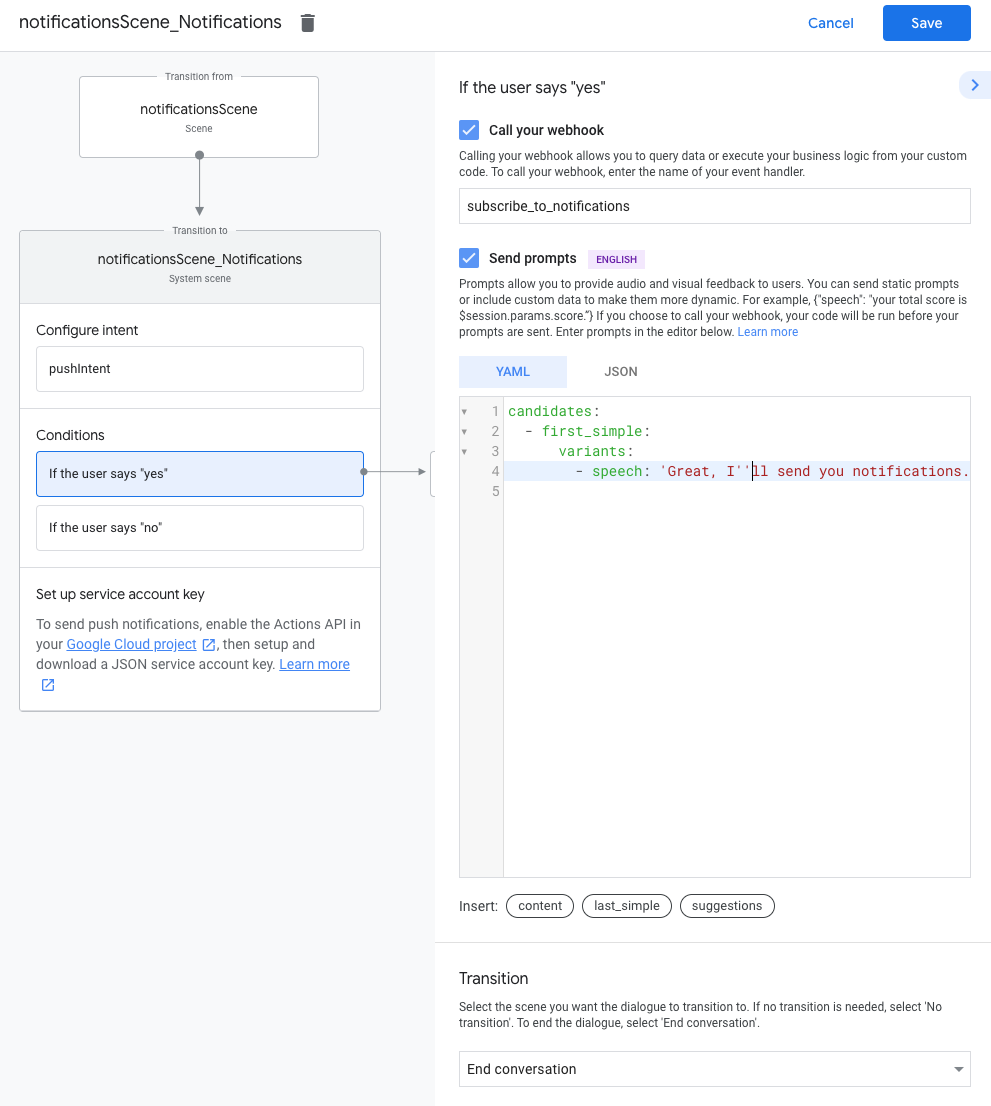
- ضمن المَشاهد، اختَر مشهد النظام الإشعارات.
- ضمن الشروط، اختَر إذا قال المستخدم "نعم".
- فعِّل الاتصال بالردّ التلقائي على الويب وقدِّم اسم معالج الأحداث، مثل
subscribe_to_notifications. يمكنك تفعيل إرسال الطلبات وتقديم طلب بسيط لإعلام المستخدم بأنّه سيتم إرسال إشعارات إليه:
candidates:
- first simple:
  variants:
  - speech: 'Great, I'll send you notifications.'
ضمن النقل، اختَر إنهاء المحادثة لإنهاء المحادثة بعد اشتراك المستخدم في الإشعارات.
إعداد الإيقاف
لضبط خيار إيقاف الإشعارات الفورية، اتّبِع الخطوات التالية:
- ضمن الشروط، اختَر إذا قال المستخدم "لا".
يمكنك تفعيل إرسال الطلبات وتقديم طلب بسيط لإعلام المستخدم بأنّه لن يتم إرسال إشعارات إليه:
candidates:
- first simple:
  variants:
  - speech: Okay, I won't send you notifications.
ضمن النقل، اختَر إنهاء المحادثة لإنهاء المحادثة بعد أن يوقف المستخدم الإشعارات.

ضبط الرد التلقائي على الويب
لضبط الردّ التلقائي على الويب، اتّبِع الخطوات التالية:
في الردّ التلقائي على الويب، أضِف معالج أهداف لتخزين
updatesUserId:app.handle('subscribe_to_notifications', conv => { const intentName = '<name_of_intent_to_trigger>'; const notificationsSlot = conv.session.params['NotificationSlot_${intentName}']; if(notificationsSlot.permissionStatus == 'PERMISSION_GRANTED') { const updateUserId = notificationsSlot.additionalUserData.updateUserId; // Store the user ID and the notification's target intent for later use. // (Use a database, like Firestore, for best practice.) } });
إرسال الإشعارات
يتم إرسال الإشعارات الفورية إلى المستخدمين باستخدام واجهة برمجة تطبيقات الإجراءات. لاستخدام واجهة برمجة التطبيقات هذه، يجب تفعيل واجهة برمجة التطبيقات في مشروعك على Google Cloud وإعداد مفتاح حساب خدمة JSON وتنزيله.
يمكنك بعد ذلك استخدام مكتبة برامج Google OAuth2 لاستبدال مفتاح حساب الخدمة برمز وصول واستخدام الرمز المميّز لمصادقة طلباتك إلى واجهة برمجة تطبيقات الإجراءات.
الحصول على مفتاح حساب الخدمة
- انتقِل إلى وحدة تحكُّم واجهة برمجة تطبيقات Google واختَر مشروعك من القائمة المنسدلة اختيار مشروع.
- انقر على تفعيل لتفعيل واجهة برمجة تطبيقات الإجراءات لمشروعك.
- انتقِل إلى صفحة بيانات اعتماد Google Cloud Console واختَر مشروعك من القائمة المنسدلة اختيار مشروع.
- انقر على إنشاء بيانات اعتماد > حساب الخدمة:
- أدخِل اسم حساب خدمة وانقر على إنشاء.
- من القائمة المنسدلة اختيار دور، اختَر مشروع >. المالك:
- انقر على متابعة.
- انقر على إنشاء مفتاح لتنزيل ملف JSON لحساب الخدمة.
استبدال المفتاح برمز دخول وإرسال إشعار
لإرسال الإشعارات الفورية من خلال واجهة برمجة تطبيقات المهام، عليك استبدال مفتاح حساب الخدمة برمز الدخول. ننصح باستخدام مكتبة برامج واجهة Google API لإجراء ذلك. في سلسلة مقتطفات الرمز اللاحقة، نستخدم مكتبة برامج Node.js لواجهة Google API.
ثبِّت مكتبة برامج واجهة Google API واطلب ما يلي:
npm install googleapis request --saveاستخدِم الرمز التالي للحصول على رمز الدخول من مفتاح حساب الخدمة وإرسال إشعار فوري:
// Use the Actions API to send a Google Assistant push notification.
let client = auth.fromJSON(require('./service-account.json'));
client.scopes = ['https://www.googleapis.com/auth/actions.fulfillment.conversation'];
let notification = {
  userNotification: {
    title: 'Example notification title',
  },
  target: {
    userId: '<UPDATES_USER_ID>',
    intent: 'Notifications Intent',
  },
};
client.authorize((err, tokens) => {
  if (err) {
    throw new Error('Auth error: ${err}');
  }
  request.post('https://actions.googleapis.com/v2/conversations:send', {
    'auth': {
      'bearer': tokens.access_token,
    },
    'json': true,
    'body': {'customPushMessage': notification, 'isInSandbox': true},
  }, (err, httpResponse, body) => {
    if (err) {
      throw new Error('API request error: ${err}');
    }
    console.log('${httpResponse.statusCode}: ' + '${httpResponse.statusMessage}');
    console.log(JSON.stringify(body));
  });
});