با مجموعهها، منظم بمانید
ذخیره و طبقهبندی محتوا براساس اولویتهای شما.
Action شما میتواند هر زمان که مرتبط باشد، اعلانها را به کاربران ارسال کند، مانند ارسال یادآوری زمانی که موعد مقرر برای یک کار نزدیک است.
این راهنما نحوه تنظیم اعلانهای فشار را برای Action خود توضیح میدهد.
سطوح پشتیبانی شده
اعلانهای فشاری در دستگاههای Android و iOS در دسترس هستند (دستگاههای iOS باید برنامه Assistant را برای دریافت اعلانهای فشار نصب کرده باشند). آنها در حال حاضر در بلندگوهای فعال صوتی، نمایشگرهای هوشمند یا سطوح دیگر پشتیبانی نمیشوند.
پیش نیازها
پروژه شما باید حداقل دارای یک هدف کلی باشد که وقتی کاربر روی یک اعلان فشاری دریافت شده از دستیار ضربه می زند، فراخوانی می شود.
شروع کنید
بخشهای زیر نحوه تنظیم اعلانهای فشاری را در Action شرح میدهند.
یک قصد برای تحریک ایجاد کنید
هدفی که در این بخش ایجاد میکنید، جریان اعلانها را فعال میکند. برای ایجاد این هدف، مراحل زیر را دنبال کنید:
به کنسول Actions بروید و در منوی بالا روی Develop کلیک کنید.
روی Intents در منوی سمت چپ کلیک کنید تا بخش بزرگ شود.
روی add_circle_outline در پایین لیست کلیک کنید و یک نام برای هدف جدید وارد کنید.
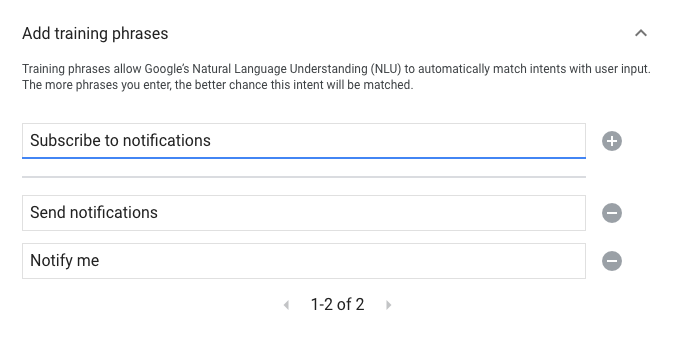
Enter/Return را فشار دهید تا هدف جدید ایجاد شود.
عبارات آموزشی را برای راه اندازی جریان اعلان ها اضافه کنید. چند نمونه عبارتند از:
Notify me
Send notifications
Subscribe to notifications
روی ذخیره کلیک کنید.
انتقال به قصد سیستم
برای تنظیم انتقال به صحنه سیستم Notifications ، مراحل زیر را دنبال کنید:
در قسمت صحنهها در منوی سمت چپ، روی صحنهای که میخواهید جریان اشتراک اعلانها را به آن اضافه کنید، کلیک کنید.
در قسمت User intent handling صحنه، روی + کلیک کنید تا یک کنترل کننده قصد جدید اضافه شود.
در قسمت Intent ، هدفی را که در بخش قبلی ایجاد کردید انتخاب کنید.
در بخش Transition ، صحنه سیستم Notifications را انتخاب کنید.
روی ذخیره کلیک کنید.
پیکربندی صحنه سیستم
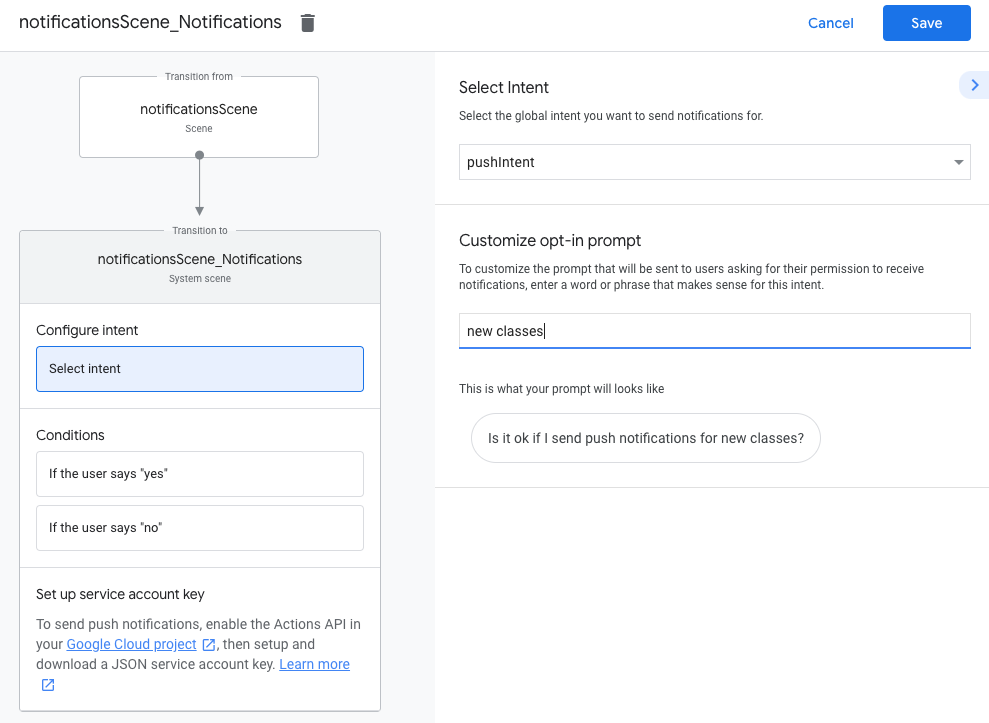
برای پیکربندی صحنه سیستم Notifications ، مراحل زیر را دنبال کنید:
در قسمت Scenes در منوی سمت چپ، صحنه جدید سیستم Notifications را انتخاب کنید.
در بخش Configure intent ، روی Select intent کلیک کنید.
در بخش Select intent ، هدفی را انتخاب کنید که میخواهید وقتی کاربر روی یک اعلان فشار ضربه میزند، مطابقت داشته باشد.
برای سفارشی کردن درخواست انتخاب ، درخواستی را وارد کنید که وقتی از آنها خواسته میشود مشترک اعلانهای فشاری شوند، به کاربران نمایش داده میشود. درخواست به شکل "آیا اشکالی ندارد اگر اعلانهای فشاری برای $prompt ارسال کنم" است.
روی ذخیره کلیک کنید.
انتخاب کردن را پیکربندی کنید
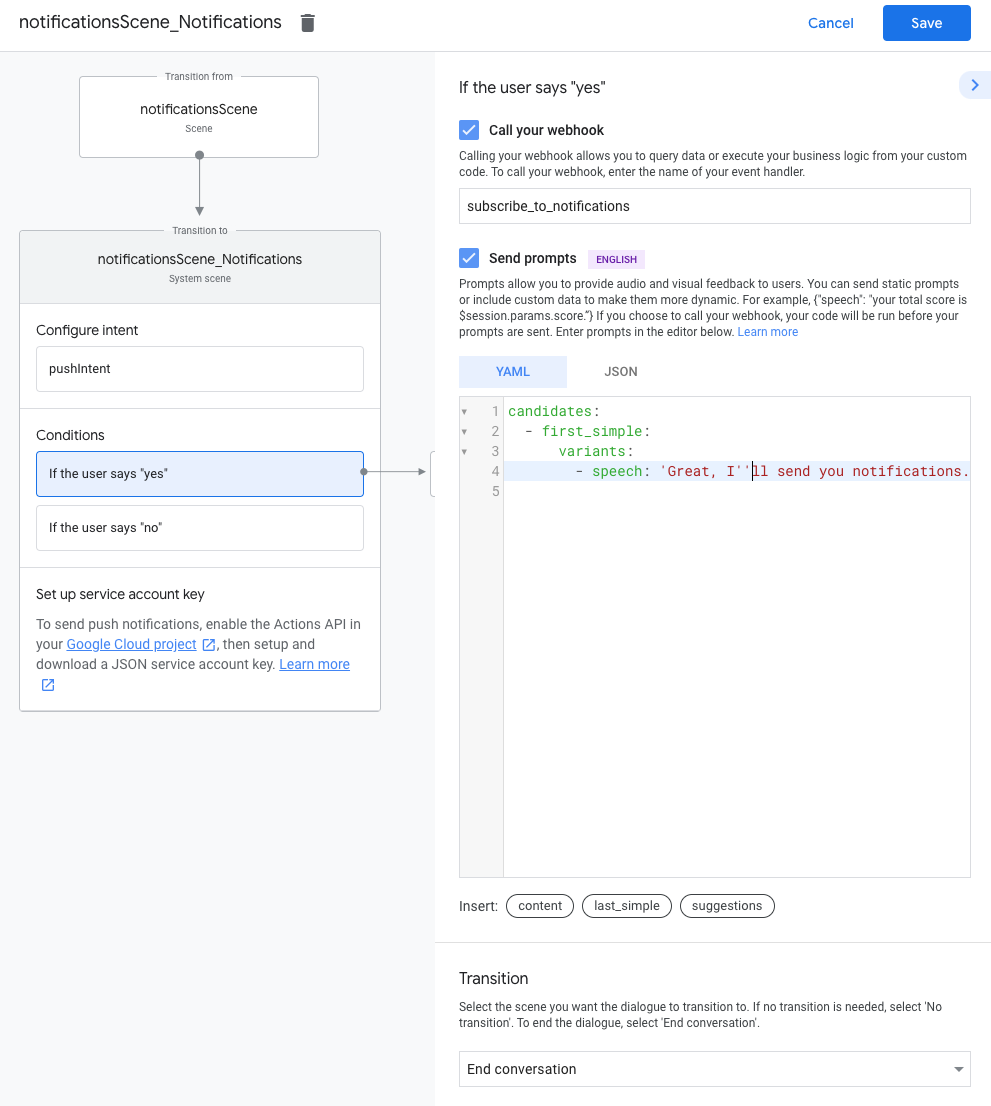
برای پیکربندی شرکت در پوش اعلانها، این مراحل را دنبال کنید:
در بخش صحنهها ، صحنه سیستم اعلانها را انتخاب کنید.
در زیر شرایط ، اگر کاربر «بله» میگوید را انتخاب کنید.
Call your webhook را فعال کنید و یک نام مدیریت رویداد مانند subscribe_to_notifications ارائه دهید.
درخواستهای ارسال را فعال کنید و یک فرمان ساده ارائه دهید تا به کاربر اطلاع دهید که اعلانهایی برایشان ارسال میشود:
در بخش انتقال ، پایان مکالمه را انتخاب کنید تا پس از عضویت کاربر در اعلانها، به مکالمه پایان دهید.
انصراف را پیکربندی کنید
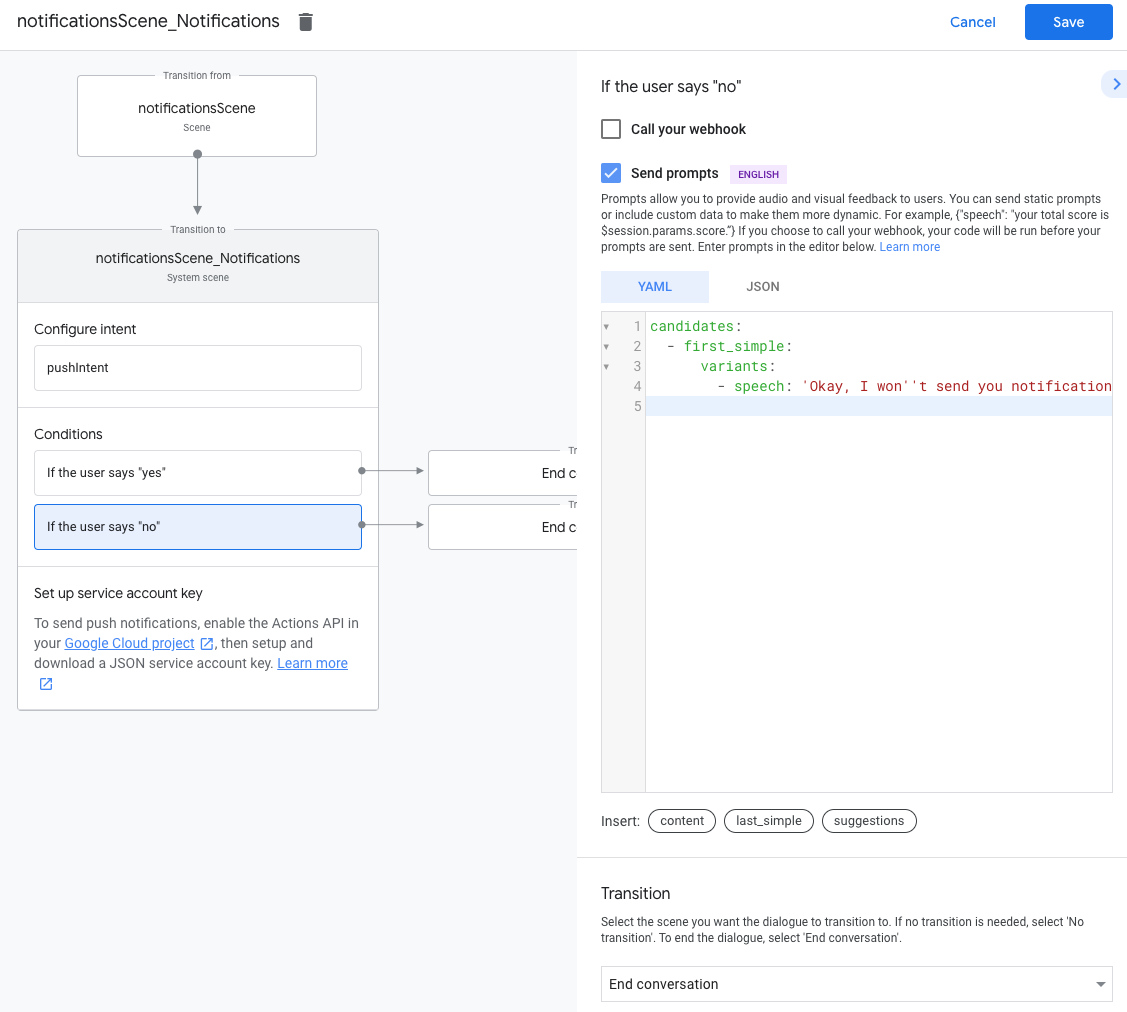
برای پیکربندی انصراف از اعلانهای فشار، این مراحل را دنبال کنید:
در قسمت Conditions ، If the user say "no" را انتخاب کنید.
درخواستهای ارسال را فعال کنید و یک فرمان ساده ارائه دهید تا کاربر بداند اعلانهایی برایشان ارسال نمیشود:
candidates:-firstsimple:variants:-speech:Okay,Iwon't send you notifications.
در بخش انتقال ، پایان مکالمه را انتخاب کنید تا پس از انصراف کاربر از اعلانها، به مکالمه پایان دهید.
پیکربندی وب هوک
برای پیکربندی وب هوک خود، این مراحل را دنبال کنید:
در وب هوک خود، یک کنترل کننده قصد برای ذخیره updatesUserId اضافه کنید:
app.handle('subscribe_to_notifications',conv=>{constintentName='<name_of_intent_to_trigger>';constnotificationsSlot=conv.session.params['NotificationSlot_${intentName}'];if(notificationsSlot.permissionStatus=='PERMISSION_GRANTED'){constupdateUserId=notificationsSlot.additionalUserData.updateUserId;//StoretheuserIDandthenotification's target intent for later use.//(Useadatabase,likeFirestore,forbestpractice.)}});
ارسال نوتیفیکیشن
اعلانهای فشاری با استفاده از Actions API برای کاربران ارسال میشوند. برای استفاده از این API، باید API را در پروژه Google Cloud خود فعال کنید و کلید حساب سرویس JSON را تنظیم و دانلود کنید.
سپس میتوانید از کتابخانه سرویس گیرنده Google OAuth2 برای مبادله کلید حساب سرویس با یک نشانه دسترسی استفاده کنید و از آن برای تأیید اعتبار درخواستهای خود در API Action استفاده کنید.
یک کلید حساب سرویس دریافت کنید
به کنسول Google API بروید و پروژه خود را از منوی کشویی Select a project انتخاب کنید.
روی Enable کلیک کنید تا Actions API برای پروژه شما فعال شود.
نام حساب سرویس را وارد کنید و روی ایجاد کلیک کنید.
از منوی کشویی Select a role ، Project > Owner را انتخاب کنید.
روی Continue کلیک کنید.
برای دانلود فایل JSON حساب سرویس، روی ایجاد کلید کلیک کنید.
کلید را با یک نشانه دسترسی تعویض کنید و یک اعلان ارسال کنید
برای ارسال اعلانهای فشار از طریق API Action، باید کلید حساب سرویس را با یک نشانه دسترسی مبادله کنید. توصیه می کنیم برای این کار از کتابخانه سرویس گیرنده Google API استفاده کنید. در مجموعه کدهای زیر، از کتابخانه سرویس گیرنده Google API Node.js استفاده می کنیم.
کتابخانه سرویس گیرنده Google API را نصب کنید و درخواست کنید:
npm install googleapis request --save
از کد زیر برای دریافت رمز دسترسی از کلید حساب سرویس و ارسال اعلان فشار استفاده کنید:
تاریخ آخرین بهروزرسانی 2025-07-24 بهوقت ساعت هماهنگ جهانی.
[null,null,["تاریخ آخرین بهروزرسانی 2025-07-24 بهوقت ساعت هماهنگ جهانی."],[[["\u003cp\u003ePush notifications can be sent to Android and iOS users to provide timely reminders or updates from your Action.\u003c/p\u003e\n"],["\u003cp\u003eYou need to create a global intent that will be triggered when the user interacts with the notification.\u003c/p\u003e\n"],["\u003cp\u003eUsers must explicitly opt-in to receive push notifications through a prompt within your Action.\u003c/p\u003e\n"],["\u003cp\u003eSending notifications requires using the Actions API with a service account key for authentication.\u003c/p\u003e\n"],["\u003cp\u003eStore the \u003ccode\u003eupdatesUserId\u003c/code\u003e securely to target specific users with notifications.\u003c/p\u003e\n"]]],[],null,["# Push notifications\n\nYour Action can push notifications to users whenever relevant, such as sending a reminder when the due date for a task is near.\n\nThis guide describes how to set up push notifications for your Action.\n\nSupported surfaces\n------------------\n\nPush notifications are available on Android and iOS devices (iOS devices must have the Assistant app installed to receive push notifications). They are not currently supported on voice-activated speakers, smart displays, or other surfaces.\n\nPrerequisites\n-------------\n\nYour project must contain at least one [global intent](/assistant/conversational/intents#custom_intents), which is invoked when the user taps a push notification received from Assistant.\n\nGet started\n-----------\n\nThe following sections describe how to set up push notifications in your Action.\n\n### Create an intent for triggering\n\nThe intent you create in this section triggers the notifications flow. To create\nthis intent, follow these steps:\n\n1. Go to the [Actions console](//console.actions.google.com/) and click **Develop** in the top menu.\n2. Click **Intents** in the left menu to expand the section.\n3. Click the add_circle_outline at the bottom of the list and enter a name for the new intent.\n4. Press `Enter/Return` to create the new intent.\n5. Add training phrases for triggering the notifications flow. Some examples are:\n\n - `Notify me`\n - `Send notifications`\n - `Subscribe to notifications`\n6. Click **Save**.\n\n### Transition to system intent\n\nTo set up the transition to the `Notifications` system scene, follow these steps:\n\n1. Under **Scenes** in the left menu, click the scene you want to add the notifications subscription flow to.\n2. Under the **User intent handling** section of the scene, click **+** to add a new intent handler.\n3. Under **Intent**, select the intent you created in the previous section.\n4. Under **Transition** , select the **Notifications** system scene.\n\n5. Click **Save**.\n\n### Configure system scene\n\nTo configures the `Notifications` system scene, follow these steps:\n\n1. Under **Scenes** in the left menu, select the new **Notifications** system scene.\n2. Under the **Configure intent** section, click **Select intent**.\n3. Under the **Select intent** section, select the intent you want to be matched when a user taps a push notification.\n\n | **Note:** The intent you choose for this step needs to be a global intent.\n4. For **Customize opt-in prompt**, enter a prompt that is displayed to users when they're asked to subscribe to push notifications. The prompt is in the form of \"Is it ok if I send push notifications for $prompt\".\n\n5. Click **Save**.\n\n### Configure opt-in\n\nTo configure opting in to push notifications, follow these steps:\n\n1. Under **Scenes** , select the **Notifications** system scene.\n2. Under **Conditions** , select **If the user says \"yes\"**.\n3. Enable **Call your webhook** and provide an event handler name, such as `subscribe_to_notifications`.\n4. Enable **Send prompts** and provide a simple prompt to let the user know they'll be sent notifications:\n\n candidates:\n - first simple:\n variants:\n - speech: 'Great, I'll send you notifications.'\n\n5. Under **Transition** , select **End conversation** to end the conversation after a user subscribes to notifications.\n\n### Configure opt-out\n\nTo configure opting out of push notifications, follow these steps:\n\n1. Under **Conditions** , select **If the user says \"no\"**.\n2. Enable **Send prompts** and provide a simple prompt to let the user know they won't be sent notifications:\n\n candidates:\n - first simple:\n variants:\n - speech: Okay, I won't send you notifications.\n\n3. Under **Transition** , select **End conversation** to end the conversation after a user opts out of notifications.\n\n### Configure webhook\n\nTo configure your webhook, follow these steps:\n\n1. In your webhook, add an intent handler for storing the `updatesUserId`:\n\n app.handle('subscribe_to_notifications', conv =\u003e {\n const intentName = '\u003cname_of_intent_to_trigger\u003e';\n const notificationsSlot = conv.session.params['NotificationSlot_${intentName}'];\n if(notificationsSlot.permissionStatus == 'PERMISSION_GRANTED') {\n const updateUserId = notificationsSlot.additionalUserData.updateUserId;\n // Store the user ID and the notification's target intent for later use.\n // (Use a database, like Firestore, for best practice.)\n }\n });\n\nSend notifications\n------------------\n\nPush notifications are sent to users using the Actions API. To use this API, you need to activate the API in your Google Cloud project and set up and download a JSON service account key.\n\nYou can then use the Google OAuth2 client library to exchange the service account key for an access token and use the token to authenticate your requests to the Actions API.\n\n### Get a service account key\n\n1. Go to the [Google API console](//console.developers.google.com/apis/api/actions.googleapis.com/overview) and select your project from the **Select a project** dropdown.\n2. Click **Enable** to enable the Actions API for your project.\n3. Go to the [Google Cloud console credentials page](//console.developers.google.com/apis/credentials) and select your project from the **Select a project** dropdown.\n4. Click **Create credentials \\\u003e Service account**.\n5. Enter a service account name and click **Create**.\n6. From the **Select a role** dropdown, select **Project \\\u003e Owner**.\n7. Click **Continue**.\n8. Click **Create key** to download the service account JSON file.\n\n### Exchange the key for an access token and send a notification\n\nTo send push notifications through the Actions API, you need to exchange the service account key for an access token. We recommend using a Google API client library for this. In the series of code snippets that follow, we use the Google API Node.js client library.\n\n1. Install the Google API client library and request:\n\n `npm install googleapis request --save`\n2. Use the following code to get an access token from the service account key and send a push notification:\n\n // Use the Actions API to send a Google Assistant push notification.\n let client = auth.fromJSON(require('./service-account.json'));\n client.scopes = ['https://www.googleapis.com/auth/actions.fulfillment.conversation'];\n let notification = {\n userNotification: {\n title: 'Example notification title',\n },\n target: {\n userId: '\u003cUPDATES_USER_ID\u003e',\n intent: 'Notifications Intent',\n },\n };\n client.authorize((err, tokens) =\u003e {\n if (err) {\n throw new Error('Auth error: ${err}');\n }\n request.post('https://actions.googleapis.com/v2/conversations:send', {\n 'auth': {\n 'bearer': tokens.access_token,\n },\n 'json': true,\n 'body': {'customPushMessage': notification, 'isInSandbox': true},\n }, (err, httpResponse, body) =\u003e {\n if (err) {\n throw new Error('API request error: ${err}');\n }\n console.log('${httpResponse.statusCode}: ' + '${httpResponse.statusMessage}');\n console.log(JSON.stringify(body));\n });\n });"]]