กําหนดค่าโครงการนักพัฒนาซอฟต์แวร์และการตั้งค่าบัญชี
จัดทุกอย่างให้เป็นระเบียบอยู่เสมอด้วยคอลเล็กชัน
บันทึกและจัดหมวดหมู่เนื้อหาตามค่ากำหนดของคุณ
กำหนดค่าโปรเจ็กต์คอนโซล Actions
โปรเจ็กต์ Google Cloud Platform ที่จัดการโดยคอนโซล Actions จะให้สิทธิ์เข้าถึง Google Assistant API แก่โปรเจ็กต์ของคุณ
โปรเจ็กต์จะติดตามการใช้โควต้าและ
ให้เมตริกที่มีค่าสำหรับคำขอที่ส่งจากฮาร์ดแวร์ของคุณ
หากต้องการเปิดใช้การเข้าถึง Google Assistant API ให้ทำตามขั้นตอนต่อไปนี้
เปิด Actions Console
ไปที่คอนโซล Actions
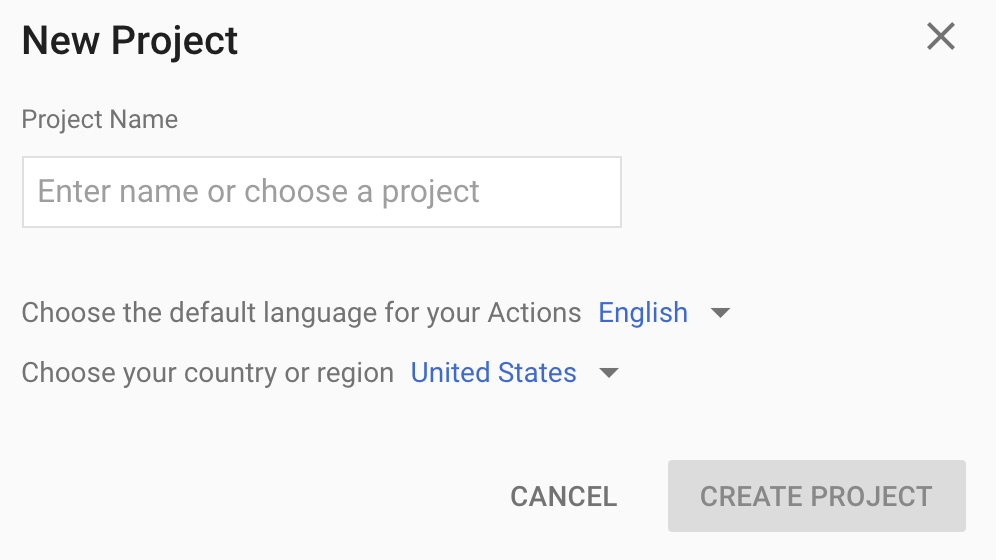
คลิกเพิ่ม/นำเข้าโปรเจ็กต์
หากต้องการสร้างโปรเจ็กต์ใหม่ ให้ป้อนชื่อในช่องชื่อโปรเจ็กต์ แล้วคลิกสร้างโปรเจ็กต์
หากมีโปรเจ็กต์ Google Cloud Platform อยู่แล้ว คุณสามารถเลือกโปรเจ็กต์นั้น
และนำเข้าแทนการสร้างโปรเจ็กต์ใหม่ได้
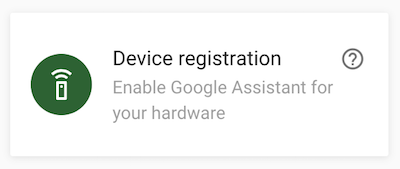
หากสร้างโปรเจ็กต์ใหม่ ให้คลิกช่องการลงทะเบียนอุปกรณ์ใกล้กับ
ด้านล่างของหน้า หากคุณนำเข้าโปรเจ็กต์ที่สร้างไว้ก่อนหน้านี้ ช่องนี้จะไม่ปรากฏขึ้น
ให้เลือกแท็บการลงทะเบียนอุปกรณ์ (ในส่วนตัวเลือกขั้นสูง) จากแถบนำทางด้านซ้าย
โปรดเปิดแท็บเบราว์เซอร์นี้ไว้ คุณจะต้องใช้รหัสนี้เพื่อลงทะเบียนโมเดลอุปกรณ์ในขั้นตอนถัดไป
เปิดใช้ Google Assistant API ในโปรเจ็กต์ที่คุณเลือก (ดูข้อกำหนด
ในการให้บริการ) คุณต้องดำเนินการนี้ใน
คอนโซล Cloud Platform
เปิดใช้
API
คลิกเปิดใช้
คุณต้องกำหนดค่าหน้าจอขอความยินยอม OAuth
สำหรับโปรเจ็กต์ใน Cloud Platform Console โปรดทราบว่าช่องส่วนใหญ่ในหน้านี้เป็นช่องที่ไม่บังคับ
ตั้งค่าส่วนควบคุมกิจกรรมสำหรับบัญชี
หากต้องการใช้ Google Assistant คุณต้องแชร์ข้อมูลกิจกรรมบางอย่างกับ Google Google Assistant ต้องใช้ข้อมูลนี้เพื่อให้ทำงานได้อย่างถูกต้อง ซึ่งไม่ได้
เจาะจง SDK หากต้องการแชร์ข้อมูลนี้ ให้สร้างบัญชี Google
หากยังไม่มีบัญชี
เปิดหน้าส่วนควบคุมกิจกรรม
สำหรับบัญชี Google ที่ต้องการใช้กับ Assistant คุณใช้บัญชี Google ใดก็ได้ ไม่จำเป็นต้องเป็นบัญชีนักพัฒนาแอป
ตรวจสอบว่าได้เปิดใช้สวิตช์เปิด/ปิดต่อไปนี้ (สีน้ำเงิน)
- กิจกรรมบนเว็บและแอป
- นอกจากนี้ อย่าลืมเลือกช่องทำเครื่องหมายรวมประวัติการเข้าชมใน Chrome และกิจกรรม
จากเว็บไซต์ แอป และอุปกรณ์ที่ใช้บริการต่างๆ ของ Google
- ข้อมูลอุปกรณ์
- กิจกรรมเสียงพูดและเสียง
ขั้นตอนถัดไป
ลงทะเบียนรุ่นอุปกรณ์
เนื้อหาของหน้าเว็บนี้ได้รับอนุญาตภายใต้ใบอนุญาตที่ต้องระบุที่มาของครีเอทีฟคอมมอนส์ 4.0 และตัวอย่างโค้ดได้รับอนุญาตภายใต้ใบอนุญาต Apache 2.0 เว้นแต่จะระบุไว้เป็นอย่างอื่น โปรดดูรายละเอียดที่นโยบายเว็บไซต์ Google Developers Java เป็นเครื่องหมายการค้าจดทะเบียนของ Oracle และ/หรือบริษัทในเครือ
อัปเดตล่าสุด 2025-07-26 UTC
[null,null,["อัปเดตล่าสุด 2025-07-26 UTC"],[[["\u003cp\u003eAn Actions Console project provides access to the Google Assistant API, tracks quota usage, and provides valuable metrics.\u003c/p\u003e\n"],["\u003cp\u003eTo enable Assistant API access, you need to create or import a project in the Actions Console and enable the necessary API.\u003c/p\u003e\n"],["\u003cp\u003eFor the Assistant to function, ensure your Google Account's "Web & App Activity," "Device Information," and "Voice & Audio Activity" are enabled within the Activity Controls.\u003c/p\u003e\n"],["\u003cp\u003eBefore using the Assistant, be sure to register a Device Model in the Actions Console to associate with your project.\u003c/p\u003e\n"]]],["To begin, open the Actions Console and add or import a Google Cloud Platform project. If creating a new project, enter a name and proceed to \"Device registration\"; if importing, go directly to the \"Device registration\" tab. Then, enable the Google Assistant API in the Cloud Platform Console. Lastly, configure the OAuth consent screen for your project in the Cloud Platform Console. Ensure your Google account's activity controls are enabled for Web & App, Device Information, and Voice & Audio activity.\n"],null,["# Configure a Developer Project and Account Settings\n\nConfigure an Actions Console project\n------------------------------------\n\nA Google Cloud Platform project, managed by the Actions Console, gives your\nproject access to the Google Assistant API. The project tracks quota usage and\ngives you valuable metrics for the requests made from your hardware.\n\nTo enable access to the Google Assistant API, perform the following steps:\n\n1. Open the Actions Console.\n\n [Go\n to the Actions Console](https://console.actions.google.com/)\n2. Click **Add/import project**.\n\n3. To create a new project, enter a name in the **Project name** box and click\n **CREATE PROJECT**.\n\n \u003cbr /\u003e\n\n If you already have an existing Google Cloud Platform project, you can select that\n project and import it rather than creating a new one.\n\n4.\n If you created a new project, click the **Device registration** box near the\n bottom of the page. If you imported a previously-created project, this box\n does not appear; select the **Device registration** tab (under\n **ADVANCED OPTIONS**) from the left navbar.\n\n Keep this browser tab open. You will use it to register a device model in\n a later step.\n5. Enable the Google Assistant API on the project you selected (see the [Terms\n of Service](/assistant/sdk/terms-of-service)). You need to do this in the\n Cloud Platform Console.\n\n [Enable\n the API](https://console.developers.google.com/apis/api/embeddedassistant.googleapis.com/overview)\n\n Click **Enable**.\n6. You must configure the [OAuth consent\n screen](https://console.developers.google.com/apis/credentials/consent)\n for your project in the Cloud Platform Console. Note that most fields on\n this page are optional.\n\n\nSet activity controls for your account\n--------------------------------------\n\nIn order to use the Google Assistant, you must share certain activity data with\nGoogle. The Google Assistant needs this data to function properly; this is not\nspecific to the SDK. To share this data, create a\n[Google account](https://support.google.com/accounts/answer/27441)\nif you don't already have one.\n\nOpen the [Activity Controls page](https://myaccount.google.com/activitycontrols)\nfor the Google account that you want to use with the Assistant. You can use any\nGoogle account---it does not need to be your developer account.\n\n**Ensure the following toggle switches are enabled (blue)**:\n\n- Web \\& App Activity\n - In addition, be sure to select the **Include Chrome history and activity\n from sites, apps, and devices that use Google services** checkbox.\n- Device Information\n- Voice \\& Audio Activity\n\nNext step\n---------\n\n[Register the Device Model](/assistant/sdk/guides/service/python/embed/register-device)"]]