Konfigurowanie projektu i ustawień konta dewelopera
Zadbaj o dobrą organizację dzięki kolekcji
Zapisuj i kategoryzuj treści zgodnie ze swoimi preferencjami.
Konfigurowanie projektu w Konsoli Actions
Projekt Google Cloud Platform zarządzany przez Konsolę Actions zapewnia projektowi dostęp do interfejsu Google Assistant API. Projekt śledzi wykorzystanie limitu i udostępnia przydatne dane dotyczące żądań wysyłanych z Twojego sprzętu.
Aby włączyć dostęp do interfejsu Google Assistant API, wykonaj te czynności:
Otwórz Konsolę Actions.
Otwórz Konsolę Actions
Kliknij Dodaj/importuj projekt.
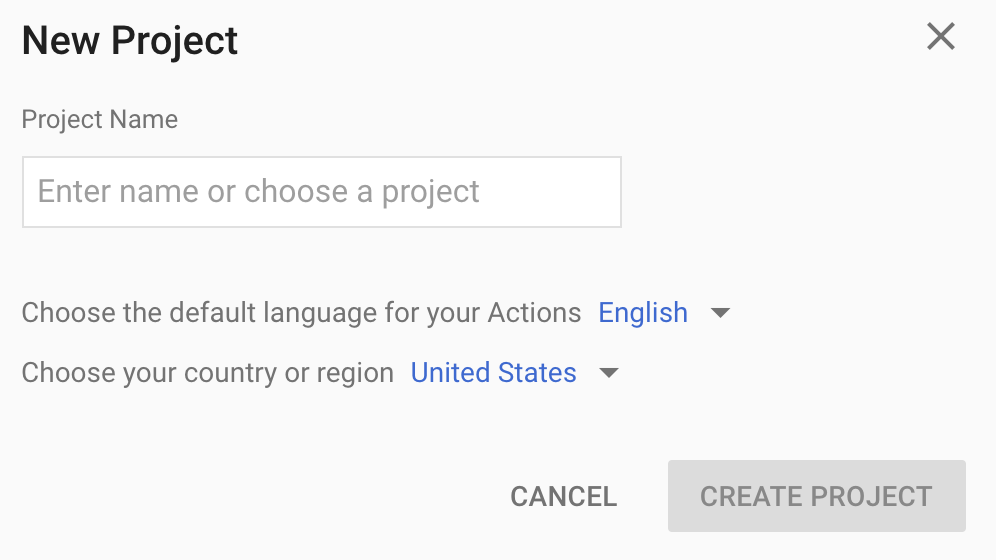
Aby utworzyć nowy projekt, wpisz nazwę w polu Nazwa projektu i kliknij UTWÓRZ PROJEKT.
Jeśli masz już projekt Google Cloud Platform, możesz go wybrać i zaimportować, zamiast tworzyć nowy.
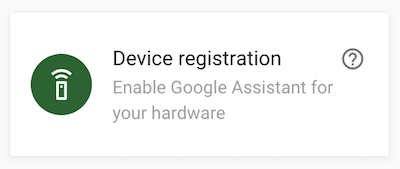
Jeśli utworzysz nowy projekt, kliknij pole Rejestracja urządzenia u dołu strony. Jeśli zaimportujesz wcześniej utworzony projekt, to pole nie będzie widoczne. W takim przypadku na pasku nawigacyjnym po lewej stronie kliknij kartę Rejestracja urządzenia (w sekcji OPCJE ZAAWANSOWANE).
Nie zamykaj tej karty przeglądarki. Użyjesz go w późniejszym kroku do zarejestrowania modelu urządzenia.
Włącz interfejs Google Assistant API w wybranym projekcie (zapoznaj się z Warunkami usługi). Musisz to zrobić w konsoli Cloud Platform.
Włączanie interfejsu API
Kliknij Włącz.
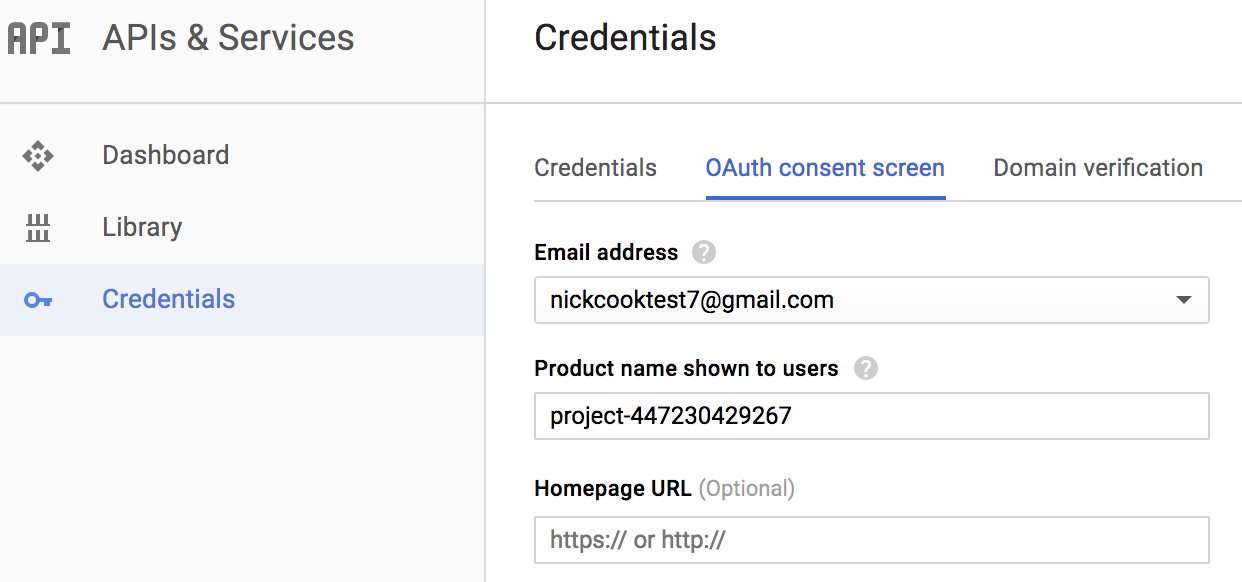
W konsoli Cloud Platform musisz skonfigurować ekran zgody OAuth w projekcie. Pamiętaj, że większość pól na tej stronie jest opcjonalna.
Ustawianie aktywności na koncie
Aby korzystać z Asystenta Google, musisz udostępniać Google określone dane o aktywności. Asystent Google potrzebuje tych danych do prawidłowego działania. Nie jest to związane z pakietem SDK. Aby udostępniać te dane, utwórz konto Google, jeśli jeszcze go nie masz.
Otwórz stronę Zarządzanie aktywnością na koncie Google, którego chcesz używać z Asystentem. Możesz użyć dowolnego konta Google, nie musi to być konto dewelopera.
Sprawdź, czy te przełączniki są włączone (niebieskie):
- Aktywność w internecie i aplikacjach
- Dodatkowo zaznacz pole Uwzględnij historię Chrome i aktywność na stronach, urządzeniach i w aplikacjach, które używają usług Google.
- Informacje z urządzenia
- Aktywność związana z głosem i dźwiękiem
Następny krok
Zarejestruj model urządzenia
O ile nie stwierdzono inaczej, treść tej strony jest objęta licencją Creative Commons – uznanie autorstwa 4.0, a fragmenty kodu są dostępne na licencji Apache 2.0. Szczegółowe informacje na ten temat zawierają zasady dotyczące witryny Google Developers. Java jest zastrzeżonym znakiem towarowym firmy Oracle i jej podmiotów stowarzyszonych.
Ostatnia aktualizacja: 2025-07-26 UTC.
[null,null,["Ostatnia aktualizacja: 2025-07-26 UTC."],[[["\u003cp\u003eAn Actions Console project provides access to the Google Assistant API, tracks quota usage, and provides valuable metrics.\u003c/p\u003e\n"],["\u003cp\u003eTo enable Assistant API access, you need to create or import a project in the Actions Console and enable the necessary API.\u003c/p\u003e\n"],["\u003cp\u003eFor the Assistant to function, ensure your Google Account's "Web & App Activity," "Device Information," and "Voice & Audio Activity" are enabled within the Activity Controls.\u003c/p\u003e\n"],["\u003cp\u003eBefore using the Assistant, be sure to register a Device Model in the Actions Console to associate with your project.\u003c/p\u003e\n"]]],["To begin, open the Actions Console and add or import a Google Cloud Platform project. If creating a new project, enter a name and proceed to \"Device registration\"; if importing, go directly to the \"Device registration\" tab. Then, enable the Google Assistant API in the Cloud Platform Console. Lastly, configure the OAuth consent screen for your project in the Cloud Platform Console. Ensure your Google account's activity controls are enabled for Web & App, Device Information, and Voice & Audio activity.\n"],null,["# Configure a Developer Project and Account Settings\n\nConfigure an Actions Console project\n------------------------------------\n\nA Google Cloud Platform project, managed by the Actions Console, gives your\nproject access to the Google Assistant API. The project tracks quota usage and\ngives you valuable metrics for the requests made from your hardware.\n\nTo enable access to the Google Assistant API, perform the following steps:\n\n1. Open the Actions Console.\n\n [Go\n to the Actions Console](https://console.actions.google.com/)\n2. Click **Add/import project**.\n\n3. To create a new project, enter a name in the **Project name** box and click\n **CREATE PROJECT**.\n\n \u003cbr /\u003e\n\n If you already have an existing Google Cloud Platform project, you can select that\n project and import it rather than creating a new one.\n\n4.\n If you created a new project, click the **Device registration** box near the\n bottom of the page. If you imported a previously-created project, this box\n does not appear; select the **Device registration** tab (under\n **ADVANCED OPTIONS**) from the left navbar.\n\n Keep this browser tab open. You will use it to register a device model in\n a later step.\n5. Enable the Google Assistant API on the project you selected (see the [Terms\n of Service](/assistant/sdk/terms-of-service)). You need to do this in the\n Cloud Platform Console.\n\n [Enable\n the API](https://console.developers.google.com/apis/api/embeddedassistant.googleapis.com/overview)\n\n Click **Enable**.\n6. You must configure the [OAuth consent\n screen](https://console.developers.google.com/apis/credentials/consent)\n for your project in the Cloud Platform Console. Note that most fields on\n this page are optional.\n\n\nSet activity controls for your account\n--------------------------------------\n\nIn order to use the Google Assistant, you must share certain activity data with\nGoogle. The Google Assistant needs this data to function properly; this is not\nspecific to the SDK. To share this data, create a\n[Google account](https://support.google.com/accounts/answer/27441)\nif you don't already have one.\n\nOpen the [Activity Controls page](https://myaccount.google.com/activitycontrols)\nfor the Google account that you want to use with the Assistant. You can use any\nGoogle account---it does not need to be your developer account.\n\n**Ensure the following toggle switches are enabled (blue)**:\n\n- Web \\& App Activity\n - In addition, be sure to select the **Include Chrome history and activity\n from sites, apps, and devices that use Google services** checkbox.\n- Device Information\n- Voice \\& Audio Activity\n\nNext step\n---------\n\n[Register the Device Model](/assistant/sdk/guides/service/python/embed/register-device)"]]