קל לארגן דפים בעזרת אוספים
אפשר לשמור ולסווג תוכן על סמך ההעדפות שלך.
עכשיו, כש-Assistant פועלת במכשיר, זה הזמן להרחיב אותה בעזרת 'פעולות במכשיר'. פעולות במכשיר מאפשרות לך לשלוט במכשיר באמצעות הקול.
בדוגמה הזו משתמשים באפשרות Built-in Device Action כדי להדליק ולכבות את הנורה.
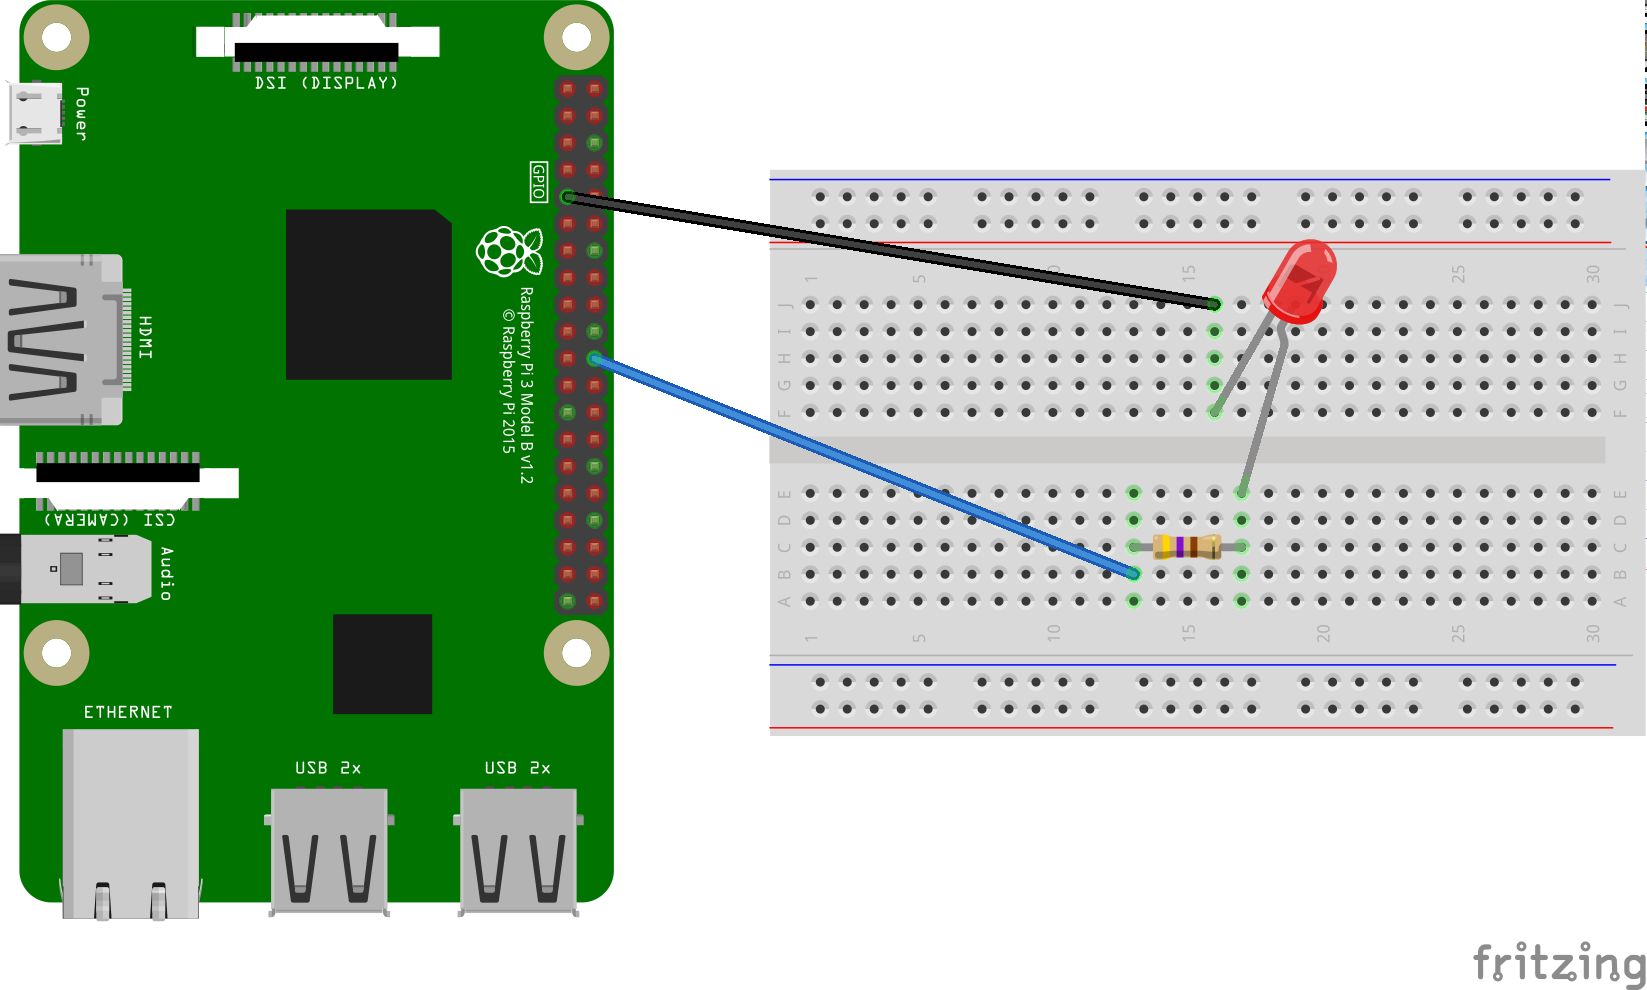
יש לפעול לפי ההוראות הבאות כדי להתקין נורית LED ב-Raspberry Pi 3 דגם B. בשלב מאוחר יותר נשנה את הקוד לדוגמה כך שידליק את נורת ה-LED באמצעות פקודה קולית.
דרישות חומרה
לפני שמתחילים בדוגמה, צריך את הרכיבים הבאים:
מטריצת חיבורים
נורת LED
נגד סדרה
שני חוטים מגשרים, שניהם עם מחבר זכרי ונקבה
ההתנגדות החשמלית של הנגד צריכה להיות קשורה לנורת ה-LED הספציפית.
כדי למצוא את הערך הנכון, ניתן להשתמש במחשבון מקוון (או לרכוש ערכה).
חיבור הרכיבים
מחברים את פין הפלט BCM25 של GPIO לצד אחד של נגד סדרה. שימו לב שמדובר בקוד אימות 22 פיזי ב-Raspberry Pi 3.
מחברים את הצד השני של הנגד לצד האנודה (העופרת הארוכה יותר) של נורית ה-LED.
מחברים את צד הקתודה (העופרת הקצרה יותר) של נורית ה-LED לקרקע.
[null,null,["עדכון אחרון: 2025-07-25 (שעון UTC)."],[[["\u003cp\u003eThis guide demonstrates how to extend Google Assistant with Device Actions to control a device, like an LED, using voice commands.\u003c/p\u003e\n"],["\u003cp\u003eYou will need a breadboard, LED, resistor, and jumper wires to connect to specific GPIO pins on a Raspberry Pi.\u003c/p\u003e\n"],["\u003cp\u003eEven without the physical components, you can still set up the Device Action and observe the output in the terminal.\u003c/p\u003e\n"],["\u003cp\u003eThis is the first step; the next involves registering device traits to define its capabilities.\u003c/p\u003e\n"]]],[],null,["# Install Hardware (Optional)\n\nNow that you have the Assistant running on the device, it is time to extend it\nwith Device Actions. Device Actions allow you to control your device via voice.\nFor this example, you will be using a [Built-in Device Action](/assistant/sdk/device-actions-overview#built-in)\nto turn a light on and off.\n\nFollow these instructions to install an LED on the Raspberry Pi 3 Model B. In a\nlater step, you will modify the sample code to light the LED by voice command.\n| **Note:** Don't worry if you don't have an LED at the moment. You can still set up a Device Action and print some output to the terminal.\n\nHardware requirements\n---------------------\n\nBefore you begin this example, you'll need the following components:\n\n- A breadboard\n- An LED\n- A series resistor\n- Two jumper wires, both with a male and female connector\n\nThe electrical resistance of the resistor should be tied to the specific LED.\nTo find the correct value, you can use an online calculator (or purchase a [kit](https://www.adafruit.com/product/3227)).\n\nConnect the components\n----------------------\n\n| **Note:** You may want to disconnect power to the Raspberry Pi to avoid short circuits.\n\n1. Connect GPIO output pin [BCM25](https://pinout.xyz) to one side of a series resistor. Note that this is physical pin 22 on the Raspberry Pi 3.\n2. Connect the other side of the resistor to the anode side (longer lead) of the LED.\n3. Connect the cathode side (shorter lead) of the LED to ground.\n\nNext step\n---------\n\n[Register Traits](/assistant/sdk/guides/service/python/extend/register-device-traits)"]]