このセクションでは、CsvDataSourceServlet について説明します。CsvDataSourceServlet は、CSV ファイルを外部データストアとして使用する実装例です。また、CsvDataSourceServlet を実行してテストする方法についても説明します。
注: このセクションを開始する前に、データソースのスタートガイドを完了しておく必要があります。
CsvDataSourceServlet のご紹介
CsvDataSourceServlet クラスは examples パッケージにあります。このクラスは、CSV ファイルを外部データストアとして使用する実装例を提供します。CsvDataSourceServlet は DataSourceServlet から継承され、generateDataTable() を実装します。サーブレット コンテナ内で実行する必要があります。
CsvDataSourceServlet のスニペットを以下に示します。generateDataTable 関数は、データをライブラリに公開します。この関数は、データテーブルの説明を作成し、データテーブルの列を定義して、CSV ファイルから取得したデータをデータテーブルに入力します。CSV ファイルは、リクエスト元のビジュアリゼーションのクエリで指定された URL から読み取られます。このライブラリは、データテーブルをクエリ ビジュアリゼーションに返すために必要な他のすべてのアクションを処理します。
/**
 * A demo servlet for serving a simple, constant data table.
 * This servlet extends DataSourceServlet, but does not override the default
 * empty implementation of method getCapabilities(). This servlet therefore ignores the
 * user query (as passed in the 'tq' url parameter), leaving the
 * query engine to apply it to the data table created here.
 *
 * @author Nimrod T.
 */
public class CsvDataSourceServlet extends DataSourceServlet {

  /**
   * Log.
   */
  private static final Log log = LogFactory.getLog(CsvDataSourceServlet.class.getName());

  /**
   * The name of the parameter that contains the url of the CSV to load.
   */
  private static final String URL_PARAM_NAME = "url";

  /**
   * Generates the data table.
   * This servlet assumes a special parameter that contains the CSV URL from which to load
   * the data.
   */
  @Override
  public DataTable generateDataTable(Query query, HttpServletRequest request)
      throws DataSourceException {
    String url = request.getParameter(URL_PARAM_NAME);
    if (StringUtils.isEmpty(url)) {
      log.error("url parameter not provided.");
      throw new DataSourceException(ReasonType.INVALID_REQUEST, "url parameter not provided");
    }

    Reader reader;
    try {
      reader = new BufferedReader(new InputStreamReader(new URL(url).openStream()));
    } catch (MalformedURLException e) {
      log.error("url is malformed: " + url);
      throw new DataSourceException(ReasonType.INVALID_REQUEST, "url is malformed: " + url);
    } catch (IOException e) {
      log.error("Couldn't read from url: " + url, e);
      throw new DataSourceException(ReasonType.INVALID_REQUEST, "Couldn't read from url: " + url);
    }
    DataTable dataTable = null;
    ULocale requestLocale = DataSourceHelper.getLocaleFromRequest(request);
    try {
      // Note: We assume that all the columns in the CSV file are text columns. In cases where the
      // column types are known in advance, this behavior can be overridden by passing a list of
      // ColumnDescription objects specifying the column types. See CsvDataSourceHelper.read() for
      // more details.
      dataTable = CsvDataSourceHelper.read(reader, null, true, requestLocale);
    } catch (IOException e) {
      log.error("Couldn't read from url: " + url, e);
      throw new DataSourceException(ReasonType.INVALID_REQUEST, "Couldn't read from url: " + url);
    }
    return dataTable;
  }
}
CsvDataSourceServlet の実行とテスト
このセクションでは、CsvDataSourceServlet を実行してテストする方法について説明します。
CsvDataSourceServlet を実行してテストするには、次のセクションで説明するように、CSV ファイルを作成してウェブ アプリケーションを更新し、データソースをクエリするビジュアリゼーションを設定します。
CSV ファイルの作成
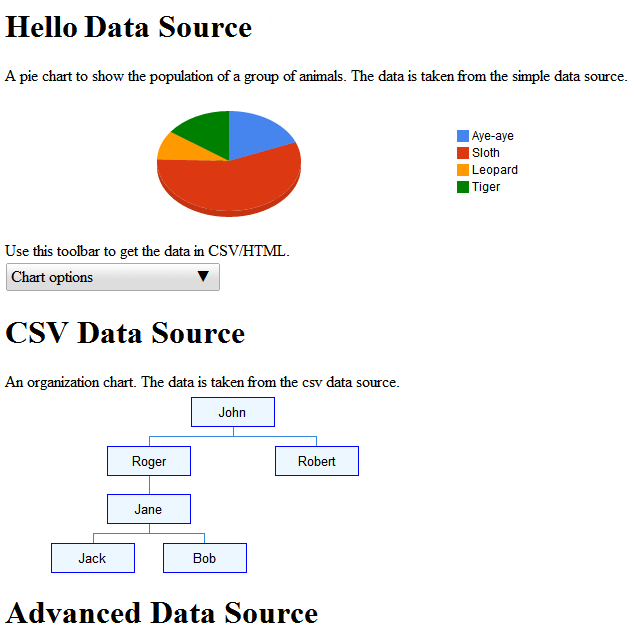
csv_example.csv ファイルは <data_source_library_install>/examples/src/html ディレクトリにあります。次の値が含まれます。
Employee,Manager
Roger,John
Robert,John
Jane,Roger
Jack,Jane
Bob,Jane
このファイルを、スタートガイドのセクションで作成した <tomcat_home>/webapps/myWebApp ディレクトリにコピーします。
Apache Tomcat でのウェブ アプリケーションの更新
以下の手順に沿って、Apache Tomcat のウェブ アプリケーションを更新します。次の手順は、Windows システムの Apache Tomcat に固有のものです。
- 以前に
WEB-INFディレクトリにコピーしたweb.xmlファイルには、この例に必要な定義とマッピングがすでに含まれています。これを定義する行は次のとおりです。
<servlet>
  <servlet-name>CSV Example</servlet-name>
  <description>
  CsvDataSourceServlet
  </description>
  <servlet-class>CsvDataSourceServlet</servlet-class>
</servlet>

<servlet-mapping>
  <servlet-name>CSV Example</servlet-name>
  <url-pattern>/csv</url-pattern>
</servlet-mapping>
- Tomcat を起動します。すでに実行中の場合は Tomcat を再起動します。
- 次のリンクをクリックします。
http://localhost:8080/myWebApp/csv?url=http://localhost:8080/myWebApp/csv_example.csv
画面の幅に応じて、6 ~ 7 行のテキストが表示されます。
テキストはgoogle.visualization.Query.setResponse
で始まり、{c:[{v:'Bob'},{v:'Jane'}]}]}});で終わります。
これは、サンプルの CSV データソースがビジュアリゼーションに送信するレスポンスです。
ビジュアリゼーションを使用してデータを表示する
<data_source_library_install>/examples/src/html ディレクトリの all_examples.html ファイルを使用すると、データを可視化できます。
all_examples.html ファイルのソースを表示すると、3 つのビジュアリゼーションがファイルに含まれていることがわかります。次のスニペットは、これらの可視化の仕様を再現したものです。
- 次の行は、このセクションで説明する
csvの例を指定しています。
query = new google.visualization.Query('csv?url=http://localhost:8080/myWebApp/csv_example.csv');次の行は、組織図の可視化を指定します。var chart = new google.visualization.OrgChart(document.getElementById('csv_div')); - 次の行は、スタートガイドで説明した
simpleexampleを指定しています。
var query = new google.visualization.Query('simpleexample?tq=select name,population');次の行は、円グラフの可視化を指定しています。var chart = new google.visualization.PieChart(document.getElementById('simple_div')); - 次の行は、機能とイベントのフローの定義で説明した
advancedの例を指定しています。
query = new google.visualization.Query('advanced?tableId=planets&tq=select planet,mass');次の行は、棒グラフの可視化を指定しています。var chart = new google.visualization.BarChart(document.getElementById('advanced_div'));
グラフの指定方法とクエリ言語の使用方法について詳しくは、グラフツールの使用の概要とクエリ言語リファレンスをご覧ください。
以下の手順に沿って、CsvDataSourceServlet によって提供されるデータを可視化します。
all_examples.htmlファイルを<data_source_library_install>/examples/src/htmlディレクトリから<tomcat_home>/webapps/myWebApp/ディレクトリにコピーします。- http://localhost:8080/myWebApp/all_examples.html をクリックすると、次のように可視化されます。
高度なデータソースの例については、機能とイベントのフローの定義をご覧ください。
次のステップ
次のサンプルについては、機能とイベントのフローの定義 をご覧ください。または、次のリンクをご覧ください。
- ライブラリでよく使用されるクラスの概要については、キークラスをご覧ください。
- データソースは
DataSourceServletから継承する代わりに、別のクラスから継承できます。詳細については、独自のサーブレットの使用をご覧ください。 - アプリケーションからデータソースにパラメータを渡す方法については、
DataTableGenerator.generateDataTableにパラメータを渡すをご覧ください。