Las cuentas se vinculan con el flujo de código de autorización de OAuth 2.0 estándar de la industria.
OAuth 2.1 y PKCE para agentes
Para los agentes de IA sin estado y las canalizaciones multimodales, se recomienda aplicar OAuth 2.1.
- PKCE (Proof Key for Code Exchange): Se debe usar para proteger el flujo del código de autorización y evitar ataques de interceptación.
- No hay flujo implícito: El flujo implícito expone tokens de acceso en la URL, lo que representa un riesgo de seguridad para los entornos de agentes.
Tu servicio debe admitir extremos de autorización y de intercambio de tokens que cumplan con OAuth 2.0/2.1.
Crea el proyecto
Para crear tu proyecto y usar la vinculación de cuentas, haz lo siguiente:
- Ve a la Consola de API de Google.
- Haz clic en Crear proyecto.
- Ingresa un nombre o acepta la sugerencia generada.
- Confirma o edita los campos restantes.
- Haz clic en Crear.
Para ver el ID del proyecto, haz lo siguiente:
- Ve a la Consola de API de Google.
- Busca tu proyecto en la tabla de la página de destino. El ID del proyecto aparece en la ID columna.
Configura la pantalla de consentimiento de OAuth
El proceso de vinculación de Cuentas de Google incluye una pantalla de consentimiento que les indica a los usuarios la aplicación que solicita acceso a sus datos, qué tipo de datos solicita y las condiciones que se aplican. Deberás configurar la pantalla de consentimiento de OAuth antes de generar un ID de cliente de la API de Google.
- Abre la página de la pantalla de consentimiento de OAuth de la consola de APIs de Google.
- Si se te solicita, selecciona el proyecto que acabas de crear.
En la página "Pantalla de consentimiento de OAuth", completa el formulario y haz clic en el botón "Guardar".
Nombre de la aplicación: Es el nombre de la aplicación que solicita el consentimiento. El nombre debe reflejar con precisión tu aplicación y ser coherente con el nombre de la aplicación que los usuarios ven en otros lugares. El nombre de la aplicación se mostrará en la pantalla de consentimiento de vinculación de cuentas.
Logotipo de la aplicación: Es una imagen en la pantalla de consentimiento que ayudará a los usuarios a reconocer tu app. El logotipo se muestra en la pantalla de consentimiento de vinculación de cuentas y en la configuración de la cuenta.
Correo electrónico de asistencia: Es para que los usuarios se comuniquen contigo si tienen preguntas sobre su consentimiento.
Permisos para las APIs de Google: Los permisos permiten que tu aplicación acceda a los datos privados de Google de tu usuario. Para el caso de uso de vinculación de Cuentas de Google, el permiso predeterminado (correo electrónico, perfil, openid) es suficiente, no es necesario agregar permisos sensibles. Por lo general, se recomienda solicitar permisos de forma incremental, en el momento en que se requiere el acceso, en lugar de hacerlo por adelantado. Obtén más información.
Dominios autorizados: Para protegerlos a ti y a tus usuarios, Google solo permite que las aplicaciones que se autentican con OAuth usen dominios autorizados. Los vínculos de tus aplicaciones deben alojarse en dominios autorizados. Obtén más información.
Vínculo a la página principal de la aplicación: Es la página principal de tu aplicación. Debe alojarse en un dominio autorizado.
Vínculo a la Política de Privacidad de la aplicación: Se muestra en la pantalla de consentimiento de vinculación de Cuentas de Google. Debe alojarse en un dominio autorizado.
Vínculo a las Condiciones del Servicio de la aplicación (opcional): Debe alojarse en un dominio autorizado.
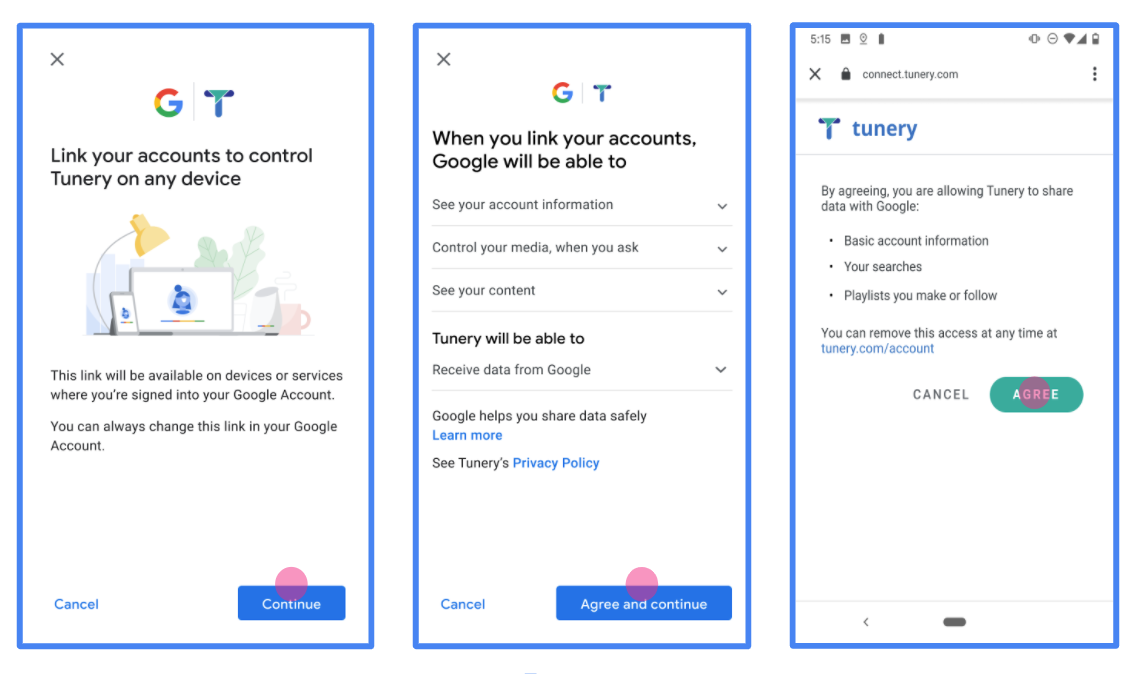
Figura 1. Pantalla de consentimiento de vinculación de Cuentas de Google para una aplicación ficticia, Tunery
Verifica el "Estado de verificación". Si tu aplicación necesita verificación, haz clic en el botón "Enviar para verificación" para enviarla. Consulta los requisitos de verificación de OAuth para obtener más detalles.
Implementa tu servidor de OAuth
OAuth 2.0 服务器的 授权代码流程实现包含两个端点,您的服务通过 HTTPS 提供这两个端点。第一个端点是授权端点,负责查找用户或征得用户同意以获取数据访问权限。授权端点会向尚未登录的用户显示登录界面,并记录用户对所请求访问权限的同意情况。第二个端点是令牌交换端点,用于获取加密字符串(称为令牌),这些令牌授权用户访问您的服务。
当 Google 应用需要调用您服务的某个 API 时,Google 会同时使用这些端点,以获取用户授权代表他们调用这些 API。
Google 账号关联:OAuth 授权代码流程
以下序列图详细介绍了用户、Google 和您服务的端点之间的交互。
角色和职责
下表定义了 Google 账号关联 (GAL) OAuth 流程中参与者的角色和职责。请注意,在 GAL 中,Google 充当 OAuth 客户端 ,而您的服务充当 身份/服务提供方 。
| 参与者 / 组件 | GAL 角色 | 职责 |
|---|---|---|
| Google 应用 / 服务器 | OAuth 客户端 | 发起流程,接收授权代码,将其交换为 令牌,并安全地存储这些令牌以访问您服务的 API。 |
| 您的授权端点 | 授权服务器 | 对用户进行身份验证,并征得用户同意与 Google 分享其数据访问权限。 |
| 您的令牌交换端点 | 授权服务器 | 验证授权代码和刷新令牌,并向 Google 服务器颁发访问 令牌。 |
| Google 重定向 URI | 回调端点 | 接收来自您的授权服务的用户重定向,其中包含
code 和 state 值。 |
由 Google 发起的 OAuth 2.0 授权代码流程会话具有以下流程:
- Google 在用户的浏览器中打开您的授权端点。如果流程是在仅支持语音的设备上为 Action 启动的,Google 会将执行转移到手机。
- 用户登录(如果尚未登录),并授予 Google 权限以使用您的 API 访问其数据(如果尚未授予权限)。
- 您的服务会创建 授权代码并将其返回给 Google。为此,请将用户的浏览器重定向回 Google,并将授权代码附加到请求中。
- Google 会将授权代码发送到您的令牌交换端点,该端点会验证代码的真实性并返回 访问令牌和 刷新令牌。访问令牌是一种短期令牌,您的服务会将其作为访问 API 的凭据。刷新令牌是一种长期令牌,Google 可以存储该令牌,并在访问令牌过期时使用它来获取新的访问令牌。
- 用户完成账号关联流程后,Google 发送的每个后续请求都包含访问令牌。
实现方案
请按照以下步骤实现授权代码流程。
第 1 步:处理授权请求
当 Google 发起账号关联时,它会将用户重定向到您的授权端点。如需了解详细的协议合同和参数要求,请参阅授权端点。
如需处理请求,请执行以下操作:
验证请求:
- 确认
client_id与分配给 Google 的客户端 ID 相匹配。 - 确认
redirect_uri与预期的 Google 重定向 网址:none https://oauth-redirect.googleusercontent.com/r/YOUR_PROJECT_ID https://oauth-redirect-sandbox.googleusercontent.com/r/YOUR_PROJECT_ID相匹配 - 验证
response_type是否为code。
- 确认
对用户进行身份验证:
- 检查用户是否已登录您的服务。
- 如果用户未登录,请提示他们完成您的登录或注册流程。
生成授权代码:
- 创建与用户和客户端关联的唯一且难以猜测的授权代码。
- 将代码设置为在约 10 分钟后过期。
重定向回 Google:
- 将浏览器重定向到
redirect_uri中提供的网址。 - 附加以下查询参数:
code:您生成的授权代码。state:从 Google 收到的未修改的状态值。
- 将浏览器重定向到
第 2 步:处理令牌交换请求
您的令牌交换端点会处理两种类型的请求:将代码交换为令牌,以及刷新过期的访问令牌。如需了解详细的协议合同和参数要求,请参阅令牌交换端点。
A. 将授权代码交换为令牌
当 Google 收到授权代码时,它会调用您的令牌交换端点 (POST) 以检索令牌。
验证请求:
- 验证
client_id和client_secret。 - 验证授权代码是否有效且未过期。
- 确认
redirect_uri与第 1 步中使用的值相匹配。 - 如果验证失败,则返回 HTTP
400 Bad Request,并返回{"error": "invalid_grant"}。
- 验证
颁发令牌:
- 生成长期有效的
refresh_token和短期有效的access_token(通常为 1 小时)。 - 返回 HTTP
200 OK,并返回标准 JSON 令牌响应。
- 生成长期有效的
B. 刷新访问令牌
当访问令牌过期时,Google 会使用刷新令牌请求新的访问令牌。
验证请求:
- 验证
client_id、client_secret和refresh_token。 - 如果验证失败,则返回 HTTP
400 Bad Request,并返回{"error": "invalid_grant"}。
- 验证
颁发新的访问令牌:
- 生成新的短期有效的
access_token。 - 返回 HTTP
200 OK,并返回 JSON 令牌响应(可以选择包含新的刷新令牌)。
- 生成新的短期有效的
Controla las solicitudes userinfo
El extremo userinfo es un recurso protegido de OAuth 2.0 que muestra reclamos sobre el usuario vinculado. La implementación y el alojamiento del extremo userinfo son opcionales, excepto en los siguientes casos de uso:
- Acceso a la cuenta vinculada con Google One Tap.
- Suscripción sin inconvenientes en Android TV.
Una vez que el token de acceso se recupera correctamente del extremo del token, Google envía una solicitud al extremo userinfo para recuperar la información básica de perfil del usuario vinculado.
| Encabezados de la solicitud del extremo userinfo | |
|---|---|
Authorization header |
El token de acceso del tipo portador. |
Por ejemplo, si el extremo userinfo está disponible en
https://myservice.example.com/userinfo, una solicitud podría verse de la siguiente manera:
GET /userinfo HTTP/1.1
Host: myservice.example.com
Authorization: Bearer ACCESS_TOKEN
Para que tu extremo userinfo controle las solicitudes, sigue estos pasos:
- Extrae el token de acceso del encabezado de autorización y muestra la información del usuario asociada con el token de acceso.
- Si el token de acceso no es válido, muestra un error HTTP 401 No autorizado con el encabezado de respuesta
WWW-Authenticate. A continuación, se muestra un ejemplo de una respuesta de error de userinfo:HTTP/1.1 401 Unauthorized WWW-Authenticate: error="invalid_token", error_description="The Access Token expired"
Si el token de acceso es válido, devuelve una respuesta HTTP 200 con el siguiente objeto JSON en el cuerpo del protocolo HTTPS respuesta:
{ "sub": "USER_UUID", "email": "EMAIL_ADDRESS", "given_name": "FIRST_NAME", "family_name": "LAST_NAME", "name": "FULL_NAME", "picture": "PROFILE_PICTURE", }respuesta del extremo userinfo subUn ID único que identifica al usuario en tu sistema. emailDirección de correo electrónico del usuario. given_nameOpcional: Es el nombre del usuario. family_nameOpcional: Apellido del usuario. nameOpcional: Es el nombre completo del usuario. pictureOpcional: Foto de perfil del usuario.
Cómo validar la implementación
Puedes validar tu implementación con la herramienta OAuth 2.0 Playground.
En la herramienta, sigue estos pasos:
- Haz clic en Configuración para abrir la ventana Configuración de OAuth 2.0.
- En el campo Flujo de OAuth, selecciona Del cliente.
- En el campo Extremos de OAuth, selecciona Personalizado.
- Especifica tu extremo de OAuth 2.0 y el ID de cliente que le asignaste a Google en los campos correspondientes.
- En la sección Paso 1, no selecciones ningún alcance de Google. En su lugar, deja este campo en blanco o escribe un alcance válido para tu servidor (o una cadena arbitraria si no usas alcances de OAuth). Cuando termines, haz clic en Autorizar APIs.
- En las secciones Paso 2 y Paso 3, sigue el flujo de OAuth 2.0 y verifica que cada paso funcione según lo previsto.
Puedes validar tu implementación con la herramienta de demostración de vinculación de Cuentas de Google.
En la herramienta, sigue estos pasos:
- Haz clic en el botón Acceder con Google.
- Elige la cuenta que quieras vincular.
- Ingresa el ID de servicio.
- De manera opcional, ingresa uno o más alcances para los que solicitarás acceso.
- Haz clic en Iniciar demostración.
- Cuando se te solicite, confirma que puedes dar tu consentimiento y rechazar la solicitud de vinculación.
- Confirma que se te redirecciona a tu plataforma.