概览
借助精细权限,用户可以更精细地控制与每个应用共享哪些账号数据 。精细权限可提供更强的控制力、更高的透明度和更强的安全性,因此对用户和开发者都有好处 。本指南将帮助您了解成功更新应用以处理精细权限所需的更改和步骤。
什么是精细权限?
假设您开发了一个效率提升应用,该应用同时请求电子邮件范围和日历范围的权限。您的用户 可能只想使用应用的 Google 日历功能,而不想使用 Gmail 功能。借助精细的 OAuth 权限,用户可以选择仅授予 Google 日历权限,而不授予 Gmail 权限。通过让用户授予对特定数据的访问权限,这可以最大限度地减少数据暴露,增强信任感,并让用户能够以隐私优先的方式控制自己的数字生活。请务必将应用设计为能够处理此类情况。
请求多个非登录范围时
登录范围和非登录范围
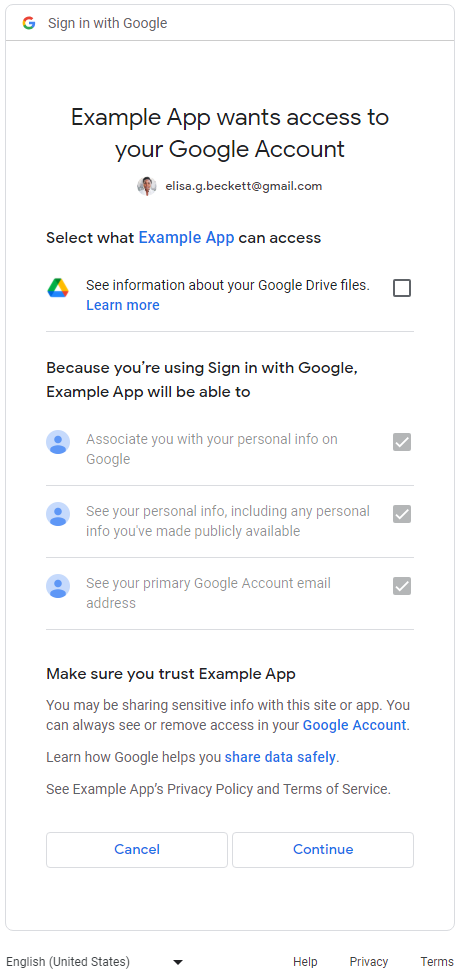
对于同时请求登录范围和非登录范围的应用,用户首先会看到登录范围(email、profile 和 openid)的权限请求页面。在用户同意共享其基本身份信息(姓名、电子邮件地址和个人资料照片)后,用户会看到非登录范围的精细权限请求页面。在这种情况下,应用
必须检查用户授予了哪些范围,而不能假定用户授予了所有请求的
范围。在以下示例中,Web 应用请求了所有三个登录范围和一个
Google 云端硬盘非登录范围。在用户同意登录范围后,用户会看到
Google 云端硬盘权限的精细权限请求页面:
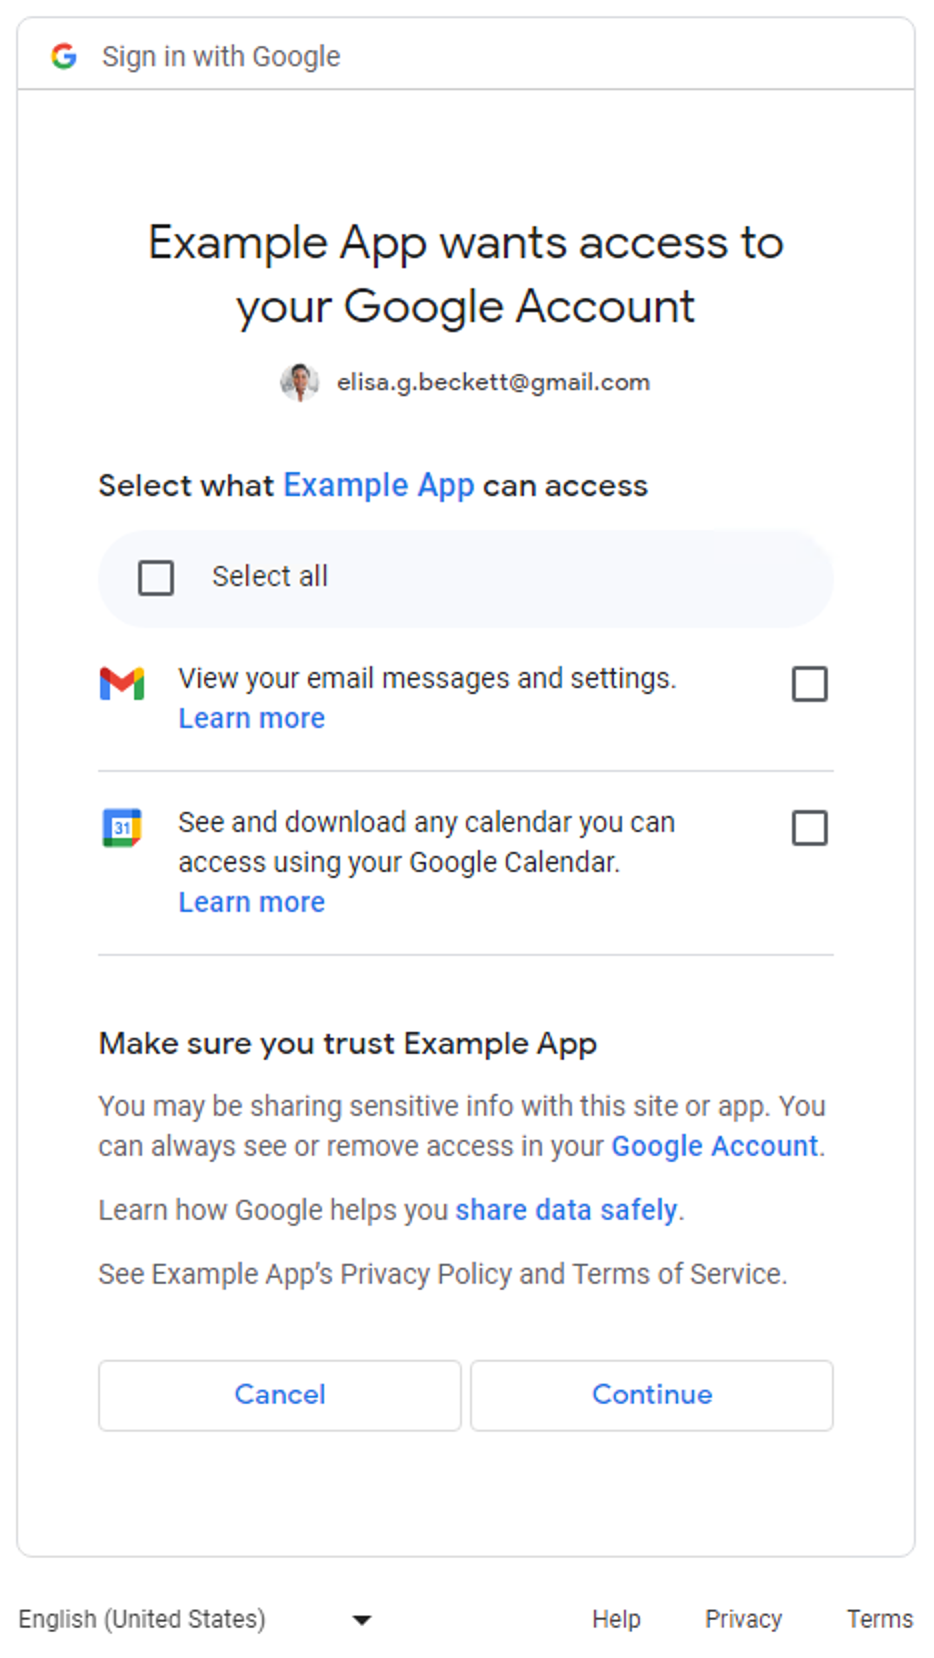
多个非登录范围
当应用请求多个非登录范围时,系统会向用户显示精细权限请求页面。用户可以选择要批准哪些权限以与应用共享 。以下是一个精细权限请求页面的示例,该页面请求访问用户的 Gmail 邮件和 Google 日历数据:
对于仅请求登录范围(email、profile 和 openid)的应用,精细权限请求页面不适用。用户要么批准整个登录请求,要么拒绝整个登录请求。换句话说,如果应用仅请求登录范围(一个、两个或全部
三个),则精细权限请求页面不适用。
对于仅请求一个 非登录范围的应用,精细权限请求页面不 适用。换句话说,用户要么批准整个请求,要么 拒绝整个请求,并且权限请求页面中没有复选框。下表总结了何时显示精细权限请求页面。
| 登录范围的数量 | 非登录范围的数量 | 精细权限请求页面 |
|---|---|---|
| 1-3 | 0 | 不适用 |
| 1-3 | 1+ | 适用 |
| 0 | 1 | 不适用 |
| 0 | 2+ | 适用 |
确定您的应用是否受到影响
全面检查应用中所有使用 Google OAuth 2.0 授权端点进行权限请求的部分。请注意那些请求多个范围的部分,因为它们会触发向用户显示的精细权限请求页面。在这种情况下,请确保您的代码可以处理用户仅授权部分范围的情况。
如何确定您的应用是否使用了多个范围
检查您的应用代码或出站网络调用,以确定您的应用发出的 Google OAuth 2.0 授权请求是否会导致显示精细权限请求页面。
检查您的应用代码
检查应用代码中调用 Google OAuth 授权端点以向用户请求权限的部分。如果您使用 Google API 客户端库之一,通常可以在客户端 初始化步骤中找到应用请求的范围。以下部分显示了一些示例。您应参阅 应用用于处理 Google OAuth 2.0 的 SDK 的文档,以确定您的 应用是否受到影响,并以以下示例中显示的指南作为 参考。
Google Identity 服务
以下 Google Identity 服务
JavaScript 库代码段使用多个非登录范围初始化了 TokenClient。当 Web 应用向用户请求授权时,系统会显示精细权限请求页面。
const client = google.accounts.oauth2.initTokenClient({
  client_id: 'YOUR_CLIENT_ID',
  scope: 'https://www.googleapis.com/auth/calendar.readonly \
  https://www.googleapis.com/auth/contacts.readonly',
  callback: (response) => {
    ...
  },
});
Python
以下代码段使用 google-auth-oauthlib.flow 模块来
构建授权请求;scope 参数包含两个
非登录范围。当 Web 应用向用户请求授权时,系统会显示精细权限请求页面。
import google.oauth2.credentials
import google_auth_oauthlib.flow

# Use the client_secret.json file to identify the application requesting
# authorization. The client ID (from that file) and access scopes are required.
flow = google_auth_oauthlib.flow.Flow.from_client_secrets_file(
    'client_secret.json',
    scopes=['https://www.googleapis.com/auth/calendar.readonly',
                    'https://www.googleapis.com/auth/contacts.readonly'])
Node.js
以下代码段创建了一个 google.auth.OAuth2 对象,该对象定义了
授权请求中的参数,其 scope 参数包含两个
非登录范围。当 Web 应用请求授权时,系统会显示精细权限请求页面。
const {google} = require('googleapis');

/**
  * To use OAuth2 authentication, we need access to a CLIENT_ID, CLIENT_SECRET, AND REDIRECT_URI
  * from the client_secret.json file. To get these credentials for your application, visit
  * https://console.cloud.google.com/apis/credentials.
  */
const oauth2Client = new google.auth.OAuth2(
  YOUR_CLIENT_ID,
  YOUR_CLIENT_SECRET,
  YOUR_REDIRECT_URL
);

// Access scopes for read-only Calendar and Contacts.
const scopes = [
  'https://www.googleapis.com/auth/calendar.readonly',
  'https://www.googleapis.com/auth/contacts.readonly']
];

// Generate a url that asks permissions
const authorizationUrl = oauth2Client.generateAuthUrl({
  // 'online' (default) or 'offline' (gets refresh_token)
  access_type: 'offline',
  /** Pass in the scopes array defined above.
    * Alternatively, if only one scope is needed, you can pass a scope URL as a string */
  scope: scopes,
  // Enable incremental authorization. Recommended as best practices.
  include_granted_scopes: true
});
检查出站网络调用
- Web 应用 - 检查 Chrome 上的网络活动
- Android - 使用 Network Inspector 检查网络流量
-
Chrome 应用
- 前往 Chrome 扩展程序 页面
- 选中扩展程序页面右上角的开发者模式 复选框
- 选择要监控的扩展程序
- 点击扩展程序页面的 检查视图 部分中的后台页面 链接
- 系统会打开一个开发者工具 弹出式窗口,您可以在其中的“ 网络”标签页中监控网络流量
- iOS - 使用 Instruments 分析 HTTP 流量
- 桌面应用 - 使用适用于开发应用的操作系统提供的网络捕获工具
检查网络调用时,请查找发送到 Google OAuth
授权端点的请求,并检查 scope 参数。
这些值会导致 显示精细权限请求页面。
scope参数包含登录范围和非登录范围。以下示例请求包含所有三个登录范围和一个非登录范围 用于查看用户 Google 云端硬盘文件的元数据:
https://accounts.google.com/o/oauth2/v2/auth?
access_type=offline&
scope=https%3A%2F%2Fwww.googleapis.com%2Fauth%2Fuserinfo.email%20https%3A%2F%2Fwww.googleapis.com%2Fauth%2Fuserinfo.profile%20openid%20https%3A%2F%2Fwww.googleapis.com%2Fauth%2Fdrive.metadata.readonly&
include_granted_scopes=true&
response_type=code&
redirect_uri=YOUR_REDIRECT_URL&
client_id=YOUR_CLIENT_ID
scope参数包含多个非登录范围。以下示例请求包含两个非登录范围,用于查看用户的 Google 云端硬盘 元数据和管理特定的 Google 云端硬盘文件:
https://accounts.google.com/o/oauth2/v2/auth?
access_type=offline&
scope=https%3A%2F%2Fwww.googleapis.com%2Fauth%2Fdrive.metadata.readonly%20https%3A%2F%2Fwww.googleapis.com%2Fauth%2Fdrive.file&
include_granted_scopes=true&
response_type=code&
redirect_uri=YOUR_REDIRECT_URL&
client_id=YOUR_CLIENT_ID
处理精细权限的最佳实践
如果您 确定 需要更新应用以处理 精细权限,则应更新代码以正确处理对多个范围的权限请求。所有应用都应遵循以下最佳实践:
- 查看 《Google API 服务:用户数据政策》,并确保您遵守这些政策。
- 请求 任务所需的特定范围。您 必须遵守 Google OAuth 2.0 政策,即仅请求您 需要的范围。除非对应用的核心功能至关重要,否则您应避免在登录时请求多个 范围。将多个 范围捆绑在一起,尤其是对于不熟悉应用功能的新用户,可能会让他们难以理解需要这些 权限的原因。这可能会引发警报,并阻止用户进一步使用您的 应用。
- 在发出 授权请求之前,向用户说明理由。清楚地解释您的应用为何需要请求的权限、 您将如何处理用户的数据,以及用户批准请求后将获得哪些好处。 我们的研究表明,这些解释可以提高用户的信任度和参与度。
- 每当应用请求范围时, 使用增量授权 ,以避免管理多个访问令牌。
- 检查 用户授予了哪些范围。一次请求多个 范围时,用户可能不会授予应用请求的所有范围。您的应用应始终 检查用户授予了哪些范围,并通过停用相关 功能来处理任何范围拒绝。请遵循 Google OAuth 2.0 政策,了解如何处理对多个 范围的权限请求,并且仅在用户明确表示打算使用需要该范围的特定功能时,才再次提示用户授予权限。
更新应用以处理精细权限
Android 应用
您应参阅用于与 Google OAuth 2.0 交互的 SDK 的文档,并根据 最佳实践更新应用以处理精细权限。
如果您使用
auth.api.signin
Play 服务中的 SDK 与 Google OAuth 2.0 交互,则可以使用
requestPermissions
函数请求 所需的最小范围集,
并使用
hasPermissions
函数检查用户在
请求精细权限时授予了哪些范围。
Chrome 扩展程序应用
您应使用 Chrome Identity API 根据 最佳实践使用 Google OAuth 2.0。
以下示例展示了如何正确处理精细权限。
manifest.json
示例清单文件为 Chrome 扩展程序应用声明了两个非登录范围。
{
  "name": "Example Chrome extension application",
  ...
  "permissions": [
      "identity"
    ],
  "oauth2" : {
      "client_id": "YOUR_CLIENT_ID",
      "scopes":["https://www.googleapis.com/auth/calendar.readonly",
                "https://www.googleapis.com/auth/contacts.readonly"]
  }
}
错误方法
全有或全无
用户点击按钮以启动授权流程。此代码段假定系统向用户显示了一个“全有或全无”的权限请求页面,其中包含 manifest.json 文件中指定的两个范围。它忽略了检查用户授予了哪些范围。
oauth.js
...
document.querySelector('button').addEventListener('click', function () {
  chrome.identity.getAuthToken({ interactive: true },
      function (token) {
          if (token === undefined) {
            // User didn't authorize both scopes.
            // Updating the UX and application accordingly
            ...
          } else {
            // User authorized both or one of the scopes.
            // It neglects to check which scopes users granted and assumes users granted all scopes.

            // Calling the APIs, etc.
            ...
          }
      });
});
正确方法
最小范围
选择所需的最小范围集
应用应仅请求所需的最小范围集。建议您的应用在需要完成任务时一次请求一个范围。
在此示例中,假定 manifest.json
文件中声明的两个范围都是所需的最小范围集。oauth.js 文件使用 Chrome
Identity API 通过 Google 启动授权流程。
您应选择启用精细权限,以便用户能够更好地控制向应用授予权限。您的应用应通过检查
用户授权了哪些范围来正确处理用户的响应。
oauth.js
...
document.querySelector('button').addEventListener('click', function () {
  chrome.identity.getAuthToken({ interactive: true, enableGranularPermissions: true },
      function (token, grantedScopes) {
          if (token === undefined) {
            // User didn't authorize any scope.
            // Updating the UX and application accordingly
            ...
          } else {
            // User authorized the request. Now, check which scopes were granted.
            if (grantedScopes.includes('https://www.googleapis.com/auth/calendar.readonly'))
            {
              // User authorized Calendar read permission.
              // Calling the APIs, etc.
              ...
            }
            else
            {
              // User didn't authorize Calendar read permission.
              // Update UX and application accordingly
              ...
            }

            if (grantedScopes.includes('https://www.googleapis.com/auth/contacts.readonly'))
            {
              // User authorized Contacts read permission.
              // Calling the APIs, etc.
              ...
            }
            else
            {
              // User didn't authorize Contacts read permission.
              // Update UX and application accordingly
              ...
            }
          }
      });
});
iOS、iPadOS 和 macOS 应用
您应参阅用于与 Google OAuth 2.0 交互的 SDK 的文档,并根据 最佳实践更新应用以处理精细权限。
如果您使用适用于 iOS 和 macOS 的 Google 登录库与 Google OAuth 2.0 交互,则应查看有关处理精细权限的文档。
Web 应用
您应参阅用于与 Google OAuth 2.0 交互的 SDK 的文档,并根据 最佳实践更新应用以处理精细权限。
服务器端(离线)访问
以下代码段展示了一个 NodeJS 示例,该示例请求了两个非登录范围。用户将 看到精细权限请求页面。
错误方法
全有或全无
用户会被重定向到授权网址。此代码段假定系统向用户显示了一个“全有或全无”的权限请求页面,其中包含 scopes 数组中指定的两个范围。它忽略了检查用户授予了哪些范围。
main.js
...
const oauth2Client = new google.auth.OAuth2(
  YOUR_CLIENT_ID,
  YOUR_CLIENT_SECRET,
  YOUR_REDIRECT_URL
);

// Access scopes for two non-Sign-In scopes - Google Calendar and Contacts
const scopes = [
  'https://www.googleapis.com/auth/contacts.readonly',
  'https://www.googleapis.com/auth/calendar.readonly'
];

// Generate a url that asks permissions for the Google Calendar and Contacts scopes
const authorizationUrl = oauth2Client.generateAuthUrl({
  // 'online' (default) or 'offline' (gets refresh_token)
  access_type: 'offline',
  // Pass in the scopes array defined above
  scope: scopes,
  // Enable incremental authorization. Recommended as best practices.
  include_granted_scopes: true
});

async function main() {
  const server = http.createServer(async function (req, res) {
    // Example on redirecting user to Google OAuth 2.0 server.
    if (req.url == '/') {
      res.writeHead(301, { "Location": authorizationUrl });
    }
    // Receive the callback from Google OAuth 2.0 server.
    if (req.url.startsWith('/oauth2callback')) {
      // Handle the Google OAuth 2.0 server response
      let q = url.parse(req.url, true).query;

      if (q.error) {
        // User didn't authorize both scopes.
        // Updating the UX and application accordingly
        ...
      } else {
        // User authorized both or one of the scopes.
        // It neglects to check which scopes users granted and assumes users granted all scopes.

        // Get access and refresh tokens (if access_type is offline)
        let { tokens } = await oauth2Client.getToken(q.code);
        // Calling the APIs, etc.
        ...
      }
    }
    res.end();
  }).listen(80);
}
正确方法
最小范围
选择所需的最小范围集
应用应仅请求所需的最小范围集。建议您的应用在需要完成任务时一次请求一个范围。每当应用请求范围时,都应使用 增量授权 以避免管理多个访问令牌。
如果您的应用必须请求多个非登录范围,则在请求时应始终使用 增量授权 ,并检查用户授予了哪些范围。
在此示例中,假定应用正常运行需要这两个范围。 您应选择启用精细权限,以便用户能够更好地控制向应用授予权限。您的应用应通过检查 用户授权了哪些范围来正确处理用户的响应。
main.js
...
const oauth2Client = new google.auth.OAuth2(
  YOUR_CLIENT_ID,
  YOUR_CLIENT_SECRET,
  YOUR_REDIRECT_URL
);

// Access scopes for two non-Sign-In scopes - Google Calendar and Contacts
const scopes = [
  'https://www.googleapis.com/auth/contacts.readonly',
  'https://www.googleapis.com/auth/calendar.readonly'
];

// Generate a url that asks permissions for the Google Calendar and Contacts scopes
const authorizationUrl = oauth2Client.generateAuthUrl({
  // 'online' (default) or 'offline' (gets refresh_token)
  access_type: 'offline',
  // Pass in the scopes array defined above
  scope: scopes,
  // Enable incremental authorization. Recommended as best practices.
  include_granted_scopes: true,
  // Set to true to enable more granular permissions for Google OAuth 2.0 client IDs created before 2019.
  // No effect for newer Google OAuth 2.0 client IDs, since more granular permissions is always enabled for them.
  enable_granular_consent: true
});

async function main() {
  const server = http.createServer(async function (req, res) {
    // Redirect users to Google OAuth 2.0 server.
    if (req.url == '/') {
      res.writeHead(301, { "Location": authorizationUrl });
    }
    // Receive the callback from Google OAuth 2.0 server.
    if (req.url.startsWith('/oauth2callback')) {
      // Handle the Google OAuth 2.0 server response
      let q = url.parse(req.url, true).query;

      if (q.error) {
        // User didn't authorize both scopes.
        // Updating the UX and application accordingly
        ...
      } else {
        // Get access and refresh tokens (if access_type is offline)
        let { tokens } = await oauth2Client.getToken(q.code);
        oauth2Client.setCredentials(tokens);

        // User authorized the request. Now, check which scopes were granted.
        if (tokens.scope.includes('https://www.googleapis.com/auth/calendar.readonly'))
        {
          // User authorized Calendar read permission.
          // Calling the APIs, etc.
          ...
        }
        else
        {
          // User didn't authorize Calendar read permission.
          // Calling the APIs, etc.
          ...
        }

        // Check which scopes user granted the permission to application
        if (tokens.scope.includes('https://www.googleapis.com/auth/contacts.readonly'))
        {
          // User authorized Contacts read permission.
          // Calling the APIs, etc.
          ...
        }
        else
        {
          // User didn't authorize Contacts read permission.
          // Update UX and application accordingly
          ...
        }
      }
    }
    res.end();
  }).listen(80);
}
查看有关如何从基于服务器的应用访问 Google API 的 服务器端 Web 应用指南。
仅限客户端访问
- 对于使用 Google Identity 服务 JavaScript 库与 Google OAuth 2.0 交互的应用,您应查看有关处理精细权限的文档。
- 对于直接使用 JavaScript 调用 Google OAuth 2.0 授权端点的应用,您应查看此 文档 有关处理精细权限的信息。
测试更新后的应用对精细权限的处理
- 列出 用户可以响应权限请求的所有情况,以及应用中的 预期行为。例如,如果用户仅授权了三个请求范围中的两个,则应用应相应地运行。
-
测试 启用了精细权限的应用。您可以通过以下两种方式启用
精细权限:
- 检查应用的 OAuth 2.0 权限请求页面,查看是否已为应用启用 精细权限。您还可以通过 Google Cloud 控制台创建新的 Web、Android 或 iOS Google OAuth 2.0 客户端 ID 以进行测试,因为精细权限始终 为这些客户端 ID 启用。
-
调用 Google OAuth
授权端点时,将参数
enable_granular_consent设置为true。某些 SDK 明确支持此 参数。对于其他 SDK,请查看文档,了解如何手动添加此参数及其值。如果您的实现不支持添加该参数,您可以按照上一点所述,通过 Google Cloud 控制台创建新的 Web、 Android 或 iOS Google OAuth 2.0 客户端 ID 以进行测试。
- 测试更新后的应用时,请使用个人 Google 账号 (@gmail.com),而不是 Workspace 账号。这是因为,目前,具有 全网域授权或标记为 “受信任” 的 Workspace 企业应用不受精细权限更改的影响。因此,使用您组织的 Workspace 账号进行测试可能无法按预期显示新的精细化意见征求页面。