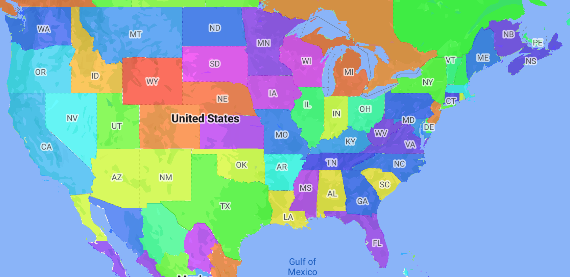
등치 지역도는 데이터 값에 따라 행정 구역에 색상이 지정되거나 음영 처리되는 주제별 지도입니다. 스타일 팩토리 함수를 사용하여 각 행정 구역이 숫자 값의 범위와 연결되는 데이터를 기반으로 지도의 스타일을 지정할 수 있습니다. 다음 예시 지도는 미국의 주에 대한 등치지역도를 보여줍니다.
이 예에서 데이터는 주의 장소 ID로 구성됩니다. 스타일 팩토리 함수는 상태의 장소 ID의 해시 값을 기반으로 각 상태의 색상을 조건부로 지정합니다.
새 지도 ID와 지도 스타일을 아직 만들지 않았다면 시작하기의 단계에 따라 만드세요. 행정 구역 1단계 지형지물 레이어를 사용 설정해야 합니다.
지도가 초기화될 때 행정 구역 단위 1 지형지물 레이어에 대한 참조를 가져옵니다. 미국의 경우 이러한 행정 구역 수준은 개별 주에 해당합니다.
자바
privateFeatureLayerareaLevel1Layer; @OverridepublicvoidonMapReady(GoogleMapmap){areaLevel1Layer=map.getFeatureLayer(newFeatureLayerOptions.Builder().featureType(FeatureType.ADMINISTRATIVE_AREA_LEVEL_1).build()); // Apply style factory function to ADMINISTRATIVE_AREA_LEVEL_1 layer.styleAreaLevel1Layer();}
Kotlin
privatevarareaLevel1Layer:FeatureLayer?=null overridefunonMapReady(googleMap:GoogleMap){// Get the ADMINISTRATIVE_AREA_LEVEL_1 feature layer.areaLevel1Layer=googleMap.getFeatureLayer(FeatureLayerOptions.Builder().featureType(FeatureType.ADMINISTRATIVE_AREA_LEVEL_1).build()) // Apply style factory function to ADMINISTRATIVE_AREA_LEVEL_1 layer.styleAreaLevel1Layer()}
스타일 팩토리 함수를 만들고 이를 행정 구역 단위 1 지형지물 레이어에 적용합니다. 다음 예에서는 미국의 각 주를 나타내는 다각형에 함수를 적용합니다.
자바
privatevoidstyleAreaLevel1Layer(){FeatureLayer.StyleFactorystyleFactory=(Featurefeature)->{if(featureinstanceofPlaceFeature){PlaceFeatureplaceFeature=(PlaceFeature)feature; // Return a hueColor in the range [-299,299]. If the value is// negative, add 300 to make the value positive.inthueColor=placeFeature.getPlaceId().hashCode()%300;if(hueColor < 0){hueColor+=300;} returnnewFeatureStyle.Builder()// Set the fill color for the state based on the hashed hue color..fillColor(Color.HSVToColor(150,newfloat[]{hueColor,1,1})).build();}returnnull;}; // Apply the style factory function to the feature layer.areaLevel1Layer.setFeatureStyle(styleFactory);}
Kotlin
privatefunstyleAreaLevel1Layer(){valstyleFactory=FeatureLayer.StyleFactory{feature:Feature->
if(featureisPlaceFeature){valplaceFeature:PlaceFeature=featureasPlaceFeature // Return a hueColor in the range [-299,299]. If the value is// negative, add 300 to make the value positive.varhueColor:Int=placeFeature.getPlaceId().hashCode()%300if(hueColor < 0){hueColor+=300}return@StyleFactoryFeatureStyle.Builder()// Set the fill color for the state based on the hashed hue color..fillColor(Color.HSVToColor(150,floatArrayOf(hueColor.toFloat(),1f,1f))).build()}return@StyleFactorynull} // Apply the style factory function to the feature layer.areaLevel1Layer?.setFeatureStyle(styleFactory)}
[null,null,["최종 업데이트: 2025-08-31(UTC)"],[[["\u003cp\u003eChoropleth maps use color variations to represent data values associated with geographic areas, like shading states based on population.\u003c/p\u003e\n"],["\u003cp\u003eThis guide explains how to create a choropleth map using a style factory function that colors administrative areas based on data ranges.\u003c/p\u003e\n"],["\u003cp\u003eYou'll learn to enable the "Administrative Area Level 1" feature, access this layer, and apply a style factory function to it, demonstrated with code snippets for Android (Java/Kotlin).\u003c/p\u003e\n"],["\u003cp\u003eThe example provided utilizes a hashed value of the place ID to determine the color of each state, although real-world scenarios would likely involve a lookup table for color assignments.\u003c/p\u003e\n"]]],[],null,["# Make a choropleth map\n\nSelect platform: [Android](/maps/documentation/android-sdk/dds-boundaries/choropleth-map \"View this page for the Android platform docs.\") [iOS](/maps/documentation/ios-sdk/dds-boundaries/choropleth-map \"View this page for the iOS platform docs.\") [JavaScript](/maps/documentation/javascript/dds-boundaries/choropleth-map \"View this page for the JavaScript platform docs.\")\n\n\u003cbr /\u003e\n\nA choropleth map is a type of thematic map in which administrative areas are\ncolored or shaded according to a data value. You can use a style factory\nfunction to style a map based on data where each administrative area is\nassociated with a range of numeric values. The following example map shows a\nchoropleth map for the states of the United States.\n\nIn this example, the data consists of the place ID of the state. The style\nfactory function conditionally colors each state based on a hashed value of the\nplace ID for the state.\n\n| **Note:** Typically, you would define a table of the color for each state, and then lookup the color for each state based on the state's place ID.\n\n1. If you haven't already done so, follow the steps in\n [Get Started](/maps/documentation/android/dds-boundaries/start)\n to create a new map ID and map style. Be sure to enable the\n **Administrative Area Level 1** feature layer.\n\n2. Get a reference to the Administrative Area Level 1 feature layer when the\n map initializes. For the United States, these administrative levels\n correspond to the individual states.\n\n ### Java\n\n\n ```java\n private FeatureLayer areaLevel1Layer;\n\n @Override\n public void onMapReady(GoogleMap map) {\n areaLevel1Layer = map.getFeatureLayer(new FeatureLayerOptions.Builder()\n .featureType(FeatureType.ADMINISTRATIVE_AREA_LEVEL_1)\n .build());\n\n // Apply style factory function to ADMINISTRATIVE_AREA_LEVEL_1 layer.\n styleAreaLevel1Layer();\n }\n ```\n\n \u003cbr /\u003e\n\n ### Kotlin\n\n\n ```java\n private var areaLevel1Layer: FeatureLayer? = null\n\n override fun onMapReady(googleMap: GoogleMap) {\n // Get the ADMINISTRATIVE_AREA_LEVEL_1 feature layer.\n areaLevel1Layer = googleMap.getFeatureLayer(FeatureLayerOptions.Builder()\n .featureType(FeatureType.ADMINISTRATIVE_AREA_LEVEL_1)\n .build())\n\n // Apply style factory function to ADMINISTRATIVE_AREA_LEVEL_1 layer.\n styleAreaLevel1Layer()\n }\n ```\n\n \u003cbr /\u003e\n\n3. Create a style factory function and apply it to the\n Administrative Area Level 1 feature layer. The following example applies the\n function to the polygon representing each state of the United States.\n\n ### Java\n\n\n ```java\n private void styleAreaLevel1Layer() {\n FeatureLayer.StyleFactory styleFactory = (Feature feature) -\u003e {\n if (feature instanceof PlaceFeature) {\n PlaceFeature placeFeature = (PlaceFeature) feature;\n\n // Return a hueColor in the range [-299,299]. If the value is\n // negative, add 300 to make the value positive.\n int hueColor = placeFeature.getPlaceId().hashCode() % 300;\n if (hueColor \u003c 0) {\n hueColor += 300;\n }\n\n return new FeatureStyle.Builder()\n // Set the fill color for the state based on the hashed hue color.\n .fillColor(Color.HSVToColor(150, new float[] {hueColor, 1, 1}))\n .build();\n }\n return null;\n };\n\n // Apply the style factory function to the feature layer.\n areaLevel1Layer.setFeatureStyle(styleFactory);\n }\n ```\n\n \u003cbr /\u003e\n\n ### Kotlin\n\n\n ```java\n private fun styleAreaLevel1Layer() {\n val styleFactory = FeatureLayer.StyleFactory { feature: Feature -\u003e\n if (feature is PlaceFeature) {\n val placeFeature: PlaceFeature = feature as PlaceFeature\n\n // Return a hueColor in the range [-299,299]. If the value is\n // negative, add 300 to make the value positive.\n var hueColor: Int = placeFeature.getPlaceId().hashCode() % 300\n if (hueColor \u003c 0) {\n hueColor += 300\n }\n return@StyleFactory FeatureStyle.Builder()\n // Set the fill color for the state based on the hashed hue color.\n .fillColor(Color.HSVToColor(150, floatArrayOf(hueColor.toFloat(), 1f, 1f)))\n .build()\n }\n return@StyleFactory null\n }\n\n // Apply the style factory function to the feature layer.\n areaLevel1Layer?.setFeatureStyle(styleFactory)\n }\n ```\n\n \u003cbr /\u003e"]]