
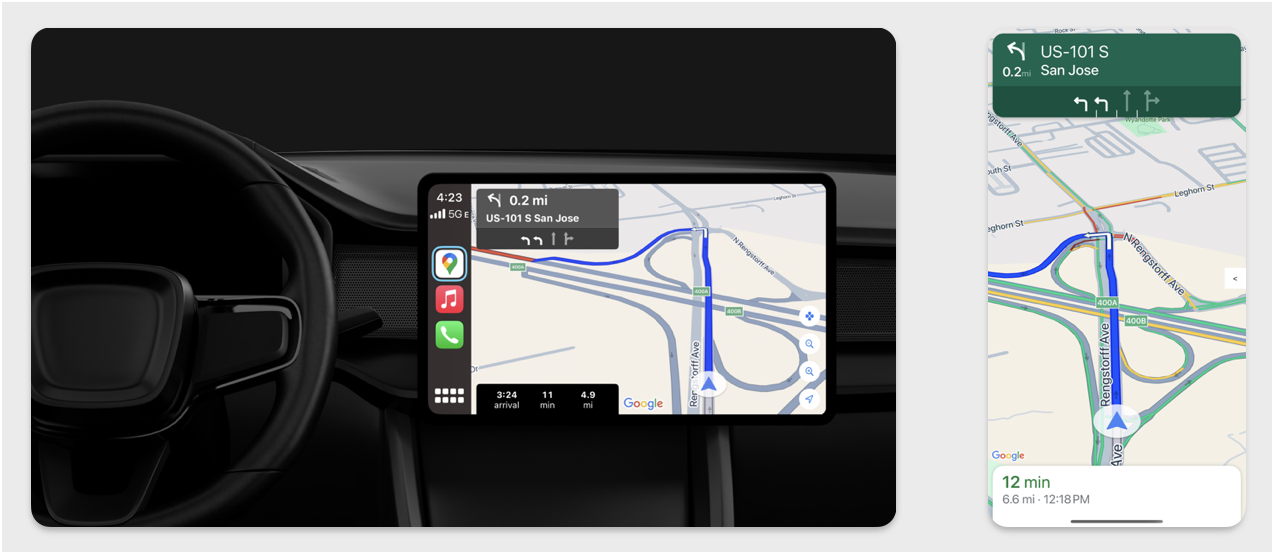
Cette section explique comment utiliser le SDK Navigation avec la bibliothèque Apple CarPlay pour afficher l'expérience de navigation de votre application sur les unités principales intégrées . Si le système intégré d'un conducteur est compatible avec CarPlay, il peut utiliser votre application directement sur l'écran de sa voiture en connectant son téléphone à l'unité. Les instructions vocales sont également diffusées sur les haut-parleurs de la voiture.
Vous créez votre application CarPlay à partir d'un ensemble de modèles d'interface utilisateur fournis par Apple. Votre application est chargée de sélectionner le modèle à afficher et de fournir les données qu'il contient.
Le système intégré affiche les éléments interactifs approuvés pour la sécurité afin que le conducteur puisse se rendre à destination en toute sécurité sans être trop distrait. Vous pouvez également programmer votre application pour que le conducteur puisse interagir avec ses fonctionnalités spécifiques, par exemple accepter ou refuser des commandes, ou afficher l'emplacement du client sur une carte. Les mises à jour de l'état des commandes peuvent également être programmées pour s'afficher sur l'unité intégrée.
Configuration
Commencer avec CarPlay
Tout d'abord, familiarisez-vous avec la documentation Apple :
Configurer le SDK Navigation
- Une fois que vous avez lu la documentation Apple, vous êtes prêt à utiliser le SDK Navigation.
- Configurez votre projet si vous n'avez pas encore intégré le SDK Navigation à votre application.
- Activez le flux d'instructions détaillées pour votre application.
- Facultatif. Utilisez les icônes générées à partir du SDK Navigation.
- Dessinez la carte à l'aide de la classe
GMSMapViewfournie dans la classe UIView. Pour en savoir plus, consultez la section Naviguer sur un itinéraire. RemplissezCPNavigationSessionavec les données de la bibliothèque TurnByTurn.
Dessiner la carte et l'interface utilisateur de navigation
La classe
GMSMapView
affiche une carte et
CPMapTemplate
affiche l'interface utilisateur sur les écrans CarPlay. Elle offre la même fonctionnalité que GMSMapView pour les téléphones, mais avec une interactivité limitée.
Swift
init(window: CPWindow) {
    super.init(nibName: nil, bundle: nil)
    self.window = window

    // More CPMapTemplate initialization

}

override func viewDidLoad() {
    super.viewDidLoad()

    let mapViewOptions = GMSMapViewOptions()
    mapViewOptions.screen = window.screen
    mapViewOptions.frame = self.view.bounds

    mapView = GMSMapView(options: mapViewOptions)
    mapView.autoresizingMask = [.flexibleHeight, .flexibleWidth]
    mapView.settings.isNavigationHeaderEnabled = false
    mapView.settings.isNavigationFooterEnabled = false

    // Disable buttons: in CarPlay, no part of the map is clickable.
    // The app should instead place these buttons in the appropriate slots of the CarPlay template.
    mapView.settings.compassButton = false
    mapView.settings.isRecenterButtonEnabled = false
    mapView.shouldDisplaySpeedometer = false
    mapView.isMyLocationEnabled = true

    self.view.addSubview(mapView)
}
Objective-C
- (instancetype)initWithWindow:(CPWindow *)window {
  self = [super initWithNibName:nil bundle:nil];
  if (self) {
    _window = window;

  // More CPMapTemplate initialization
  }
}

- (void)viewDidLoad {
  [super viewDidLoad];
  GMSMapViewOptions *options = [[GMSMapViewOptions alloc] init];
  options.screen = _window.screen;
  options.frame = self.view.bounds;
  _mapView = [[GMSMapView alloc] initWithOptions:options];
  _mapView.autoresizingMask = UIViewAutoresizingFlexibleHeight | UIViewAutoresizingFlexibleWidth;
  _mapView.settings.navigationHeaderEnabled = NO;
  _mapView.settings.navigationFooterEnabled = NO;

  // Disable buttons: in CarPlay, no part of the map is clickable.
  // The app should instead place these buttons in the appropriate slots of the CarPlay template.
  _mapView.settings.compassButton = NO;
  _mapView.settings.recenterButtonEnabled = NO;

  _mapView.shouldDisplaySpeedometer = NO;
  _mapView.myLocationEnabled = YES;

  [self.view addSubview:_mapView];
}
Activer l'interaction avec la carte
Pour garantir la sécurité du conducteur, CarPlay limite l'interaction avec la surface de l'écran à une série
de
CPMapTemplateDelegate
méthodes. Utilisez ces rappels pour permettre une interaction limitée du conducteur avec la carte sur un écran intégré.
Pour prendre en charge des actions utilisateur supplémentaires, créez un tableau de CPMapButton et attribuez-le à CPMapTemplate.mapButtons.
Le code suivant crée des interactions de panoramique et des boutons pour effectuer un panoramique, effectuer un zoom avant et arrière, et fournir l'emplacement de l'utilisateur.
Interactions de panoramique
Swift
// MARK: CPMapTemplateDelegate
func mapTemplate(_ mapTemplate: CPMapTemplate, panBeganWith direction: CPMapTemplate.PanDirection) {

}

func mapTemplate(_ mapTemplate: CPMapTemplate, panWith direction: CPMapTemplate.PanDirection) {
    let scrollAmount = scrollAmount(for: direction)
    let scroll = GMSCameraUpdate.scrollBy(x: scrollAmount.x, y: scrollAmount.y)
    mapView.animate(with: scroll)
}

func mapTemplate(_ mapTemplate: CPMapTemplate, panEndedWith direction: CPMapTemplate.PanDirection) {
}

func scrollAmount(for panDirection: CPMapTemplate.PanDirection) -> CGPoint {
    let scrollDistance = 80.0
    var scrollAmount = CGPoint(x: 0, y: 0)
    switch panDirection {
        case .left:
            scrollAmount.x -= scrollDistance
            break;
        case .right:
            scrollAmount.x += scrollDistance
            break;
        case .up:
            scrollAmount.y += scrollDistance
            break;
        case .down:
            scrollAmount.y -= scrollDistance
            break;
        default:
            break;
    }
    if scrollAmount.x != 0 && scrollAmount.y != 0 {
        // Adjust length if scrolling diagonally.
        scrollAmount = CGPointMake(scrollAmount.x * sqrt(1.0/2.0), scrollAmount.y * sqrt(1.0/2.0))
    }
    return scrollAmount
}
Objective-C
#pragma mark - CPMapTemplateDelegate

- (void)mapTemplate:(CPMapTemplate *)mapTemplate panBeganWithDirection:(CPPanDirection)direction {
}

- (void)mapTemplate:(CPMapTemplate *)mapTemplate panWithDirection:(CPPanDirection)direction {
CGPoint scrollAmount = [self scrollAmountForPanDirection:direction];
GMSCameraUpdate *scroll = [GMSCameraUpdate scrollByX:scrollAmount.x Y:scrollAmount.y];
[_mapView animateWithCameraUpdate:scroll];
}

- (void)mapTemplate:(CPMapTemplate *)mapTemplate panEndedWithDirection:(CPPanDirection)direction {
}
- (CGPoint)scrollAmountForPanDirection:(CPPanDirection)direction {
  static const CGFloat scrollDistance = 80.;
  CGPoint scrollAmount = {0., 0.};
  if (direction & CPPanDirectionLeft) {
    scrollAmount.x = -scrollDistance;
  }
  if (direction & CPPanDirectionRight) {
    scrollAmount.x = scrollDistance;
  }
  if (direction & CPPanDirectionUp) {
    scrollAmount.y = -scrollDistance;
  }
  if (direction & CPPanDirectionDown) {
    scrollAmount.y = scrollDistance;
  }
  if (scrollAmount.x != 0 && scrollAmount.y != 0) {
  // Adjust length if scrolling diagonally.
  scrollAmount =
    CGPointMake(scrollAmount.x * (CGFloat)M_SQRT1_2, scrollAmount.y * (CGFloat)M_SQRT1_2);
  }
  return scrollAmount;
}
Utilisations courantes des boutons
Swift
// MARK: Create Buttons

func createMapButtons() -> [CPMapButton] {
    let panButton = mapButton(systemImageName: "dpad.fill") { [weak self] in
        self?.didTapPanButton()
    }

    let zoomOutButton = mapButton(systemImageName: "minus.magnifyingglass") { [weak self] in
        self?.didTapZoomOutButton()
    }

    let zoomInButton = mapButton(systemImageName: "plus.magnifyingglass") { [weak self] in
        self?.didTapZoomInButton()
    }

    let myLocationButton = mapButton(systemImageName: "location") { [weak self] in
        self?.didTapMyLocationButton()
    }

    let mapButtons = [panButton, zoomOutButton, zoomInButton, myLocationButton]
    return mapButtons
}

func mapButton(systemImageName: String, handler: @escaping () -> Void) -> CPMapButton {

}


// MARK: Button callbacks

@objc func didTapPanButton() {
    mapTemplate?.showPanningInterface(animated: true)
}

@objc func didTapZoomOutButton() {
    mapView.animate(with: GMSCameraUpdate.zoomOut())
}

@objc func didTapZoomInButton() {
    mapView.animate(with: GMSCameraUpdate.zoomIn())
}

@objc func didTapMyLocationButton() {
    if let lastLocation = lastLocation {
        let cameraPosition = GMSCameraPosition(target: lastLocation.coordinate, zoom: 15)
        mapView.animate(to: cameraPosition)
    }
}
Objective-C
#pragma mark - Create Buttons

- (NSArray<CPMapButton *>*)createMapButtons {
    NSMutableArray<CPMapButton *> *mapButtons = [NSMutableArray<CPMapButton *> array];

    __weak __typeof__(self) weakSelf = self;
    CPMapButton *panButton = [self mapButtonWithSystemImageNamed:@"dpad.fill"
                                                        handler:^(CPMapButton *_) {
                                                        [weakSelf didTapPanButton];
                                                        }];
    [mapButtons addObject:panButton];

    CPMapButton *zoomOutButton =
        [self mapButtonWithSystemImageNamed:@"minus.magnifyingglass"
                                    handler:^(CPMapButton *_Nonnull mapButon) {
                                    [weakSelf didTapZoomOutButton];
                                    }];
    [mapButtons addObject:zoomOutButton];

    CPMapButton *zoomInButton =
        [self mapButtonWithSystemImageNamed:@"plus.magnifyingglass"
                                    handler:^(CPMapButton *_Nonnull mapButon) {
                                    [weakSelf didTapZoomInButton];
                                    }];
    [mapButtons addObject:zoomInButton];

    CPMapButton *myLocationButton =
        [self mapButtonWithSystemImageNamed:@"location"
                                    handler:^(CPMapButton *_Nonnull mapButton) {
                                    [weakSelf didTapMyLocationButton];
                                    }];
    [mapButtons addObject:myLocationButton];
    return mapButtons;
}

#pragma mark - Button Callbacks

- (void)didTapZoomOutButton {
[_mapView animateWithCameraUpdate:[GMSCameraUpdate zoomOut]];
}

- (void)didTapZoomInButton {
[_mapView animateWithCameraUpdate:[GMSCameraUpdate zoomIn]];
}

- (void)didTapMyLocationButton {
CLLocation *location = self.lastLocation;
if (location) {
    GMSCameraPosition *position =
        [[GMSCameraPosition alloc] initWithTarget:self.lastLocation.coordinate zoom:15.];
    [_mapView animateToCameraPosition:position];
}
}

- (void)didTapPanButton {
[_mapTemplate showPanningInterfaceAnimated:YES];
_isPanningInterfaceEnabled = YES;
}

- (void)didTapStopPanningButton {
[_mapTemplate dismissPanningInterfaceAnimated:YES];
_isPanningInterfaceEnabled = NO;
}
Remarque : Les itinéraires bis ne peuvent pas être sélectionnés sur l'écran CarPlay. Ils doivent être sélectionnés depuis le téléphone avant le démarrage de CarPlay.
Afficher les instructions de navigation
Cette section explique comment configurer un écouteur pour un flux de données et comment remplir les instructions de navigation dans les panneaux d'instructions et d'estimation du trajet. Pour en savoir plus, consultez la section "Créer une application de navigation CarPlay" du guide de programmation d'applications CarPlay.
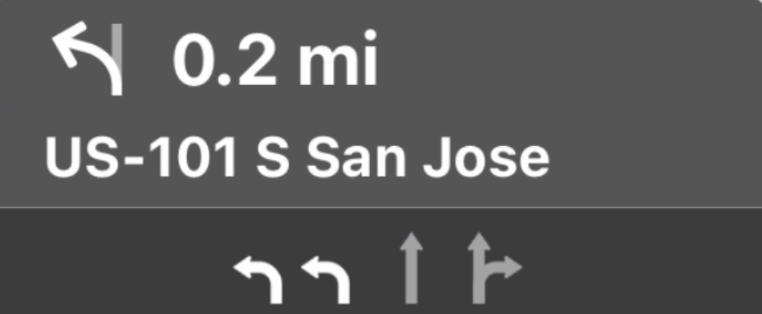
Les panneaux d'instructions et d'estimation du trajet fournissent une fiche de navigation qui affiche des informations de navigation liées au trajet en cours. La bibliothèque TurnByTurn du SDK Navigation peut vous aider à fournir certaines de ces informations, telles que le symbole, le texte et le temps restant.
Configurer un écouteur
Suivez les instructions pour configurer un écouteur d'événements dans Détails sur le flux de données d'instructions détaillées.
Remplir les informations de navigation
La première partie de l'exemple de code suivant montre comment créer des estimations de trajet CarPlay en traduisant GMSNavigationNavInfo.timeToCurrentStepSeconds en CPTravelEstimate. Pour en savoir plus sur ces éléments d'affichage et d'autres, consultez la section Détails sur le flux de données d'instructions détaillées.
La deuxième partie de l'exemple montre comment créer un objet et le stocker dans le champ userInfo de CPManuevers. Cela détermine le CPManeuverDisplayStyle, qui est également utilisé pour les informations d'aide au changement de voie. Pour en savoir plus, consultez le guide de programmation d'applications CarPlay
d'Apple.
Swift
// Get a CPTravelEstimate from GMSNavigationNavInfo
func getTravelEstimates(from navInfo:GMSNavigationNavInfo) -> CPTravelEstimates {
    let distanceRemaining = navInfo.roundedDistance(navInfo.distanceToCurrentStepMeters)
    let timeRemaining = navInfo.roundedTime(navInfo.timeToCurrentStepSeconds)
    let travelEstimates = CPTravelEstimates(distanceRemaining: distanceRemaining, timeRemaining: timeRemaining)
    return travelEstimates
}

//  Create an object to be stored in the userInfo field of CPManeuver to determine the CPManeuverDisplayStyle.

/** An object to be stored in the userInfo field of a CPManeuver. */

struct ManeuverUserInfo {
    var stepInfo: GMSNavigationStepInfo
    var isLaneGuidance: Bool
}

func mapTemplate(_ mapTemplate: CPMapTemplate, displayStyleFor maneuver: CPManeuver) -> CPManeuverDisplayStyle {
    let userInfo = maneuver.userInfo
    if let maneuverUserInfo = userInfo as? ManeuverUserInfo {
        return maneuverUserInfo.isLaneGuidance ? .symbolOnly : .leadingSymbol
    }
    return .leadingSymbol
}

// Get a CPManeuver with instructionVariants and symbolImage from GMSNavigationStepInfo
func getManeuver(for stepInfo: GMSNavigationStepInfo) -> CPManeuver {
    let maneuver = CPManeuver()
    maneuver.userInfo = ManeuverUserInfo(stepInfo: stepInfo, isLaneGuidance: false)
    switch stepInfo.maneuver {
        case .destination:
            maneuver.instructionVariants = ["Your destination is ahead."]
            break
        case .destinationLeft:
            maneuver.instructionVariants = ["Your destination is ahead on your left."]
            break
        case .destinationRight:
            maneuver.instructionVariants = ["Your destination is ahead on your right."]
            break
        default:
            maneuver.attributedInstructionVariants = currentNavInfo?.instructions(forStep: stepInfo, options: instructionOptions)
            break
    }
    maneuver.symbolImage = stepInfo.maneuverImage(with: instructionOptions.imageOptions)
    return maneuver
}

// Get the lane image for a CPManeuver from GMSNavigationStepInfo
func laneGuidanceManeuver(for stepInfo: GMSNavigationStepInfo) -> CPManeuver? {
    let maneuver = CPManeuver()
    maneuver.userInfo = ManeuverUserInfo(stepInfo: stepInfo, isLaneGuidance: true)
    let lanesImage = stepInfo.lanesImage(with: imageOptions)
    guard let lanesImage = lanesImage else { return nil }
    maneuver.symbolImage = lanesImage
    return maneuver
}
Objective-C
// Get a CPTravelEstimate from GMSNavigationNavInfo
- (nonull CPTravelEstimates *)travelEstimates:(GMSNavigationNavInfo *_Nonnull navInfo) {
NSMeasurement<NSUnitLength *> *distanceRemaining = [navInfo roundedDistance:navInfo.distanceToCurrentStepMeters];
NSTimeInterval timeRemaining = [navInfo roundedTime:navInfo.timeToCurrentStepSeconds];
CPTravelEstimate* travelEstimate = [[CPTravelEstimates alloc] initWithDistanceRemaining:distanceRemaining
                                                timeRemaining:timeRemaining];
}
//  Create an object to be stored in the userInfo field of CPManeuver to determine the CPManeuverDisplayStyle.

/** An object to be stored in the userInfo field of a CPManeuver. */
@interface ManeuverUserInfo : NSObject

@property(nonatomic, readonly, nonnull) GMSNavigationStepInfo *stepInfo;
@property(nonatomic, readonly, getter=isLaneGuidance) BOOL laneGuidance;

- (nonnull instancetype)initWithStepInfo:(GMSNavigationStepInfo *)stepInfo
                        isLaneGuidance:(BOOL)isLaneGuidance NS_DESIGNATED_INITIALIZER;

- (instancetype)init NS_UNAVAILABLE;

@end

- (CPManeuverDisplayStyle)mapTemplate:(CPMapTemplate *)mapTemplate
            displayStyleForManeuver:(nonnull CPManeuver *)maneuver {
ManeuverUserInfo *userInfo = maneuver.userInfo;
return userInfo.laneGuidance ? CPManeuverDisplayStyleSymbolOnly : CPManeuverDisplayStyleDefault;
}
// Get a CPManeuver with instructionVariants and symbolImage from GMSNavigationStepInfo
- (nonnull CPManeuver *)maneuverForStep:(nonnull GMSNavigationStepInfo *)stepInfo {
CPManeuver *maneuver = [[CPManeuver alloc] init];
maneuver.userInfo = [[ManeuverUserInfo alloc] initWithStepInfo:stepInfo isLaneGuidance:NO];
switch (stepInfo.maneuver) {
    case GMSNavigationManeuverDestination:
    maneuver.instructionVariants = @[ @"Your destination is ahead." ];
    break;
    case GMSNavigationManeuverDestinationLeft:
    maneuver.instructionVariants = @[ @"Your destination is ahead on your left." ];
    break;
    case GMSNavigationManeuverDestinationRight:
    maneuver.instructionVariants = @[ @"Your destination is ahead on your right." ];
    break;
    default: {
    maneuver.attributedInstructionVariants =
        [_currentNavInfo instructionsForStep:stepInfo options:_instructionOptions];
    break;
    }
}
maneuver.symbolImage = [stepInfo maneuverImageWithOptions:_instructionOptions.imageOptions];
return maneuver;
}
// Get the lane image for a CPManeuver from GMSNavigationStepInfo
- (nullable CPManeuver *)laneGuidanceManeuverForStep:(nonnull GMSNavigationStepInfo *)stepInfo {
CPManeuver *maneuver = [[CPManeuver alloc] init];
maneuver.userInfo = [[ManeuverUserInfo alloc] initWithStepInfo:stepInfo isLaneGuidance:YES];
UIImage *lanesImage = [stepInfo lanesImageWithOptions:_imageOptions];
if (!lanesImage) {
    return nil;
}
maneuver.symbolImage = lanesImage;
return maneuver;
}
Manœuvres
CarPlay uses the CPManeuver
class to provide
des instructions détaillées. Pour en savoir plus sur les manœuvres et l'aide au changement de voie, consultez la section Détails sur le flux de données
d'instructions détaillées.
Documentation associée
- https://developer.apple.com/carplay/
- https://developer.apple.com/carplay/documentation/CarPlay-App-Programming-Guide.pdf
- https://developer.apple.com/design/human-interface-guidelines/carplay
- Détails sur le flux de données d'instructions détaillées
- Naviguer sur un itinéraire