
שירות ההשלמה האוטומטית ב-Places SDK ל-iOS מחזיר תחזיות של מקומות בתגובה לשאילתות חיפוש של משתמשים. בזמן שהמשתמש מקליד, שירות ההשלמה האוטומטית מחזיר הצעות למקומות כמו עסקים, כתובות, קודי OLC ונקודות עניין.
אפשר להוסיף השלמה אוטומטית לאפליקציה בדרכים הבאות:
- מוסיפים רכיב אינטראקטיבי של ממשק משתמש להשלמה אוטומטית כדי לחסוך זמן פיתוח ולהבטיח חוויית משתמש עקבית.
- קבלת תחזיות לגבי מקומות באופן פרוגרמטי כדי ליצור חוויית משתמש מותאמת אישית.
הוספת רכיב אינטראקטיבי של ממשק משתמש להשלמה אוטומטית
רכיב אינטראקטיבי של השלמה אוטומטית בממשק המשתמש הוא תיבת דו-שיח לחיפוש עם פונקציונליות מובנית של השלמה אוטומטית. כשהמשתמש מזין מונחי חיפוש, הרכיב מציג רשימה של מקומות משוערים שאפשר לבחור מתוכה. כשהמשתמש בוחר מקום, מוחזרת לו דוגמה של GMSPlace, שהאפליקציה יכולה להשתמש בה כדי לקבל פרטים על המקום שנבחר.
אפשר להוסיף את רכיב האינטראקטיבי של ממשק המשתמש להשלמה אוטומטית לאפליקציה בדרכים הבאות:
הוספת אמצעי בקרה למסך מלא
משתמשים בפקד של המסך המלא כשרוצים להציג הקשר מודאלי, שבו ממשק המשתמש של ההשלמה האוטומטית מחליף באופן זמני את ממשק המשתמש של האפליקציה עד שהמשתמש בוחר אפשרות. הפונקציונליות הזו מסופקת על ידי המחלקה GMSAutocompleteViewController. כשהמשתמש בוחר מקום, האפליקציה מקבלת קריאה חוזרת (callback).
כדי להוסיף לאפליקציה רכיב בקרה למסך מלא:
- יוצרים רכיב בממשק המשתמש באפליקציה הראשית כדי להפעיל את אמצעי הבקרה של ההשלמה האוטומטית בממשק המשתמש, לדוגמה, מטפל במגע ב-
UIButton. - מטמיעים את פרוטוקול
GMSAutocompleteViewControllerDelegateבבקר התצוגה להורה. - יוצרים מופע של
GMSAutocompleteViewControllerומקצים את בקר התצוגה של תצוגה להורה כמאפיין הנציג. - יוצרים
GMSPlaceFieldכדי להגדיר את סוגי הנתונים של המקום שיוחזרו. - מוסיפים
GMSAutocompleteFilterכדי להגביל את השאילתה לסוג מסוים של מקום. - הצגת
GMSAutocompleteViewControllerבאמצעות[self presentViewController...]. - מטפלים בבחירה של המשתמש בשיטת הנציג
didAutocompleteWithPlace. - סוגרים את הבקר בשיטות ההעברה של
didAutocompleteWithPlace,didFailAutocompleteWithErrorו-wasCancelled.
בדוגמה הבאה מוצגת דרך אפשרית להפעלת GMSAutocompleteViewController בתגובה להקשה של המשתמש על לחצן.
Swift
import UIKit
import GooglePlaces

class ViewController: UIViewController {

  override func viewDidLoad() {
    makeButton()
  }

  // Present the Autocomplete view controller when the button is pressed.
  @objc func autocompleteClicked(_ sender: UIButton) {
    let autocompleteController = GMSAutocompleteViewController()
    autocompleteController.delegate = self

    // Specify the place data types to return.
    let fields: GMSPlaceField = GMSPlaceField(rawValue: UInt(GMSPlaceField.name.rawValue) |
      UInt(GMSPlaceField.placeID.rawValue))!
    autocompleteController.placeFields = fields

    // Specify a filter.
    let filter = GMSAutocompleteFilter()
    filter.types = [kGMSPlaceTypeCollectionAddress]
    autocompleteController.autocompleteFilter = filter

    // Display the autocomplete view controller.
    present(autocompleteController, animated: true, completion: nil)
  }

  // Add a button to the view.
  func makeButton() {
    let btnLaunchAc = UIButton(frame: CGRect(x: 5, y: 150, width: 300, height: 35))
    btnLaunchAc.backgroundColor = .blue
    btnLaunchAc.setTitle("Launch autocomplete", for: .normal)
    btnLaunchAc.addTarget(self, action: #selector(autocompleteClicked), for: .touchUpInside)
    self.view.addSubview(btnLaunchAc)
  }

}

extension ViewController: GMSAutocompleteViewControllerDelegate {

  // Handle the user's selection.
  func viewController(_ viewController: GMSAutocompleteViewController, didAutocompleteWith place: GMSPlace) {
    print("Place name: \(place.name)")
    print("Place ID: \(place.placeID)")
    print("Place attributions: \(place.attributions)")
    dismiss(animated: true, completion: nil)
  }

  func viewController(_ viewController: GMSAutocompleteViewController, didFailAutocompleteWithError error: Error) {
    // TODO: handle the error.
    print("Error: ", error.localizedDescription)
  }

  // User canceled the operation.
  func wasCancelled(_ viewController: GMSAutocompleteViewController) {
    dismiss(animated: true, completion: nil)
  }

  // Turn the network activity indicator on and off again.
  func didRequestAutocompletePredictions(_ viewController: GMSAutocompleteViewController) {
    UIApplication.shared.isNetworkActivityIndicatorVisible = true
  }

  func didUpdateAutocompletePredictions(_ viewController: GMSAutocompleteViewController) {
    UIApplication.shared.isNetworkActivityIndicatorVisible = false
  }

}
Objective-C
#import "ViewController.h"
@import GooglePlaces;

@interface ViewController () <GMSAutocompleteViewControllerDelegate>

@end

@implementation ViewController {
  GMSAutocompleteFilter *_filter;
}

-   (void)viewDidLoad {
  [super viewDidLoad];
  [self makeButton];
}

  // Present the autocomplete view controller when the button is pressed.
-   (void)autocompleteClicked {
  GMSAutocompleteViewController *acController = [[GMSAutocompleteViewController alloc] init];
  acController.delegate = self;

  // Specify the place data types to return.
  GMSPlaceField fields = (GMSPlaceFieldName | GMSPlaceFieldPlaceID);
  acController.placeFields = fields;

  // Specify a filter.
  _filter = [[GMSAutocompleteFilter alloc] init];
  _filter.types = @[ kGMSPlaceTypeBank ];
  acController.autocompleteFilter = _filter;

  // Display the autocomplete view controller.
  [self presentViewController:acController animated:YES completion:nil];
}

  // Add a button to the view.
-   (void)makeButton{
  UIButton *btnLaunchAc = [UIButton buttonWithType:UIButtonTypeCustom];
  [btnLaunchAc addTarget:self
             action:@selector(autocompleteClicked) forControlEvents:UIControlEventTouchUpInside];
  [btnLaunchAc setTitle:@"Launch autocomplete" forState:UIControlStateNormal];
  btnLaunchAc.frame = CGRectMake(5.0, 150.0, 300.0, 35.0);
  btnLaunchAc.backgroundColor = [UIColor blueColor];
  [self.view addSubview:btnLaunchAc];
}

  // Handle the user's selection.
-   (void)viewController:(GMSAutocompleteViewController *)viewController
didAutocompleteWithPlace:(GMSPlace *)place {
  [self dismissViewControllerAnimated:YES completion:nil];
  // Do something with the selected place.
  NSLog(@"Place name %@", place.name);
  NSLog(@"Place ID %@", place.placeID);
  NSLog(@"Place attributions %@", place.attributions.string);
}

-   (void)viewController:(GMSAutocompleteViewController *)viewController
didFailAutocompleteWithError:(NSError *)error {
  [self dismissViewControllerAnimated:YES completion:nil];
  // TODO: handle the error.
  NSLog(@"Error: %@", [error description]);
}

  // User canceled the operation.
-   (void)wasCancelled:(GMSAutocompleteViewController *)viewController {
  [self dismissViewControllerAnimated:YES completion:nil];
}

  // Turn the network activity indicator on and off again.
-   (void)didRequestAutocompletePredictions:(GMSAutocompleteViewController *)viewController {
  [UIApplication sharedApplication].networkActivityIndicatorVisible = YES;
}

-   (void)didUpdateAutocompletePredictions:(GMSAutocompleteViewController *)viewController {
  [UIApplication sharedApplication].networkActivityIndicatorVisible = NO;
}

@end
הוספת אמצעי בקרה לתוצאות
כדאי להשתמש בבקר תוצאות כשרוצים יותר שליטה בממשק המשתמש של הזנת הטקסט. בקר התוצאות מחליף באופן דינמי את מצב החשיפה של רשימת התוצאות על סמך המיקוד של ממשק המשתמש של הקלט.
כדי להוסיף לאפליקציה רכיב לשליטה בתוצאות:
- יצירת
GMSAutocompleteResultsViewController.- מטמיעים את פרוטוקול
GMSAutocompleteResultsViewControllerDelegateב-view controller של תצוגה להורה ומקצים את ה-view controller של תצוגה להורה כמאפיין של הנציג.
- מטמיעים את פרוטוקול
- יוצרים אובייקט
UISearchControllerומעבירים אתGMSAutocompleteResultsViewControllerכארגומנט של בקר התוצאות. - מגדירים את
GMSAutocompleteResultsViewControllerכמאפייןsearchResultsUpdaterשלUISearchController. - מוסיפים את
searchBarשלUISearchControllerלממשק המשתמש של האפליקציה. - מטפלים בבחירה של המשתמש בשיטת הנציג
didAutocompleteWithPlace.
יש כמה דרכים להציב את סרגל החיפוש של UISearchController בממשק המשתמש של האפליקציה:
- הוספת סרגל חיפוש לסרגל הניווט
- הוספה של סרגל חיפוש לחלק העליון של תצוגה
- הוספת סרגל חיפוש באמצעות תוצאות בחלון קופץ
הוספת סרגל חיפוש לסרגל הניווט
בדוגמה הבאה של קוד אפשר לראות איך מוסיפים בקר תוצאות, מוסיפים את searchBar לסרגל הניווט ומטפלים בבחירה של המשתמש:
Swift
class ViewController: UIViewController {

  var resultsViewController: GMSAutocompleteResultsViewController?
  var searchController: UISearchController?
  var resultView: UITextView?

  override func viewDidLoad() {
    super.viewDidLoad()

    resultsViewController = GMSAutocompleteResultsViewController()
    resultsViewController?.delegate = self

    searchController = UISearchController(searchResultsController: resultsViewController)
    searchController?.searchResultsUpdater = resultsViewController

    // Put the search bar in the navigation bar.
    searchController?.searchBar.sizeToFit()
    navigationItem.titleView = searchController?.searchBar

    // When UISearchController presents the results view, present it in
    // this view controller, not one further up the chain.
    definesPresentationContext = true

    // Prevent the navigation bar from being hidden when searching.
    searchController?.hidesNavigationBarDuringPresentation = false
  }
}

// Handle the user's selection.
extension ViewController: GMSAutocompleteResultsViewControllerDelegate {
  func resultsController(_ resultsController: GMSAutocompleteResultsViewController,
                         didAutocompleteWith place: GMSPlace) {
    searchController?.isActive = false
    // Do something with the selected place.
    print("Place name: \(place.name)")
    print("Place address: \(place.formattedAddress)")
    print("Place attributions: \(place.attributions)")
  }

  func resultsController(_ resultsController: GMSAutocompleteResultsViewController,
                         didFailAutocompleteWithError error: Error){
    // TODO: handle the error.
    print("Error: ", error.localizedDescription)
  }

  // Turn the network activity indicator on and off again.
  func didRequestAutocompletePredictions(_ viewController: GMSAutocompleteViewController) {
    UIApplication.shared.isNetworkActivityIndicatorVisible = true
  }

  func didUpdateAutocompletePredictions(_ viewController: GMSAutocompleteViewController) {
    UIApplication.shared.isNetworkActivityIndicatorVisible = false
  }
}
Objective-C
-   (void)viewDidLoad {
  _resultsViewController = [[GMSAutocompleteResultsViewController alloc] init];
  _resultsViewController.delegate = self;

  _searchController = [[UISearchController alloc]
                       initWithSearchResultsController:_resultsViewController];
  _searchController.searchResultsUpdater = _resultsViewController;

  // Put the search bar in the navigation bar.
  [_searchController.searchBar sizeToFit];
  self.navigationItem.titleView = _searchController.searchBar;

  // When UISearchController presents the results view, present it in
  // this view controller, not one further up the chain.
  self.definesPresentationContext = YES;

  // Prevent the navigation bar from being hidden when searching.
  _searchController.hidesNavigationBarDuringPresentation = NO;
}

// Handle the user's selection.
-   (void)resultsController:(GMSAutocompleteResultsViewController *)resultsController
  didAutocompleteWithPlace:(GMSPlace *)place {
    _searchController.active = NO;
    // Do something with the selected place.
    NSLog(@"Place name %@", place.name);
    NSLog(@"Place address %@", place.formattedAddress);
    NSLog(@"Place attributions %@", place.attributions.string);
}

-   (void)resultsController:(GMSAutocompleteResultsViewController *)resultsController
didFailAutocompleteWithError:(NSError *)error {
  [self dismissViewControllerAnimated:YES completion:nil];
  // TODO: handle the error.
  NSLog(@"Error: %@", [error description]);
}

// Turn the network activity indicator on and off again.
-   (void)didRequestAutocompletePredictionsForResultsController:
    (GMSAutocompleteResultsViewController *)resultsController {
  [UIApplication sharedApplication].networkActivityIndicatorVisible = YES;
}

-   (void)didUpdateAutocompletePredictionsForResultsController:
    (GMSAutocompleteResultsViewController *)resultsController {
  [UIApplication sharedApplication].networkActivityIndicatorVisible = NO;
}
הוספת סרגל חיפוש לחלק העליון של תצוגה
בדוגמת הקוד הבאה אפשר לראות איך מוסיפים את searchBar לחלק העליון של תצוגה.
Swift
import UIKit
import GooglePlaces

class ViewController: UIViewController {

  var resultsViewController: GMSAutocompleteResultsViewController?
  var searchController: UISearchController?
  var resultView: UITextView?

  override func viewDidLoad() {
    super.viewDidLoad()

    resultsViewController = GMSAutocompleteResultsViewController()
    resultsViewController?.delegate = self

    searchController = UISearchController(searchResultsController: resultsViewController)
    searchController?.searchResultsUpdater = resultsViewController

    let subView = UIView(frame: CGRect(x: 0, y: 65.0, width: 350.0, height: 45.0))

    subView.addSubview((searchController?.searchBar)!)
    view.addSubview(subView)
    searchController?.searchBar.sizeToFit()
    searchController?.hidesNavigationBarDuringPresentation = false

    // When UISearchController presents the results view, present it in
    // this view controller, not one further up the chain.
    definesPresentationContext = true
  }
}

// Handle the user's selection.
extension ViewController: GMSAutocompleteResultsViewControllerDelegate {
  func resultsController(_ resultsController: GMSAutocompleteResultsViewController,
                         didAutocompleteWith place: GMSPlace) {
    searchController?.isActive = false
    // Do something with the selected place.
    print("Place name: \(place.name)")
    print("Place address: \(place.formattedAddress)")
    print("Place attributions: \(place.attributions)")
  }

  func resultsController(_ resultsController: GMSAutocompleteResultsViewController,
                         didFailAutocompleteWithError error: Error){
    // TODO: handle the error.
    print("Error: ", error.localizedDescription)
  }

  // Turn the network activity indicator on and off again.
  func didRequestAutocompletePredictions(forResultsController resultsController: GMSAutocompleteResultsViewController) {
    UIApplication.shared.isNetworkActivityIndicatorVisible = true
  }

  func didUpdateAutocompletePredictions(forResultsController resultsController: GMSAutocompleteResultsViewController) {
    UIApplication.shared.isNetworkActivityIndicatorVisible = false
  }
}
Objective-C
-   (void)viewDidLoad {
    [super viewDidLoad];

    _resultsViewController = [[GMSAutocompleteResultsViewController alloc] init];
    _resultsViewController.delegate = self;

    _searchController = [[UISearchController alloc]
                             initWithSearchResultsController:_resultsViewController];
    _searchController.searchResultsUpdater = _resultsViewController;

    UIView *subView = [[UIView alloc] initWithFrame:CGRectMake(0, 65.0, 250, 50)];

    [subView addSubview:_searchController.searchBar];
    [_searchController.searchBar sizeToFit];
    [self.view addSubview:subView];

    // When UISearchController presents the results view, present it in
    // this view controller, not one further up the chain.
    self.definesPresentationContext = YES;
}

// Handle the user's selection.
-   (void)resultsController:(GMSAutocompleteResultsViewController *)resultsController
didAutocompleteWithPlace:(GMSPlace *)place {
  [self dismissViewControllerAnimated:YES completion:nil];
  // Do something with the selected place.
  NSLog(@"Place name %@", place.name);
  NSLog(@"Place address %@", place.formattedAddress);
  NSLog(@"Place attributions %@", place.attributions.string);
}

-   (void)resultsController:(GMSAutocompleteResultsViewController *)resultsController
didFailAutocompleteWithError:(NSError *)error {
  [self dismissViewControllerAnimated:YES completion:nil];
  // TODO: handle the error.
  NSLog(@"Error: %@", [error description]);
}

// Turn the network activity indicator on and off again.
-   (void)didRequestAutocompletePredictionsForResultsController:
    (GMSAutocompleteResultsViewController *)resultsController {
  [UIApplication sharedApplication].networkActivityIndicatorVisible = YES;
}

-   (void)didUpdateAutocompletePredictionsForResultsController:
    (GMSAutocompleteResultsViewController *)resultsController {
  [UIApplication sharedApplication].networkActivityIndicatorVisible = NO;
}
כברירת מחדל,
UISearchController
סרגל הניווט מוסתר במהלך הצגת המצגת (אפשר להשבית את ההגדרה הזו). במקרים שבהם סרגל הניווט גלוי ואטום, UISearchController לא מגדיר את המיקום בצורה נכונה.
אפשר להשתמש בקוד הבא כפתרון עקיף:
Swift
navigationController?.navigationBar.translucent = false
searchController?.hidesNavigationBarDuringPresentation = false

// This makes the view area include the nav bar even though it is opaque.
// Adjust the view placement down.
self.extendedLayoutIncludesOpaqueBars = true
self.edgesForExtendedLayout = .top
Objective-C
self.navigationController.navigationBar.translucent = NO;
_searchController.hidesNavigationBarDuringPresentation = NO;

// This makes the view area include the nav bar even though it is opaque.
// Adjust the view placement down.
self.extendedLayoutIncludesOpaqueBars = YES;
self.edgesForExtendedLayout = UIRectEdgeTop;
הוספת סרגל חיפוש באמצעות תוצאות בחלון קופץ
בדוגמת הקוד הבאה מוצג מיקום של סרגל חיפוש בצד שמאל של סרגל הניווט, והצגת התוצאות בחלון קופץ.
Swift
import UIKit
import GooglePlaces

class ViewController: UIViewController {

  var resultsViewController: GMSAutocompleteResultsViewController?
  var searchController: UISearchController?
  var resultView: UITextView?

  override func viewDidLoad() {
    super.viewDidLoad()

    resultsViewController = GMSAutocompleteResultsViewController()
    resultsViewController?.delegate = self

    searchController = UISearchController(searchResultsController: resultsViewController)
    searchController?.searchResultsUpdater = resultsViewController

    // Add the search bar to the right of the nav bar,
    // use a popover to display the results.
    // Set an explicit size as we don't want to use the entire nav bar.
    searchController?.searchBar.frame = (CGRect(x: 0, y: 0, width: 250.0, height: 44.0))
    navigationItem.rightBarButtonItem = UIBarButtonItem(customView: (searchController?.searchBar)!)

    // When UISearchController presents the results view, present it in
    // this view controller, not one further up the chain.
    definesPresentationContext = true

    // Keep the navigation bar visible.
    searchController?.hidesNavigationBarDuringPresentation = false
    searchController?.modalPresentationStyle = .popover
  }
}
// Handle the user's selection.
extension ViewController: GMSAutocompleteResultsViewControllerDelegate {
  func resultsController(_ resultsController: GMSAutocompleteResultsViewController,
                         didAutocompleteWith place: GMSPlace) {
    searchController?.isActive = false
    // Do something with the selected place.
    print("Place name: \(place.name)")
    print("Place address: \(place.formattedAddress)")
    print("Place attributions: \(place.attributions)")
  }

  func resultsController(_ resultsController: GMSAutocompleteResultsViewController,
                         didFailAutocompleteWithError error: Error){
    // TODO: handle the error.
    print("Error: ", error.localizedDescription)
  }

  // Turn the network activity indicator on and off again.
  func didRequestAutocompletePredictions(forResultsController resultsController: GMSAutocompleteResultsViewController) {
    UIApplication.shared.isNetworkActivityIndicatorVisible = true
  }

  func didUpdateAutocompletePredictions(forResultsController resultsController: GMSAutocompleteResultsViewController) {
    UIApplication.shared.isNetworkActivityIndicatorVisible = false
  }
}
Objective-C
-   (void)viewDidLoad {
  [super viewDidLoad];

  _resultsViewController = [[GMSAutocompleteResultsViewController alloc] init];
  _resultsViewController.delegate = self;

  _searchController = [[UISearchController alloc]
                           initWithSearchResultsController:_resultsViewController];
  _searchController.searchResultsUpdater = _resultsViewController;

  // Add the search bar to the right of the nav bar,
  // use a popover to display the results.
  // Set an explicit size as we don't want to use the entire nav bar.
  _searchController.searchBar.frame = CGRectMake(0, 0, 250.0f, 44.0f);
  self.navigationItem.rightBarButtonItem =
  [[UIBarButtonItem alloc] initWithCustomView:_searchController.searchBar];

  // When UISearchController presents the results view, present it in
  // this view controller, not one further up the chain.
  self.definesPresentationContext = YES;

  // Keep the navigation bar visible.
  _searchController.hidesNavigationBarDuringPresentation = NO;

  _searchController.modalPresentationStyle = UIModalPresentationPopover;
}

// Handle the user's selection.
-   (void)resultsController:(GMSAutocompleteResultsViewController *)resultsController
didAutocompleteWithPlace:(GMSPlace *)place {
  [self dismissViewControllerAnimated:YES completion:nil];
  NSLog(@"Place name %@", place.name);
  NSLog(@"Place address %@", place.formattedAddress);
  NSLog(@"Place attributions %@", place.attributions.string);
}

-   (void)resultsController:(GMSAutocompleteResultsViewController *)resultsController
didFailAutocompleteWithError:(NSError *)error {
  [self dismissViewControllerAnimated:YES completion:nil];
  // TODO: handle the error.
  NSLog(@"Error: %@", [error description]);
}

// Turn the network activity indicator on and off again.
-   (void)didRequestAutocompletePredictionsForResultsController:
    (GMSAutocompleteResultsViewController *)resultsController {
  [UIApplication sharedApplication].networkActivityIndicatorVisible = YES;
}

-   (void)didUpdateAutocompletePredictionsForResultsController:
    (GMSAutocompleteResultsViewController *)resultsController {
  [UIApplication sharedApplication].networkActivityIndicatorVisible = NO;
}
שימוש במקור נתונים של טבלה
אם לאפליקציה יש ממשק משתמש מותאם אישית לחיפוש טקסט, אפשר להשתמש במחלקה
GMSAutocompleteTableDataSource
כדי להפעיל את תצוגת הטבלה שבה מוצגות התוצאות בבקר התצוגה.
כדי להשתמש ב-GMSAutocompleteTableDataSource כמקור הנתונים וכנציג של UITableView בבקר תצוגה:
- מטמיעים את הפרוטוקולים
GMSAutocompleteTableDataSourceDelegateו-UISearchBarDelegateבבקר התצוגה. - יוצרים מופע של
GMSAutocompleteTableDataSourceומקצים את בקר התצוגה כמאפיין של הנציג. - מגדירים את
GMSAutocompleteTableDataSourceכמקור הנתונים ואת מאפייני ההרשאה של מופעUITableViewבבקר התצוגה. - ב-handler של קלט טקסט החיפוש, קוראים ל-
sourceTextHasChangedב-GMSAutocompleteTableDataSource.- מטפלים בבחירה של המשתמש בשיטת הנציג
didAutocompleteWithPlace.
- מטפלים בבחירה של המשתמש בשיטת הנציג
- סוגרים את הבקר בשיטות ההעברה
didAutocompleteWithPlace,didFailAutocompleteWithErrorו-wasCancelled.
בדוגמה הבאה של קוד מוצג שימוש במחלקה GMSAutocompleteTableDataSource כדי להציג את תצוגת הטבלה של UIViewController כשמוסיפים את UISearchBar בנפרד.
Swift
// Copyright 2020 Google LLC
//
// Licensed under the Apache License, Version 2.0 (the "License");
// you may not use this file except in compliance with the License.
// You may obtain a copy of the License at
//
//      http://www.apache.org/licenses/LICENSE-2.0
//
// Unless required by applicable law or agreed to in writing, software
// distributed under the License is distributed on an "AS IS" BASIS,
// WITHOUT WARRANTIES OR CONDITIONS OF ANY KIND, either express or implied.
// See the License for the specific language governing permissions and
// limitations under the License.

import GooglePlaces
import UIKit

class PlaceAutocompleteViewController: UIViewController {

  private var tableView: UITableView!
  private var tableDataSource: GMSAutocompleteTableDataSource!

  override func viewDidLoad() {
    super.viewDidLoad()

    let searchBar = UISearchBar(frame: CGRect(x: 0, y: 20, width: self.view.frame.size.width, height: 44.0))
    searchBar.delegate = self
    view.addSubview(searchBar)

    tableDataSource = GMSAutocompleteTableDataSource()
    tableDataSource.delegate = self

    tableView = UITableView(frame: CGRect(x: 0, y: 64, width: self.view.frame.size.width, height: self.view.frame.size.height - 44))
    tableView.delegate = tableDataSource
    tableView.dataSource = tableDataSource

    view.addSubview(tableView)
  }
}

extension PlaceAutocompleteViewController: UISearchBarDelegate {
  func searchBar(_ searchBar: UISearchBar, textDidChange searchText: String) {
    // Update the GMSAutocompleteTableDataSource with the search text.
    tableDataSource.sourceTextHasChanged(searchText)
  }
}

extension PlaceAutocompleteViewController: GMSAutocompleteTableDataSourceDelegate {
  func didUpdateAutocompletePredictions(for tableDataSource: GMSAutocompleteTableDataSource) {
    // Turn the network activity indicator off.
    UIApplication.shared.isNetworkActivityIndicatorVisible = false
    // Reload table data.
    tableView.reloadData()
  }

  func didRequestAutocompletePredictions(for tableDataSource: GMSAutocompleteTableDataSource) {
    // Turn the network activity indicator on.
    UIApplication.shared.isNetworkActivityIndicatorVisible = true
    // Reload table data.
    tableView.reloadData()
  }

  func tableDataSource(_ tableDataSource: GMSAutocompleteTableDataSource, didAutocompleteWith place: GMSPlace) {
    // Do something with the selected place.
    print("Place name: \(place.name)")
    print("Place address: \(place.formattedAddress)")
    print("Place attributions: \(place.attributions)")
  }

  func tableDataSource(_ tableDataSource: GMSAutocompleteTableDataSource, didFailAutocompleteWithError error: Error) {
    // Handle the error.
    print("Error: \(error.localizedDescription)")
  }

  func tableDataSource(_ tableDataSource: GMSAutocompleteTableDataSource, didSelect prediction: GMSAutocompletePrediction) -> Bool {
    return true
  }
}
Objective-C
// Copyright 2020 Google LLC
//
// Licensed under the Apache License, Version 2.0 (the "License");
// you may not use this file except in compliance with the License.
// You may obtain a copy of the License at
//
//      http://www.apache.org/licenses/LICENSE-2.0
//
// Unless required by applicable law or agreed to in writing, software
// distributed under the License is distributed on an "AS IS" BASIS,
// WITHOUT WARRANTIES OR CONDITIONS OF ANY KIND, either express or implied.
// See the License for the specific language governing permissions and
// limitations under the License.

#import "PlaceAutocompleteViewController.h"
@import GooglePlaces;
@import UIKit;

@interface PlaceAutocompleteViewController () <GMSAutocompleteTableDataSourceDelegate, UISearchBarDelegate>

@end

@implementation PlaceAutocompleteViewController {
  UITableView *tableView;
  GMSAutocompleteTableDataSource *tableDataSource;
}

- (void)viewDidLoad {
  [super viewDidLoad];

  UISearchBar *searchBar = [[UISearchBar alloc] initWithFrame:CGRectMake(0, 20, self.view.frame.size.width, 44)];
  searchBar.delegate = self;

  [self.view addSubview:searchBar];

  tableDataSource = [[GMSAutocompleteTableDataSource alloc] init];
  tableDataSource.delegate = self;

  tableView = [[UITableView alloc] initWithFrame:CGRectMake(0, 64, self.view.frame.size.width, self.view.frame.size.height - 44)];
  tableView.delegate = tableDataSource;
  tableView.dataSource = tableDataSource;

  [self.view addSubview:tableView];
}

#pragma mark - GMSAutocompleteTableDataSourceDelegate

- (void)didUpdateAutocompletePredictionsForTableDataSource:(GMSAutocompleteTableDataSource *)tableDataSource {
  // Turn the network activity indicator off.
  UIApplication.sharedApplication.networkActivityIndicatorVisible = NO;

  // Reload table data.
  [tableView reloadData];
}

- (void)didRequestAutocompletePredictionsForTableDataSource:(GMSAutocompleteTableDataSource *)tableDataSource {
  // Turn the network activity indicator on.
  UIApplication.sharedApplication.networkActivityIndicatorVisible = YES;

  // Reload table data.
  [tableView reloadData];
}

- (void)tableDataSource:(GMSAutocompleteTableDataSource *)tableDataSource didAutocompleteWithPlace:(GMSPlace *)place {
  // Do something with the selected place.
  NSLog(@"Place name: %@", place.name);
  NSLog(@"Place address: %@", place.formattedAddress);
  NSLog(@"Place attributions: %@", place.attributions);
}

- (void)tableDataSource:(GMSAutocompleteTableDataSource *)tableDataSource didFailAutocompleteWithError:(NSError *)error {
  // Handle the error
  NSLog(@"Error %@", error.description);
}

- (BOOL)tableDataSource:(GMSAutocompleteTableDataSource *)tableDataSource didSelectPrediction:(GMSAutocompletePrediction *)prediction {
  return YES;
}

#pragma mark - UISearchBarDelegate

- (void)searchBar:(UISearchBar *)searchBar textDidChange:(NSString *)searchText {
  // Update the GMSAutocompleteTableDataSource with the search text.
  [tableDataSource sourceTextHasChanged:searchText];
}

@end
התאמה אישית של צבעי הטקסט והרקע
אתם יכולים להגדיר את הצבעים של כל הטקסטים והרקעים בפקד של ממשק המשתמש להשלמה אוטומטית, כדי שהווידג'ט יתאים יותר למראה החזותי של האפליקציה. יש שתי דרכים להגדיר את צבעי הרכיבים האינטראקטיביים בממשק המשתמש:
- באמצעות פרוטוקול UIAppearance המובנה ב-iOS, כדי להחיל סגנון על רכיבי ממשק משתמש באופן גלובלי, איפה שאפשר. ההגדרות האלה חלות על הרבה רכיבים אינטראקטיביים של ממשק המשתמש, אבל לא על כולם.
- שימוש בשיטות של SDK במחלקות של הווידג'טים כדי להגדיר מאפיינים שלא נתמכים על ידי הפרוטוקול UIAppearance.
בדרך כלל, האפליקציה משתמשת בשילוב כלשהו של פרוטוקול UIAppearance ושיטות ה-SDK. בתרשים הבא מוצגים הרכיבים שאפשר להגדיר להם סגנון:
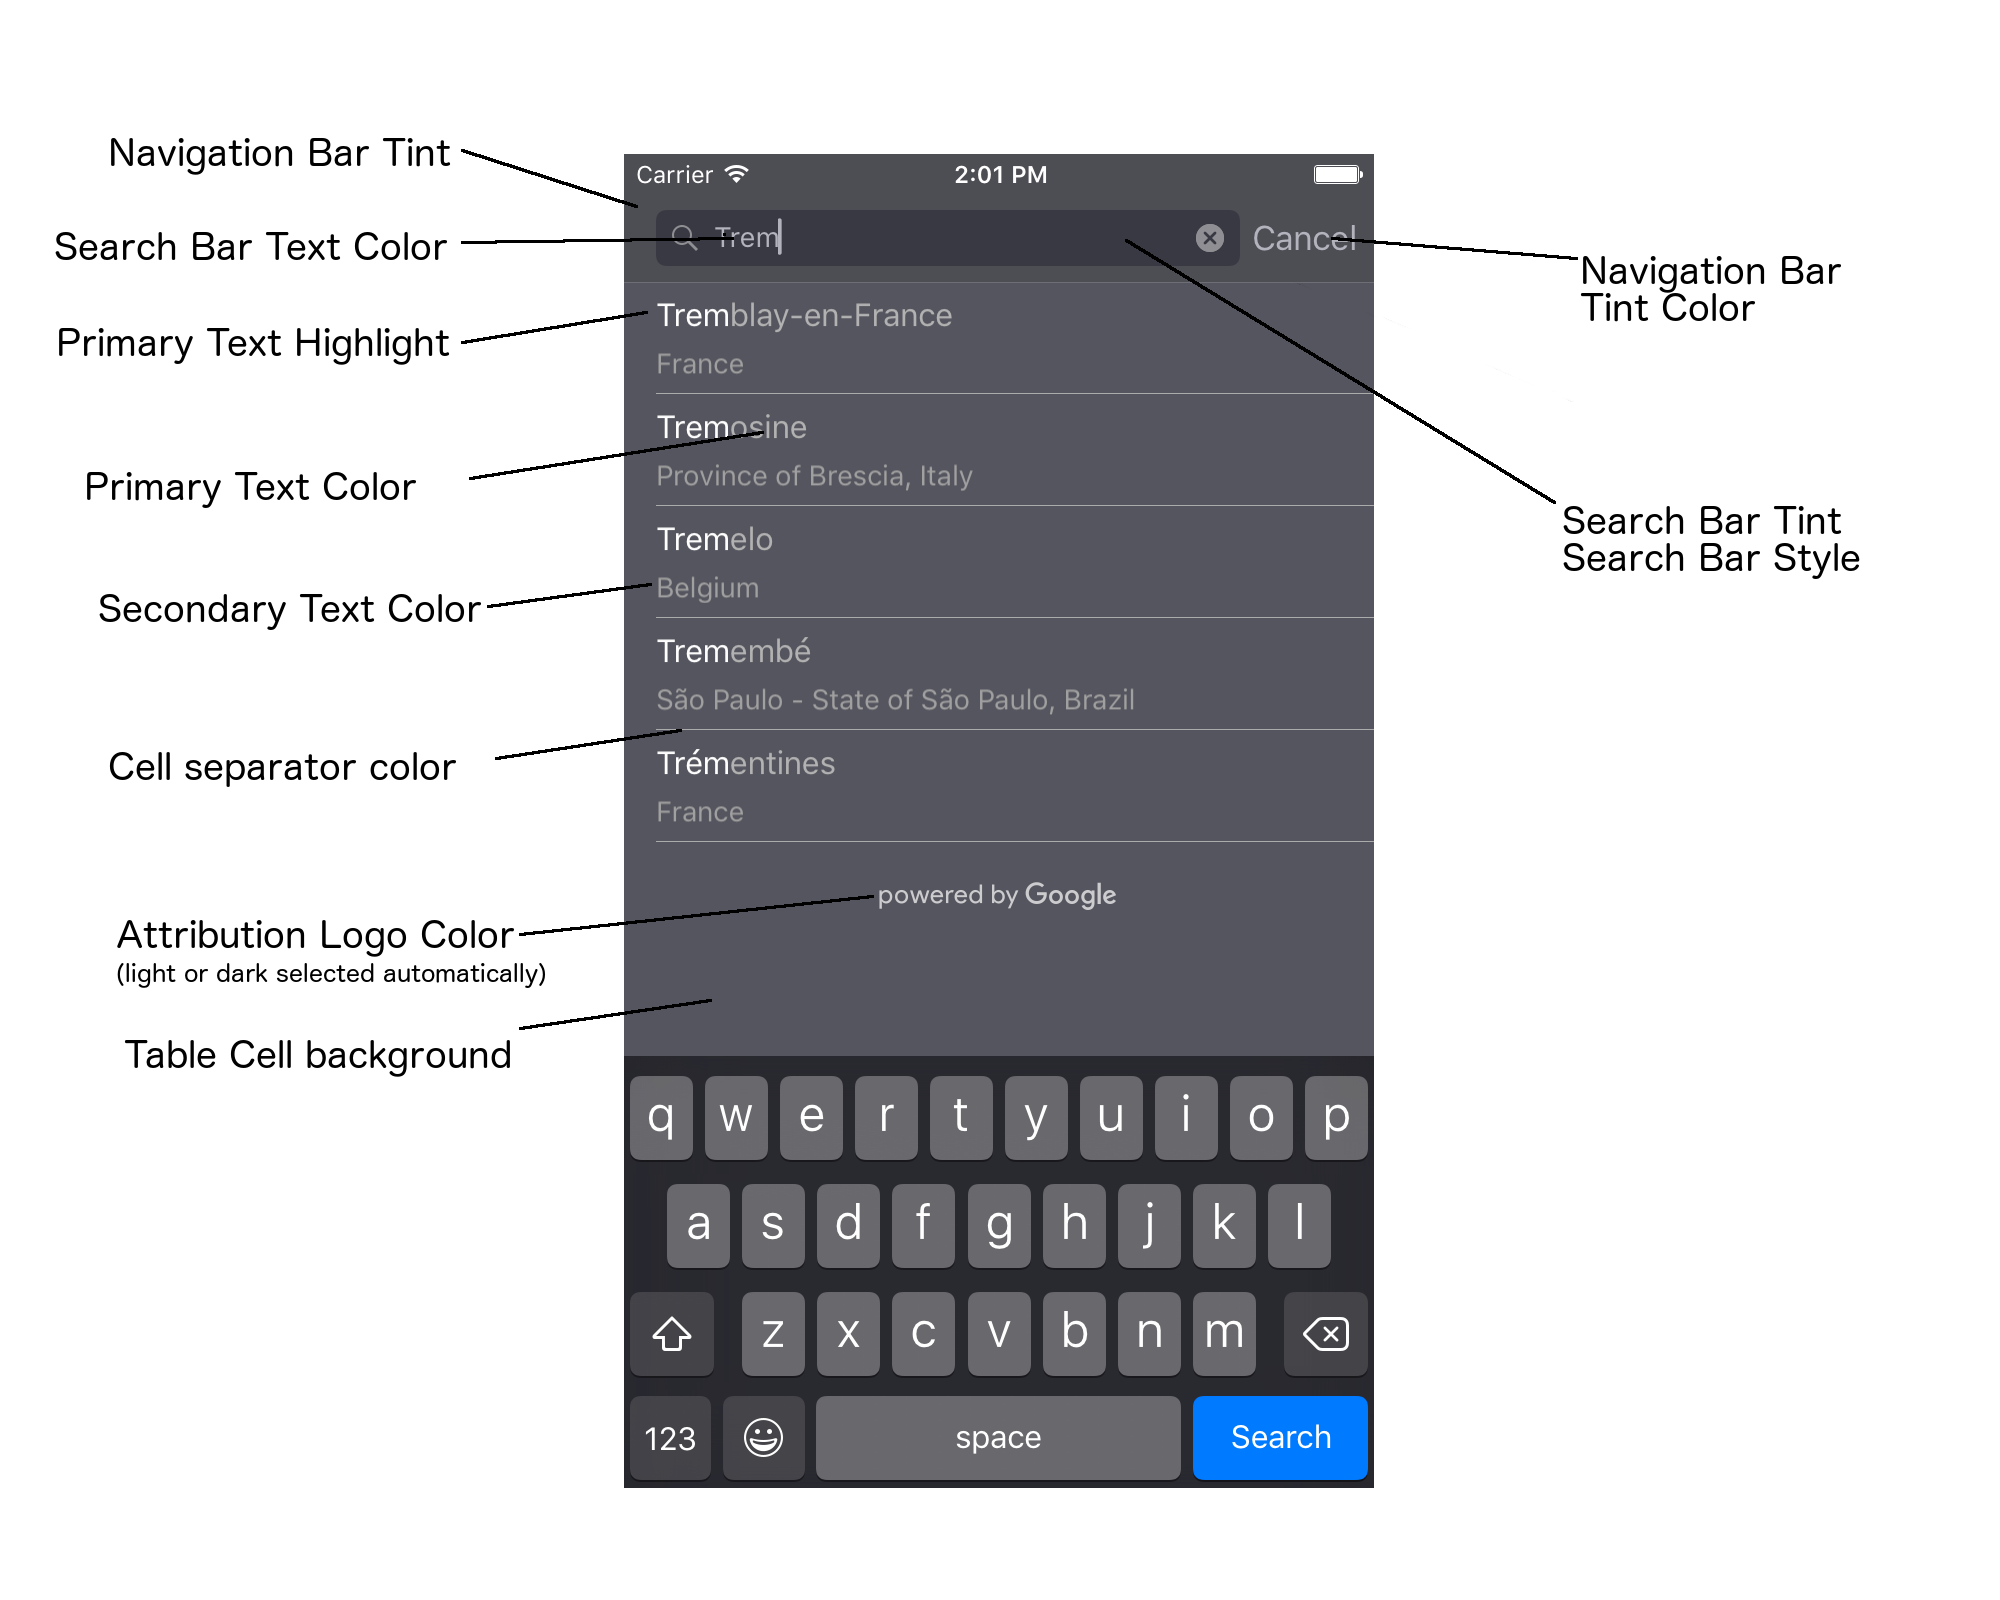
בטבלה הבאה מפורטים כל רכיבי ממשק המשתמש, ומוסבר איך צריך לעצב כל אחד מהם (פרוטוקול UIAppearance או שיטת SDK).
| רכיב בממשק המשתמש | שיטה | מדריכים וסטייל |
|---|---|---|
| גוון (רקע) של סרגל הניווט | פרוטוקול UIAppearance | התקשרות אל setBarTintColor בשרת proxy UINavigationBar. |
| צבע הגוון של סרגל הניווט (הסמן של הטקסט בסרגל החיפוש והלחצן 'ביטול') | פרוטוקול UIAppearance | התקשרות אל setTintColor בשרת proxy UINavigationBar. |
| צבע הטקסט בסרגל החיפוש | פרוטוקול UIAppearance | הגדרת NSForegroundColorAttributeName ב-searchBarTextAttributes. |
| גוון הצבע של סרגל החיפוש | לא רלוונטי | סרגל החיפוש שקוף למחצה ויוצג כגרסה מוצללת של סרגל הניווט. |
| צבע הטקסט של ה-placeholder בסרגל החיפוש (טקסט החיפוש שמופיע כברירת מחדל) | פרוטוקול UIAppearance | הגדרת NSForegroundColorAttributeName ב-placeholderAttributes. |
| טקסט ראשי (מוחל גם על טקסט של שגיאות והודעות) | שיטת SDK | התקשרו אל primaryTextColor. |
| הדגשה של הטקסט הראשי | שיטת SDK | התקשרו אל primaryTextHighlightColor. |
| טקסט משני | שיטת SDK | התקשרו אל secondaryTextColor. |
| שגיאה וטקסט ההודעה | שיטת SDK | התקשרו אל primaryTextColor. |
| רקע של תא בטבלה | שיטת SDK | התקשרו אל tableCellBackgroundColor. |
| הצבע של הקו המפריד בין תאים בטבלה | שיטת SDK | התקשרו אל tableCellSeparatorColor. |
| הלחצן 'ניסיון חוזר' | שיטת SDK | התקשרו אל tintColor. |
| אינדיקטור של פעילות (סמל התקדמות מסתובב) | פרוטוקול UIAppearance | התקשרות אל setColor בשרת proxy UIActivityIndicatorView. |
| הלוגו 'מופעל על ידי Google', תמונה של ענן עצוב | לא רלוונטי | הגרסה הלבנה או האפורה נבחרת אוטומטית על סמך הניגודיות של הרקע. |
| סמלים של זכוכית מגדלת וטקסט גלוי בשדה הטקסט של סרגל החיפוש | לא רלוונטי | כדי לשנות את הסגנון, מחליפים את תמונות ברירת המחדל בתמונות בצבע הרצוי. |
שימוש בפרוטוקול UIAppearance
אפשר להשתמש בפרוטוקול UIAppearance כדי לקבל את פרוקסי המראה של רכיב ממשק משתמש נתון, ואז להשתמש בו כדי להגדיר את הצבע של רכיב ממשק המשתמש. כשמבצעים שינוי, הוא משפיע על כל המופעים של רכיב ממשק משתמש נתון. לדוגמה, בדוגמה הבאה משנים באופן גלובלי את צבע הטקסט של מחלקות UITextField לירוק כשהן כלולות ב-UISearchBar:
[[UITextField appearanceWhenContainedIn:[UISearchBar class], nil]
    setDefaultTextAttributes:@{NSForegroundColorAttributeName:[UIColor greenColor]}];
מידע נוסף על הגדרת ערכי צבע זמין בהפניה למחלקה UIColor.
קטעי הקוד הבאים מציגים את כל פקודות ה-proxy שצריך להשתמש בהן כדי להגדיר את הסגנון של כל הרכיבים האינטראקטיביים בממשק המשתמש של ההשלמה האוטומטית במסך מלא. מוסיפים את הקוד הזה לשיטה didFinishLaunchingWithOptions בקובץ Appdelegate.m:
// Define some colors.
UIColor *darkGray = [UIColor darkGrayColor];
UIColor *lightGray = [UIColor lightGrayColor];

// Navigation bar background.
[[UINavigationBar appearance] setBarTintColor:darkGray];
[[UINavigationBar appearance] setTintColor:lightGray];

// Color of typed text in the search bar.
NSDictionary *searchBarTextAttributes = @{
                                          NSForegroundColorAttributeName: lightGray,
                                          NSFontAttributeName : [UIFont systemFontOfSize:[UIFont systemFontSize]]
                                          };
[UITextField appearanceWhenContainedInInstancesOfClasses:@[[UISearchBar class]]]
    .defaultTextAttributes = searchBarTextAttributes;

// Color of the placeholder text in the search bar prior to text entry.
NSDictionary *placeholderAttributes = @{
                                        NSForegroundColorAttributeName: lightGray,
                                        NSFontAttributeName : [UIFont systemFontOfSize:[UIFont systemFontSize]]
                                        };

// Color of the default search text.
// NOTE: In a production scenario, "Search" would be a localized string.
NSAttributedString *attributedPlaceholder =
[[NSAttributedString alloc] initWithString:@"Search"
                                attributes:placeholderAttributes];
[UITextField appearanceWhenContainedInInstancesOfClasses:@[[UISearchBar class]]]
    .attributedPlaceholder = attributedPlaceholder;

// Color of the in-progress spinner.
[[UIActivityIndicatorView appearance] setColor:lightGray];

// To style the two image icons in the search bar (the magnifying glass
// icon and the 'clear text' icon), replace them with different images.
[[UISearchBar appearance] setImage:[UIImage imageNamed:@"custom_clear_x_high"]
                  forSearchBarIcon:UISearchBarIconClear
                            state:UIControlStateHighlighted];
[[UISearchBar appearance] setImage:[UIImage imageNamed:@"custom_clear_x"]
                  forSearchBarIcon:UISearchBarIconClear
                            state:UIControlStateNormal];
[[UISearchBar appearance] setImage:[UIImage imageNamed:@"custom_search"]
                    forSearchBarIcon:UISearchBarIconSearch
                            state:UIControlStateNormal];

// Color of selected table cells.
UIView *selectedBackgroundView = [[UIView alloc] init];
selectedBackgroundView.backgroundColor = [UIColor lightGrayColor];
[UITableViewCell appearanceWhenContainedIn:[GMSAutocompleteViewController class], nil]
    .selectedBackgroundView = selectedBackgroundView;
הגדרת מאפייני סגנון של רכיב אינטראקטיבי בממשק המשתמש
לחלק מרכיבי הבקרה בממשק המשתמש יש מאפיינים שלא מושפעים מפרוטוקול UIAppearance, ולכן צריך להגדיר אותם ישירות. בדוגמת הקוד הבאה מוצגת הגדרה של צבעי חזית ורקע, והחלה שלהם על מופע של רכיב ממשק משתמש בשם acController. מוסיפים את הקוד הזה לשיטה onLaunchClicked
ב-ViewController.m:
UIColor *darkGray = [UIColor darkGrayColor];
UIColor *lightGray = [UIColor lightGrayColor];

acController.secondaryTextColor = [UIColor colorWithWhite:1.0f alpha:0.5f];
acController.primaryTextColor = lightGray;
acController.primaryTextHighlightColor = [UIColor grayColor];
acController.tableCellBackgroundColor = darkGray;
acController.tableCellSeparatorColor = lightGray;
acController.tintColor = lightGray;
קבלת תחזיות לגבי מקומות באופן פרוגרמטי
אתם יכולים ליצור ממשק משתמש מותאם אישית לחיפוש כחלופה לממשק המשתמש שמסופק על ידי הווידג'ט של ההשלמה האוטומטית. כדי לעשות את זה, האפליקציה צריכה לקבל תחזיות לגבי מקומות באופן פרוגרמטי. האפליקציה יכולה לקבל רשימה של שמות מקומות או כתובות שחזתה באחת מהדרכים הבאות:
מתבצעת התקשרות אל GMSPlacesClient findAutocompletePredictionsFromQuery:
כדי לקבל רשימה של שמות מקומות ו/או כתובות שחזויים, קודם יוצרים מופע של GMSPlacesClient, ואז קוראים למתודה GMSPlacesClient
findAutocompletePredictionsFromQuery: עם הפרמטרים הבאים:
- מחרוזת
autocompleteQueryשמכילה את הטקסט שהמשתמש הקליד. - A
GMSAutocompleteSessionToken, שמשמש לזיהוי כל סשן בנפרד. האפליקציה צריכה להעביר את אותו טוקן לכל קריאה של בקשת השלמה אוטומטית, ואז להעביר את הטוקן הזה, יחד עם מזהה מקום, בקריאה הבאה אלfetchPlacefromPlaceID:כדי לאחזר את פרטי המקום שנבחר על ידי המשתמש. - א
GMSAutocompleteFilterאל:- הטיה או הגבלה של התוצאות לאזור ספציפי.
- הגבלת התוצאות לסוג מסוים של מקום.
- אובייקט
GMSPlaceLocationBias/Restriction שמשפיע על התוצאות כך שיוצגו תוצאות מאזור ספציפי שמוגדר לפי גבולות קו הרוחב וקו האורך.
- שיטת קריאה חוזרת לטיפול בתחזיות שהוחזרו.
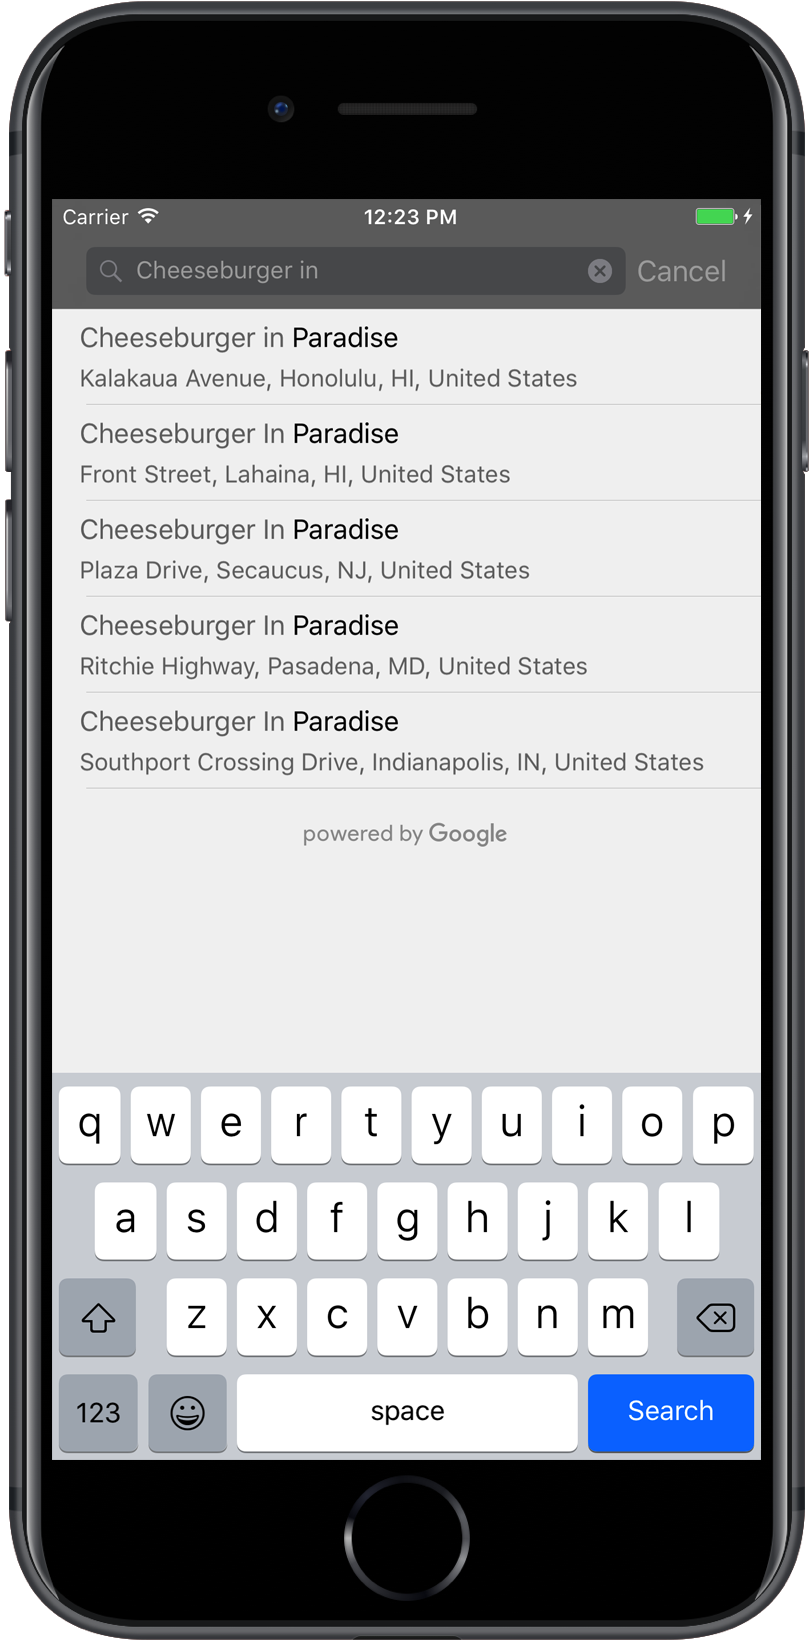
בדוגמאות הקוד הבאות מוצגת קריאה ל-findAutocompletePredictionsFromQuery:.
Swift
/**
 *   Create a new session token. Be sure to use the same token for calling
 *   findAutocompletePredictions, as well as the subsequent place details request.
 *   This ensures that the user's query and selection are billed as a single session.
 */
let token = GMSAutocompleteSessionToken.init()

// Create a type filter.
let filter = GMSAutocompleteFilter()
filter.types = [kGMSPlaceTypeBank]
filter.locationBias = GMSPlaceRectangularLocationOption( northEastBounds,
                                   southWestBounds);

placesClient?.findAutocompletePredictions(fromQuery: "cheesebu",

                                          filter: filter,
                                          sessionToken: token,
                                          callback: { (results, error) in
    if let error = error {
      print("Autocomplete error: \(error)")
      return
    }
    if let results = results {
      for result in results {
        print("Result \(result.attributedFullText) with placeID \(result.placeID)")
      }
    }
})
Objective-C
/**
 *   Create a new session token. Be sure to use the same token for calling
 *   findAutocompletePredictionsFromQuery:, as well as the subsequent place details request.
 *   This ensures that the user's query and selection are billed as a single session.
 */
GMSAutocompleteSessionToken *token = [[GMSAutocompleteSessionToken alloc] init];

// Create a type filter.
GMSAutocompleteFilter *_filter = [[GMSAutocompleteFilter alloc] init];
_filter.types = @[ kGMSPlaceTypeBank ];

[_placesClient findAutocompletePredictionsFromQuery:@"cheesebu"
filter:_filter sessionToken:token callback:^(NSArray<GMSAutocompletePrediction *> * _Nullable results, NSError * _Nullable error) {
  if (error != nil) {
    NSLog(@"An error occurred %@", [error localizedDescription]);
    return;
  }
  if (results != nil) {
    for (GMSAutocompletePrediction *result in results) {
      NSLog(@"Result %@ with PlaceID %@", result.attributedFullText, result.placeID);
    }
  }
}];
ה-API מפעיל את שיטת הקריאה החוזרת שצוינה, ומעביר מערך של אובייקטים מסוג GMSAutocompletePrediction.
כל אובייקט GMSAutocompletePrediction מכיל את הפרטים הבאים:
-
attributedFullText– הטקסט המלא של התחזית, בצורה שלNSAttributedString. לדוגמה, 'בית האופרה של סידני, סידני, ניו סאות' ויילס, אוסטרליה'. לכל טווח טקסט שתואם לקלט של המשתמש יש מאפיין,kGMSAutocompleteMatchAttribute. אתם יכולים להשתמש במאפיין הזה כדי להדגיש את הטקסט התואם בשאילתה של המשתמש, כמו בדוגמה שבהמשך. -
placeID– מזהה המקום של המקום החזוי. מזהה מקום הוא מזהה טקסטואלי שמזהה באופן ייחודי מקום מסוים. מידע נוסף על מזהי מקומות זמין במאמר מבט כולל על מזהי מקומות. -
distanceMeters– המרחק בקו ישר מoriginשצוין אל היעד. אם לא מגדירים את המאפייןorigin, לא יוחזר ערך של מרחק.
בדוגמת הקוד הבאה מוצג איך להדגיש טקסט מודגש את החלקים בתוצאה שתואמים לטקסט בשאילתה של המשתמש באמצעות enumerateAttribute:
Swift
let regularFont = UIFont.systemFont(ofSize: UIFont.labelFontSize)
let boldFont = UIFont.boldSystemFont(ofSize: UIFont.labelFontSize)

let bolded = prediction.attributedFullText.mutableCopy() as! NSMutableAttributedString
bolded.enumerateAttribute(kGMSAutocompleteMatchAttribute, in: NSMakeRange(0, bolded.length), options: []) {
  (value, range: NSRange, stop: UnsafeMutablePointer<ObjCBool>) -> Void in
    let font = (value == nil) ? regularFont : boldFont
    bolded.addAttribute(NSFontAttributeName, value: font, range: range)
}

label.attributedText = bolded
Objective-C
UIFont *regularFont = [UIFont systemFontOfSize:[UIFont labelFontSize]];
UIFont *boldFont = [UIFont boldSystemFontOfSize:[UIFont labelFontSize]];

NSMutableAttributedString *bolded = [prediction.attributedFullText mutableCopy];
[bolded enumerateAttribute:kGMSAutocompleteMatchAttribute
                   inRange:NSMakeRange(0, bolded.length)
                   options:0
                usingBlock:^(id value, NSRange range, BOOL *stop) {
                  UIFont *font = (value == nil) ? regularFont : boldFont;
                  [bolded addAttribute:NSFontAttributeName value:font range:range];
                }];

label.attributedText = bolded;
שימוש ב-Fetcher
אם רוצים ליצור מאפס רכיב שליטה משלכם להשלמה אוטומטית, אפשר להשתמש ב-GMSAutocompleteFetcher, שעוטף את השיטה autocompleteQuery ב-GMSPlacesClient. הכלי לאחזור נתונים מגביל את מספר הבקשות, ומחזיר רק תוצאות של טקסט החיפוש שהוזן לאחרונה. הוא לא מספק רכיבים של ממשק משתמש.
כדי להטמיע את GMSAutocompleteFetcher, צריך לבצע את השלבים הבאים:
- מטמיעים את הפרוטוקול
GMSAutocompleteFetcherDelegate. - יוצרים אובייקט
GMSAutocompleteFetcher. - מתקשרים אל
sourceTextHasChangedב-fetcher בזמן שהמשתמש מקליד. - מטפלים בחיזויים ובשגיאות באמצעות השיטות של פרוטוקול
didAutcompleteWithPredictionsו-didFailAutocompleteWithError.
בדוגמת הקוד הבאה אפשר לראות איך משתמשים בכלי לאחזור נתונים כדי לקבל קלט מהמשתמש ולהציג התאמות למקומות בתצוגת טקסט. הפונקציונליות של בחירת מקום הושמטה. FetcherSampleViewController נובע מ-UIViewController ב-FetcherSampleViewController.h.
Swift
import UIKit
import GooglePlaces

class ViewController: UIViewController {

  var textField: UITextField?
  var resultText: UITextView?
  var fetcher: GMSAutocompleteFetcher?

  override func viewDidLoad() {
    super.viewDidLoad()

    view.backgroundColor = .white
    edgesForExtendedLayout = []

    // Set bounds to inner-west Sydney Australia.
    let neBoundsCorner = CLLocationCoordinate2D(latitude: -33.843366,
                                                longitude: 151.134002)
    let swBoundsCorner = CLLocationCoordinate2D(latitude: -33.875725,
                                                longitude: 151.200349)

    // Set up the autocomplete filter.
    let filter = GMSAutocompleteFilter()
    filter.locationRestriction = GMSPlaceRectangularLocationOption(neBoundsCorner, swBoundsCorner)

    // Create a new session token.
    let token: GMSAutocompleteSessionToken = GMSAutocompleteSessionToken.init()

    // Create the fetcher.
    fetcher = GMSAutocompleteFetcher(bounds: nil, filter: filter)
    fetcher?.delegate = self
    fetcher?.provide(token)

    textField = UITextField(frame: CGRect(x: 5.0, y: 10.0,
                                          width: view.bounds.size.width - 5.0,
                                          height: 64.0))
    textField?.autoresizingMask = .flexibleWidth
    textField?.addTarget(self, action: #selector(textFieldDidChange(textField:)),
                         for: .editingChanged)
    let placeholder = NSAttributedString(string: "Type a query...")

    textField?.attributedPlaceholder = placeholder

    resultText = UITextView(frame: CGRect(x: 0, y: 65.0,
                                          width: view.bounds.size.width,
                                          height: view.bounds.size.height - 65.0))
    resultText?.backgroundColor = UIColor(white: 0.95, alpha: 1.0)
    resultText?.text = "No Results"
    resultText?.isEditable = false

    self.view.addSubview(textField!)
    self.view.addSubview(resultText!)
  }

  @objc func textFieldDidChange(textField: UITextField) {
    fetcher?.sourceTextHasChanged(textField.text!)
  }

}

extension ViewController: GMSAutocompleteFetcherDelegate {
  func didAutocomplete(with predictions: [GMSAutocompletePrediction]) {
    let resultsStr = NSMutableString()
    for prediction in predictions {
      resultsStr.appendFormat("\n Primary text: %@\n", prediction.attributedPrimaryText)
      resultsStr.appendFormat("Place ID: %@\n", prediction.placeID)
    }

    resultText?.text = resultsStr as String
  }

  func didFailAutocompleteWithError(_ error: Error) {
    resultText?.text = error.localizedDescription
  }
}
Objective-C
#import "FetcherSampleViewController.h"
#import <GooglePlaces/GooglePlaces.h>

@interface FetcherSampleViewController () <GMSAutocompleteFetcherDelegate>

@end

@implementation FetcherSampleViewController {
  UITextField *_textField;
  UITextView *_resultText;
  GMSAutocompleteFetcher* _fetcher;
}

-   (void)viewDidLoad {
  [super viewDidLoad];

  self.view.backgroundColor = [UIColor whiteColor];
  self.edgesForExtendedLayout = UIRectEdgeNone;

  // Set bounds to inner-west Sydney Australia.
  CLLocationCoordinate2D neBoundsCorner = CLLocationCoordinate2DMake(-33.843366, 151.134002);
  CLLocationCoordinate2D swBoundsCorner = CLLocationCoordinate2DMake(-33.875725, 151.200349);

  GMSAutocompleteFilter *autocompleteFilter = [[GMSAutocompleteFilter alloc] init];
  autocompleteFilter.locationRestriction =
        GMSPlaceRectangularLocationOption(neBoundsCorner, swBoundsCorner);

  // Create the fetcher.
  _fetcher = [[GMSAutocompleteFetcher alloc] initWithBounds:nil
                                                     filter:filter];
  _fetcher.delegate = self;

  // Set up the UITextField and UITextView.
  _textField = [[UITextField alloc] initWithFrame:CGRectMake(5.0f,
                                                             0,
                                                             self.view.bounds.size.width - 5.0f,
                                                             44.0f)];
  _textField.autoresizingMask = UIViewAutoresizingFlexibleWidth;
  [_textField addTarget:self
                 action:@selector(textFieldDidChange:)
       forControlEvents:UIControlEventEditingChanged];
  _resultText =[[UITextView alloc] initWithFrame:CGRectMake(0,
                                                            45.0f,
                                                            self.view.bounds.size.width,
                                                            self.view.bounds.size.height - 45.0f)];
  _resultText.backgroundColor = [UIColor colorWithWhite:0.95f alpha:1.0f];
  _resultText.text = @"No Results";
  _resultText.editable = NO;
  [self.view addSubview:_textField];
  [self.view addSubview:_resultText];
}

-   (void)textFieldDidChange:(UITextField *)textField {
  NSLog(@"%@", textField.text);
  [_fetcher sourceTextHasChanged:textField.text];
}

#pragma mark - GMSAutocompleteFetcherDelegate
-   (void)didAutocompleteWithPredictions:(NSArray *)predictions {
  NSMutableString *resultsStr = [NSMutableString string];
  for (GMSAutocompletePrediction *prediction in predictions) {
      [resultsStr appendFormat:@"%@\n", [prediction.attributedPrimaryText string]];
  }
  _resultText.text = resultsStr;
}

-   (void)didFailAutocompleteWithError:(NSError *)error {
  _resultText.text = [NSString stringWithFormat:@"%@", error.localizedDescription];
}

@end
טוקנים של סשנים
אסימוני סשן מקבצים את שלבי השאילתה והבחירה של השלמה אוטומטית של חיפוש משתמש לסשן נפרד למטרות חיוב. הסשן מתחיל כשהמשתמש מתחיל להקליד שאילתה, ומסתיים כשהוא בוחר מקום. בכל סשן יכולות להיות כמה שאילתות, ואחריהן בחירה של מקום אחד. אחרי שסשן מסתיים, האסימון כבר לא תקף. האפליקציה צריכה ליצור אסימון חדש לכל סשן. מומלץ להשתמש באסימוני סשן לכל הסשנים של השלמה אוטומטית שמתבצעים באופן פרוגרמטי (כשמשתמשים בבקר של המסך המלא או בבקר של התוצאות, ה-API מטפל בזה באופן אוטומטי).
Places SDK ל-iOS משתמש בGMSAutocompleteSessionToken כדי לזהות כל סשן. האפליקציה צריכה להעביר טוקן לסשן חדש בתחילת כל סשן חדש, ואז להעביר את אותו טוקן, יחד עם מזהה מקום, בקריאה הבאה אל fetchPlacefromPlaceID: כדי לאחזר את Place Details עבור המקום שנבחר על ידי המשתמש.
משתמשים בקוד הבא כדי ליצור טוקן לסשן חדש:
let token: GMSAutocompleteSessionToken = GMSAutocompleteSessionToken.init()
מכסות שימוש
- השימוש בשיטה
GMSPlacesClient findAutocompletePredictionsFromQueryכפוף למגבלות שאילתות מדורגות. אפשר לעיין במאמרי העזרה בנושא מגבלות שימוש.
הצגת שיוכים באפליקציה
- אם האפליקציה שלכם משתמשת בשירות ההשלמה האוטומטית באופן פרוגרמטי, ממשק המשתמש חייב להציג את הכיתוב 'מופעל על ידי Google' או להופיע במפה עם מיתוג של Google.
- אם האפליקציה שלכם משתמשת ברכיב האינטראקטיבי של ההשלמה האוטומטית בממשק המשתמש, לא נדרשת פעולה נוספת (השיוך הנדרש מוצג כברירת מחדל).
- אם מאחזרים ומציגים מידע נוסף על מקום אחרי קבלת מקום לפי מזהה, צריך להציג גם את שיוכי הצד השלישי.
פרטים נוספים זמינים במאמר בנושא שיוכים.
שליטה באינדיקטור של פעילות הרשת
כדי לשלוט במחוון הפעילות ברשת בסרגל המצב של האפליקציות, צריך להטמיע את שיטות ההקצאה המתאימות והאופציונליות למחלקה של ההשלמה האוטומטית שבה משתמשים, ולהפעיל או להשבית את מחוון הרשת באופן ידני.
- ב-
GMSAutocompleteViewController, צריך להטמיע את שיטות ההקצאהdidRequestAutocompletePredictions:ו-didUpdateAutocompletePredictions:. - ב-
GMSAutocompleteResultsViewController, צריך להטמיע את ה-delegate methodsdidRequestAutocompletePredictionsForResultsController:ו-didUpdateAutocompletePredictionsForResultsController:. - ב-
GMSAutocompleteTableDataSource, צריך להטמיע את ה-delegate methodsdidRequestAutocompletePredictionsForTableDataSource:ו-didUpdateAutocompletePredictionsForTableDataSource:.
אם מטמיעים את השיטות האלה ומגדירים את [UIApplication
sharedApplication].networkActivityIndicatorVisible ל-YES ואת NO ל-YES, סרגל הסטטוס יתאים לממשק המשתמש של ההשלמה האוטומטית.
הגבלת תוצאות ההשלמה האוטומטית
אפשר להגדיר את רכיב אינטראקטיבי של ממשק המשתמש להשלמה אוטומטית כך שהתוצאות יוגבלו לאזור גיאוגרפי ספציפי, ו/או לסנן את התוצאות לפי סוג מקום אחד או יותר, או לפי מדינה ספציפית או מדינות ספציפיות. כדי לצמצם את התוצאות, אפשר:
- כדי להעדיף (להטות) תוצאות בתוך האזור המוגדר, מגדירים את
locationBiasל-on ב-GMSAutocompleteFilter(יכול להיות שעדיין יוחזרו תוצאות מחוץ לאזור המוגדר). אם גם המדיניותlocationRestrictionמוגדרת, המערכת תתעלם מהמדיניותlocationBias. כדי להציג רק (להגביל) תוצאות באזור המוגדר, צריך להגדיר את הערך
locationRestrictionבפרמטרGMSAutocompleteFilter(יוחזרו רק תוצאות באזור המוגדר).- הערה: ההגבלה הזו חלה רק על מסלולים שלמים. יכול להיות שיוחזרו תוצאות סינתטיות שנמצאות מחוץ לגבולות המלבניים, על סמך מסלול שחופף להגבלת המיקום.
כדי להחזיר רק תוצאות שתואמות לסוג מסוים של מקום, צריך להגדיר את
typesב-GMSAutocompleteFilter(לדוגמה, ציון של kGMSPlaceTypeCollectionAddress יגרום לווידג'ט להחזיר רק תוצאות עם כתובת מדויקת).כדי להחזיר רק תוצאות במדינות ספציפיות (עד חמש), צריך להגדיר את
countriesב-GMSAutocompleteFilter.
הטיית התוצאות לאזור ספציפי
כדי להעדיף (להטות) תוצאות בתוך האזור המוגדר, מגדירים את locationBias ב-GMSAutocompleteFilter, כמו שמוצג כאן:
northEast = CLLocationCoordinate2DMake(39.0, -95.0);  southWest =
CLLocationCoordinate2DMake(37.5, -100.0);  GMSAutocompleteFilter *filter =
[[GMSAutocompleteFilter alloc] init];  filter.locationBias =
GMSPlaceRectangularLocationOption(northEast, southWest);
הגבלת התוצאות לאזור ספציפי
כדי להציג רק (להגביל) תוצאות באזור המוגדר, צריך להגדיר את locationRestriction ב-GMSAutocompleteFilter, כמו שמוצג כאן:
northEast = CLLocationCoordinate2DMake(39.0, -95.0);  southWest =
CLLocationCoordinate2DMake(37.5, -100.0);  GMSAutocompleteFilter *filter =
[[GMSAutocompleteFilter alloc] init];  filter.locationRestriction =
GMSPlaceRectangularLocationOption(northEast, southWest);
סינון התוצאות לפי מדינה
כדי לסנן את התוצאות בחמש מדינות לכל היותר, מגדירים את countries ב-GMSAutocompleteFilter, כמו שמוצג כאן:
GMSAutocompleteFilter *filter = [[GMSAutocompleteFilter alloc] init];
filter.countries = @[ @"au", @"nz" ];
סינון התוצאות לפי סוג מקום או סוג אוסף
כדי להגביל את התוצאות לסוג מסוים או לאוסף סוגים, צריך להגדיר את המאפיין types של GMSAutoCompleteFilter.
משתמשים במאפיין הזה כדי לציין מסננים שמפורטים בטבלאות 1, 2 ו-3 במאמר בנושא סוגי מקומות. אם לא מציינים כלום, כל הסוגים מוחזרים.
כדי לציין מסנן של סוג או אוסף סוגים:
משתמשים במאפיין
typesכדי לציין עד חמישה ערכים של type מתוך טבלה 1 וטבלה 2 שמוצגות במאמר סוגי מקומות. ערכי הסוג מוגדרים על ידי הקבועים ב-GMSPlaceType.משתמשים במאפיין
typesכדי לציין אוסף סוגים מטבלה 3 שמוצגת בסוגי מקומות. הערכים של אוסף הסוגים מוגדרים על ידי הקבועים ב-GMSPlaceType.מותר להשתמש בבקשה רק בסוג אחד מתוך הטבלה 3. אם מציינים ערך מטבלה 3, אי אפשר לציין ערך מטבלה 1 או מטבלה 2. אם כן, תתרחש שגיאה.
לדוגמה, כדי להחזיר רק תוצאות שתואמות לסוג מסוים של מקום, צריך להגדיר את types ב-GMSAutocompleteFilter. בדוגמה הבאה מוצג איך להגדיר את המסנן כך שיחזיר רק תוצאות עם כתובת מדויקת:
GMSAutocompleteFilter *filter = [[GMSAutocompleteFilter alloc] init];
filter.types = @[ kGMSPlaceTypeAirport, kGMSPlaceTypeAmusementPark ];
אופטימיזציה של השלמה אוטומטית למקומות (מדור קודם)
בקטע הזה מתוארות שיטות מומלצות שיעזרו לכם להפיק את המרב משירות השלמה אוטומטית למקומות (גרסה קודמת).
הנה כמה הנחיות כלליות:
- הדרך הכי מהירה לפתח ממשק משתמש תקין היא להשתמש בווידג'ט השלמה אוטומטית למקומות (מדור קודם) של Maps JavaScript API, בווידג'ט השלמה אוטומטית למקומות (מדור קודם) של Places SDK ל-Android או ברכיב אינטראקטיבי השלמה אוטומטית למקומות (מדור קודם) של Places SDK ל-iOS.
- הסבר על שדות הנתונים החיוניים של השלמה אוטומטית למקומות (מדור קודם) מההתחלה.
- השדות 'הטיה לפי מיקום' ו'הגבלת מיקום' הם אופציונליים, אבל יכולה להיות להם השפעה משמעותית על הביצועים של ההשלמה האוטומטית.
- כדאי להשתמש בטיפול בשגיאות כדי לוודא שהאפליקציה תפעל בצורה תקינה גם אם ה-API יחזיר שגיאה.
- חשוב לוודא שהאפליקציה מטפלת במצב שבו לא נבחרה אפשרות, ומציעה למשתמשים דרך להמשיך.
שיטות מומלצות לאופטימיזציה של עלויות
אופטימיזציה בסיסית של עלויות
כדי לבצע אופטימיזציה של העלות של השימוש בשירות השלמה אוטומטית למקומות (מדור ישן), צריך להשתמש במסכות שדות בווידג'טים Place Details (מדור ישן) והשלמה אוטומטית למקומות (מדור ישן) כדי להחזיר רק את שדות הנתונים של השלמה אוטומטית למקומות (מדור ישן) שאתם צריכים.
אופטימיזציה מתקדמת של עלויות
כדאי לשקול הטמעה פרוגרמטית של השלמה אוטומטית למקומות (מדור קודם) כדי לגשת אל SKU: השלמה אוטומטית – תמחור לפי בקשה ולבקש תוצאות של Geocoding API לגבי המקום שנבחר במקום Place Details (מדור קודם). תמחור לפי בקשה בשילוב עם Geocoding API הוא חסכוני יותר מתמחור לפי סשן (מבוסס-סשן) אם מתקיימים שני התנאים הבאים:
- אם אתם צריכים רק את קו הרוחב/קו האורך או את הכתובת של המקום שהמשתמש בחר, Geocoding API מספק את המידע הזה בפחות משיחה של Place Details (Legacy).
- אם המשתמשים בוחרים הצעות להשלמת החיפוש בתוך ממוצע של ארבע בקשות או פחות של השלמה אוטומטית למקומות (גרסה קודמת), התמחור לפי בקשה עשוי להיות חסכוני יותר מהתמחור לפי סשן.
האם האפליקציה שלך דורשת מידע כלשהו מלבד הכתובת וקו הרוחב/קו האורך של החיזוי שנבחר?
כן, צריך עוד פרטים
שימוש ב-השלמה אוטומטית למקומות (מדור קודם) מבוסס-סשן עם Place Details (מדור קודם)
מכיוון שהאפליקציה שלך דורשת פרטים על מקומות (מדור קודם), כמו שם המקום, סטטוס העסק או שעות הפתיחה, ההטמעה של Place Autocomplete (מדור קודם) צריכה להשתמש בטוקן סשן (באופן פרוגרמטי או כחלק מווידג'טים של JavaScript, Android או iOS) לכל סשן, בנוסף למזהי SKU של נתוני מקומות שרלוונטיים, בהתאם לשדות נתוני המקומות שאתם מבקשים.1
הטמעת ווידג'טים
ניהול הסשנים מוטמע אוטומטית בווידג'טים של
JavaScript,
Android,
או iOS. החיוב כולל גם את הבקשות של השלמה אוטומטית למקומות (מדור קודם) וגם את הבקשה של Place Details (מדור קודם) לגבי החיזוי שנבחר. כדי לוודא שאתם מבקשים רק את שדות הנתונים שאתם צריכים ב-השלמה אוטומטית למקומות (גרסה קודמת), הקפידו לציין את הפרמטר fields.
הטמעה פרוגרמטית
משתמשים בטוקן לסשן עם הבקשות של השלמה אוטומטית למקומות (מדור קודם). כשמבקשים Place Details (גרסה קודמת) לגבי התחזית שנבחרה, צריך לכלול את הפרמטרים הבאים:
- מזהה המקום מהתגובה של השלמה אוטומטית למקומות (מדור קודם)
- טוקן הסשן שמשמש בבקשה של השלמה אוטומטית למקומות (מדור ישן)
- הפרמטר
fieldsשמציין את שדות הנתונים של השלמה אוטומטית למקומות (מדור קודם) שדרושים לכם
לא, צריך רק כתובת ומיקום
יכול להיות ש-Geocoding API יהיה אפשרות חסכונית יותר מאשר Place Details (מדור קודם) לאפליקציה שלכם, בהתאם לביצועים של השימוש שלכם ב-השלמה אוטומטית למקומות (מדור קודם). היעילות של השלמה אוטומטית למקומות (גרסה קודמת) בכל אפליקציה משתנה בהתאם למה שהמשתמשים מזינים, איפה האפליקציה נמצאת והאם הוטמעו שיטות מומלצות לאופטימיזציה של הביצועים.
כדי לענות על השאלה הבאה, צריך לנתח כמה תווים משתמש מקליד בממוצע לפני שהוא בוחר חיזוי של השלמה אוטומטית למקומות (מדור קודם) באפליקציה.
האם המשתמשים שלכם בוחרים חיזוי של השלמה אוטומטית למקומות (מדור קודם) בארבע בקשות או פחות, בממוצע?
כן
הטמעה פרוגרמטית של השלמה אוטומטית למקומות (מדור קודם) ללא טוקנים לסשן, וקריאה ל-Geocoding API לגבי חיזוי המקום שנבחר.
Geocoding API מספק כתובות וקואורדינטות של קווי אורך ורוחב.
ביצוע ארבע בקשות של השלמה אוטומטית למקומות – לכל בקשה בתוספת קריאה ל-Geocoding API לגבי החיזוי של המקום שנבחר, יעלה פחות מהעלות של השלמה אוטומטית למקומות (מדור קודם) לכל סשן.1
כדאי להשתמש בשיטות מומלצות לשיפור הביצועים כדי לעזור למשתמשים לקבל את התחזית שהם מחפשים גם אם הם מקלידים פחות תווים.
לא
שימוש ב-השלמה אוטומטית למקומות (מדור קודם) מבוסס-סשן עם Place Details (מדור קודם)
מכיוון שהמספר הממוצע של הבקשות שצפויות להישלח לפני שהמשתמש בוחר חיזוי של השלמה אוטומטית למקומות (מדור קודם) חורג מהעלות של התמחור לכל סשן, בהטמעה של השלמה אוטומטית למקומות (מדור קודם) צריך להשתמש בטוקן סשן גם לבקשות של השלמה אוטומטית למקומות (מדור קודם) וגם לבקשות המשויכות של Place Details (מדור קודם) לכל סשן.
1
הטמעת ווידג'טים
ניהול הסשנים מוטמע אוטומטית בווידג'טים של
JavaScript,
Android,
או iOS. החיוב כולל גם את הבקשות של השלמה אוטומטית למקומות (מדור קודם) וגם את הבקשה של Place Details (מדור קודם) לגבי החיזוי שנבחר. כדי לוודא שאתם מבקשים רק את השדות שאתם צריכים, הקפידו לציין את הפרמטר fields.
הטמעה פרוגרמטית
משתמשים בטוקן לסשן עם הבקשות של השלמה אוטומטית למקומות (מדור קודם).
כשמבקשים Place Details (גרסה מדור קודם) לגבי התחזית שנבחרה, צריך לכלול את הפרמטרים הבאים:
- מזהה המקום מהתגובה של השלמה אוטומטית למקומות (מדור קודם)
- טוקן הסשן שמשמש בבקשה של השלמה אוטומטית למקומות (מדור ישן)
- הפרמטר
fieldsשמציין שדות של נתונים בסיסיים כמו כתובת וגיאומטריה
כדאי לשקול לדחות בקשות של השלמה אוטומטית למקומות (מדור קודם)
אפשר להשתמש באסטרטגיות כמו דחיית בקשה של השלמה אוטומטית למקומות (מדור קודם) עד שהמשתמש יקליד את שלושת או ארבעת התווים הראשונים, כדי שהאפליקציה תשלח פחות בקשות. לדוגמה, אם שולחים בקשות להשלמה אוטומטית למקומות (גרסה קודמת) לכל תו אחרי שהמשתמש הקליד את התו השלישי, ואם המשתמש מקליד שבעה תווים ואז בוחר תחזית שבשבילה נשלחת בקשת API אחת ל-Geocoding API, העלות הכוללת תהיה של 4 בקשות להשלמה אוטומטית למקומות (גרסה קודמת) לכל בקשה + Geocoding.1
אם עיכוב הבקשות יכול להוריד את הממוצע של הבקשות הפרוגרמטיות מתחת לארבע, אפשר לפעול לפי ההנחיות להטמעה של השלמה אוטומטית למקומות (מדור קודם) עם Geocoding API. חשוב לזכור שעיכוב בקשות עלול להיתפס כזמן אחזור על ידי המשתמש, שאולי מצפה לראות תחזיות עם כל הקשה חדשה על המקשים.
כדאי להשתמש בשיטות מומלצות לשיפור הביצועים כדי לעזור למשתמשים לקבל את התחזית שהם מחפשים בפחות תווים.
-
למידע על עלויות, אפשר לעיין במחירונים של Google Maps Platform.
שיטות מומלצות לשיפור הביצועים
בהמשך מפורטות הנחיות לאופטימיזציה של הביצועים של השלמה אוטומטית למקומות (גרסה קודמת):
- מוסיפים הגבלות לפי מדינה, הטיה של מיקום והעדפת שפה (להטמעות פרוגרמטיות) להטמעה של השלמה אוטומטית למקומות (מדור קודם). אין צורך בהעדפת שפה בווידג'טים, כי הם בוחרים את העדפות השפה מתוך הדפדפן או המכשיר הנייד של המשתמש.
- אם השלמה אוטומטית למקומות (מדור קודם) מופיע עם מפה, אפשר להטות את המיקום לפי אזור התצוגה של המפה.
- במקרים שבהם משתמש לא בוחר באחד מהחיזויים של השלמה אוטומטית למקומות (מדור קודם), בדרך כלל כי אף אחד מהחיזויים האלה לא מתאים לכתובת הרצויה, אפשר להשתמש מחדש בקלט של משתמשים כדי לנסות לקבל תוצאות רלוונטיות יותר:
- אם אתם מצפים שהמשתמש יזין רק פרטי כתובת, תוכלו להשתמש מחדש בקלט של משתמשים המקורי בקריאה ל-Geocoding API.
- אם אתם מצפים שהמשתמש יזין שאילתות לגבי מקום ספציפי לפי שם או כתובת, תשתמשו בבקשה של Place Details (גרסה קודמת). אם אתם מצפים לתוצאות רק באזור מסוים, כדאי להשתמש בהטיה לפי מיקום.
- משתמשים שמזינים כתובות של יחידות משנה בתוך בניין, כמו כתובות של יחידות או דירות ספציפיות. לדוגמה, הכתובת הצ'כית "Stroupežnického 3191/17, Praha" מניבה חיזוי חלקי ב-השלמה אוטומטית למקומות (מדור קודם).
- משתמשים שמזינים כתובות עם קידומות של קטע כביש כמו "23-30 29th St, Queens" בניו יורק או "47-380 Kamehameha Hwy, Kaneohe" באי קוואי בהוואי.
הטיה של מיקום
כדי להטות את התוצאות לאזור מסוים, מעבירים פרמטר location ופרמטר radius. ההוראה הזו גורמת ל-השלמה אוטומטית למקומות (מדור קודם) להעדיף להציג תוצאות באזור המוגדר. יכול להיות שיוצגו תוצאות מחוץ לאזור שהוגדר. אפשר להשתמש בפרמטר includedRegionCodes כדי לסנן את התוצאות ולהציג רק מקומות במדינה שצוינה.
הגבלת מיקום
כדי להגביל את התוצאות לאזור מסוים, מעבירים פרמטר locationRestriction.
אפשר גם להגביל את התוצאות לאזור שהוגדר על ידי location
והפרמטר radius, על ידי הוספת הפרמטר
strictbounds. ההוראה הזו גורמת להשלמה אוטומטית למקומות (מדור קודם) להחזיר רק תוצאות באזור הזה.
פתרון בעיות
יכולות להיות שגיאות מגוונות, אבל רוב השגיאות שסביר להניח שהאפליקציה שלכם תיתקל בהן נגרמות בדרך כלל משגיאות בהגדרות (לדוגמה, נעשה שימוש במפתח API שגוי או שמפתח ה-API הוגדר בצורה לא נכונה) או משגיאות שקשורות למכסה (האפליקציה חרגה מהמכסה שלה). מידע נוסף על מכסות זמין במאמר מכסות שימוש.
שגיאות שמתרחשות בשימוש באמצעי הבקרה של ההשלמה האוטומטית מוחזרות בשיטה didFailAutocompleteWithError() של פרוטוקולי הנציגים השונים. המאפיין code של האובייקט NSError שסופק מוגדר לאחד מהערכים של הספירה GMSPlacesErrorCode.