開發人員可以使用 Google 代碼管理工具,在行動應用程式中導入及管理評估代碼和像素,不必重建應用程式二進位檔並重新提交至應用程式市集。使用 Google Analytics for Firebase SDK 的開發人員可以輕鬆新增代碼管理工具,即使應用程式已發布,也能管理及變更導入作業。
開發人員可以記錄重要事件,稍後再決定要觸發哪些代碼或像素。
必要條件
- 在 Firebase 主控台內,將您的應用程式新增至 Firebase 專案中。
- 為應用程式設定 Google Analytics,包括在 Firebase 專案中啟用 Google Analytics,以及在應用程式中新增 Google Analytics for Firebase SDK。
- 建立代碼管理工具帳戶。
- 設定代碼管理工具容器。
以下各節將逐步說明如何在 iOS 應用程式中設定及使用 Google 代碼管理工具。
1. 在專案中新增代碼管理工具
新增代碼管理工具套件:
CocoaPods
如要透過 CocoaPods 新增代碼管理工具,請按照下列步驟操作:
在終端機中執行下列指令:
$ sudo gem install cocoapods切換至專案目錄。
執行下列指令,建立名為
Podfile的檔案:$ pod init在
Podfile中新增下列項目:pod 'GoogleTagManager', '~> 6.0'執行下列指令,將代碼管理工具依附元件下載並安裝至專案:
$ pod install
Swift Package Manager
如要透過 Swift Package Manager 新增代碼管理工具,請按照下列步驟操作:
- 如果是從以 CocoaPods 為基礎的專案遷移,請執行
pod deintegrate,從 Xcode 專案中移除 CocoaPods。之後可以放心刪除 CocoaPods 產生的.xcworkspace檔案。如果您是首次在專案中新增 Firebase,可以忽略這個步驟。 - 在 Xcode 12 中,依序前往「File」(檔案) >「Tag Manager Packages」(代碼管理工具套件) >「Add Package Dependency…」(新增套件依附元件…),然後安裝代碼管理工具程式庫。
在隨即出現的提示中,輸入代碼管理工具 GitHub 存放區:
https://github.com/googleanalytics/google-tag-manager-ios-sdk.git選取要使用的 Google 代碼管理工具版本。如果是新專案,建議使用最新版代碼管理工具。
在專案的「Build Settings」中,將
-ObjC新增至「Other Linker Flags」。
如果代碼管理工具帳戶沒有 iOS 容器,請建立一個:
- 登入 代碼管理工具帳戶。
- 在「帳戶」分頁中,選取 iOS 容器。
- 按一下頂端導覽列中的「管理」。
- 在「CONTAINER」(容器) 欄中,按一下「+」圖示建立容器。
- 輸入容器名稱。
- 選取「iOS」iOS容器。
- 按一下「建立」。
下載容器:
- 登入 代碼管理工具帳戶。
- 在「帳戶」分頁中,選取 iOS 容器。
- 按一下頂端導覽列的「版本」。
- 選取要下載的容器版本。
點選 [下載]。
將下載的容器新增至專案:
- 將下載的檔案複製到 XCode 專案根目錄中名為
container的資料夾 (通常是PROJECT_ROOT/container/GTM-XXXXXX.json)。 - 開啟 Xcode。
- 從「檔案」選單中選擇「將檔案新增至...」
- 選取
container資料夾。 - 按一下「選項」,確認已選取「建立資料夾參照」。
- 按一下「完成」。
- 將下載的檔案複製到 XCode 專案根目錄中名為
2. 記錄事件和變數
代碼管理工具會使用 Google Analytics for Firebase SDK 記錄的事件、參數和使用者屬性,觸發及建立您在 Google 代碼管理工具中設定的代碼。
如要瞭解如何記錄事件和設定使用者屬性,請參閱 Firebase 開發人員說明文件。
在代碼管理工具中設定變數
如要擷取事件參數和使用者屬性的值,以便在 Google 代碼管理工具中使用,請在代碼管理工具介面設定變數。
舉例來說,您可以在應用程式中記錄下列自訂事件:
Analytics.logEvent("share_image", parameters: [
  "image_name": name,
  "full_text": text
])
接著,您可以在代碼管理工具中設定新的事件參數變數,如下所示擷取 image_name 和 full_text parameter 值:
- 變數名稱:圖片名稱
- 變數類型:事件參數
- 事件參數鍵名稱:
image_name
和:
- 變數名稱:全文
- 變數類型:事件參數
- 事件參數鍵名稱:
full_text
同樣地,您可以在應用程式中設定下列使用者屬性:
Analytics.setUserProperty(food, forName: "favorite_food")
接著,您可以在 Google 代碼管理工具中設定新的 Firebase 使用者屬性變數,擷取 favorite_food 值:
- 變數名稱:喜愛的食物
- 變數類型:Firebase 使用者屬性
- 事件參數鍵名稱:
favorite_food
修改和封鎖事件
代碼管理工具可讓您在 Google Analytics for Firebase SDK 記錄事件前,修改及封鎖事件。修改事件可協助您新增、移除或變更事件參數的值,或調整事件名稱,而無須更新應用程式。Google Analytics for Firebase SDK 會記錄未遭封鎖的事件。
Google Analytics for Firebase SDK 也會自動記錄部分事件和使用者屬性。您可以在代碼管理工具中使用自動收集的事件和屬性,不必新增任何程式碼。但無法封鎖對方。
3. 傳送事件
Firebase 事件名稱變數、Firebase 事件參數變數和其他變數可用於設定觸發條件。每當您記錄 Firebase 事件,系統就會評估觸發條件。根據預設,Google Analytics for Firebase 事件會自動觸發。您可以在代碼管理工具中新增 Google Analytics for Firebase 代碼,封鎖事件傳送至 Google Analytics。
4. 預覽、偵錯及發布容器
發布容器版本前,請先預覽版本,確認運作正常。代碼管理工具可讓您在代碼管理工具網頁介面中產生連結和 QR code,並使用這些連結和 QR code 開啟應用程式,預覽容器版本。
預覽容器
如要預覽容器,請在代碼管理工具網頁介面中產生預覽網址:
- 登入 代碼管理工具帳戶。
- 選取行動容器。
- 按一下頂端導覽列的「版本」。
- 找到要預覽的容器版本,然後按一下「動作」>「預覽」。
- 輸入應用程式的套件名稱。
按一下「產生開始預覽連結」。
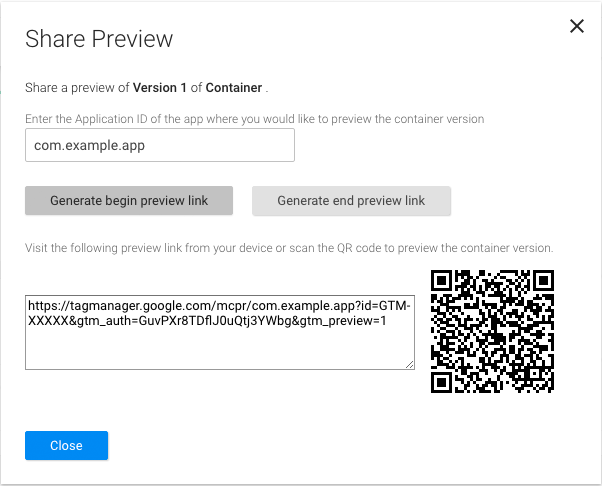
圖 1: 從代碼管理工具網頁介面取得預覽網址。 請儲存這個預覽網址,稍後會用到。
如要啟用容器預覽功能,您必須在專案的屬性清單中定義代碼管理工具預覽網址架構。在應用程式的屬性清單檔案中,於「URL types」下方註冊下列網址 ID 和網址配置:
URL identifier: _your.package.name_
URL scheme: tagmanager.c._your.package.name_

停止應用程式,並在模擬器或實體裝置上開啟預覽網址,預覽應用程式中的草稿容器。
偵錯容器
在模擬器或預覽模式中執行應用程式時,代碼管理工具會自動將記錄設為詳細模式。
發布容器
預覽容器並確認運作正常後,即可發布容器。發布容器後,行動應用程式使用者就能使用代碼設定。
相關資源
請參閱「進階設定」。