
این صفحه توضیح میدهد که چگونه یک برنامه چت گوگل میتواند پنجرههای گفتگو را برای نمایش رابطهای کاربری (UI) باز کند و به کاربران پاسخ دهد.
دیالوگها رابطهای کاربری مبتنی بر کارت و پنجرهای هستند که از یک فضای چت یا پیام باز میشوند. دیالوگ و محتوای آن فقط برای کاربری که آن را باز کرده قابل مشاهده است.
برنامههای چت میتوانند از دیالوگها برای درخواست و جمعآوری اطلاعات از کاربران چت، از جمله فرمهای چند مرحلهای، استفاده کنند. برای جزئیات بیشتر در مورد ساخت ورودیهای فرم، به بخش جمعآوری و پردازش اطلاعات از کاربران مراجعه کنید.
پیشنیازها
اچتیپی
یک افزونهی Google Workspace که Google Chat را توسعه میدهد. برای ساخت آن، راهنمای سریع HTTP را تکمیل کنید.
اسکریپت برنامهها
یک افزونهی Google Workspace که Google Chat را توسعه میدهد. برای ساخت آن، راهنمای سریع Apps Script را تکمیل کنید.
باز کردن یک کادر محاورهای
این بخش نحوه پاسخ دادن و تنظیم یک گفتگو را با انجام موارد زیر توضیح میدهد:
- درخواست گفتگو را از تعامل کاربر فعال میکند.
- با بازگرداندن و باز کردن یک کادر محاورهای، درخواست را مدیریت کنید.
- پس از ارسال اطلاعات توسط کاربران، با بستن کادر محاورهای یا بازگرداندن کادر محاورهای دیگر، اطلاعات ارسالی را پردازش کنید.
ایجاد یک درخواست محاورهای
یک برنامه چت فقط میتواند دیالوگهایی را برای پاسخ به تعامل کاربر، مانند یک دستور یا کلیک روی دکمهای از یک پیام در یک کارت، باز کند.
برای پاسخ به کاربران با یک دیالوگ، یک برنامه چت باید تعاملی ایجاد کند که درخواست دیالوگ را فعال کند، مانند موارد زیر:
- پاسخ به یک فرمان. برای فعال کردن درخواست از یک فرمان، باید هنگام پیکربندی فرمان، کادر انتخاب Opens a dialog را علامت بزنید.
- به کلیک دکمه در یک پیام ، چه به عنوان بخشی از یک کارت و چه در پایین پیام، پاسخ دهید. برای اجرای درخواست از یک دکمه در یک پیام، میتوانید با تنظیم
interactionآن باOPEN_DIALOG، عملکردonClickدکمه را پیکربندی کنید.
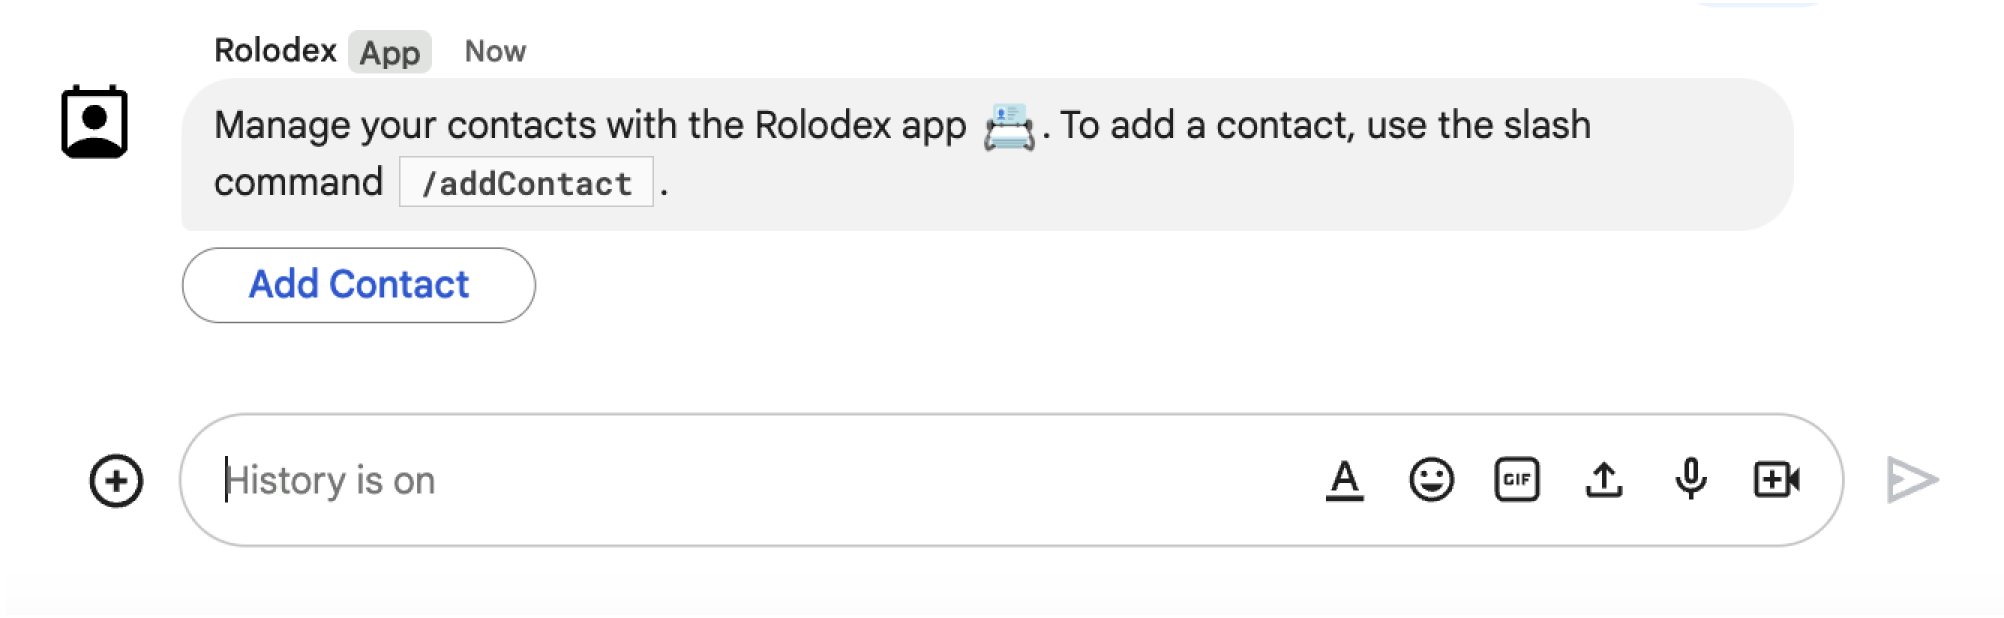
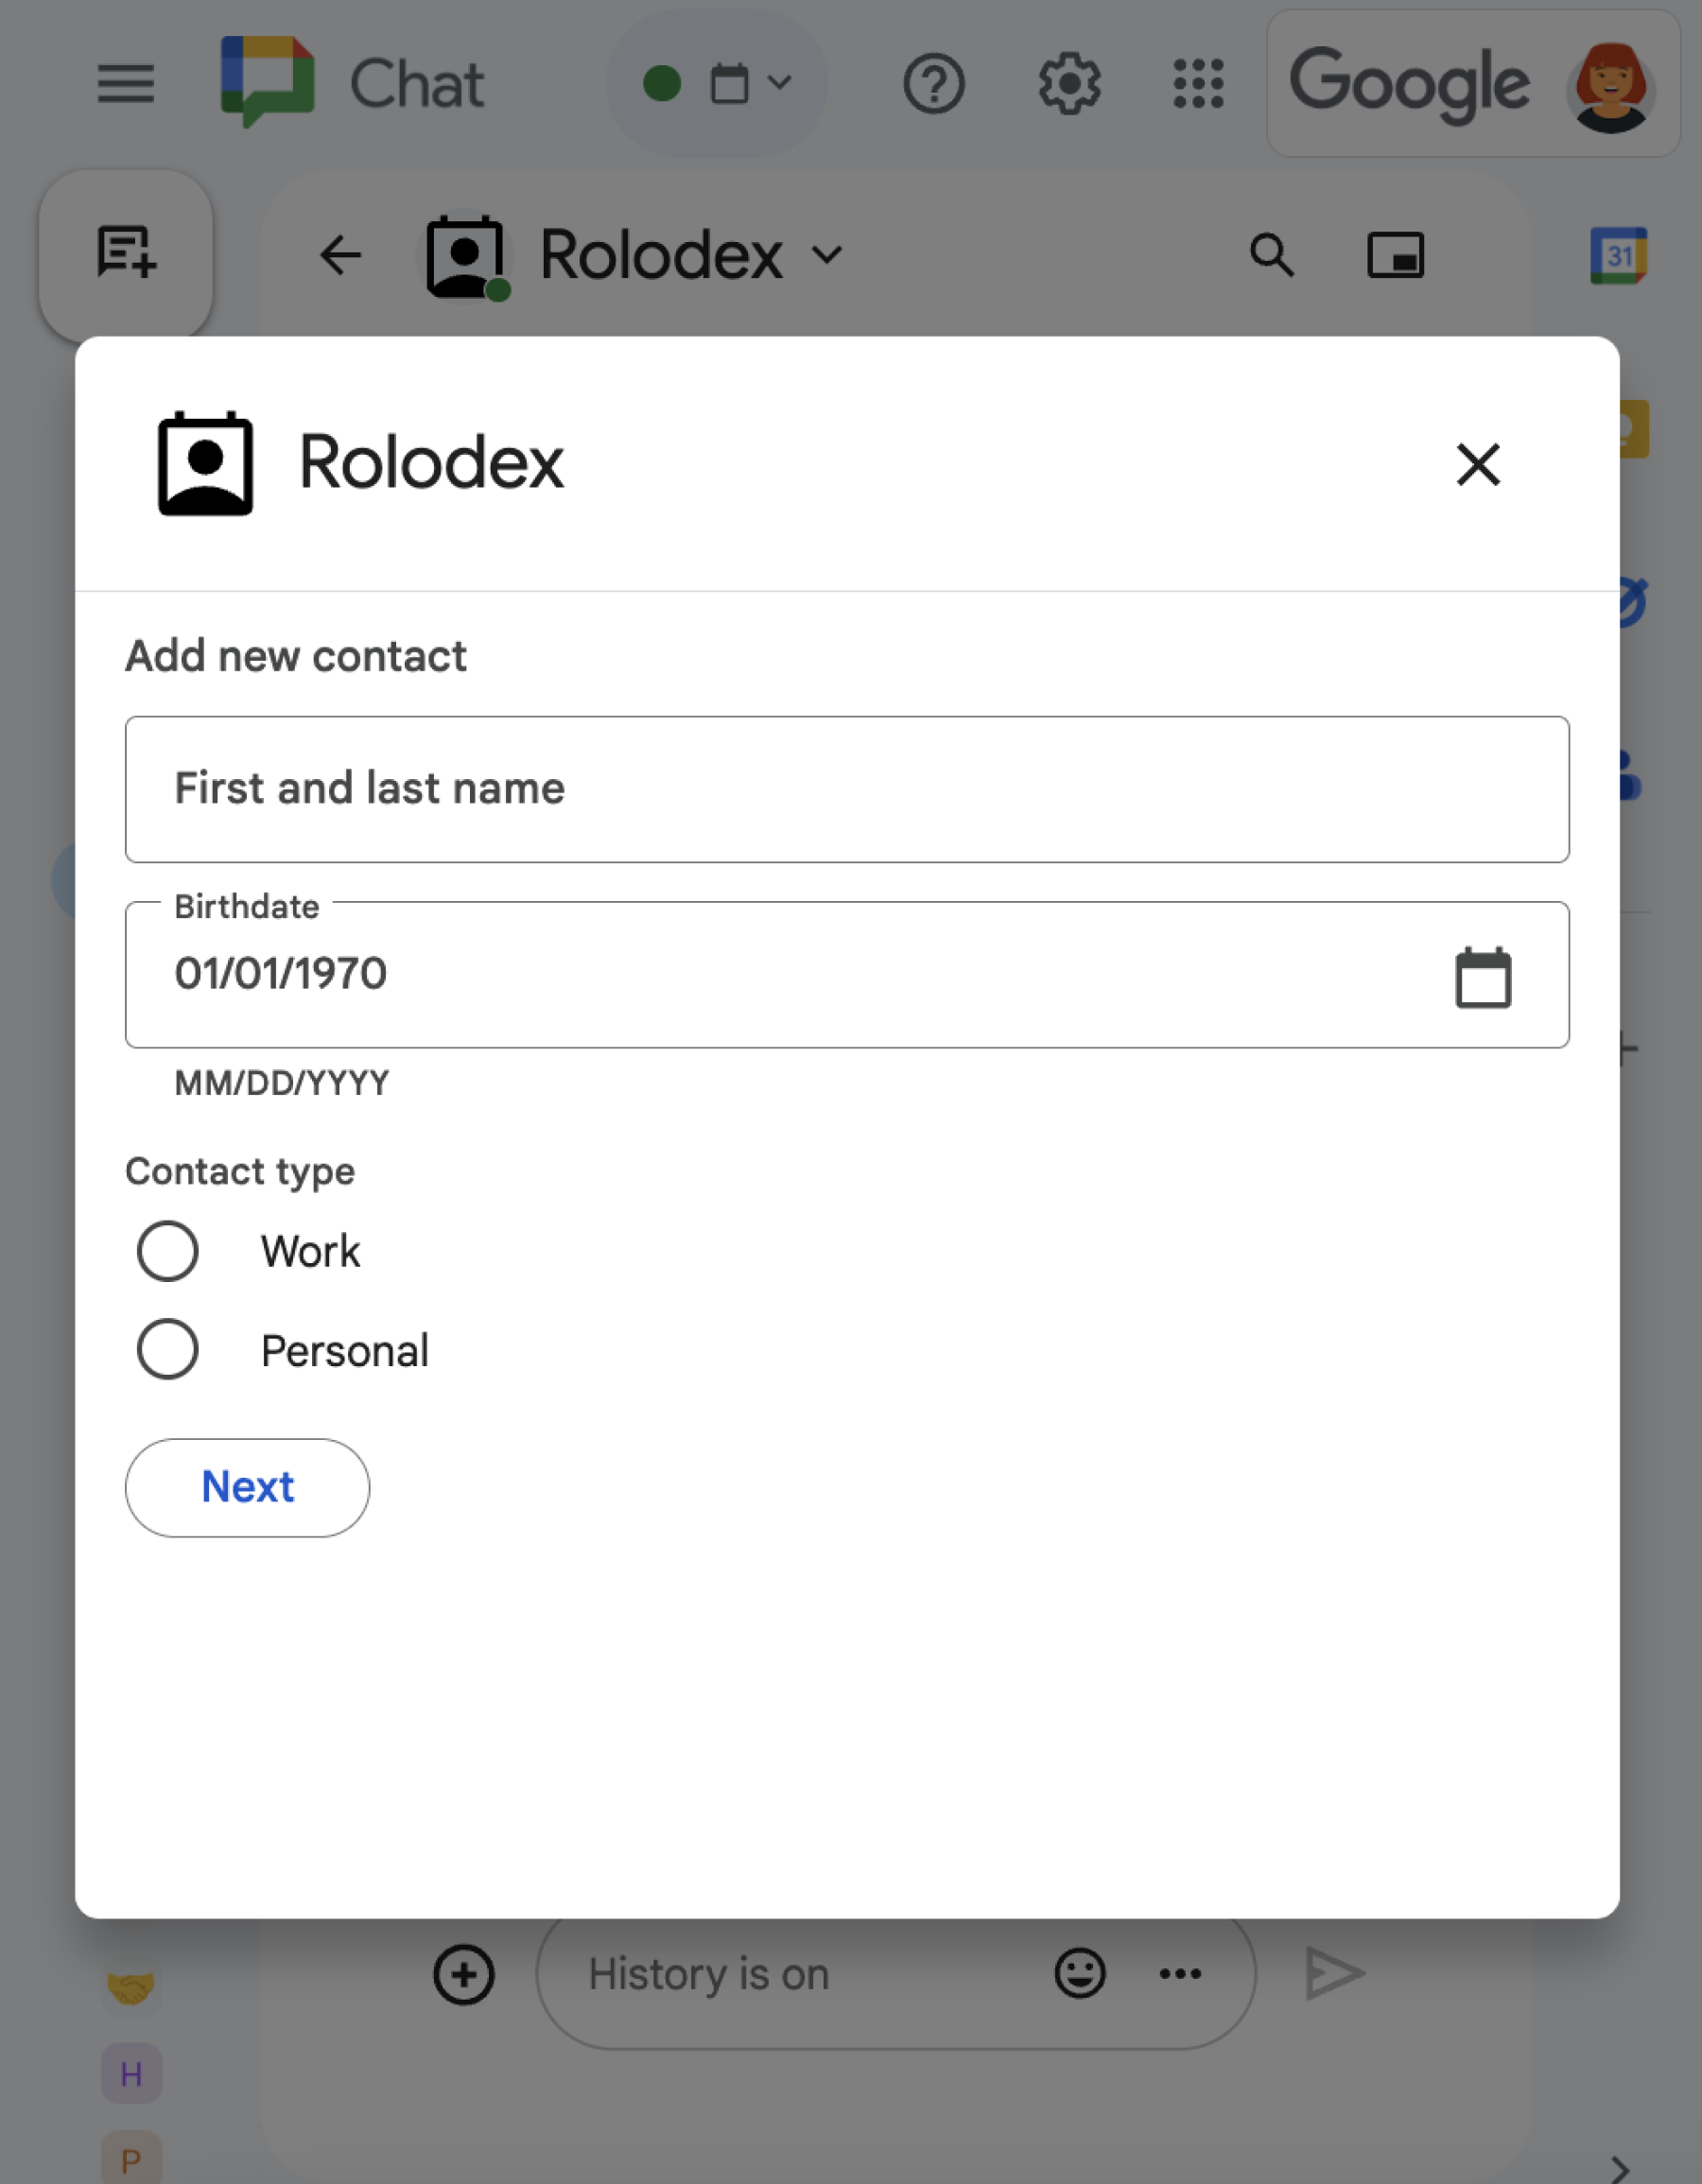
/addContact اسلش ترغیب میکند.این پیام همچنین شامل دکمهای است که کاربران میتوانند برای اجرای دستور روی آن کلیک کنند.
نمونه کد زیر نحوهی فعالسازی درخواست دیالوگ از یک دکمه در یک پیام کارت را نشان میدهد. برای باز کردن دیالوگ، فیلد onClick.action.interaction دکمه را روی OPEN_DIALOG تنظیم کنید:
نود جی اس
FUNCTION_URL با نقطه پایانی HTTP که کلیکهای دکمه را مدیریت میکند، جایگزین کنید.
پایتون
FUNCTION_URL با نقطه پایانی HTTP که کلیکهای دکمه را مدیریت میکند، جایگزین کنید.
جاوا
FUNCTION_URL با نقطه پایانی HTTP که کلیکهای دکمه را مدیریت میکند، جایگزین کنید.
اسکریپت برنامهها
این مثال با برگرداندن JSON کارت، یک پیام کارت ارسال میکند. همچنین میتوانید از سرویس کارت Apps Script استفاده کنید.
باز کردن کادر محاورهای اولیه
وقتی کاربری یک درخواست دیالوگ را ارسال میکند، برنامه چت شما یک شیء رویداد با یک payload دریافت میکند که مشخص میکند یک شیء dialogEventType به عنوان REQUEST_DIALOG است.
برای باز کردن یک کادر محاورهای، برنامه چت شما میتواند با برگرداندن یک شیء RenderActions به همراه pushCard ناوبری برای نمایش یک کارت، به درخواست پاسخ دهد. کارت باید شامل هر عنصر رابط کاربری (UI)، از جمله یک یا چند sections[] از ویجتها باشد. برای جمعآوری اطلاعات از کاربران، میتوانید ویجتهای ورودی فرم و یک ویجت دکمه را مشخص کنید. برای کسب اطلاعات بیشتر در مورد طراحی ورودیهای فرم، به بخش جمعآوری و پردازش اطلاعات از کاربران مراجعه کنید.
نمونه کد زیر نشان میدهد که چگونه یک برنامه چت، پاسخی را برمیگرداند که یک کادر محاورهای را باز میکند:
نود جی اس
FUNCTION_URL با نقطه پایانی HTTP که کلیکهای دکمه را مدیریت میکند، جایگزین کنید.
پایتون
FUNCTION_URL با نقطه پایانی HTTP که کلیکهای دکمه را مدیریت میکند، جایگزین کنید.
جاوا
FUNCTION_URL با نقطه پایانی HTTP که کلیکهای دکمه را مدیریت میکند، جایگزین کنید.
اسکریپت برنامهها
این مثال با برگرداندن JSON کارت، یک پیام کارت ارسال میکند. همچنین میتوانید از سرویس کارت Apps Script استفاده کنید.
مدیریت ارسال دیالوگ
وقتی کاربران روی دکمهای که یک کادر محاورهای را ارسال میکند کلیک میکنند، برنامه چت شما یک شیء رویداد با یک شیء ButtonClickedPayload دریافت میکند. در این payload، dialogEventType روی SUBMIT_DIALOG تنظیم شده است. برای درک نحوه جمعآوری و پردازش اطلاعات در کادر محاورهای، به بخش جمعآوری و پردازش اطلاعات از کاربران Google Chat مراجعه کنید.
برنامه چت شما باید با انجام یکی از موارد زیر به شیء رویداد پاسخ دهد:
- برای پر کردن کارت یا فرم دیگر ، کادر محاورهای دیگری را برگردانید .
- پس از اعتبارسنجی دادههای ارسالی کاربر، کادر محاورهای را ببندید و در صورت تمایل، یک پیام تأیید ارسال کنید.
اختیاری: یک کادر محاورهای دیگر برگردانید
پس از ارسال دیالوگ اولیه توسط کاربران، برنامههای چت میتوانند یک یا چند دیالوگ اضافی را برای کمک به کاربران در بررسی اطلاعات قبل از ارسال، تکمیل فرمهای چند مرحلهای یا پر کردن پویای محتوای فرم، برگردانند.
برای پردازش دادههایی که کاربران وارد میکنند، برنامه چت دادههای موجود در شیء commonEventObject.formInputs مربوط به رویداد را مدیریت میکند. برای کسب اطلاعات بیشتر در مورد بازیابی مقادیر از ویجتهای ورودی، به بخش «جمعآوری و پردازش اطلاعات از کاربران» مراجعه کنید.
برای پیگیری هرگونه دادهای که کاربران از کادر محاورهای اولیه وارد میکنند، باید پارامترهایی را به دکمهای که کادر محاورهای بعدی را باز میکند اضافه کنید. برای جزئیات بیشتر، به بخش انتقال داده به کارت دیگر مراجعه کنید.
در این مثال، یک برنامه چت یک کادر محاورهای اولیه را باز میکند که قبل از ارسال، به کادر محاورهای دوم برای تأیید منتهی میشود:
نود جی اس
FUNCTION_URL با نقطه پایانی HTTP که کلیکهای دکمه را مدیریت میکند، جایگزین کنید.
پایتون
FUNCTION_URL با نقطه پایانی HTTP که کلیکهای دکمه را مدیریت میکند، جایگزین کنید.
جاوا
FUNCTION_URL با نقطه پایانی HTTP که کلیکهای دکمه را مدیریت میکند، جایگزین کنید.
اسکریپت برنامهها
این مثال با برگرداندن JSON کارت، یک پیام کارت ارسال میکند. همچنین میتوانید از سرویس کارت Apps Script استفاده کنید.
بستن کادر محاورهای
وقتی کاربران روی دکمه ارسال در یک کادر محاورهای کلیک میکنند، برنامه چت شما اکشن مرتبط با آن را اجرا میکند و شیء رویداد را با buttonClickedPayload که به صورت زیر تنظیم شده است، ارائه میدهد:
-
isDialogEventtrueاست. -
dialogEventTypeSUBMIT_DIALOGاست.
برنامه چت باید یک شیء RenderActions با EndNavigation تنظیم شده روی CLOSE_DIALOG برگرداند.
اختیاری: نمایش یک اعلان موقت
وقتی کادر محاورهای را میبندید، میتوانید یک اعلان متنی موقت نیز به کاربری که در حال تعامل با برنامه است، نمایش دهید.
برای نمایش یک اعلان، شیء RenderActions را به همراه فیلد notification تنظیم شده، برگردانید.
مثال زیر کادر محاورهای را با یک اعلان متنی میبندد:
نود جی اس
پایتون
جاوا
اسکریپت برنامهها
این مثال با برگرداندن JSON کارت، یک پیام کارت ارسال میکند. همچنین میتوانید از سرویس کارت Apps Script استفاده کنید.
برای جزئیات بیشتر در مورد ارسال پارامترها بین کادرهای محاورهای، به بخش انتقال داده به کارت دیگر مراجعه کنید.
اختیاری: ارسال پیام چت تأیید
وقتی کادر محاورهای را میبندید، میتوانید یک پیام چت جدید ارسال کنید یا یک پیام موجود را بهروزرسانی کنید.
برای ارسال پیام جدید، یک شیء DataActions را با فیلد CreateMessageAction که با پیام جدید تنظیم شده است، برگردانید. برای مثال، برای بستن کادر محاورهای و ارسال پیام متنی، کد زیر را برگردانید:
مثال زیر با ارسال یک پیام جدید، پنجره گفتگو را میبندد:
نود جی اس
پایتون
جاوا
اسکریپت برنامهها
این مثال با برگرداندن JSON کارت، یک پیام کارت ارسال میکند. همچنین میتوانید از سرویس کارت Apps Script استفاده کنید.
برای بهروزرسانی یک پیام پس از ارسال یک دیالوگ توسط کاربر، یک شیء DataActions را که شامل یکی از اقدامات زیر است، برگردانید:
-
UpdateMessageAction: پیامی که توسط برنامه چت ارسال شده است را بهروزرسانی میکند ، مانند پیامی که کاربر از طریق آن کادر محاورهای را درخواست کرده است. -
UpdateInlinePreviewAction: کارت را از طریق پیشنمایش لینک بهروزرسانی میکند.
عیبیابی
وقتی یک برنامه یا کارت چت گوگل خطایی را برمیگرداند، رابط چت پیامی با عنوان «مشکلی پیش آمده است» یا «درخواست شما قابل پردازش نیست» نمایش میدهد. گاهی اوقات رابط کاربری چت هیچ پیام خطایی را نمایش نمیدهد، اما برنامه یا کارت چت نتیجه غیرمنتظرهای را ایجاد میکند؛ برای مثال، ممکن است پیام کارت ظاهر نشود.
اگرچه ممکن است پیام خطا در رابط کاربری چت نمایش داده نشود، پیامهای خطای توصیفی و دادههای گزارش برای کمک به شما در رفع خطاها هنگام فعال بودن ثبت خطا برای برنامههای چت در دسترس هستند. برای کمک به مشاهده، اشکالزدایی و رفع خطاها، به عیبیابی و رفع خطاهای گوگل چت مراجعه کنید.