

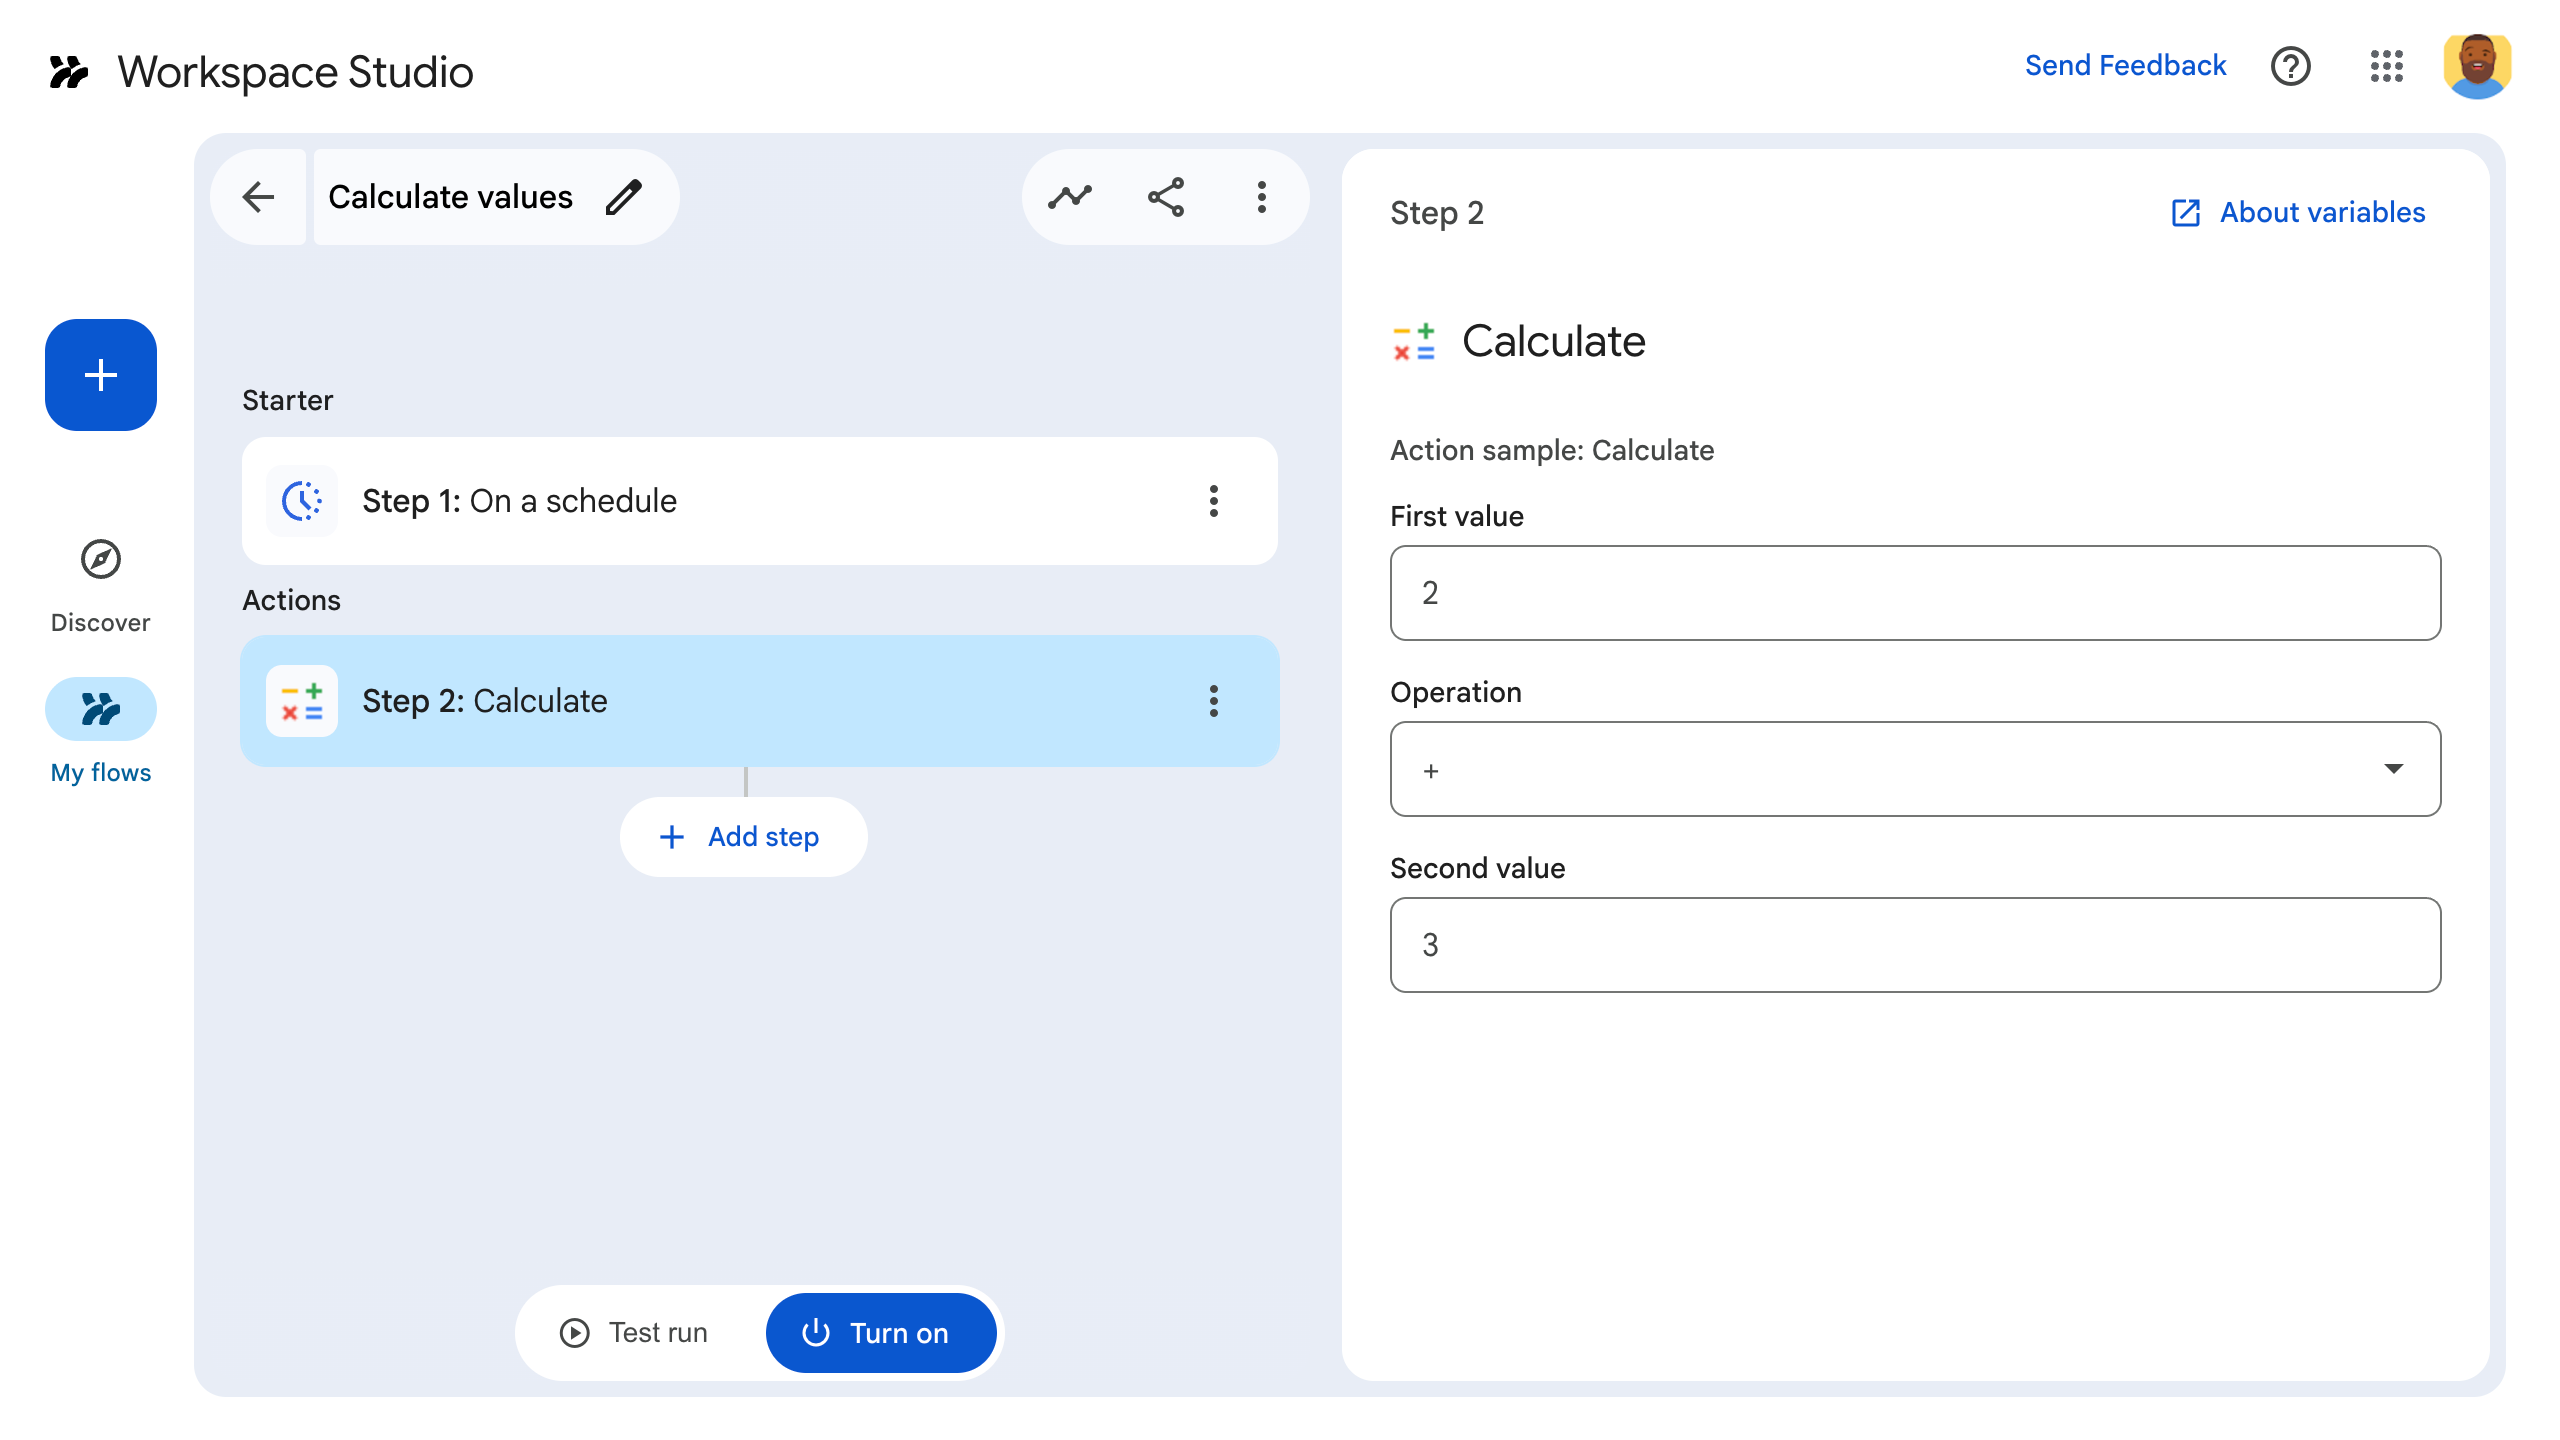
يوضّح لك دليل البدء السريع هذا كيفية إنشاء خطوة مخصّصة لـ Workspace Studio باستخدام "برمجة تطبيقات Google". تأخذ الخطوة المخصّصة رقمَين وعملية حسابية كمدخلات، وتُجري العملية الحسابية، وتُخرج النتيجة.
الأهداف
- أنشِئ خطوة مخصّصة في Workspace Studio باستخدام "برمجة تطبيقات Google".
- انشر الخطوة المخصّصة في مؤسستك على Google Workspace.
- اختبِر الخطوة المخصّصة في Workspace Studio.
المتطلبات الأساسية
- حساب Google يتيح الوصول إلى Workspace Studio
إعداد النص البرمجي
لإعداد النص البرمجي، أنشئ مشروعًا جديدًا في "برمجة تطبيقات Google" وأضِف رمز البدء السريع:
انقر على الزر التالي لإنشاء مشروع جديد في "برمجة تطبيقات Google":
أدخِل اسمًا لمشروع "برمجة تطبيقات Google":
انقر على مشروع بلا عنوان.
في حقل عنوان المشروع، اكتب
Calculator quickstart.انقر على إعادة تسمية.
بجانب ملف
Code.gs، انقر على "المزيد" > إعادة التسمية. أدخِل اسم الملفCalculator.استبدِل محتوى
Calculator.gsبالرمز التالي. يحدّد هذا الملف خطوة مخصّصة لـ Google Workspace Studio باسم "Calculate" تأخذ رقمَين وعملية كإدخال وتعرض نتيجة العملية الحسابية.عرض رمز
Calculator.gs/** * This script defines a custom step for Google Workspace Studio. * The step, named "Calculate", takes two numbers and an operation as input * and returns the result of the calculation. * * The script includes functions to: * * 1. Define the configuration UI for the step using Card objects: * * - `onConfigCalculateFunction()`: Generates the main configuration card. * - Helper functions like `pushCard()`, `saveButton()` to build card components. * * 2. Handle the execution of the step. * * - `onExecuteCalculateFunction()`: Retrieves inputs, performs the calculation, * and returns outputs. * * To learn more, see the following quickstart guide: * https://developers.google.com/workspace/add-ons/studio/quickstart */ /** * Creates an action response to push a new card onto the card stack. * * This function generates an action object that, when returned, causes the * provided card to be pushed onto the card stack, making it the currently * displayed card in the configuration UI. * @param {Object} card The Card object to push. * @return {Object} The action response object. */ function pushCard(card) { return { "action": { "navigations": [{ "push_card": card } ] } }; } /** * Creates an action response to update the currently displayed card. * * This function generates an action object that, when returned, causes the * currently displayed card to be replaced with the provided card in the * configuration UI. * @param {Object} card The Card object to update. * @return {Object} The render actions object. */ function updateCard(card) { return { "render_actions": { "action": { "navigations": [{ "update_card": card } ] } } }; } /** * Creates a button configuration object for saving the step. * * This function generates a button definition that, when clicked, triggers * a save action for the current step configuration. * @return {Object} The button widget object. */ function saveButton() { return { "text": "Save", "onClick": { "hostAppAction" : { "workflowAction" : { "saveWorkflowAction" : {} } } }, }; } /** * Creates a button configuration object for a refresh action. * * This function generates a button definition that, when clicked, triggers * a function to refresh the current card. * @param {string} functionName The name of the Apps Script function to call on click. * @return {Object} The button widget object. */ function refreshButton(functionName) { return { "text": "Refresh", "onClick": { "action" : { "function" : functionName } }, }; } /** * Generates and displays a configuration card for the sample calculation action. * * This function creates a card with input fields for two values and a dropdown * for selecting an arithmetic operation. The card also includes a "Save" * button to save the action configuration for the step. * * The input fields are configured to let the user select outputs from previous * steps as input values using the `hostAppDataSource` property. * This function is called when the user adds or edits the "Calculate" step in the UI. * @return {Object} The action response object containing the card to display. */ function onConfigCalculateFunction() { var card = { "sections": [ { "header": "Action sample: Calculate", "widgets": [ { "textInput": { "name": "value1", "label": "First value", "hostAppDataSource" : { "workflowDataSource" : { "includeVariables" : true } } } }, { "selectionInput": { "name": "operation", "label": "Operation", "type": "DROPDOWN", "items": [ { "text": "+", "value": "+", }, { "text": "-", "value": "-", }, { "text": "x", "value": "x", }, { "text": "/", "value": "/", } ] } }, { "textInput": { "name": "value2", "label": "Second value", "hostAppDataSource" : { "workflowDataSource" : { "includeVariables" : true } } } } ] } ] }; return pushCard(card); } /** * Gets an integer value from variable data, handling both string and integer formats. * * This function attempts to extract an integer value from the provided variable data. * It checks if the data contains string values and, if so, parses the first string * as an integer. If integer values are present, it returns the first integer. * @param {Object} variableData The variable data object from the event. * @return {number} The extracted integer value. */ function getIntValue(variableData) { if (variableData.stringValues) { return parseInt(variableData.stringValues[0]); } return variableData.integerValues[0]; } /** * Returns output variables from a step. * * This function constructs an object that, when returned, sends the * provided variable values as output from the current step. * The variable values are logged to the console for debugging purposes. */ function outputVariables(variableDataMap) { const workflowAction = AddOnsResponseService.newReturnOutputVariablesAction() .setVariableDataMap(variableDataMap); const hostAppAction = AddOnsResponseService.newHostAppAction() .setWorkflowAction(workflowAction); const renderAction = AddOnsResponseService.newRenderActionBuilder() .setHostAppAction(hostAppAction) .build(); return renderAction; } /** * Executes the calculation action based on the inputs from an event. * * This function retrieves input values ("value1", "value2") and the "operation" * from the event, performs the calculation, and returns the "result" and * "log" as output variables. * This function is called when the flow reaches this custom step. * @param {Object} event The event object passed by the runtime. * @return {Object} The output variables object. */ function onExecuteCalculateFunction(event) { console.log("output: " + JSON.stringify(event)); var calculatedValue = 0; var value1 = event.workflow.actionInvocation.inputs["value1"].integerValues[0]; var value2 = event.workflow.actionInvocation.inputs["value2"].integerValues[0]; var operation = event.workflow.actionInvocation.inputs["operation"].stringValues[0]; if (operation == "+") { calculatedValue = value1 + value2; } else if (operation == "-") { calculatedValue = value1 - value2; } else if (operation == "x") { calculatedValue = value1 * value2; } else if (operation == "/") { calculatedValue = value1 / value2; } const variableDataMap = { "result": AddOnsResponseService.newVariableData().addIntegerValue(calculatedValue) }; return outputVariables(variableDataMap); }
انقر على إعدادات المشروع وضَع علامة في المربّع عرض ملف البيان "appsscript.json" في المحرِّر.
انقر على المحرِّر ، وافتح ملف البيان
appsscript.json، واستبدِل محتواه بالرمز التالي:عرض رمز
appsscript.json{ "timeZone": "America/Los_Angeles", "exceptionLogging": "STACKDRIVER", "runtimeVersion": "V8", "addOns": { "common": { "name": "Calculator", "logoUrl": "https://www.gstatic.com/images/branding/productlogos/calculator_search/v1/web-24dp/logo_calculator_search_color_1x_web_24dp.png", "useLocaleFromApp": true }, "flows": { "workflowElements": [ { "id": "actionElement", "state": "ACTIVE", "name": "Calculate", "description": "Asks the user for two values and a math operation, then performs the math operation on the values and outputs the result.", "workflowAction": { "inputs": [ { "id": "value1", "description": "value1", "cardinality": "SINGLE", "dataType": { "basicType": "INTEGER" } }, { "id": "value2", "description": "value2", "cardinality": "SINGLE", "dataType": { "basicType": "INTEGER" } }, { "id": "operation", "description": "operation", "cardinality": "SINGLE", "dataType": { "basicType": "STRING" } } ], "outputs": [ { "id": "result", "description": "Calculated result", "cardinality": "SINGLE", "dataType": { "basicType": "INTEGER" } } ], "onConfigFunction": "onConfigCalculateFunction", "onExecuteFunction": "onExecuteCalculateFunction" } } ] } } }
انقر على "حفظ" .
نشر الخطوة واختبارها
لاختبار خطوتك، يمكنك إعداد عملية نشر تجريبية للإضافة، ثم إضافة الخطوة إلى سير عمل وتشغيل سير العمل.
إعداد عملية نشر تجريبية للإضافة:
- افتح مشروع النص البرمجي في محرِّر "برمجة التطبيقات".
- انقر على نشر > اختبار عمليات النشر.
- انقر على تثبيت.
- في أسفل الصفحة، انقر على تم.
يمكنك السماح للمستخدمين الآخرين باختبار الإضافة من خلال مشاركة مشروع "برمجة تطبيقات Google" مع حساباتهم (يجب منحهم إذن التعديل). بعد ذلك، اطلب من المستخدمين اتّباع الخطوات السابقة.
بعد تثبيت الإضافة، تصبح متاحة على الفور في Flows. قد تحتاج إلى إعادة تحميل Flows قبل ظهور الإضافة. يجب أيضًا تفويض الإضافة قبل استخدامها.
لمزيد من المعلومات عن عمليات النشر الاختبارية، يُرجى الاطّلاع على تثبيت إضافة غير منشورة.
افتح Flows.
أنشِئ مسارًا يتضمّن خطوتك:
- انقر على مسار جديد.
- اختَر طريقة بدء المسار. إذا كانت الخطوة تتطلّب متغيّر إدخال، اضبط متغيّر الإدخال كجزء من مخرجات المشغّل.
- انقر على إضافة خطوة. اختَر الخطوة التي أنشأتها أو عدّلتها، والتي تحمل اسم Calculate.
- اضبط الخطوة. بالنسبة إلى خطوة الحساب، اختَر قيمتَين وعملية حسابية. يتم حفظ الخطوة تلقائيًا.
- لاختبار مخرجات الخطوة، أضِف خطوة أخرى. على سبيل المثال، لإضافة مخرجات إلى رسالة في Google Chat، أضِف خطوة إرسال إشعار إليّ في Chat. في الرسالة، انقر على المتغيّرات واختَر مخرجات الخطوة. بالنسبة إلى خطوة الحساب، اختَر المتغيّرات > الخطوة 2: الحساب > النتيجة المحسوبة. يظهر المتغيّر كشريحة في حقل الرسالة.
- انقر على تفعيل. أصبح المسار جاهزًا للتشغيل.
شغِّل المسار من خلال تفعيل إجراء التفعيل الخاص به. على سبيل المثال، إذا بدأ سير العمل وفقًا لجدول زمني، سيتم تشغيله في التاريخ والوقت المحدَّدَين.
تأكَّد من أنّ المسار يعمل على النحو المتوقّع. يمكنك الاطّلاع على السجلّات من خلال الانتقال إلى علامة التبويب النشاط في أداة إنشاء التدفقات. لمعرفة كيفية إنشاء سجلّات مخصّصة في علامة التبويب "النشاط"، يُرجى الاطّلاع على سجلّات الأنشطة.
الخطوات التالية
لقد أنشأت خطوة مخصّصة واختبرتها بنجاح في Workspace Studio. ويمكنك الآن:
يمكنك مواصلة تخصيص الخطوة من خلال توجيه طلب إلى Gemini لمساعدتك في تنفيذ منطق أكثر تعقيدًا.
إنشاء بطاقة إعدادات لتخصيص إعدادات الخطوة
تسجيل النشاط والأخطاء لتسجيل عمليات تشغيل الخطوات وتحديد المشاكل وحلّها
مراجعة كائنات الأحداث لمراجعة حمولة JSON التي ترسلها التدفقات وتتلقاها أثناء تشغيل الخطوات.
يمكنك تجربة الدرس التطبيقي حول الترميز إنشاء خطوات مخصّصة للمشغّلات والإجراءات في Workspace Studio لإنشاء مشغّل مخصّص وخطوة مخصّصة باستخدام "برمجة تطبيقات Google".