

Questa guida rapida spiega come creare un passaggio personalizzato per Workspace Studio utilizzando Google Apps Script. Il passaggio personalizzato accetta due numeri e un'operazione aritmetica come input, esegue il calcolo e restituisce il risultato.
Obiettivi
- Crea un passaggio personalizzato per Workspace Studio con Google Apps Script.
- Esegui il deployment del passaggio personalizzato nella tua organizzazione Google Workspace.
- Testa il passaggio personalizzato in Workspace Studio.
Prerequisiti
- Un Account Google con accesso a Workspace Studio.
Configura lo script
Per configurare lo script, crea un nuovo progetto Apps Script e aggiungi il codice di avvio rapido:
Fai clic sul seguente pulsante per creare un nuovo progetto Apps Script:
Assegna un nome al progetto Apps Script:
Fai clic su Progetto senza titolo.
In Titolo del progetto, digita
Calculator quickstart.Fai clic su Rinomina.
Accanto al file
Code.gs, fai clic su Altro > Rinomina. Assegna al file il nomeCalculator.Sostituisci i contenuti di
Calculator.gscon il seguente codice. Questo file definisce un passaggio personalizzato per Google Workspace Studio denominato "Calculate" che accetta due numeri e un'operazione come input e restituisce il risultato del calcolo.Visualizza il codice
Calculator.gs/** * This script defines a custom step for Google Workspace Studio. * The step, named "Calculate", takes two numbers and an operation as input * and returns the result of the calculation. * * The script includes functions to: * * 1. Define the configuration UI for the step using Card objects: * * - `onConfigCalculateFunction()`: Generates the main configuration card. * - Helper functions like `pushCard()`, `saveButton()` to build card components. * * 2. Handle the execution of the step. * * - `onExecuteCalculateFunction()`: Retrieves inputs, performs the calculation, * and returns outputs. * * To learn more, see the following quickstart guide: * https://developers.google.com/workspace/add-ons/studio/quickstart */ /** * Creates an action response to push a new card onto the card stack. * * This function generates an action object that, when returned, causes the * provided card to be pushed onto the card stack, making it the currently * displayed card in the configuration UI. * @param {Object} card The Card object to push. * @return {Object} The action response object. */ function pushCard(card) { return { "action": { "navigations": [{ "push_card": card } ] } }; } /** * Creates an action response to update the currently displayed card. * * This function generates an action object that, when returned, causes the * currently displayed card to be replaced with the provided card in the * configuration UI. * @param {Object} card The Card object to update. * @return {Object} The render actions object. */ function updateCard(card) { return { "render_actions": { "action": { "navigations": [{ "update_card": card } ] } } }; } /** * Creates a button configuration object for saving the step. * * This function generates a button definition that, when clicked, triggers * a save action for the current step configuration. * @return {Object} The button widget object. */ function saveButton() { return { "text": "Save", "onClick": { "hostAppAction" : { "workflowAction" : { "saveWorkflowAction" : {} } } }, }; } /** * Creates a button configuration object for a refresh action. * * This function generates a button definition that, when clicked, triggers * a function to refresh the current card. * @param {string} functionName The name of the Apps Script function to call on click. * @return {Object} The button widget object. */ function refreshButton(functionName) { return { "text": "Refresh", "onClick": { "action" : { "function" : functionName } }, }; } /** * Generates and displays a configuration card for the sample calculation action. * * This function creates a card with input fields for two values and a dropdown * for selecting an arithmetic operation. The card also includes a "Save" * button to save the action configuration for the step. * * The input fields are configured to let the user select outputs from previous * steps as input values using the `hostAppDataSource` property. * This function is called when the user adds or edits the "Calculate" step in the UI. * @return {Object} The action response object containing the card to display. */ function onConfigCalculateFunction() { var card = { "sections": [ { "header": "Action sample: Calculate", "widgets": [ { "textInput": { "name": "value1", "label": "First value", "hostAppDataSource" : { "workflowDataSource" : { "includeVariables" : true } } } }, { "selectionInput": { "name": "operation", "label": "Operation", "type": "DROPDOWN", "items": [ { "text": "+", "value": "+", }, { "text": "-", "value": "-", }, { "text": "x", "value": "x", }, { "text": "/", "value": "/", } ] } }, { "textInput": { "name": "value2", "label": "Second value", "hostAppDataSource" : { "workflowDataSource" : { "includeVariables" : true } } } } ] } ] }; return pushCard(card); } /** * Gets an integer value from variable data, handling both string and integer formats. * * This function attempts to extract an integer value from the provided variable data. * It checks if the data contains string values and, if so, parses the first string * as an integer. If integer values are present, it returns the first integer. * @param {Object} variableData The variable data object from the event. * @return {number} The extracted integer value. */ function getIntValue(variableData) { if (variableData.stringValues) { return parseInt(variableData.stringValues[0]); } return variableData.integerValues[0]; } /** * Returns output variables from a step. * * This function constructs an object that, when returned, sends the * provided variable values as output from the current step. * The variable values are logged to the console for debugging purposes. */ function outputVariables(variableDataMap) { const workflowAction = AddOnsResponseService.newReturnOutputVariablesAction() .setVariableDataMap(variableDataMap); const hostAppAction = AddOnsResponseService.newHostAppAction() .setWorkflowAction(workflowAction); const renderAction = AddOnsResponseService.newRenderActionBuilder() .setHostAppAction(hostAppAction) .build(); return renderAction; } /** * Executes the calculation action based on the inputs from an event. * * This function retrieves input values ("value1", "value2") and the "operation" * from the event, performs the calculation, and returns the "result" and * "log" as output variables. * This function is called when the flow reaches this custom step. * @param {Object} event The event object passed by the runtime. * @return {Object} The output variables object. */ function onExecuteCalculateFunction(event) { console.log("output: " + JSON.stringify(event)); var calculatedValue = 0; var value1 = event.workflow.actionInvocation.inputs["value1"].integerValues[0]; var value2 = event.workflow.actionInvocation.inputs["value2"].integerValues[0]; var operation = event.workflow.actionInvocation.inputs["operation"].stringValues[0]; if (operation == "+") { calculatedValue = value1 + value2; } else if (operation == "-") { calculatedValue = value1 - value2; } else if (operation == "x") { calculatedValue = value1 * value2; } else if (operation == "/") { calculatedValue = value1 / value2; } const variableDataMap = { "result": AddOnsResponseService.newVariableData().addIntegerValue(calculatedValue) }; return outputVariables(variableDataMap); }
Fai clic su Impostazioni progetto e seleziona la casella di controllo Mostra il file manifest "appsscript.json" nell'editor.
Fai clic su Editor , apri il file manifest
appsscript.jsone sostituisci i contenuti con il seguente codice:Visualizza il codice
appsscript.json{ "timeZone": "America/Los_Angeles", "exceptionLogging": "STACKDRIVER", "runtimeVersion": "V8", "addOns": { "common": { "name": "Calculator", "logoUrl": "https://www.gstatic.com/images/branding/productlogos/calculator_search/v1/web-24dp/logo_calculator_search_color_1x_web_24dp.png", "useLocaleFromApp": true }, "flows": { "workflowElements": [ { "id": "actionElement", "state": "ACTIVE", "name": "Calculate", "description": "Asks the user for two values and a math operation, then performs the math operation on the values and outputs the result.", "workflowAction": { "inputs": [ { "id": "value1", "description": "value1", "cardinality": "SINGLE", "dataType": { "basicType": "INTEGER" } }, { "id": "value2", "description": "value2", "cardinality": "SINGLE", "dataType": { "basicType": "INTEGER" } }, { "id": "operation", "description": "operation", "cardinality": "SINGLE", "dataType": { "basicType": "STRING" } } ], "outputs": [ { "id": "result", "description": "Calculated result", "cardinality": "SINGLE", "dataType": { "basicType": "INTEGER" } } ], "onConfigFunction": "onConfigCalculateFunction", "onExecuteFunction": "onExecuteCalculateFunction" } } ] } } }
Fai clic su Salva .
Esegui il deployment e testa il passaggio
Per testare il passaggio, configura un deployment di test per il componente aggiuntivo, aggiungi il passaggio a un flusso, quindi esegui il flusso.
Configura un deployment di test per il tuo componente aggiuntivo:
- Apri il progetto di script nell'editor di Apps Script.
- Fai clic su Esegui il deployment > Esegui il deployment dei test.
- Fai clic su Installa.
- In basso, fai clic su Fine.
Puoi consentire ad altri utenti di testare il componente aggiuntivo condividendo il progetto Apps Script con il loro account (è richiesto l'accesso in modifica). Quindi, chiedi agli utenti di seguire i passaggi precedenti.
Una volta installato, il componente aggiuntivo è immediatamente disponibile in Flows. Potresti dover aggiornare Flows prima che venga visualizzato il componente aggiuntivo. Devi anche autorizzare il componente aggiuntivo prima di utilizzarlo.
Per scoprire di più sui deployment di test, consulta Installa un componente aggiuntivo non pubblicato.
Apri Flows.
Crea un flusso che includa il tuo passaggio:
- Fai clic su Nuovo flusso.
- Seleziona come avviare il flusso. Se il passaggio richiede una variabile di input, configurala come parte dell'output del comando iniziale.
- Fai clic su Aggiungi passaggio. Seleziona il passaggio che hai creato o aggiornato, denominato Calculate.
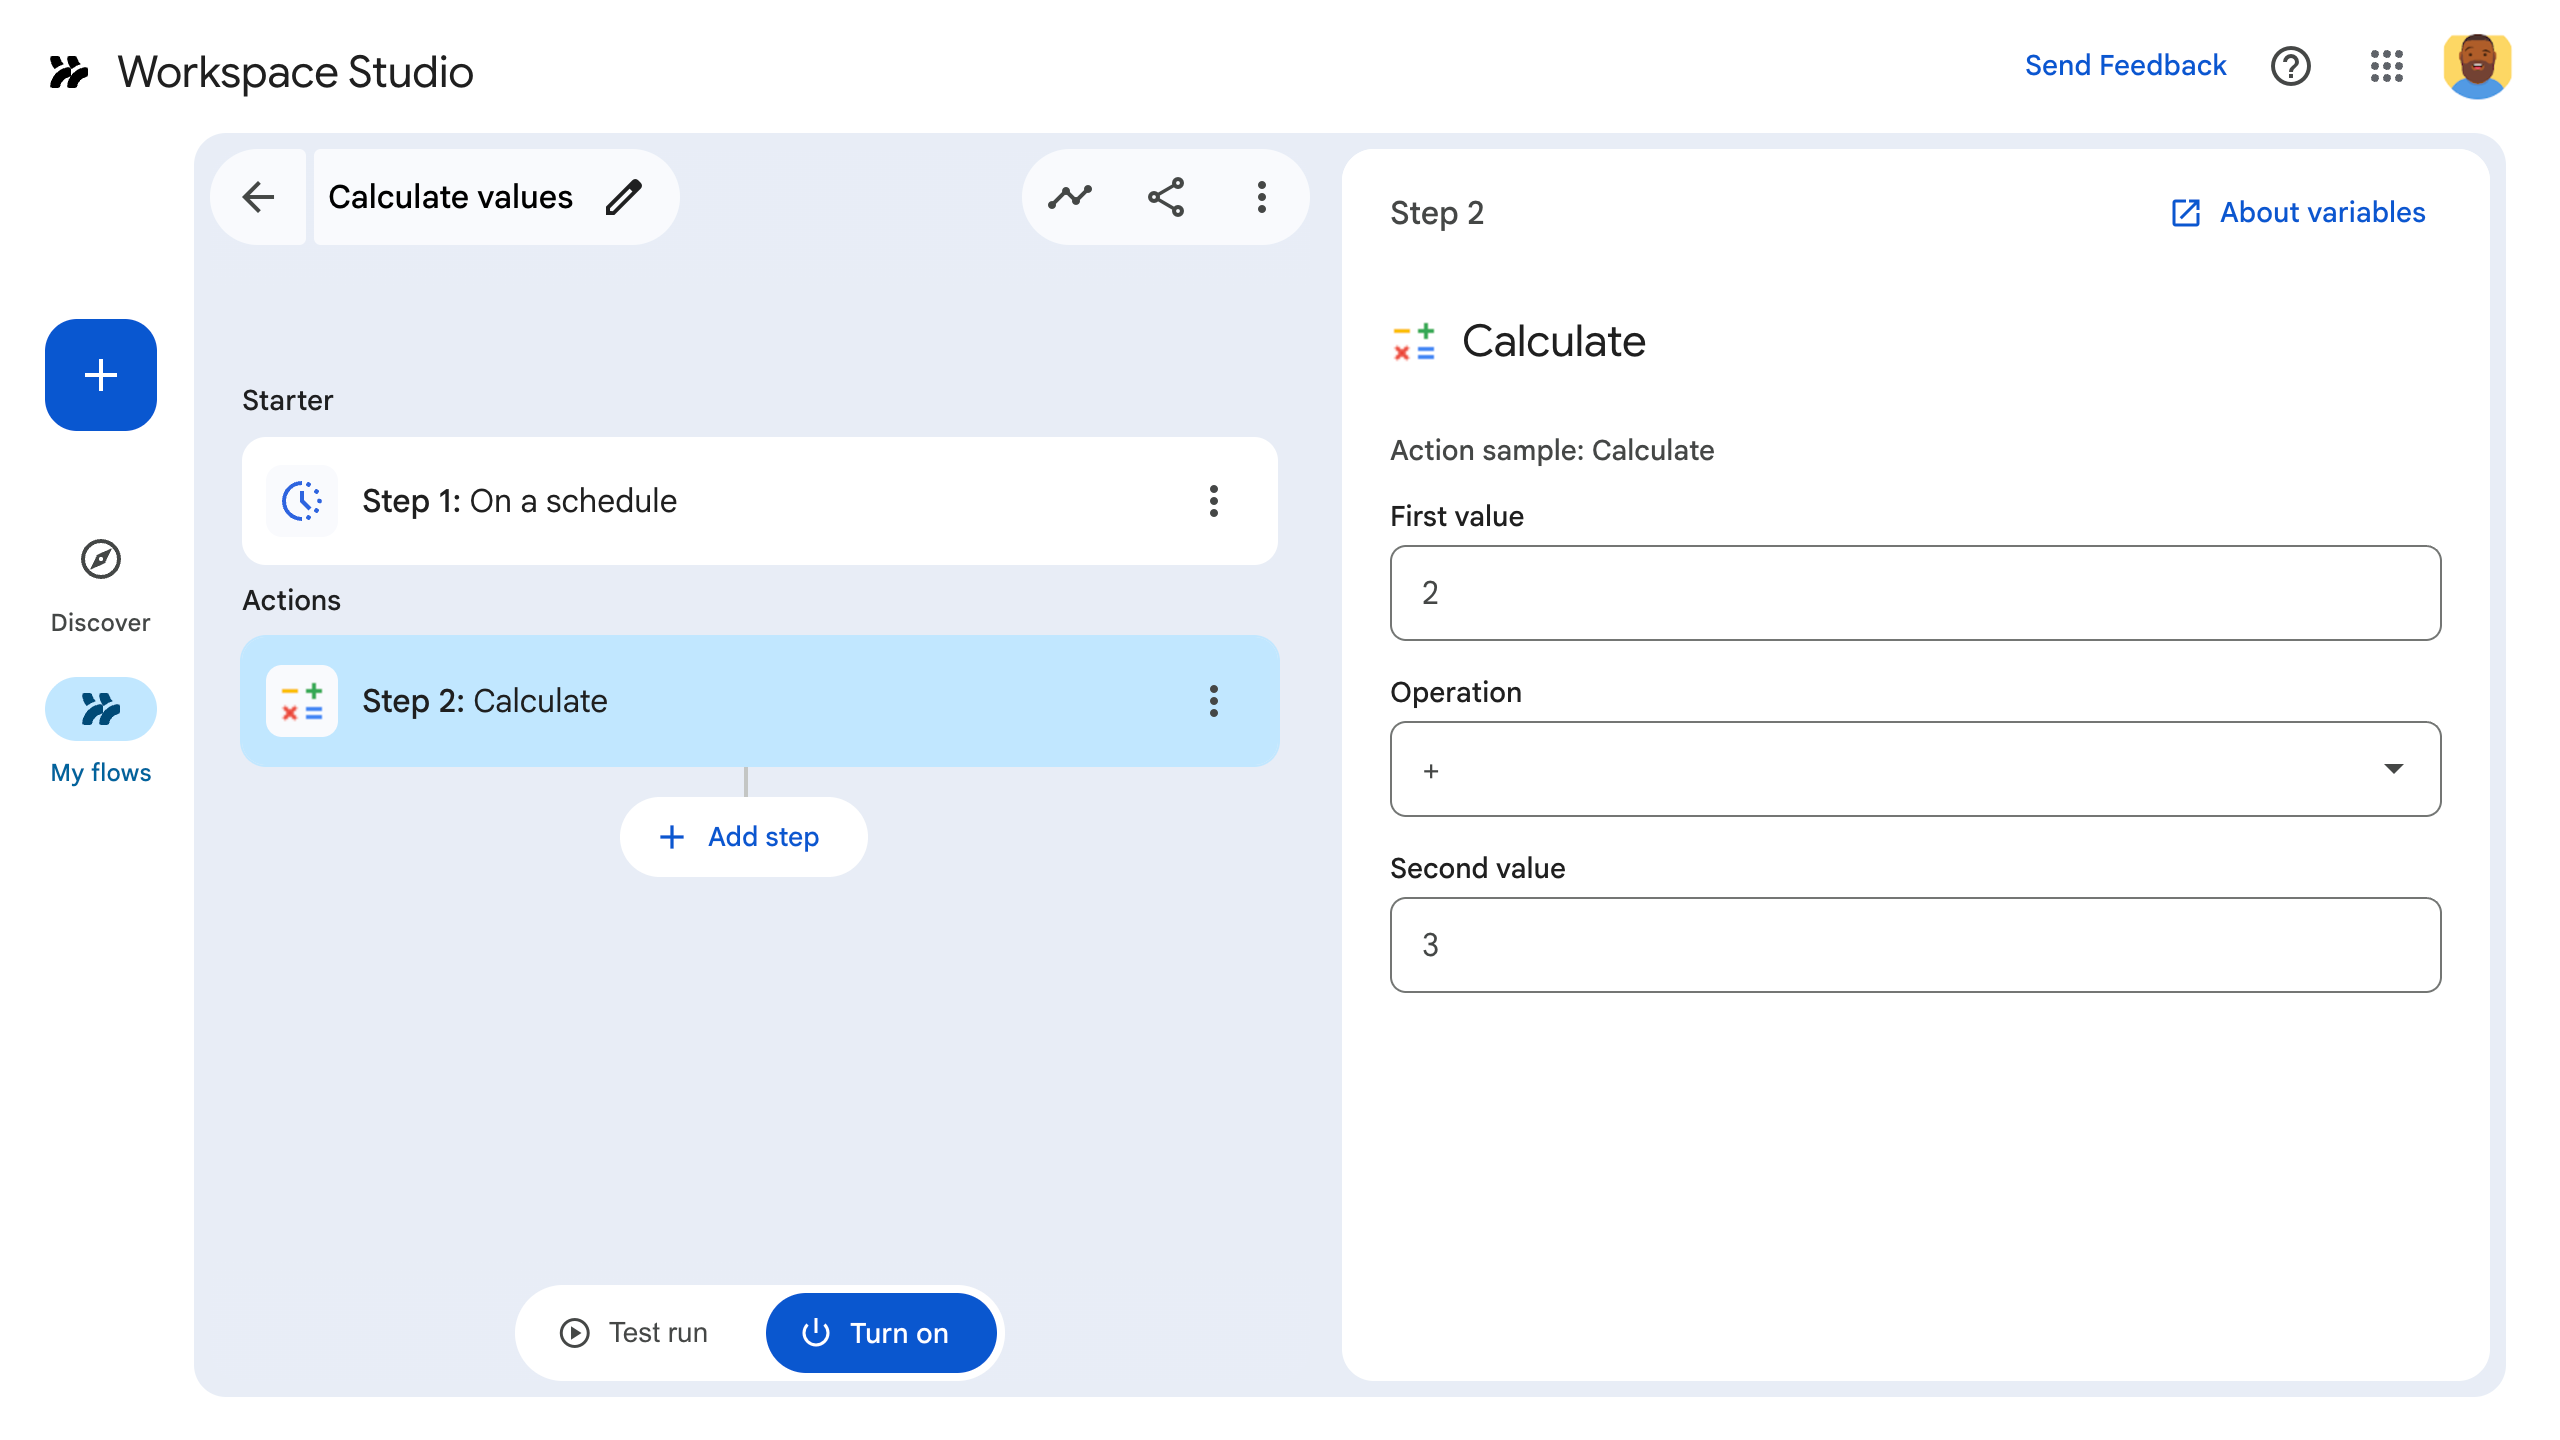
- Configura il passaggio. Per il passaggio di calcolo, scegli due valori e un'operazione matematica. Il passaggio viene salvato automaticamente.
- Per testare l'output del passaggio, aggiungi un altro passaggio. Ad esempio, per aggiungere l'output a un messaggio chat di Google Chat, aggiungi il passaggio Inviami una notifica in Chat di Chat. In Messaggio, fai clic su Variabili e seleziona l'output del passaggio. Per il passaggio di calcolo, seleziona Variabili > Passaggio 2: calcola > Risultato calcolato. La variabile viene visualizzata come chip nel campo Messaggio.
- Fai clic su Attiva. Il flusso è pronto per essere eseguito.
Esegui il flusso attivando il comando iniziale. Ad esempio, se il flusso inizia in base a una programmazione, viene eseguito nella data e nell'ora specificate.
Verifica che il flusso venga eseguito come previsto. Controlla i log visitando la scheda Attività del Flow Builder. Per scoprire come creare log personalizzati nella scheda Attività, consulta Log delle attività.
Passaggi successivi
Hai creato e testato un passaggio personalizzato per Workspace Studio. Ora puoi:
Continua a personalizzare il passaggio chiedendo a Gemini di aiutarti a implementare una logica più complessa.
Crea una scheda di configurazione per personalizzare la configurazione del passaggio.
Registra attività ed errori per registrare e risolvere i problemi relativi alle esecuzioni dei passaggi.
Esamina gli oggetti evento per esaminare il payload JSON che i flussi inviano e ricevono durante l'esecuzione dei passaggi.
Prova il codelab Crea passaggi di avvio e di azione personalizzati di Workspace Studio per creare un passaggio di avvio e un passaggio personalizzati con Apps Script.