با استفاده از Google Chat API پیام ارسال کنید

این راهنما نحوه استفاده از متد create() در منبع Message از API چت گوگل را برای انجام هر یک از موارد زیر توضیح می‌دهد:

  • پیام‌هایی ارسال کنید که حاوی متن، کارت و ابزارک‌های تعاملی باشند.
  • ارسال پیام خصوصی به یک کاربر خاص چت.
  • یک رشته پیام را شروع کنید یا به آن پاسخ دهید.
  • یک پیام را نامگذاری کنید تا بتوانید آن را در سایر درخواست‌های API چت مشخص کنید.

حداکثر اندازه پیام (شامل هرگونه متن یا کارت) ۳۲۰۰۰ بایت است. برای ارسال پیامی که از این اندازه بیشتر باشد، برنامه چت شما باید چندین پیام ارسال کند.

علاوه بر فراخوانی Chat API برای ایجاد پیام‌ها، برنامه‌های چت می‌توانند پیام‌هایی را برای پاسخ به تعاملات کاربر ایجاد و ارسال کنند، مانند ارسال پیام خوشامدگویی پس از افزودن برنامه چت به یک فضا توسط کاربر. هنگام پاسخ به تعاملات، برنامه‌های چت می‌توانند از انواع دیگر ویژگی‌های پیام‌رسانی، از جمله دیالوگ‌های تعاملی و رابط‌های پیش‌نمایش لینک، استفاده کنند. برای پاسخ به یک کاربر، برنامه چت پیام را به صورت همزمان و بدون فراخوانی Chat API برمی‌گرداند. برای کسب اطلاعات در مورد ارسال پیام برای پاسخ به تعاملات، به بخش دریافت و پاسخ به تعاملات با برنامه Google Chat خود مراجعه کنید.

نحوه نمایش و نسبت‌دهی پیام‌های ایجاد شده با Chat API در Chat

می‌توانید متد create() را با استفاده از احراز هویت برنامه و احراز هویت کاربر فراخوانی کنید. Chat بسته به نوع احراز هویتی که استفاده می‌کنید، فرستنده پیام را به طور متفاوتی نسبت می‌دهد.

وقتی به عنوان برنامه چت احراز هویت می‌شوید، برنامه چت پیام را ارسال می‌کند.

فراخوانی متد create() با احراز هویت برنامه.
شکل ۱ : با احراز هویت برنامه، برنامه چت پیام را ارسال می‌کند. برای اینکه توجه داشته باشید که فرستنده شخص نیست، چت App در کنار نام آن نمایش می‌دهد.

وقتی به عنوان کاربر احراز هویت می‌شوید، برنامه‌ی چت پیام را از طرف کاربر ارسال می‌کند. چت همچنین با نمایش نام برنامه‌ی چت، آن را به پیام نسبت می‌دهد.

فراخوانی متد create() به همراه احراز هویت کاربر.
شکل ۲ : با احراز هویت کاربر، کاربر پیام را ارسال می‌کند و Chat نام برنامه Chat را در کنار نام کاربر نمایش می‌دهد.

نوع احراز هویت همچنین تعیین می‌کند که کدام ویژگی‌ها و رابط‌های پیام‌رسانی را می‌توانید در پیام بگنجانید. با احراز هویت برنامه، برنامه‌های چت می‌توانند پیام‌هایی حاوی متن غنی، رابط‌های مبتنی بر کارت و ابزارک‌های تعاملی ارسال کنند. از آنجایی که کاربران چت فقط می‌توانند متن را در پیام‌های خود ارسال کنند، شما فقط می‌توانید هنگام ایجاد پیام‌ها با استفاده از احراز هویت کاربر، متن را وارد کنید. برای کسب اطلاعات بیشتر در مورد ویژگی‌های پیام‌رسانی موجود برای API چت، به نمای کلی پیام‌های Google Chat مراجعه کنید.

این راهنما نحوه استفاده از هر دو نوع احراز هویت برای ارسال پیام با Chat API را توضیح می‌دهد.

پیش‌نیازها

نود جی اس

پایتون

جاوا

اسکریپت برنامه‌ها

ارسال پیام به عنوان برنامه چت

این بخش نحوه ارسال پیام‌هایی که حاوی متن، کارت و ابزارک‌های جانبی تعاملی هستند را با استفاده از احراز هویت برنامه توضیح می‌دهد.

پیام با احراز هویت برنامه ارسال شد
شکل ۴. یک برنامه چت، پیامی حاوی متن، کارت و دکمه لوازم جانبی ارسال می‌کند.

برای فراخوانی متد CreateMessage() با استفاده از احراز هویت برنامه، باید فیلدهای زیر را در درخواست مشخص کنید:

  • دامنه‌ی مجوز chat.bot .
  • منبع Space که می‌خواهید پیام را در آن ارسال کنید. برنامه چت باید عضوی از آن فضا باشد.
  • منبع Message برای ایجاد. برای تعریف محتوای پیام، می‌توانید متن غنی ( text )، یک یا چند رابط کارت ( cardsV2 ) یا هر دو را وارد کنید.

به صورت اختیاری، می‌توانید موارد زیر را نیز در آن بگنجانید:

کد زیر مثالی از چگونگی ارسال پیام ارسال شده به عنوان برنامه چت توسط یک برنامه چت را نشان می‌دهد که شامل متن، یک کارت و یک دکمه قابل کلیک در پایین پیام است:

نود جی اس

چت/کتابخانه‌های-مشتری/ابر/ایجاد-پیام-برنامه-create-message.js
import {createClientWithAppCredentials} from './authentication-utils.js';

// This sample shows how to create message with app credential
async function main() {
  // Create a client
  const chatClient = createClientWithAppCredentials();

  // Initialize request argument(s)
  const request = {
    // Replace SPACE_NAME here.
    parent: 'spaces/SPACE_NAME',
    message: {
      text:
        '👋🌎 Hello world! I created this message by calling ' +
        "the Chat API's `messages.create()` method.",
      cardsV2: [
        {
          card: {
            header: {
              title: 'About this message',
              imageUrl:
                'https://fonts.gstatic.com/s/i/short-term/release/googlesymbols/info/default/24px.svg',
            },
            sections: [
              {
                header: 'Contents',
                widgets: [
                  {
                    textParagraph: {
                      text:
                        '🔡 <b>Text</b> which can include ' +
                        'hyperlinks 🔗, emojis 😄🎉, and @mentions 🗣️.',
                    },
                  },
                  {
                    textParagraph: {
                      text:
                        '🖼️ A <b>card</b> to display visual elements' +
                        'and request information such as text 🔤, ' +
                        'dates and times 📅, and selections ☑️.',
                    },
                  },
                  {
                    textParagraph: {
                      text:
                        '👉🔘 An <b>accessory widget</b> which adds ' +
                        'a button to the bottom of a message.',
                    },
                  },
                ],
              },
              {
                header: "What's next",
                collapsible: true,
                widgets: [
                  {
                    textParagraph: {
                      text: "❤️ <a href='https://developers.google.com/workspace/chat/api/reference/rest/v1/spaces.messages.reactions/create'>Add a reaction</a>.",
                    },
                  },
                  {
                    textParagraph: {
                      text:
                        "🔄 <a href='https://developers.google.com/workspace/chat/api/reference/rest/v1/spaces.messages/patch'>Update</a> " +
                        "or ❌ <a href='https://developers.google.com/workspace/chat/api/reference/rest/v1/spaces.messages/delete'>delete</a> " +
                        'the message.',
                    },
                  },
                ],
              },
            ],
          },
        },
      ],
      accessoryWidgets: [
        {
          buttonList: {
            buttons: [
              {
                text: 'View documentation',
                icon: {materialIcon: {name: 'link'}},
                onClick: {
                  openLink: {
                    url: 'https://developers.google.com/workspace/chat/create-messages',
                  },
                },
              },
            ],
          },
        },
      ],
    },
  };

  // Make the request
  const response = await chatClient.createMessage(request);

  // Handle the response
  console.log(response);
}

await main();

پایتون

chat/client-libraries/cloud/create_message_app_cred.py
from authentication_utils import create_client_with_app_credentials
from google.apps import chat_v1 as google_chat

# This sample shows how to create message with app credential
def create_message_with_app_cred():
    # Create a client
    client = create_client_with_app_credentials()

    # Initialize request argument(s)
    request = google_chat.CreateMessageRequest(
        # Replace SPACE_NAME here.
        parent = "spaces/SPACE_NAME",
        message = {
            "text": '👋🌎 Hello world! I created this message by calling ' +
                    'the Chat API\'s `messages.create()` method.',
            "cards_v2" : [{ "card": {
                "header": {
                    "title": 'About this message',
                    "image_url": 'https://fonts.gstatic.com/s/i/short-term/release/googlesymbols/info/default/24px.svg'
                },
                "sections": [{
                    "header": "Contents",
                    "widgets": [{ "text_paragraph": {
                            "text": '🔡 <b>Text</b> which can include ' +
                                    'hyperlinks 🔗, emojis 😄🎉, and @mentions 🗣️.'
                        }}, { "text_paragraph": {
                            "text": '🖼️ A <b>card</b> to display visual elements' +
                                    'and request information such as text 🔤, ' +
                                    'dates and times 📅, and selections ☑️.'
                        }}, { "text_paragraph": {
                            "text": '👉🔘 An <b>accessory widget</b> which adds ' +
                                    'a button to the bottom of a message.'
                        }}
                    ]}, {
                        "header": "What's next",
                        "collapsible": True,
                        "widgets": [{ "text_paragraph": {
                                "text": "❤️ <a href='https://developers.google.com/workspace/chat/api/reference/rest/v1/spaces.messages.reactions/create'>Add a reaction</a>."
                            }}, { "text_paragraph": {
                                "text": "🔄 <a href='https://developers.google.com/workspace/chat/api/reference/rest/v1/spaces.messages/patch'>Update</a> " +
                                        "or ❌ <a href='https://developers.google.com/workspace/chat/api/reference/rest/v1/spaces.messages/delete'>delete</a> " +
                                        "the message."
                            }
                        }]
                    }
                ]
            }}],
            "accessory_widgets": [{ "button_list": { "buttons": [{
                "text": 'View documentation',
                "icon": { "material_icon": { "name": 'link' }},
                "on_click": { "open_link": {
                    "url": 'https://developers.google.com/workspace/chat/create-messages'
                }}
            }]}}]
        }
    )

    # Make the request
    response = client.create_message(request)

    # Handle the response
    print(response)

create_message_with_app_cred()

جاوا

chat/client-libraries/cloud/src/main/java/com/google/workspace/api/chat/samples/CreateMessageAppCred.java
import com.google.apps.card.v1.Button;
import com.google.apps.card.v1.ButtonList;
import com.google.apps.card.v1.Card;
import com.google.apps.card.v1.Icon;
import com.google.apps.card.v1.MaterialIcon;
import com.google.apps.card.v1.OnClick;
import com.google.apps.card.v1.OpenLink;
import com.google.apps.card.v1.TextParagraph;
import com.google.apps.card.v1.Widget;
import com.google.apps.card.v1.Card.CardHeader;
import com.google.apps.card.v1.Card.Section;
import com.google.chat.v1.AccessoryWidget;
import com.google.chat.v1.CardWithId;
import com.google.chat.v1.ChatServiceClient;
import com.google.chat.v1.CreateMessageRequest;
import com.google.chat.v1.Message;

// This sample shows how to create message with app credential.
public class CreateMessageAppCred {

  public static void main(String[] args) throws Exception {
    try (ChatServiceClient chatServiceClient =
        AuthenticationUtils.createClientWithAppCredentials()) {
      CreateMessageRequest.Builder request = CreateMessageRequest.newBuilder()
        // Replace SPACE_NAME here.
        .setParent("spaces/SPACE_NAME")
        .setMessage(Message.newBuilder()
          .setText( "👋🌎 Hello world! I created this message by calling " +
                    "the Chat API\'s `messages.create()` method.")
          .addCardsV2(CardWithId.newBuilder().setCard(Card.newBuilder()
            .setHeader(CardHeader.newBuilder()
              .setTitle("About this message")
              .setImageUrl("https://fonts.gstatic.com/s/i/short-term/release/googlesymbols/info/default/24px.svg"))
            .addSections(Section.newBuilder()
              .setHeader("Contents")
              .addWidgets(Widget.newBuilder().setTextParagraph(TextParagraph.newBuilder().setText(
                "🔡 <b>Text</b> which can include " +
                "hyperlinks 🔗, emojis 😄🎉, and @mentions 🗣️.")))
              .addWidgets(Widget.newBuilder().setTextParagraph(TextParagraph.newBuilder().setText(
                "🖼️ A <b>card</b> to display visual elements " +
                "and request information such as text 🔤, " +
                "dates and times 📅, and selections ☑️.")))
              .addWidgets(Widget.newBuilder().setTextParagraph(TextParagraph.newBuilder().setText(
                "👉🔘 An <b>accessory widget</b> which adds " +
                "a button to the bottom of a message."))))
            .addSections(Section.newBuilder()
              .setHeader("What's next")
              .setCollapsible(true)
              .addWidgets(Widget.newBuilder().setTextParagraph(TextParagraph.newBuilder().setText(
                "❤️ <a href='https://developers.google.com/workspace/chat/api/reference/rest/v1/spaces.messages.reactions/create'>Add a reaction</a>.")))
              .addWidgets(Widget.newBuilder().setTextParagraph(TextParagraph.newBuilder().setText(
                "🔄 <a href='https://developers.google.com/workspace/chat/api/reference/rest/v1/spaces.messages/patch'>Update</a> " +
                "or ❌ <a href='https://developers.google.com/workspace/chat/api/reference/rest/v1/spaces.messages/delete'>delete</a> " +
                "the message."))))))
          .addAccessoryWidgets(AccessoryWidget.newBuilder()
            .setButtonList(ButtonList.newBuilder()
              .addButtons(Button.newBuilder()
                .setText("View documentation")
                .setIcon(Icon.newBuilder()
                  .setMaterialIcon(MaterialIcon.newBuilder().setName("link")))
                .setOnClick(OnClick.newBuilder()
                  .setOpenLink(OpenLink.newBuilder()
                    .setUrl("https://developers.google.com/workspace/chat/create-messages")))))));
      Message response = chatServiceClient.createMessage(request.build());

      System.out.println(JsonFormat.printer().print(response));
    }
  }
}

اسکریپت برنامه‌ها

chat/advanced-service/Main.gs
/**
 * This sample shows how to create message with app credential
 * 
 * It relies on the OAuth2 scope 'https://www.googleapis.com/auth/chat.bot'
 * used by service accounts.
 */
function createMessageAppCred() {
  // Initialize request argument(s)
  // TODO(developer): Replace SPACE_NAME here.
  const parent = 'spaces/SPACE_NAME';
  const message = {
    text: '👋🌎 Hello world! I created this message by calling ' +
          'the Chat API\'s `messages.create()` method.',
    cardsV2 : [{ card: {
      header: {
        title: 'About this message',
        imageUrl: 'https://fonts.gstatic.com/s/i/short-term/release/googlesymbols/info/default/24px.svg'
      },
      sections: [{
        header: 'Contents',
        widgets: [{ textParagraph: {
            text: '🔡 <b>Text</b> which can include ' +
                  'hyperlinks 🔗, emojis 😄🎉, and @mentions 🗣️.'
          }}, { textParagraph: {
            text: '🖼️ A <b>card</b> to display visual elements' +
                  'and request information such as text 🔤, ' +
                  'dates and times 📅, and selections ☑️.'
          }}, { textParagraph: {
            text: '👉🔘 An <b>accessory widget</b> which adds ' +
                  'a button to the bottom of a message.'
          }}
        ]}, {
          header: "What's next",
          collapsible: true,
          widgets: [{ textParagraph: {
              text: "❤️ <a href='https://developers.google.com/workspace/chat/api/reference/rest/v1/spaces.messages.reactions/create'>Add a reaction</a>."
            }}, { textParagraph: {
              text: "🔄 <a href='https://developers.google.com/workspace/chat/api/reference/rest/v1/spaces.messages/patch'>Update</a> " +
                    "or ❌ <a href='https://developers.google.com/workspace/chat/api/reference/rest/v1/spaces.messages/delete'>delete</a> " +
                    "the message."
            }
          }]
        }
      ]
    }}],
    accessoryWidgets: [{ buttonList: { buttons: [{
      text: 'View documentation',
      icon: { materialIcon: { name: 'link' }},
      onClick: { openLink: {
        url: 'https://developers.google.com/workspace/chat/create-messages'
      }}
    }]}}]
  };
  const parameters = {};

  // Make the request
  const response = Chat.Spaces.Messages.create(
    message, parent, parameters, getHeaderWithAppCredentials()
  );

  // Handle the response
  console.log(response);
}

برای اجرای این نمونه، به جای SPACE_NAME ، شناسه (ID) فیلد name فضا را وارد کنید. می‌توانید شناسه را با فراخوانی متد ListSpaces() یا از طریق URL فضا به دست آورید.

ابزارک‌های تعاملی را در پایین پیام اضافه کنید

در اولین نمونه کد این راهنما، پیام برنامه چت یک دکمه قابل کلیک در پایین پیام نمایش می‌دهد که به عنوان ویجت لوازم جانبی شناخته می‌شود. ویجت‌های لوازم جانبی بعد از هر متن یا کارتی در یک پیام ظاهر می‌شوند. می‌توانید از این ویجت‌ها برای ترغیب کاربران به تعامل با پیام خود به روش‌های مختلف، از جمله موارد زیر، استفاده کنید:

  • میزان دقت یا رضایت از یک پیام را ارزیابی کنید.
  • مشکلی را در مورد پیام یا برنامه گپ گزارش دهید.
  • پیوندی به محتوای مرتبط، مانند مستندات، باز کنید.
  • پیام‌های مشابه را از برنامه چت برای مدت زمان مشخصی رد کنید یا به تعویق بیندازید.

برای افزودن ویجت‌های جانبی، فیلد accessoryWidgets[] را در بدنه درخواست خود قرار دهید و یک یا چند ویجت مورد نظر خود را مشخص کنید.

تصویر زیر یک برنامه چت را نشان می‌دهد که یک پیام متنی را به همراه ویجت‌های جانبی ضمیمه می‌کند تا کاربران بتوانند تجربه خود را با برنامه چت ارزیابی کنند.
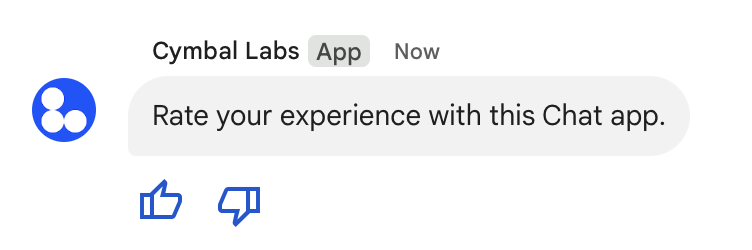
ویجت لوازم جانبی.
شکل ۵ : یک پیام از برنامه چت به همراه متن و ویجت‌های جانبی.

شکل زیر بدنه درخواستی را نشان می‌دهد که یک پیام متنی با دو دکمه جانبی ایجاد می‌کند. وقتی کاربر روی یک دکمه کلیک می‌کند، تابع مربوطه (مانند doUpvote ) تعامل را پردازش می‌کند:

{
  text: "Rate your experience with this Chat app.",
  accessoryWidgets: [{ buttonList: { buttons: [{
    icon: { material_icon: {
      name: "thumb_up"
    }},
    color: { red: 0, blue: 255, green: 0 },
    onClick: { action: {
      function: "doUpvote"
    }}
  }, {
    icon: { material_icon: {
      name: "thumb_down"
    }},
    color: { red: 0, blue: 255, green: 0 },
    onClick: { action: {
      function: "doDownvote"
    }}
  }]}}]
}

ارسال پیام به صورت خصوصی

برنامه‌های چت می‌توانند پیام‌ها را به صورت خصوصی ارسال کنند تا پیام فقط برای یک کاربر خاص در آن فضا قابل مشاهده باشد. وقتی یک برنامه چت پیام خصوصی ارسال می‌کند، پیام برچسبی را نشان می‌دهد که به کاربر اطلاع می‌دهد که پیام فقط برای او قابل مشاهده است.

برای ارسال پیام خصوصی با استفاده از Chat API، فیلد privateMessageViewer را در بدنه درخواست خود مشخص کنید. برای مشخص کردن کاربر، مقدار را روی منبع User که نشان دهنده کاربر Chat است تنظیم می‌کنید. همچنین می‌توانید از فیلد name منبع User استفاده کنید، همانطور که در مثال زیر نشان داده شده است:

{
  text: "Hello private world!",
  privateMessageViewer: {
    name: "users/USER_ID"
  }
}

برای استفاده از این نمونه، USER_ID با یک شناسه منحصر به فرد برای کاربر، مانند 12345678987654321 یا hao@cymbalgroup.com جایگزین کنید. برای اطلاعات بیشتر در مورد تعیین کاربران، به بخش شناسایی و تعیین کاربران Google Chat مراجعه کنید.

برای ارسال پیام خصوصی، باید موارد زیر را در درخواست خود حذف کنید:

ارسال پیامک از طرف کاربر

این بخش نحوه ارسال پیام از طرف یک کاربر با استفاده از احراز هویت کاربر را توضیح می‌دهد. با احراز هویت کاربر، محتوای پیام فقط می‌تواند شامل متن باشد و باید ویژگی‌های پیام‌رسانی که فقط برای برنامه‌های چت در دسترس هستند، از جمله رابط‌های کارت و ابزارک‌های تعاملی، حذف شوند.

پیام ارسال شده با احراز هویت کاربر
شکل ۳. یک برنامه چت از طرف یک کاربر پیام متنی ارسال می‌کند.

برای فراخوانی متد CreateMessage() با استفاده از احراز هویت کاربر، باید فیلدهای زیر را در درخواست مشخص کنید:

  • یک محدوده‌ی مجوز که از احراز هویت کاربر برای این متد پشتیبانی می‌کند. نمونه‌ی زیر از محدوده‌ی chat.messages.create استفاده می‌کند.
  • منبع Space که می‌خواهید پیام را در آن ارسال کنید. کاربر احراز هویت شده باید عضوی از آن فضا باشد.
  • منبع Message برای ایجاد. برای تعریف محتوای پیام، باید فیلد text را وارد کنید.

به صورت اختیاری، می‌توانید موارد زیر را نیز در آن بگنجانید:

کد زیر مثالی از چگونگی ارسال پیام متنی در یک فضای مشخص توسط یک برنامه چت از طرف یک کاربر احراز هویت شده را نشان می‌دهد:

نود جی اس

chat/client-libraries/cloud/create-message-user-cred.js
import {createClientWithUserCredentials} from './authentication-utils.js';

const USER_AUTH_OAUTH_SCOPES = [
  'https://www.googleapis.com/auth/chat.messages.create',
];

// This sample shows how to create message with user credential
async function main() {
  // Create a client
  const chatClient = await createClientWithUserCredentials(
    USER_AUTH_OAUTH_SCOPES,
  );

  // Initialize request argument(s)
  const request = {
    // Replace SPACE_NAME here.
    parent: 'spaces/SPACE_NAME',
    message: {
      text:
        '👋🌎 Hello world!' +
        'Text messages can contain things like:\n\n' +
        '* Hyperlinks 🔗\n' +
        '* Emojis 😄🎉\n' +
        '* Mentions of other Chat users `@` \n\n' +
        'For details, see the ' +
        '<https://developers.google.com/workspace/chat/format-messages' +
        '|Chat API developer documentation>.',
    },
  };

  // Make the request
  const response = await chatClient.createMessage(request);

  // Handle the response
  console.log(response);
}

await main();

پایتون

chat/client-libraries/cloud/create_message_user_cred.py
from authentication_utils import create_client_with_user_credentials
from google.apps import chat_v1 as google_chat

SCOPES = ["https://www.googleapis.com/auth/chat.messages.create"]

def create_message_with_user_cred():
    # Create a client
    client = create_client_with_user_credentials(SCOPES)

    # Initialize request argument(s)
    request = google_chat.CreateMessageRequest(
        # Replace SPACE_NAME here.
        parent = "spaces/SPACE_NAME",
        message = {
            "text": '👋🌎 Hello world!' +
                    'Text messages can contain things like:\n\n' +
                    '* Hyperlinks 🔗\n' +
                    '* Emojis 😄🎉\n' +
                    '* Mentions of other Chat users `@` \n\n' +
                    'For details, see the ' +
                    '<https://developers.google.com/workspace/chat/format-messages' +
                    '|Chat API developer documentation>.'
        }
    )

    # Make the request
    response = client.create_message(request)

    # Handle the response
    print(response)

create_message_with_user_cred()

جاوا

chat/client-libraries/cloud/src/main/java/com/google/workspace/api/chat/samples/CreateMessageUserCred.java
import com.google.chat.v1.ChatServiceClient;
import com.google.chat.v1.CreateMessageRequest;
import com.google.chat.v1.Message;

// This sample shows how to create message with user credential.
public class CreateMessageUserCred {

  private static final String SCOPE =
    "https://www.googleapis.com/auth/chat.messages.create";

  public static void main(String[] args) throws Exception {
    try (ChatServiceClient chatServiceClient =
        AuthenticationUtils.createClientWithUserCredentials(
          ImmutableList.of(SCOPE))) {
      CreateMessageRequest.Builder request = CreateMessageRequest.newBuilder()
        // Replace SPACE_NAME here.
        .setParent("spaces/SPACE_NAME")
        .setMessage(Message.newBuilder()
          .setText( "👋🌎 Hello world!" +
                    "Text messages can contain things like:\n\n" +
                    "* Hyperlinks 🔗\n" +
                    "* Emojis 😄🎉\n" +
                    "* Mentions of other Chat users `@` \n\n" +
                    "For details, see the " +
                    "<https://developers.google.com/workspace/chat/format-messages" +
                    "|Chat API developer documentation>."));
      Message response = chatServiceClient.createMessage(request.build());

      System.out.println(JsonFormat.printer().print(response));
    }
  }
}

اسکریپت برنامه‌ها

chat/advanced-service/Main.gs
/**
 * This sample shows how to create message with user credential
 * 
 * It relies on the OAuth2 scope 'https://www.googleapis.com/auth/chat.messages.create'
 * referenced in the manifest file (appsscript.json).
 */
function createMessageUserCred() {
  // Initialize request argument(s)
  // TODO(developer): Replace SPACE_NAME here.
  const parent = 'spaces/SPACE_NAME';
  const message = {
    text: '👋🌎 Hello world!' +
          'Text messages can contain things like:\n\n' +
          '* Hyperlinks 🔗\n' +
          '* Emojis 😄🎉\n' +
          '* Mentions of other Chat users `@` \n\n' +
          'For details, see the ' +
          '<https://developers.google.com/workspace/chat/format-messages' +
          '|Chat API developer documentation>.'
  };

  // Make the request
  const response = Chat.Spaces.Messages.create(message, parent);

  // Handle the response
  console.log(response);
}

برای اجرای این نمونه، به جای SPACE_NAME ، شناسه (ID) فیلد name فضا را وارد کنید. می‌توانید شناسه را با فراخوانی متد ListSpaces() یا از طریق URL فضا به دست آورید.

شروع یا پاسخ دادن در یک تاپیک

برای فضاهایی که از threadها استفاده می‌کنند، می‌توانید مشخص کنید که آیا یک پیام جدید، یک thread را شروع می‌کند یا به یک thread موجود پاسخ می‌دهد.

به طور پیش‌فرض، پیام‌هایی که با استفاده از Chat API ایجاد می‌کنید، یک رشته جدید را شروع می‌کنند. برای کمک به شما در شناسایی رشته و پاسخ دادن به آن بعداً، می‌توانید یک کلید رشته در درخواست خود مشخص کنید:

  • در بدنه درخواست خود، فیلد thread.threadKey را مشخص کنید.
  • پارامتر پرس‌وجوی messageReplyOption را مشخص کنید تا مشخص شود در صورت وجود کلید، چه اتفاقی می‌افتد.

برای ایجاد پیامی که به یک رشته‌ی موجود پاسخ می‌دهد:

  • در بدنه درخواست خود، فیلد thread را وارد کنید. در صورت تنظیم، می‌توانید threadKey که ایجاد کرده‌اید را مشخص کنید. در غیر این صورت، باید از name thread استفاده کنید.
  • پارامتر پرس و جو messageReplyOption را مشخص کنید.

کد زیر مثالی از چگونگی ارسال یک پیام متنی توسط یک برنامه چت را نشان می‌دهد که از طرف یک کاربر احراز هویت شده، یک رشته داده شده را که توسط کلید یک فضای داده شده شناسایی شده است، شروع می‌کند یا به آن پاسخ می‌دهد:

نود جی اس

chat/client-libraries/cloud/create-message-user-cred-thread-key.js
import {protos} from '@google-apps/chat';
import {createClientWithUserCredentials} from './authentication-utils.js';

const USER_AUTH_OAUTH_SCOPES = [
  'https://www.googleapis.com/auth/chat.messages.create',
];

// This sample shows how to create message with user credential with thread key
async function main() {
  // Create a client
  const chatClient = await createClientWithUserCredentials(
    USER_AUTH_OAUTH_SCOPES,
  );

  // Initialize request argument(s)
  const request = {
    // Replace SPACE_NAME here.
    parent: 'spaces/SPACE_NAME',
    // Creates the message as a reply to the thread specified by thread_key
    // If it fails, the message starts a new thread instead
    messageReplyOption:
      protos.google.chat.v1.CreateMessageRequest.MessageReplyOption
        .REPLY_MESSAGE_FALLBACK_TO_NEW_THREAD,
    message: {
      text: 'Hello with user credential!',
      thread: {
        // Thread key specifies a thread and is unique to the chat app
        // that sets it
        threadKey: 'THREAD_KEY',
      },
    },
  };

  // Make the request
  const response = await chatClient.createMessage(request);

  // Handle the response
  console.log(response);
}

await main();

پایتون

chat/client-libraries/cloud/create_message_user_cred_thread_key.py
from authentication_utils import create_client_with_user_credentials
from google.apps import chat_v1 as google_chat

import google.apps.chat_v1.CreateMessageRequest.MessageReplyOption

SCOPES = ["https://www.googleapis.com/auth/chat.messages.create"]

# This sample shows how to create message with user credential with thread key
def create_message_with_user_cred_thread_key():
    # Create a client
    client = create_client_with_user_credentials(SCOPES)

    # Initialize request argument(s)
    request = google_chat.CreateMessageRequest(
        # Replace SPACE_NAME here
        parent = "spaces/SPACE_NAME",
        # Creates the message as a reply to the thread specified by thread_key.
        # If it fails, the message starts a new thread instead.
        message_reply_option = MessageReplyOption.REPLY_MESSAGE_FALLBACK_TO_NEW_THREAD,
        message = {
            "text": "Hello with user credential!",
            "thread": {
                # Thread key specifies a thread and is unique to the chat app
                # that sets it.
                "thread_key": "THREAD_KEY"
            }
        }
    )

    # Make the request
    response = client.create_message(request)

    # Handle the response
    print(response)

create_message_with_user_cred_thread_key()

جاوا

chat/client-libraries/cloud/src/main/java/com/google/workspace/api/chat/samples/CreateMessageUserCredThreadKey.java
import com.google.chat.v1.ChatServiceClient;
import com.google.chat.v1.CreateMessageRequest;
import com.google.chat.v1.CreateMessageRequest.MessageReplyOption;
import com.google.chat.v1.Message;
import com.google.chat.v1.Thread;

// This sample shows how to create message with a thread key with user
// credential.
public class CreateMessageUserCredThreadKey {

  private static final String SCOPE =
    "https://www.googleapis.com/auth/chat.messages.create";

  public static void main(String[] args) throws Exception {
    try (ChatServiceClient chatServiceClient =
        AuthenticationUtils.createClientWithUserCredentials(
          ImmutableList.of(SCOPE))) {
      CreateMessageRequest.Builder request = CreateMessageRequest.newBuilder()
        // Replace SPACE_NAME here.
        .setParent("spaces/SPACE_NAME")
        // Creates the message as a reply to the thread specified by thread_key.
        // If it fails, the message starts a new thread instead.
        .setMessageReplyOption(
          MessageReplyOption.REPLY_MESSAGE_FALLBACK_TO_NEW_THREAD)
        .setMessage(Message.newBuilder()
          .setText("Hello with user credentials!")
          // Thread key specifies a thread and is unique to the chat app
          // that sets it.
          .setThread(Thread.newBuilder().setThreadKey("THREAD_KEY")));
      Message response = chatServiceClient.createMessage(request.build());

      System.out.println(JsonFormat.printer().print(response));
    }
  }
}

اسکریپت برنامه‌ها

chat/advanced-service/Main.gs
/**
 * This sample shows how to create message with user credential with thread key
 * 
 * It relies on the OAuth2 scope 'https://www.googleapis.com/auth/chat.messages.create'
 * referenced in the manifest file (appsscript.json).
 */
function createMessageUserCredThreadKey() {
  // Initialize request argument(s)
  // TODO(developer): Replace SPACE_NAME here.
  const parent = 'spaces/SPACE_NAME';
  // Creates the message as a reply to the thread specified by thread_key
  // If it fails, the message starts a new thread instead
  const messageReplyOption = 'REPLY_MESSAGE_FALLBACK_TO_NEW_THREAD';
  const message = {
    text: 'Hello with user credential!',
    thread: {
      // Thread key specifies a thread and is unique to the chat app
      // that sets it
      threadKey: 'THREAD_KEY'
    }
  };

  // Make the request
  const response = Chat.Spaces.Messages.create(message, parent, {
    messageReplyOption: messageReplyOption
  });

  // Handle the response
  console.log(response);
}

برای اجرای این نمونه، موارد زیر را جایگزین کنید:

  • THREAD_KEY : یک کلید رشته موجود در فضا، یا برای ایجاد یک رشته جدید، یک نام منحصر به فرد برای رشته.
  • SPACE_NAME : شناسه‌ی فیلد name فضا. می‌توانید شناسه را با فراخوانی متد ListSpaces() یا از URL فضا به دست آورید.

نام گذاری یک پیام

برای بازیابی یا مشخص کردن یک پیام در فراخوانی‌های API آینده، می‌توانید با تنظیم فیلد messageId در درخواست خود، یک پیام را نامگذاری کنید. نامگذاری پیام به شما امکان می‌دهد پیام را بدون نیاز به ذخیره شناسه اختصاص داده شده توسط سیستم از نام منبع پیام (که در فیلد name نمایش داده می‌شود) مشخص کنید.

برای مثال، برای بازیابی یک پیام با استفاده از متد get() ، از نام منبع برای مشخص کردن پیامی که باید بازیابی شود استفاده می‌کنید. نام منبع به صورت spaces/{space}/messages/{message} قالب‌بندی می‌شود، که در آن {message} نشان‌دهنده شناسه اختصاص داده شده توسط سیستم یا نام سفارشی است که هنگام ایجاد پیام تنظیم کرده‌اید.

برای نامگذاری یک پیام، هنگام ایجاد پیام، یک شناسه سفارشی در فیلد messageId مشخص کنید. فیلد messageId مقدار فیلد clientAssignedMessageId از منبع Message را تعیین می‌کند.

شما فقط می‌توانید هنگام ایجاد پیام، آن را نامگذاری کنید. نمی‌توانید برای پیام‌های موجود، شناسه سفارشی تعیین کنید یا آن را تغییر دهید. شناسه سفارشی باید شرایط زیر را داشته باشد:

  • با client- شروع می‌شود. برای مثال، client-custom-name یک شناسه سفارشی معتبر است، اما custom-name معتبر نیست.
  • شامل حداکثر ۶۳ کاراکتر و فقط حروف کوچک، اعداد و خط فاصله باشد.
  • در یک فضا منحصر به فرد است. یک برنامه چت نمی‌تواند از یک شناسه سفارشی برای پیام‌های مختلف استفاده کند.

کد زیر مثالی از چگونگی ارسال پیام متنی حاوی شناسه توسط یک برنامه چت به فضای مشخص شده از طرف یک کاربر احراز هویت شده را نشان می‌دهد:

نود جی اس

chat/client-libraries/cloud/create-message-user-cred-message-id.js
import {createClientWithUserCredentials} from './authentication-utils.js';

const USER_AUTH_OAUTH_SCOPES = [
  'https://www.googleapis.com/auth/chat.messages.create',
];

// This sample shows how to create a message with user credentials and a custom
// message id
async function main() {
  // Create a client
  const chatClient = await createClientWithUserCredentials(
    USER_AUTH_OAUTH_SCOPES,
  );

  // Initialize request argument(s)
  const request = {
    // Replace SPACE_NAME here.
    parent: 'spaces/SPACE_NAME',
    // Message id lets chat apps get, update or delete a message without needing
    // to store the system assigned ID in the message's resource name
    messageId: 'client-MESSAGE-ID',
    message: {text: 'Hello with user credential!'},
  };

  // Make the request
  const response = await chatClient.createMessage(request);

  // Handle the response
  console.log(response);
}

await main();

پایتون

chat/client-libraries/cloud/create_message_user_cred_message_id.py
from authentication_utils import create_client_with_user_credentials
from google.apps import chat_v1 as google_chat

SCOPES = ["https://www.googleapis.com/auth/chat.messages.create"]

# This sample shows how to create message with user credential with message id
def create_message_with_user_cred_message_id():
    # Create a client
    client = create_client_with_user_credentials(SCOPES)

    # Initialize request argument(s)
    request = google_chat.CreateMessageRequest(
        # Replace SPACE_NAME here
        parent = "spaces/SPACE_NAME",
        # Message id let chat apps get, update or delete a message without needing
        # to store the system assigned ID in the message's resource name.
        message_id = "client-MESSAGE-ID",
        message = {
            "text": "Hello with user credential!"
        }
    )

    # Make the request
    response = client.create_message(request)

    # Handle the response
    print(response)

create_message_with_user_cred_message_id()

جاوا

chat/client-libraries/cloud/src/main/java/com/google/workspace/api/chat/samples/CreateMessageUserCredMessageId.java
import com.google.chat.v1.ChatServiceClient;
import com.google.chat.v1.CreateMessageRequest;
import com.google.chat.v1.Message;

// This sample shows how to create message with message id specified with user
// credential.
public class CreateMessageUserCredMessageId {

  private static final String SCOPE =
    "https://www.googleapis.com/auth/chat.messages.create";

  public static void main(String[] args) throws Exception {
    try (ChatServiceClient chatServiceClient =
        AuthenticationUtils.createClientWithUserCredentials(
          ImmutableList.of(SCOPE))) {
      CreateMessageRequest.Builder request = CreateMessageRequest.newBuilder()
        // Replace SPACE_NAME here.
        .setParent("spaces/SPACE_NAME")
        .setMessage(Message.newBuilder()
          .setText("Hello with user credentials!"))
        // Message ID lets chat apps get, update or delete a message without
        // needing to store the system assigned ID in the message's resource
        // name.
        .setMessageId("client-MESSAGE-ID");
      Message response = chatServiceClient.createMessage(request.build());

      System.out.println(JsonFormat.printer().print(response));
    }
  }
}

اسکریپت برنامه‌ها

chat/advanced-service/Main.gs
/**
 * This sample shows how to create message with user credential with message id
 * 
 * It relies on the OAuth2 scope 'https://www.googleapis.com/auth/chat.messages.create'
 * referenced in the manifest file (appsscript.json).
 */
function createMessageUserCredMessageId() {
  // Initialize request argument(s)
  // TODO(developer): Replace SPACE_NAME here.
  const parent = 'spaces/SPACE_NAME';
  // Message id lets chat apps get, update or delete a message without needing
  // to store the system assigned ID in the message's resource name
  const messageId = 'client-MESSAGE-ID';
  const message = { text: 'Hello with user credential!' };

  // Make the request
  const response = Chat.Spaces.Messages.create(message, parent, {
    messageId: messageId
  });

  // Handle the response
  console.log(response);
}

برای اجرای این نمونه، موارد زیر را جایگزین کنید:

  • SPACE_NAME : شناسه‌ی فیلد name فضا. می‌توانید شناسه را با فراخوانی متد ListSpaces() یا از URL فضا به دست آورید.
  • MESSAGE-ID : نامی برای پیام که با custom- شروع می‌شود. باید از هر نام پیام دیگری که توسط برنامه چت در فضای مشخص شده ایجاد می‌شود، منحصر به فرد باشد.

نقل قول یک پیام

شما می‌توانید با فراخوانی CreateMessage() ( rpc , rest ) و تنظیم quotedMessageMetadata ( rpc , rest ) در درخواست، پیام دیگری را نقل قول کنید.

شما می‌توانید پیام‌های داخل یک تاپیک یا در چت اصلی را نقل قول کنید، اما نمی‌توانید پیامی را از یک تاپیک دیگر نقل قول کنید.

کد زیر نحوه ایجاد پیامی را نشان می‌دهد که از پیام دیگری نقل قول می‌کند:

نود جی اس

import {createClientWithUserCredentials} from './authentication-utils.js';

const USER_AUTH_OAUTH_SCOPES = ['https://www.googleapis.com/auth/chat.messages.create'];

// This sample shows how to create a message that quotes another message.
async function main() {

  // Create a client
  const chatClient = await createClientWithUserCredentials(USER_AUTH_OAUTH_SCOPES);

  // Initialize request argument(s)
  const request = {

    // TODO(developer): Replace SPACE_NAME .
    parent: 'spaces/SPACE_NAME',

    message: {
      text: 'I am responding to a quoted message!',

      // quotedMessageMetadata lets chat apps respond to a message by quoting it.
      quotedMessageMetadata: {

        // TODO(developer): Replace QUOTED_MESSAGE_NAME
        // and QUOTED_MESSAGE_LAST_UPDATE_TIME.
        name: 'QUOTED_MESSAGE_NAME',
        lastUpdateTime: 'QUOTED_MESSAGE_LAST_UPDATE_TIME'
      }
    }
  };

  // Make the request
  const response = await chatClient.createMessage(request);

  // Handle the response
  console.log(response);
}

main().catch(console.error);

پایتون

from authentication_utils import create_client_with_user_credentials
from google.apps import chat_v1 as google_chat
from google.protobuf.timestamp_pb2 import Timestamp

SCOPES = ['https://www.googleapis.com/auth/chat.messages.create']

# This sample shows how to create a message that quotes another message.
def create_message_quote_message():
    '''Creates a message that quotes another message.'''

    # Create a client
    client = create_client_with_user_credentials(SCOPES)

    # Create a timestamp from the RFC-3339 string.
    # TODO(developer): Replace QUOTED_MESSAGE_LAST_UPDATE_TIME.
    last_update_time = Timestamp()
    last_update_time.FromJsonString('QUOTED_MESSAGE_LAST_UPDATE_TIME')

    # Initialize request argument(s)
    request = google_chat.CreateMessageRequest(

        # TODO(developer): Replace SPACE_NAME.
        parent='spaces/SPACE_NAME',

        # Create the message.
        message = google_chat.Message(
            text='I am responding to a quoted message!',

            # quotedMessageMetadata lets chat apps respond to a message by quoting it.
            quoted_message_metadata=google_chat.QuotedMessageMetadata(

                name='QUOTED_MESSAGE_NAME',
                last_update_time=last_update_time
            )
        )
    )

    # Make the request
    response = client.create_message(request)

    # Handle the response
    print(response)

create_message_quote_message()

جاوا

import com.google.chat.v1.ChatServiceClient;
import com.google.chat.v1.CreateMessageRequest;
import com.google.chat.v1.Message;
import com.google.chat.v1.QuotedMessageMetadata;
import com.google.protobuf.util.Timestamps;
import com.google.workspace.api.chat.samples.utils.AuthenticationUtils;
import java.text.ParseException;

// This sample shows how to create a message that quotes another message.
public class CreateMessageQuoteMessage {
  public static void main(String[] args) throws Exception, ParseException {
    // Create a client.
    ChatServiceClient chatClient = AuthenticationUtils.createClientWithUserCredentials();

    // Initialize request argument(s).
    // TODO(developer): Replace SPACE_NAME, QUOTED_MESSAGE_NAME,
    // and QUOTED_MESSAGE_LAST_UPDATE_TIME here.
    String parent = "spaces/SPACE_NAME";
    String quotedMessageName = "QUOTED_MESSAGE_NAME";
    String lastUpdateTime = "QUOTED_MESSAGE_LAST_UPDATE_TIME";

    QuotedMessageMetadata quotedMessageMetadata =
        QuotedMessageMetadata.newBuilder()
            .setName(quotedMessageName)
            .setLastUpdateTime(Timestamps.parse(lastUpdateTime))
            .build();

    Message message = Message.newBuilder()
        .setText("I am responding to a quoted message!")
        .setQuotedMessageMetadata(quotedMessageMetadata)
        .build();

    CreateMessageRequest request =
        CreateMessageRequest.newBuilder()
            .setParent(parent)
            .setMessage(message)
            .build();

    // Make the request.
    Message response = chatClient.createMessage(request);

    // Handle the response.
    System.out.println(response);
  }
}

اسکریپت برنامه‌ها

/**
 * Creates a message that quotes another message.
 *
 * Relies on the OAuth2 scope 'https://www.googleapis.com/auth/chat.messages.create'
 * referenced in the manifest file (appsscript.json).
 */
function createMessageQuoteMessage() {

  // Initialize request argument(s)
  // TODO(developer): Replace SPACE_NAME here.
  const parent = 'spaces/SPACE_NAME';

  const message = {

    // The text content of the message.
    text: 'I am responding to a quoted message!',

    // quotedMessageMetadata lets chat apps respond to a message by quoting it.
    //
    // TODO(developer): Replace QUOTED_MESSAGE_NAME
    // and QUOTED_MESSAGE_LAST_UPDATE_TIME .
    quotedMessageMetadata: {
      name: 'QUOTED_MESSAGE_NAME',
      lastUpdateTime: 'QUOTED_MESSAGE_LAST_UPDATE_TIME',
    }
  };

  // Make the request
  const response = Chat.Spaces.Messages.create(message, parent);

  // Handle the response
  console.log(response);
}

برای اجرای این نمونه، موارد زیر را جایگزین کنید:

  • SPACE_NAME : شناسه از فیلد name فضا. می‌توانید شناسه را با فراخوانی متد ListSpaces() ( rpc , rest ) یا از URL فضا به دست آورید.
  • QUOTED_MESSAGE_NAME : name منبع پیام ( rpc ، rest ) پیامی که قرار است با فرمت spaces/{space}/messages/{message} نقل قول شود.
  • QUOTED_MESSAGE_LAST_UPDATE_TIME : آخرین زمان به‌روزرسانی پیامی که می‌خواهید نقل قول کنید. اگر پیام هرگز ویرایش نشده باشد، با createTime ( rpc , rest ) مطابقت دارد. اگر پیام ویرایش شده باشد، با lastUpdateTime ( rpc , rest ) مطابقت دارد.

عیب‌یابی

وقتی یک برنامه یا کارت چت گوگل خطایی را برمی‌گرداند، رابط چت پیامی با عنوان «مشکلی پیش آمده است» یا «درخواست شما قابل پردازش نیست» نمایش می‌دهد. گاهی اوقات رابط کاربری چت هیچ پیام خطایی را نمایش نمی‌دهد، اما برنامه یا کارت چت نتیجه غیرمنتظره‌ای را ایجاد می‌کند؛ برای مثال، ممکن است پیام کارت ظاهر نشود.

اگرچه ممکن است پیام خطا در رابط کاربری چت نمایش داده نشود، پیام‌های خطای توصیفی و داده‌های گزارش برای کمک به شما در رفع خطاها هنگام فعال بودن ثبت خطا برای برنامه‌های چت در دسترس هستند. برای کمک به مشاهده، اشکال‌زدایی و رفع خطاها، به عیب‌یابی و رفع خطاهای گوگل چت مراجعه کنید.