
本指南說明如何使用 Google Chat API Message 資源的 create() 方法,執行下列任一操作:
- 傳送含有文字、資訊卡和互動式小工具的訊息。
- 私下傳送訊息給特定 Chat 使用者。
- 發起或回覆訊息討論串。
- 為訊息命名,以便在其他 Chat API 要求中指定該訊息。
訊息大小上限 (包括任何文字或資訊卡) 為 32,000 個位元組。 如要傳送超過此大小的訊息,Chat 應用程式必須改為傳送多則訊息。
除了呼叫 Chat API 建立訊息,Chat 應用程式也可以建立及傳送訊息,回覆使用者互動,例如在使用者將 Chat 應用程式新增至聊天室後,發布歡迎訊息。回覆互動時,Chat 應用程式可以使用其他類型的訊息功能,包括互動式對話方塊和連結預覽介面。如要回覆使用者,Chat 應用程式會同步傳回訊息,而不會呼叫 Chat API。如要瞭解如何傳送訊息來回覆互動,請參閱「透過 Google Chat 應用程式接收及回覆互動」。
Chat 如何顯示及歸因於使用 Chat API 建立的訊息
您可以使用應用程式驗證和使用者驗證呼叫 create() 方法。視您使用的驗證類型而定,Chat 會以不同方式歸因訊息傳送者。
以 Chat 應用程式的身分驗證時,Chat 應用程式會傳送訊息。

App。以使用者身分驗證時,Chat 應用程式會代表使用者傳送訊息。即時通訊也會顯示應用程式名稱,將訊息歸因於該應用程式。

驗證類型也會決定您可以在訊息中加入哪些訊息功能和介面。透過應用程式驗證,Chat 應用程式可以傳送含有 RTF 格式文字、以資訊卡為基礎的介面和互動式小工具的訊息。完成使用者驗證後,即可傳送簡訊。在「開發人員預覽版」中,您也可以傳送資訊卡,詳情請參閱「建立及更新資訊卡」。
如要進一步瞭解 Chat API 提供的訊息功能,請參閱「Google Chat 訊息總覽」。
本指南說明如何使用任一驗證類型,透過 Chat API 傳送訊息。
必要條件
Node.js
- 具有 Google Chat 存取權的 Business 或 Enterprise 版 Google Workspace 帳戶。
- 設定環境:
- 建立 Google Cloud 專案。
- 設定 OAuth 同意畫面。
- 啟用及設定 Google Chat API,並為 Chat 應用程式命名、設定圖示和說明。
- 安裝 Node.js Cloud 用戶端程式庫。
- 根據您要在 Google Chat API 要求中驗證身分的方式,建立存取憑證:
- 如要以 Chat 使用者身分進行驗證,請建立 OAuth 用戶端 ID 憑證,並將憑證儲存至本機目錄中名為
credentials.json的 JSON 檔案。 - 如要以 Chat 應用程式的身分進行驗證,請建立服務帳戶憑證,並將憑證儲存為名為
credentials.json的 JSON 檔案。
- 如要以 Chat 使用者身分進行驗證,請建立 OAuth 用戶端 ID 憑證,並將憑證儲存至本機目錄中名為
- 根據您要以使用者或 Chat 應用程式的身分驗證,選擇授權範圍。
- 經過驗證的使用者或呼叫 Chat 應用程式所屬的 Google Chat 聊天室。如要以 Chat 應用程式的身分驗證,請將 Chat 應用程式加入聊天室。
Python
- 具有 Google Chat 存取權的 Business 或 Enterprise 版 Google Workspace 帳戶。
- 設定環境:
- 建立 Google Cloud 專案。
- 設定 OAuth 同意畫面。
- 啟用及設定 Google Chat API,並為 Chat 應用程式命名、設定圖示和說明。
- 安裝 Python Cloud 用戶端程式庫。
- 根據您要在 Google Chat API 要求中驗證身分的方式,建立存取憑證:
- 如要以 Chat 使用者身分進行驗證,請建立 OAuth 用戶端 ID 憑證,並將憑證儲存至本機目錄中名為
credentials.json的 JSON 檔案。 - 如要以 Chat 應用程式的身分進行驗證,請建立服務帳戶憑證,並將憑證儲存為名為
credentials.json的 JSON 檔案。
- 如要以 Chat 使用者身分進行驗證,請建立 OAuth 用戶端 ID 憑證,並將憑證儲存至本機目錄中名為
- 根據您要以使用者或 Chat 應用程式的身分驗證,選擇授權範圍。
- 經過驗證的使用者或呼叫 Chat 應用程式所屬的 Google Chat 聊天室。如要以 Chat 應用程式的身分驗證,請將 Chat 應用程式加入聊天室。
Java
- 具有 Google Chat 存取權的 Business 或 Enterprise 版 Google Workspace 帳戶。
- 設定環境:
- 建立 Google Cloud 專案。
- 設定 OAuth 同意畫面。
- 啟用及設定 Google Chat API,並為 Chat 應用程式命名、設定圖示和說明。
- 安裝 Java Cloud 用戶端程式庫。
- 根據您要在 Google Chat API 要求中驗證身分的方式,建立存取憑證:
- 如要以 Chat 使用者身分進行驗證,請建立 OAuth 用戶端 ID 憑證,並將憑證儲存至本機目錄中名為
credentials.json的 JSON 檔案。 - 如要以 Chat 應用程式的身分進行驗證,請建立服務帳戶憑證,並將憑證儲存為名為
credentials.json的 JSON 檔案。
- 如要以 Chat 使用者身分進行驗證,請建立 OAuth 用戶端 ID 憑證,並將憑證儲存至本機目錄中名為
- 根據您要以使用者或 Chat 應用程式的身分驗證,選擇授權範圍。
- 經過驗證的使用者或呼叫 Chat 應用程式所屬的 Google Chat 聊天室。如要以 Chat 應用程式的身分驗證,請將 Chat 應用程式加入聊天室。
Apps Script
- 具有 Google Chat 存取權的 Business 或 Enterprise 版 Google Workspace 帳戶。
- 設定環境:
- 建立 Google Cloud 專案。
- 設定 OAuth 同意畫面。
- 啟用及設定 Google Chat API,並為 Chat 應用程式命名、設定圖示和說明。
- 建立獨立的 Apps Script 專案,並開啟進階 Chat 服務。
- 在本指南中,您必須使用使用者或應用程式驗證。如要以 Chat 應用程式的身分進行驗證,請建立服務帳戶憑證。如需相關步驟,請參閱「以 Google Chat 擴充應用程式的身分驗證及授權」。
- 根據您要以使用者或 Chat 應用程式的身分驗證,選擇授權範圍。
- 經過驗證的使用者或呼叫 Chat 應用程式所屬的 Google Chat 聊天室。如要以 Chat 應用程式的身分驗證,請將 Chat 應用程式加入聊天室。
以 Chat 應用程式身分傳送訊息
本節說明如何使用應用程式驗證,傳送含有文字、資訊卡和互動式配件小工具的訊息。

如要使用應用程式驗證呼叫 CreateMessage() 方法,您必須在要求中指定下列欄位:
chat.bot授權範圍。- 您要張貼訊息的
Space資源。Chat 應用程式必須是該空間的成員。 - 要建立的
Message資源。如要定義訊息內容,可以加入 富文字 (text)、 一或多個資訊卡介面 (cardsV2), 或兩者皆是。
視需要加入下列項目:
accessoryWidgets欄位,可在訊息底部加入互動式按鈕。privateMessageViewer欄位,可私下傳送訊息給特定使用者。messageId欄位,可讓您為訊息命名,以便用於其他 API 要求。thread.threadKey和messageReplyOption欄位,可發起或回覆討論串。如果空間未使用執行緒,系統會忽略這個欄位。
以下程式碼範例說明 Chat 應用程式如何傳送以 Chat 應用程式身分發布的訊息,其中包含文字、資訊卡,以及訊息底部的可點選按鈕:
Node.js
Python
Java
Apps Script
如要執行這個範例,請將 SPACE_NAME 換成空間的
name
欄位中的 ID。您可以呼叫 ListSpaces() 方法或從空間的網址取得 ID。
在郵件底部新增互動式小工具
在本指南的第一個程式碼範例中,Chat 應用程式訊息會在訊息底部顯示可點選的按鈕,也就是配件小工具。配件小工具會顯示在郵件中的任何文字或資訊卡後方。您可以透過這些小工具,以多種方式提示使用者與訊息互動,包括:
- 評估訊息的準確度或滿意度。
- 回報訊息或 Google Chat 應用程式的問題。
- 開啟相關內容的連結,例如文件。
- 在特定時間內,關閉或暫緩顯示 Google Chat 應用程式的類似訊息。
如要新增配件小工具,請在要求主體中加入 accessoryWidgets[] 欄位,並指定要加入的一或多個小工具。
下圖顯示的 Chat 應用程式會在訊息中附加配件小工具,方便使用者評估使用體驗。
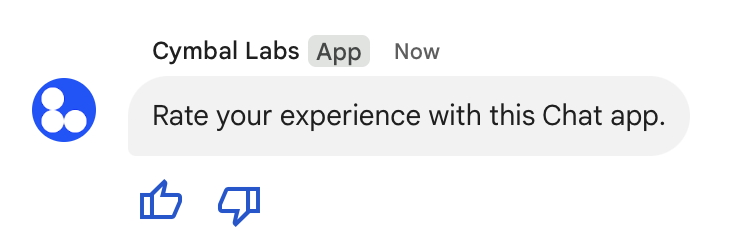
以下顯示的要求主體會建立含有兩個配件按鈕的簡訊。使用者點選按鈕時,對應的函式 (例如 doUpvote) 會處理互動:
{
  text: "Rate your experience with this Chat app.",
  accessoryWidgets: [{ buttonList: { buttons: [{
    icon: { material_icon: {
      name: "thumb_up"
    }},
    color: { red: 0, blue: 255, green: 0 },
    onClick: { action: {
      function: "doUpvote"
    }}
  }, {
    icon: { material_icon: {
      name: "thumb_down"
    }},
    color: { red: 0, blue: 255, green: 0 },
    onClick: { action: {
      function: "doDownvote"
    }}
  }]}}]
}
私下傳送訊息
Chat 應用程式可以私下傳送訊息,因此只有聊天室中的特定使用者能看到訊息。當 Chat 應用程式傳送私人訊息時,訊息會顯示標籤,通知使用者只有他們能查看該訊息。
如要使用 Chat API 私下傳送訊息,請在要求主體中指定 privateMessageViewer 欄位。如要指定使用者,請將值設為代表 Chat 使用者的 User 資源。您也可以使用 User 資源的 name 欄位,如下列範例所示:
{
  text: "Hello private world!",
  privateMessageViewer: {
    name: "users/USER_ID"
  }
}
如要使用這個範例,請將 USER_ID 替換為使用者的專屬 ID,例如 12345678987654321 或 hao@cymbalgroup.com。如要進一步瞭解如何指定使用者,請參閱「識別及指定 Google Chat 使用者」。
如要私下傳送訊息,請在要求中省略下列項目:
傳送強制通知或無聲訊息
Chat 擴充應用程式傳送訊息時,可以透過下列其中一種方式通知使用者:
- 強制傳送通知:無論收件者的通知設定或「零打擾」狀態為何,Chat 一律會傳送推播通知。在 Chat 中,系統會醒目顯示訊息,並將訊息置頂在收件者的名單或首頁清單中,同時顯示徽章。
- 傳送無聲訊息:Chat 會禁止向收件者推送通知。在 Chat 中,訊息不會在收件者的名單或首頁清單中觸發粗體或置頂行為,也不會顯示徽章。如果無聲訊息是對話中的最後一則訊息,系統不會在主畫面摘要中顯示其內容。
無論是強制或靜音,這些訊息都會包含視覺指標,通知收件者特殊通知行為。
強制通知和無聲訊息僅適用於使用應用程式驗證的 Chat 應用程式。
強制通知和無聲訊息有以下限制:
- 外部使用者:強制通知和無聲訊息不適用於聊天室中的外部使用者 (邀請對象)。外部使用者會根據自己的設定接收通知。
- 提及:靜音訊息不支援提及使用者。如果無聲訊息中包含提及內容,系統會將其視為純文字。
- 討論串:你無法使用無聲訊息發起或回覆討論串。
- 聊天室類型:系統不支援在直接訊息 (即時通訊) 或不具備 Google Workspace 帳戶的使用者所擁有的聊天室中,強制傳送通知和無聲訊息。
- 電子郵件通知:系統不會針對設為靜音的訊息傳送電子郵件通知。 強制通知的訊息只會在提及特定使用者時,觸發電子郵件通知。
如要強制顯示通知或傳送無聲訊息,請在要求中加入 createMessageNotificationOptions 欄位,並將 notificationType 設為下列其中一個值:
| 值 | 行為 |
|---|---|
NOTIFICATION_TYPE_FORCE_NOTIFY |
強制傳送通知。 |
NOTIFICATION_TYPE_SILENT |
靜音傳送訊息。 |
下列範例顯示要求傳送訊息的 JSON 主體,並強制發送通知:
{
  "text": "Critical update: the server is down!",
  "createMessageNotificationOptions": {
    "notificationType": "NOTIFICATION_TYPE_FORCE_NOTIFY"
  }
}
代表使用者傳送簡訊
本節說明如何使用使用者驗證,代表使用者傳送訊息。使用使用者驗證時,訊息內容只能包含文字,且必須省略僅供 Chat 擴充應用程式使用的訊息功能,包括資訊卡介面和互動式小工具。在開發人員預覽版中,您可以代表使用者建立含有資訊卡的訊息。詳情請參閱「建立及更新資訊卡」。

如要使用使用者驗證呼叫 CreateMessage() 方法,您必須在要求中指定下列欄位:
- 支援此方法使用者驗證的授權範圍。下列範例使用
chat.messages.create範圍。 - 您要張貼訊息的
Space資源。已通過驗證的使用者必須是聊天室成員。 - 要建立的
Message資源。如要定義訊息內容,請務必加入text欄位。
視需要加入下列項目:
createMessageNotificationOptions欄位,強制顯示通知或以無聲模式傳送訊息。messageId欄位,可讓您為訊息命名,以便用於其他 API 要求。thread.threadKey和messageReplyOption欄位,可發起或回覆討論串。如果空間未使用執行緒,系統會忽略這個欄位。
以下程式碼範例說明 Chat 應用程式如何代表已驗證的使用者,在指定空間中傳送訊息:
Node.js
Python
Java
Apps Script
如要執行這個範例,請將 SPACE_NAME 換成空間的
name
欄位中的 ID。您可以呼叫 ListSpaces() 方法或從空間的網址取得 ID。
發起或回覆討論串
如果聊天室使用討論串,您可以指定新訊息要發起討論串,還是回覆現有討論串。
根據預設,使用 Chat API 建立的訊息會啟動新的討論串。如要識別及回覆執行緒,可以在要求中指定執行緒鍵:
- 在要求主體中,指定
thread.threadKey欄位。 - 指定查詢參數
messageReplyOption,判斷金鑰已存在時的處理方式。
如要建立回覆現有討論串的訊息:
下列程式碼範例說明 Chat 應用程式如何代表已驗證的使用者,傳送文字訊息來發起或回覆特定討論串,該討論串由特定聊天室的鍵值識別:
Node.js
Python
Java
Apps Script
如要執行這個範例,請替換下列項目:
THREAD_KEY:空間中的現有討論串鍵,或是要建立新討論串的討論串專屬名稱。SPACE_NAME:來自空間的name欄位 ID。您可以呼叫ListSpaces()方法或從空間的網址取得 ID。
為訊息命名
如要在日後的 API 呼叫中擷取或指定訊息,可以在要求中設定 messageId 欄位,為訊息命名。命名訊息後,您就能指定訊息,不必儲存訊息資源名稱中系統指派的 ID (以 name 欄位表示)。
舉例來說,如要使用 get() 方法擷取訊息,請使用資源名稱指定要擷取的訊息。資源名稱的格式為 spaces/{space}/messages/{message},其中 {message} 代表系統指派的 ID,或是您在建立訊息時設定的自訂名稱。
如要為訊息命名,請在建立訊息時,於
messageId
欄位中指定自訂 ID。messageId 欄位會為 Message 資源的 clientAssignedMessageId 欄位設定值。
你只能在建立訊息時為訊息命名。您無法為現有訊息命名或修改自訂 ID。自訂 ID 必須符合下列規定:
- 開頭為「
client-」。舉例來說,client-custom-name是有效的自訂 ID,但custom-name不是。 - 最多 63 個字元,只能使用小寫英文字母、數字和連字號。
- 在空間中不得重複。Chat 應用程式無法為不同訊息使用相同的自訂 ID。
以下程式碼範例說明 Chat 應用程式如何代表已驗證的使用者,將含有 ID 的訊息傳送至指定聊天室:
Node.js
Python
Java
Apps Script
如要執行這個範例,請替換下列項目:
SPACE_NAME:來自空間的name欄位 ID。您可以呼叫ListSpaces()方法或從空間的網址取得 ID。MESSAGE-ID:訊息名稱,開頭為custom-。不得與 Chat 應用程式在指定空間中建立的任何其他訊息名稱重複。
引用訊息
如要引用其他訊息,請呼叫 CreateMessage() (rpc、rest),並在要求中設定 quotedMessageMetadata (rpc、rest)。
你可以在討論串或主要對話中引用訊息,但無法引用其他討論串中的訊息。
以下程式碼說明如何建立引用其他訊息的訊息:
Node.js
import {createClientWithUserCredentials} from './authentication-utils.js';

const USER_AUTH_OAUTH_SCOPES = ['https://www.googleapis.com/auth/chat.messages.create'];

// This sample shows how to create a message that quotes another message.
async function main() {

  // Create a client
  const chatClient = await createClientWithUserCredentials(USER_AUTH_OAUTH_SCOPES);

  // Initialize request argument(s)
  const request = {

    // TODO(developer): Replace SPACE_NAME .
    parent: 'spaces/SPACE_NAME',

    message: {
      text: 'I am responding to a quoted message!',

      // quotedMessageMetadata lets Chat apps respond to a message by quoting it.
      quotedMessageMetadata: {

        // TODO(developer): Replace QUOTED_MESSAGE_NAME
        // and QUOTED_MESSAGE_LAST_UPDATE_TIME.
        name: 'QUOTED_MESSAGE_NAME',
        lastUpdateTime: 'QUOTED_MESSAGE_LAST_UPDATE_TIME'
      }
    }
  };

  // Make the request
  const response = await chatClient.createMessage(request);

  // Handle the response
  console.log(response);
}

main().catch(console.error);
Python
from authentication_utils import create_client_with_user_credentials
from google.apps import chat_v1 as google_chat
from google.protobuf.timestamp_pb2 import Timestamp

SCOPES = ['https://www.googleapis.com/auth/chat.messages.create']

# This sample shows how to create a message that quotes another message.
def create_message_quote_message():
    '''Creates a message that quotes another message.'''

    # Create a client
    client = create_client_with_user_credentials(SCOPES)

    # Create a timestamp from the RFC-3339 string.
    # TODO(developer): Replace QUOTED_MESSAGE_LAST_UPDATE_TIME.
    last_update_time = Timestamp()
    last_update_time.FromJsonString('QUOTED_MESSAGE_LAST_UPDATE_TIME')

    # Initialize request argument(s)
    request = google_chat.CreateMessageRequest(

        # TODO(developer): Replace SPACE_NAME.
        parent='spaces/SPACE_NAME',

        # Create the message.
        message = google_chat.Message(
            text='I am responding to a quoted message!',

            # quotedMessageMetadata lets Chat apps respond to a message by quoting it.
            quoted_message_metadata=google_chat.QuotedMessageMetadata(

                name='QUOTED_MESSAGE_NAME',
                last_update_time=last_update_time
            )
        )
    )

    # Make the request
    response = client.create_message(request)

    # Handle the response
    print(response)

create_message_quote_message()
Java
import com.google.chat.v1.ChatServiceClient;
import com.google.chat.v1.CreateMessageRequest;
import com.google.chat.v1.Message;
import com.google.chat.v1.QuotedMessageMetadata;
import com.google.protobuf.util.Timestamps;
import com.google.workspace.api.chat.samples.utils.AuthenticationUtils;
import java.text.ParseException;

// This sample shows how to create a message that quotes another message.
public class CreateMessageQuoteMessage {
  public static void main(String[] args) throws Exception, ParseException {
    // Create a client.
    ChatServiceClient chatClient = AuthenticationUtils.createClientWithUserCredentials();

    // Initialize request argument(s).
    // TODO(developer): Replace SPACE_NAME, QUOTED_MESSAGE_NAME,
    // and QUOTED_MESSAGE_LAST_UPDATE_TIME here.
    String parent = "spaces/SPACE_NAME";
    String quotedMessageName = "QUOTED_MESSAGE_NAME";
    String lastUpdateTime = "QUOTED_MESSAGE_LAST_UPDATE_TIME";

    QuotedMessageMetadata quotedMessageMetadata =
        QuotedMessageMetadata.newBuilder()
            .setName(quotedMessageName)
            .setLastUpdateTime(Timestamps.parse(lastUpdateTime))
            .build();

    Message message = Message.newBuilder()
        .setText("I am responding to a quoted message!")
        .setQuotedMessageMetadata(quotedMessageMetadata)
        .build();

    CreateMessageRequest request =
        CreateMessageRequest.newBuilder()
            .setParent(parent)
            .setMessage(message)
            .build();

    // Make the request.
    Message response = chatClient.createMessage(request);

    // Handle the response.
    System.out.println(response);
  }
}
Apps Script
/**
 * Creates a message that quotes another message.
 *
 * Relies on the OAuth2 scope 'https://www.googleapis.com/auth/chat.messages.create'
 * referenced in the manifest file (appsscript.json).
 */
function createMessageQuoteMessage() {

  // Initialize request argument(s)
  // TODO(developer): Replace SPACE_NAME here.
  const parent = 'spaces/SPACE_NAME';

  const message = {

    // The text content of the message.
    text: 'I am responding to a quoted message!',

    // quotedMessageMetadata lets Chat apps respond to a message by quoting it.
    //
    // TODO(developer): Replace QUOTED_MESSAGE_NAME
    // and QUOTED_MESSAGE_LAST_UPDATE_TIME .
    quotedMessageMetadata: {
      name: 'QUOTED_MESSAGE_NAME',
      lastUpdateTime: 'QUOTED_MESSAGE_LAST_UPDATE_TIME',
    }
  };

  // Make the request
  const response = Chat.Spaces.Messages.create(message, parent);

  // Handle the response
  console.log(response);
}
如要執行這個範例,請替換下列項目:
SPACE_NAME:來自空間的name欄位 ID。您可以呼叫ListSpaces()(rpc、rest) 方法,或從空間的網址取得 ID。QUOTED_MESSAGE_NAME:要引用訊息的訊息資源name(rpc、rest),格式為spaces/{space}/messages/{message}。QUOTED_MESSAGE_LAST_UPDATE_TIME:要引用訊息的上次更新時間。如果訊息從未經過編輯,則對應createTime(rpc、rest)。如果訊息經過編輯,則對應lastUpdateTime(rpc、rest)。
疑難排解
如果 Google Chat 應用程式或資訊卡傳回錯誤,Chat 介面會顯示「發生錯誤」訊息。或「無法處理您的要求。」有時 Chat UI 不會顯示任何錯誤訊息,但 Chat 應用程式或資訊卡會產生非預期的結果,例如資訊卡訊息可能不會顯示。
即使 Chat 使用者介面未顯示錯誤訊息,只要開啟 Chat 應用程式的錯誤記錄功能,系統就會提供說明性錯誤訊息和記錄資料,協助您修正錯誤。如需查看、偵錯及修正錯誤的相關協助,請參閱「排解及修正 Google Chat 錯誤」。
相關主題
- 使用 Card Builder 設計及預覽 Chat 應用程式的 JSON 訊息。
- 設定訊息格式。
- 取得訊息的詳細資料。
- 列出聊天室中的訊息。
- 更新訊息。
- 刪除訊息。
- 在 Google Chat 訊息中識別使用者。
- 使用傳入 Webhook 將訊息傳送至 Google Chat。