สร้างแอป HTTP สำหรับ Google Chat

หน้านี้อธิบายวิธีสร้างแอป HTTP Chat ซึ่งมีวิธีต่างๆ ในการใช้งานสถาปัตยกรรมนี้ ใน Google Cloud คุณจะใช้ Cloud Functions, Cloud Run และ App Engine ได้ ในการเริ่มต้นใช้งานอย่างรวดเร็วนี้ คุณจะเขียนและทำให้Cloud Functions ใช้งานได้ ซึ่งแอป Chat จะใช้เพื่อตอบกลับข้อความของผู้ใช้

สถาปัตยกรรมนี้ให้คุณกำหนดค่า Chat ให้ผสานรวมกับ Google Cloud หรือเซิร์ฟเวอร์ในองค์กรโดยใช้ HTTP ดังที่แสดงในแผนภาพต่อไปนี้

สถาปัตยกรรมของแอป Chat ที่ใช้เว็บเซอร์วิสในเซิร์ฟเวอร์ภายในองค์กร

ในแผนภาพก่อนหน้า ผู้ใช้ที่โต้ตอบกับแอป HTTP Chat จะมีขั้นตอนการส่งข้อมูลดังนี้

  1. ผู้ใช้ส่งข้อความใน Chat ไปยังแอป Chat ไม่ว่าจะเป็นในข้อความส่วนตัวหรือในพื้นที่ทำงานของ Chat
  2. ระบบจะส่งคำขอ HTTP ไปยังเว็บเซิร์ฟเวอร์ที่เป็นระบบคลาวด์หรือระบบในองค์กรซึ่งมีตรรกะของแอป Chat
  3. ตรรกะของแอป Chat สามารถผสานรวมกับบริการ Google Workspace (เช่น ปฏิทินชีต) บริการอื่นๆ ของ Google (เช่น Maps, YouTube และ Vertex AI) หรือเว็บเซอร์วิสอื่นๆ (เช่น ระบบการจัดการโปรเจ็กต์หรือเครื่องมือการแจ้งปัญหา)
  4. เว็บเซิร์ฟเวอร์จะส่งการตอบกลับ HTTP กลับไปยังบริการแอป Chat ใน Chat
  5. ระบบจะส่งคำตอบไปยังผู้ใช้
  6. แอป Chat สามารถเรียกใช้ Chat API เพื่อโพสต์ข้อความแบบไม่พร้อมกันหรือดำเนินการอื่นๆ ได้โดยขึ้นอยู่กับความต้องการ

สถาปัตยกรรมนี้ช่วยให้คุณมีความยืดหยุ่นในการใช้ไลบรารีและคอมโพเนนต์ที่มีอยู่ในระบบอยู่แล้ว เนื่องจากแอปแชทเหล่านี้ออกแบบโดยใช้ภาษาโปรแกรมที่แตกต่างกันได้

วัตถุประสงค์

  • ตั้งค่าสภาพแวดล้อม
  • สร้างและทำให้ Cloud Function ใช้งานได้
  • เผยแพร่แอปใน Chat
  • ทดสอบแอป

ข้อกำหนดเบื้องต้น

ตั้งค่าสภาพแวดล้อม

คุณต้องเปิดใช้ Google API ในโปรเจ็กต์ Google Cloud ก่อนจึงจะใช้ได้ คุณเปิด API อย่างน้อย 1 รายการในโปรเจ็กต์ Google Cloud โปรเจ็กต์เดียวได้
  • ในคอนโซล Google Cloud ให้เปิดใช้ Google Chat API, Cloud Build API, Cloud Functions API, Cloud Pub/Sub API, Cloud Logging API, Artifact Registry API และ Cloud Run API

    เปิดใช้ API

สร้างและทำให้ Cloud Function ใช้งานได้

สร้างและทำให้ Cloud Function ทํางาน ซึ่งจะสร้างการ์ด Chat ที่มีชื่อที่แสดงและรูปโปรไฟล์ของผู้ส่ง เมื่อแอปแชทได้รับข้อความ ระบบจะเรียกใช้ฟังก์ชันและตอบกลับด้วยการ์ด

หากต้องการสร้างและทำให้ฟังก์ชันสำหรับแอป Chat ใช้งานได้ ให้ทำตามขั้นตอนต่อไปนี้

Node.js

  1. ในคอนโซล Google Cloud ให้ไปที่หน้า Cloud Functions โดยทำดังนี้

    ไปที่ Cloud Functions

    ตรวจสอบว่าได้เลือกโปรเจ็กต์สำหรับแอป Chat แล้ว

  2. คลิก สร้างฟังก์ชัน

  3. ในหน้าสร้างฟังก์ชัน ให้ตั้งค่าฟังก์ชันดังนี้

    1. ในสภาพแวดล้อม ให้เลือกฟังก์ชัน Cloud Run
    2. ป้อน QuickStartChatApp ในส่วนชื่อฟังก์ชัน
    3. เลือกภูมิภาคในภูมิภาค
    4. ในส่วนการตรวจสอบสิทธิ์ ให้เลือกต้องตรวจสอบสิทธิ์
    5. คลิกถัดไป
  4. ในรันไทม์ ให้เลือก Node.js เวอร์ชันล่าสุด

  5. ในส่วนซอร์สโค้ด ให้เลือกเครื่องมือแก้ไขในบรรทัด

  6. ในจุดแรกเข้า ให้ลบข้อความเริ่มต้นและป้อน avatarApp

  7. แทนที่เนื้อหาของ index.js ด้วยโค้ดต่อไปนี้

    node/avatar-app/index.js
    // The ID of the slash command "/about".
    // It's not enabled by default, set to the actual ID to enable it. You need to
    // use the same ID as set in the Google Chat API configuration.
    const ABOUT_COMMAND_ID = "";
    
    /**
     * Google Cloud Function that responds to messages sent from a
     * Google Chat space.
     *
     * @param {Object} req Request sent from Google Chat space
     * @param {Object} res Response to send back
     */
    exports.avatarApp = function avatarApp(req, res) {
      if (req.method === 'GET' || !req.body.message) {
        return res.send('Hello! This function is meant to be used ' +
          'in a Google Chat Space.');
      }
    
      // Stores the Google Chat event as a variable.
      const event = req.body;
    
      // Checks for the presence of a slash command in the message.
      if (event.message.slashCommand) {
        // Executes the slash command logic based on its ID.
        // Slash command IDs are set in the Google Chat API configuration.
        switch (event.message.slashCommand.commandId) {
          case ABOUT_COMMAND_ID:
            return res.send({
              privateMessageViewer: event.user,
              text: 'The Avatar app replies to Google Chat messages.'
            });
        }
      }
    
      const sender = req.body.message.sender.displayName;
      const image = req.body.message.sender.avatarUrl;
      const data = createMessage(sender, image);
      res.send(data);
    };
    
    /**
     * Creates a card with two widgets.
     * 
     * @param {string} displayName the sender's display name
     * @param {string} avatarUrl the URL for the sender's avatar
     * @return {Object} a card with the user's avatar.
     */
    function createMessage(displayName, avatarUrl) {
      return {
        text: 'Here\'s your avatar',
        cardsV2: [{
          cardId: 'avatarCard',
          card: {
            name: 'Avatar Card',
            header: {
              title: `Hello ${displayName}!`,
            },
            sections: [{ widgets: [{
              textParagraph: { text: 'Your avatar picture: ' }
            }, {
              image: { imageUrl: avatarUrl }
            }]}]
          }
        }]
      };
    }

  8. คลิกทำให้ใช้งานได้

Python

  1. ในคอนโซล Google Cloud ให้ไปที่หน้า Cloud Functions โดยทำดังนี้

    ไปที่ Cloud Functions

    ตรวจสอบว่าได้เลือกโปรเจ็กต์สำหรับแอป Chat แล้ว

  2. คลิก สร้างฟังก์ชัน

  3. ในหน้าสร้างฟังก์ชัน ให้ตั้งค่าฟังก์ชันดังนี้

    1. ในสภาพแวดล้อม ให้เลือกฟังก์ชัน Cloud Run
    2. ป้อน QuickStartChatApp ในส่วนชื่อฟังก์ชัน
    3. เลือกภูมิภาคในภูมิภาค
    4. ในส่วนการตรวจสอบสิทธิ์ ให้เลือกต้องตรวจสอบสิทธิ์
    5. คลิกถัดไป
  4. ในรันไทม์ ให้เลือก Python เวอร์ชันล่าสุด

  5. ในส่วนซอร์สโค้ด ให้เลือกเครื่องมือแก้ไขในบรรทัด

  6. ในจุดแรกเข้า ให้ลบข้อความเริ่มต้นและป้อน avatar_app

  7. แทนที่เนื้อหาของ main.py ด้วยโค้ดต่อไปนี้

    python/avatar-app/main.py
    from typing import Any, Mapping
    
    import flask
    import functions_framework
    
    # The ID of the slash command "/about".
    # It's not enabled by default, set to the actual ID to enable it. You need to
    # use the same ID as set in the Google Chat API configuration.
    ABOUT_COMMAND_ID = ""
    
    @functions_framework.http
    def avatar_app(req: flask.Request) -> Mapping[str, Any]:
      """Google Cloud Function that handles requests from Google Chat
    
      Args:
          flask.Request: the request
    
      Returns:
          Mapping[str, Any]: the response
      """
      if req.method == "GET":
        return "Hello! This function must be called from Google Chat."
    
      request_json = req.get_json(silent=True)
    
      # Checks for the presence of a slash command in the message.
      if "slashCommand" in request_json["message"]:
        # Executes the slash command logic based on its ID.
        # Slash command IDs are set in the Google Chat API configuration.
        if request_json["message"]["slashCommand"]["commandId"] == ABOUT_COMMAND_ID:
          return {
            "privateMessageViewer": request_json["user"],
            "text": 'The Avatar app replies to Google Chat messages.'
          }
    
      display_name = request_json["message"]["sender"]["displayName"]
      avatar = request_json["message"]["sender"]["avatarUrl"]
      response = create_message(name=display_name, image_url=avatar)
      return response
    
    
    def create_message(name: str, image_url: str) -> Mapping[str, Any]:
      """Google Cloud Function that handles requests from Google Chat
    
      Args:
          str name: the sender's display name.
          str image_url: the URL for the sender's avatar.
    
      Returns:
          Mapping[str, Any]: a card with the user's avatar.
      """
      return {
        "text": "Here's your avatar",
        "cardsV2": [{
          "cardId": "avatarCard",
          "card": {
              "name": "Avatar Card",
              "header": { "title": f"Hello {name}!" },
              "sections": [{
                "widgets": [{
                  "textParagraph": { "text": "Your avatar picture:" }
                }, {
                  "image": { "imageUrl": image_url }
                }]
              }]
          }
        }]
      }

  8. คลิกทำให้ใช้งานได้

Java

  1. ในคอนโซล Google Cloud ให้ไปที่หน้า Cloud Functions โดยทำดังนี้

    ไปที่ Cloud Functions

    ตรวจสอบว่าได้เลือกโปรเจ็กต์สำหรับแอป Chat แล้ว

  2. คลิก สร้างฟังก์ชัน

  3. ในหน้าสร้างฟังก์ชัน ให้ตั้งค่าฟังก์ชันดังนี้

    1. ในสภาพแวดล้อม ให้เลือกฟังก์ชัน Cloud Run
    2. ป้อน QuickStartChatApp ในส่วนชื่อฟังก์ชัน
    3. เลือกภูมิภาคในภูมิภาค
    4. ในส่วนการตรวจสอบสิทธิ์ ให้เลือกต้องตรวจสอบสิทธิ์
    5. คลิกถัดไป
  4. ในรันไทม์ ให้เลือก Java เวอร์ชันล่าสุด

  5. ในส่วนซอร์สโค้ด ให้เลือกเครื่องมือแก้ไขในบรรทัด

  6. ในจุดแรกเข้า ให้ลบข้อความเริ่มต้นและป้อน App

  7. เปลี่ยนชื่อ src/main/java/com/example/Example.java เป็น src/main/java/App.java

  8. แทนที่เนื้อหาของ App.java ด้วยโค้ดต่อไปนี้

    java/avatar-app/src/main/java/App.java
    import java.util.List;
    
    import com.google.api.services.chat.v1.model.CardWithId;
    import com.google.api.services.chat.v1.model.GoogleAppsCardV1Card;
    import com.google.api.services.chat.v1.model.GoogleAppsCardV1CardHeader;
    import com.google.api.services.chat.v1.model.GoogleAppsCardV1Image;
    import com.google.api.services.chat.v1.model.GoogleAppsCardV1Section;
    import com.google.api.services.chat.v1.model.GoogleAppsCardV1TextParagraph;
    import com.google.api.services.chat.v1.model.GoogleAppsCardV1Widget;
    import com.google.api.services.chat.v1.model.Message;
    import com.google.api.services.chat.v1.model.User;
    import com.google.cloud.functions.HttpFunction;
    import com.google.cloud.functions.HttpRequest;
    import com.google.cloud.functions.HttpResponse;
    import com.google.gson.Gson;
    import com.google.gson.JsonObject;
    
    public class App implements HttpFunction {
      private static final Gson gson = new Gson();
    
      // The ID of the slash command "/about".
      // It's not enabled by default, set to the actual ID to enable it. You need to
      // use the same ID as set in the Google Chat API configuration.
      private static final String ABOUT_COMMAND_ID = "";
    
      @Override
      public void service(HttpRequest request, HttpResponse response) throws Exception {
        JsonObject body = gson.fromJson(request.getReader(), JsonObject.class);
    
        if (request.getMethod().equals("GET") || !body.has("message")) {
          response.getWriter().write("Hello! This function must be called from Google Chat.");
          return;
        }
    
        // Checks for the presence of a slash command in the message.
        if (body.getAsJsonObject("message").has("slashCommand")) {
          // Executes the slash command logic based on its ID.
          // Slash command IDs are set in the Google Chat API configuration.
          JsonObject slashCommand = body.getAsJsonObject("message").getAsJsonObject("slashCommand");
          switch (slashCommand.get("commandId").getAsString()) {
            case ABOUT_COMMAND_ID:
              Message aboutMessage = new Message();
              aboutMessage.setText("The Avatar app replies to Google Chat messages.");
              aboutMessage.setPrivateMessageViewer(new User()
                .setName(body.getAsJsonObject("user").get("name").getAsString()));
              response.getWriter().write(gson.toJson(aboutMessage));
              return;
          }
        }
    
        JsonObject sender = body.getAsJsonObject("message").getAsJsonObject("sender");
        String displayName = sender.has("displayName") ? sender.get("displayName").getAsString() : "";
        String avatarUrl = sender.has("avatarUrl") ? sender.get("avatarUrl").getAsString() : "";
        Message message = createMessage(displayName, avatarUrl);
        response.getWriter().write(gson.toJson(message));
      }
    
      Message createMessage(String displayName, String avatarUrl) {
        return new Message()
          .setText("Here's your avatar")
          .setCardsV2(List.of(new CardWithId()
            .setCardId("previewLink")
            .setCard(new GoogleAppsCardV1Card()
              .setName("Avatar Card")
              .setHeader(new GoogleAppsCardV1CardHeader()
                .setTitle(String.format("Hello %s!", displayName)))
              .setSections(List.of(new GoogleAppsCardV1Section().setWidgets(List.of(
                new GoogleAppsCardV1Widget()
                  .setTextParagraph(new GoogleAppsCardV1TextParagraph()
                    .setText("Your avatar picture: ")),
                new GoogleAppsCardV1Widget()
                  .setImage(new GoogleAppsCardV1Image().setImageUrl(avatarUrl)))))))));
      }
    }

  9. แทนที่เนื้อหาของ pom.xml ด้วยโค้ดต่อไปนี้

    java/avatar-app/pom.xml
    <project xmlns="http://maven.apache.org/POM/4.0.0"
             xmlns:xsi="http://www.w3.org/2001/XMLSchema-instance"
             xsi:schemaLocation="http://maven.apache.org/POM/4.0.0 http://maven.apache.org/xsd/maven-4.0.0.xsd">
      <modelVersion>4.0.0</modelVersion>
    
      <groupId>com.google.chat</groupId>
      <artifactId>avatar-app</artifactId>
      <version>1.0-SNAPSHOT</version>
    
      <properties>
        <maven.compiler.target>17</maven.compiler.target>
        <maven.compiler.source>17</maven.compiler.source>
      </properties>
    
      <dependencies>
        <dependency>
          <groupId>com.google.cloud.functions</groupId>
          <artifactId>functions-framework-api</artifactId>
          <version>1.0.1</version>
        </dependency>
    
        <!-- https://mvnrepository.com/artifact/com.google.code.gson/gson -->
        <dependency>
            <groupId>com.google.code.gson</groupId>
            <artifactId>gson</artifactId>
            <version>2.9.1</version>
        </dependency>
    
        <!-- https://mvnrepository.com/artifact/com.google.apis/google-api-services-chat -->
        <dependency>
          <groupId>com.google.apis</groupId>
          <artifactId>google-api-services-chat</artifactId>
          <version>v1-rev20241008-2.0.0</version>
        </dependency>
      </dependencies>
    
      <!-- Required for Java 11 functions in the inline editor -->
      <build>
        <plugins>
          <plugin>
            <groupId>org.apache.maven.plugins</groupId>
            <artifactId>maven-compiler-plugin</artifactId>
            <version>3.8.1</version>
            <configuration>
              <excludes>
                <exclude>.google/</exclude>
              </excludes>
            </configuration>
          </plugin>
        </plugins>
      </build>
    </project>

  10. คลิกทำให้ใช้งานได้

หน้ารายละเอียด Cloud Functions จะเปิดขึ้น และฟังก์ชันจะปรากฏขึ้นพร้อมตัวบ่งชี้ความคืบหน้า 2 รายการ ได้แก่ 1 รายการสำหรับบิลด์และอีก 1 รายการสำหรับบริการ เมื่อทั้ง 2 ไฟบอกสถานะความคืบหน้าหายไปและมีเครื่องหมายถูกแสดงแทน แสดงว่าฟังก์ชันของคุณพร้อมใช้งานแล้ว

ให้สิทธิ์ Google Chat เพื่อเรียกใช้ฟังก์ชัน

หากต้องการให้สิทธิ์ Google Chat เรียกใช้ฟังก์ชัน ให้เพิ่มบัญชีบริการ Google Chat ที่มีบทบาทผู้เรียกใช้ Cloud Run

  1. ในคอนโซล Google Cloud ให้ไปที่หน้า Cloud Run โดยทำดังนี้

    ไปที่ Cloud Run

  2. ในรายการบริการ Cloud Run ให้เลือกช่องทําเครื่องหมายข้างฟังก์ชันที่รับ (อย่าคลิกฟังก์ชันนั้น)

  3. คลิกสิทธิ์ แผงสิทธิ์จะเปิดขึ้น

  4. คลิกเพิ่มผู้ใช้หลัก

  5. ป้อน chat@system.gserviceaccount.com ในผู้ใช้หลักรายใหม่

  6. ในส่วนเลือกบทบาท ให้เลือก Cloud Run > Cloud Run Invoker

  7. คลิกบันทึก

เผยแพร่แอปใน Google Chat

หลังจากทำให้ Cloud Function ใช้งานได้แล้ว ให้ทำตามขั้นตอนต่อไปนี้เพื่อเปลี่ยนเป็นแอป Google Chat

  1. ในคอนโซล Google Cloud ให้คลิกเมนู > Cloud Functions

    ไปที่ Cloud Functions

    ตรวจสอบว่าได้เลือกโปรเจ็กต์ที่คุณเปิดใช้ฟังก์ชันระบบคลาวด์แล้ว

  2. ในรายการฟังก์ชัน ให้คลิก QuickStartChatApp

  3. คลิกแท็บทริกเกอร์

  4. คัดลอก URL ในส่วน HTTPS

  5. ค้นหา "Google Chat API" แล้วคลิก Google Chat API จากนั้นคลิกจัดการ

    ไปที่ Chat API

  6. คลิกการกําหนดค่าและตั้งค่าแอป Google Chat โดยทำดังนี้

    1. ป้อน Quickstart App ในชื่อแอป
    2. ในURL ของรูปโปรไฟล์ ให้ป้อน https://developers.google.com/chat/images/quickstart-app-avatar.png
    3. ในคำอธิบาย ให้ป้อน Quickstart app
    4. ในส่วนฟังก์ชันการทำงาน ให้เลือกรับข้อความแบบ 1:1 และเข้าร่วมพื้นที่ทำงานและการสนทนากลุ่ม
    5. ในส่วนการตั้งค่าการเชื่อมต่อ ให้เลือก URL ปลายทาง HTTP แล้ววาง URL ของทริกเกอร์ Cloud Function ลงในช่อง
    6. ในกลุ่มเป้าหมายการตรวจสอบสิทธิ์ ให้เลือก URL ของปลายทาง HTTP
    7. ในส่วนระดับการเข้าถึง ให้เลือกทำให้แอป Google Chat นี้พร้อมให้บริการแก่บุคคลและกลุ่มที่เฉพาะเจาะจงในโดเมนของคุณ แล้วป้อนอีเมล
    8. ในส่วนบันทึก ให้เลือกบันทึกข้อผิดพลาดไปยังการบันทึก
  7. คลิกบันทึก

แอป Chat พร้อมรับและตอบกลับข้อความใน Chat

ทดสอบแอป Chat

หากต้องการทดสอบแอป Chat ให้เปิดพื้นที่ทำงานของข้อความส่วนตัวด้วยแอป Chat แล้วส่งข้อความ โดยทำดังนี้

  1. เปิด Google Chat โดยใช้บัญชี Google Workspace ที่คุณให้ไว้เมื่อเพิ่มตัวเองเป็นผู้ทดสอบที่เชื่อถือได้

    ไปที่ Google Chat

  2. คลิก แชทใหม่
  3. ในช่องเพิ่มบุคคลอย่างน้อย 1 คน ให้พิมพ์ชื่อแอป Chat
  4. เลือกแอป Chat จากผลการค้นหา ข้อความส่วนตัวจะเปิดขึ้น

  5. ในข้อความส่วนตัวใหม่กับแอป ให้พิมพ์ Hello แล้วกด enter

การตอบกลับของแอป Chat มีข้อความการ์ดที่แสดงชื่อและรูปโปรไฟล์ของผู้ส่ง ดังที่แสดงในภาพต่อไปนี้
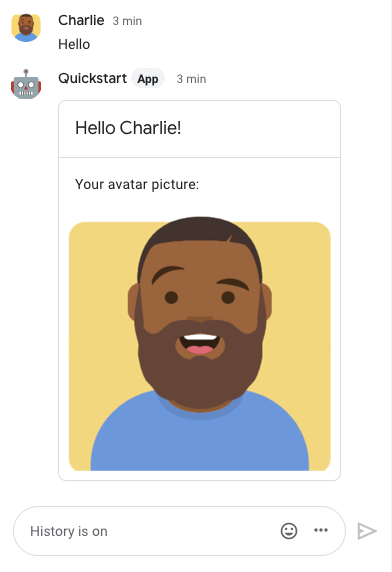
แอป Chat ตอบกลับด้วยการ์ดที่มีชื่อที่แสดงและรูปโปรไฟล์ของผู้ส่ง

หากต้องการเพิ่มผู้ทดสอบที่เชื่อถือได้และดูข้อมูลเพิ่มเติมเกี่ยวกับการทดสอบฟีเจอร์แบบอินเทอร์แอกทีฟ โปรดดูหัวข้อทดสอบฟีเจอร์แบบอินเทอร์แอกทีฟสำหรับแอป Google Chat

แก้ปัญหา

เมื่อแอป Google Chat หรือการ์ดแสดงข้อผิดพลาด อินเทอร์เฟซของ Chat จะแสดงข้อความว่า "เกิดข้อผิดพลาด" หรือ "ดำเนินการตามคำขอของคุณไม่ได้" บางครั้ง UI ของ Chat ไม่แสดงข้อความแสดงข้อผิดพลาด แต่แอป Chat หรือการ์ดให้ผลลัพธ์ที่ไม่คาดคิด เช่น ข้อความการ์ดอาจไม่ปรากฏ

แม้ว่าข้อความแสดงข้อผิดพลาดอาจไม่แสดงใน UI ของ Chat แต่ข้อความแสดงข้อผิดพลาดที่อธิบายรายละเอียดและข้อมูลบันทึกจะพร้อมให้ใช้งานเพื่อช่วยคุณแก้ไขข้อผิดพลาดเมื่อเปิดการบันทึกข้อผิดพลาดสำหรับแอป Chat หากต้องการความช่วยเหลือในการดู แก้ไขข้อบกพร่อง และแก้ไขข้อผิดพลาด โปรดดูหัวข้อแก้ปัญหาและแก้ไขข้อผิดพลาดของ Google Chat

ล้างข้อมูล

เราขอแนะนำให้คุณลบโปรเจ็กต์ Cloud เพื่อหลีกเลี่ยงการเรียกเก็บเงินจากบัญชี Google Cloud สำหรับทรัพยากรที่ใช้ในบทแนะนำนี้

  1. ในคอนโซล Google Cloud ให้ไปที่หน้าจัดการทรัพยากร คลิก เมนู > IAM และผู้ดูแลระบบ > จัดการทรัพยากร

    ไปที่เครื่องมือจัดการทรัพยากร

  2. ในรายการโปรเจ็กต์ ให้เลือกโปรเจ็กต์ที่ต้องการลบ แล้วคลิกลบ
  3. ในกล่องโต้ตอบ ให้พิมพ์รหัสโปรเจ็กต์ แล้วคลิกปิดเพื่อลบโปรเจ็กต์