این راهنما شما را در راهاندازی محیط خود برای ایجاد Actions با استفاده از Actions SDK و Actions Builder راهنمایی میکند. شما وظایف زیر را انجام خواهید داد:
- Node.js را نصب کنید: برای استفاده از کتابخانه تکمیل Node.js ما به این محیط زمان اجرا نیاز دارید.
- Firebase CLI را نصب کنید: این ابزار خط فرمان به شما امکان میدهد وابستگیهای Firebase، مانند برنامههای وب برای Interactive Canvas را برای میزبانی Firebase توسعه و استقرار دهید.
- ابزار خط فرمان gactions را نصب کنید: هنگام توسعه با Actions SDK، از این ابزار برای ایجاد، مدیریت و استقرار بسته Action برای Action خود استفاده می کنید.
- ایجاد یک پروژه Actions: پروژه Actions محفظه منطقی برای کنش های مکالمه شما است. قبل از اینکه بتوانید شروع به ساخت کنید، باید یکی را در کنسول Actions ایجاد کنید.
- یک نمونه را راهاندازی و اجرا کنید: این نمونه ساده به شما نشان میدهد چگونه شروع به ساخت اکشنهایی کنید که توسط Interactive Canvas طراحی شدهاند.
پس از تکمیل این شروع سریع، می توانید پروژه Actions خود را بین محیط توسعه محلی خود و تجربه وب Actions Builder همگام کنید.
Node.js و Firebase CLI را نصب کنید
Node.js را طبق مستندات Node.js دانلود و نصب کنید تا از کتابخانه تکمیل ما استفاده کنید. نصب Node.js شما همچنین به شما این امکان را می دهد که Firebase CLI را با npm نصب کنید، و بعداً، پیاده سازی انجام مکالمه خود را به صورت محلی اجرا کنید.
Firebase CLI را طبق مستندات Firebase نصب و راه اندازی کنید. Firebase CLI به شما امکان می دهد یک برنامه وب Interactive Canvas را در میزبانی Firebase مستقر کنید و در صورت لزوم، به صورت دستی اجرای را در Cloud Functions برای Firebase اجرا کنید.
ابزار خط فرمان gactions را نصب کنید
ابزار رابط خط فرمان gactions (CLI) را با دانلود بسته نصب، باز کردن بسته بندی آن و پیکربندی مسیر اجرای خود نصب کنید.
برای نصب و پیکربندی gaction ها، مراحل زیر را دنبال کنید:
بسته مناسب برای سیستم عامل خود را دانلود کنید:
پلت فرم بسته چک جمع ویندوز دانلود کنید SHA256 لینوکس دانلود کنید SHA256 سیستم عامل مک دانلود کنید SHA256 بسته را در مکانی دلخواه استخراج کنید و باینری را به متغیر
PATHمحیط خود اضافه کنید. از طرف دیگر، بسته را به مکانی استخراج کنید که از قبل در متغیرPATHشما قرار دارد (به عنوان مثال/usr/local/bin).در لینوکس و مک، در صورت لزوم، مجوزهای اجرا را فعال کنید:
chmod +x PATH_TO/gactions
دستور زیر را برای احراز هویت CLI اجرا کنید. این دستور یک جریان احراز هویت را شروع می کند و به یک مرورگر وب نیاز دارد:
gactions login
هنگامی که جریان کامل شد، CLI به طور خودکار احراز هویت می شود.
ایجاد و راه اندازی یک پروژه
قبل از اینکه بتوانید از ابزار خط فرمان gactions استفاده کنید، باید یک پروژه در کنسول Actions ایجاد کنید و به gactionها اجازه دسترسی به پروژه را بدهید. برای ایجاد و راه اندازی یک پروژه، موارد زیر را انجام دهید:
- به کنسول Actions بروید.
- پروژه جدید را کلیک کنید، نام پروژه را وارد کنید و روی ایجاد پروژه کلیک کنید.
- یک دسته را انتخاب کنید و روی Next کلیک کنید.
- پروژه خالی را انتخاب کنید و روی Start building کلیک کنید.
- Action API را در کنسول Google Cloud با دنبال کردن دستورالعملهای موجود در Enable and disable APIs فعال کنید. این به بازیها اجازه میدهد تا با پروژه شما تعامل داشته باشند.
نمونه سلام جهان را دریافت کنید
نمونه تعاملی hello world به شما نشان می دهد که چگونه یک پروژه اکشن ساده با یک اکشن که توسط Interactive Canvas طراحی شده است بسازید.
یک پوشه خالی ایجاد کنید و نمونه Interactive Canvas را در آن دایرکتوری مقداردهی کنید. به عنوان مثال، کد زیر نمونه را در یک دایرکتوری
interactive-canvas-sample/مقداردهی اولیه می کند، که به عنوان نمونه در سراسر این سند استفاده می شود:gactions init interactive-canvas --dest interactive-canvas-samplecd interactive-canvas-sampleفایل
interactive-canvas-sample/sdk/settings/settings.yamlرا باز کنید و مقدار فیلدprojectIdرا به شناسه پروژه خود تغییر دهید.
نمونه را مستقر و آزمایش کنید
پس از راهاندازی نمونه، میتوانید برنامه وب Interactive Canvas و پروژه Actions خود را اجرا کنید. این فرآیند یک نسخه پیش نویس از پروژه Actions شما ایجاد می کند که می توانید آن را برای پیش نمایش و آزمایش در شبیه ساز Actions مستقر کنید:
از دایرکتوری
interactive-canvas-sample/، دستور زیر را برای استقرار برنامه وب Interactive Canvas (محتوای دایرکتوریpublic/) اجرا کنید.firebase deploy --project PROJECT_ID --only hostingمیتوانید نسخه ارائهشده برنامه وب را در نشانی اینترنتی بازگردانده شده توسط Firebase CLI در مرورگر ببینید:
https:// PROJECT_ID .web.app.فایل
interactive-canvas-sample/sdk/webhooks/ActionsOnGoogleFulfillment/index.jsرا باز کنید و مقدار متغیرCANVAS_URLرا به URL برنامه وب پروژه خود تغییر دهید.const CANVAS_URL = 'https://PROJECT_ID.web.app';از دایرکتوری
interactive-canvas-sample/sdk/، دستور زیر را اجرا کنید تا نسخه محلی پروژه Actions خود را به عنوان نسخه پیش نویس به کنسول منتقل کنید:gactions pushاز دایرکتوری
interactive-canvas-sample/sdk/، دستور زیر را اجرا کنید تا پروژه Actions خود را در شبیه ساز آزمایش کنید:gactions deploy previewپیوندی را که ابزار خط فرمان برمی گرداند را باز کنید تا به شبیه ساز بروید.
در شبیه ساز، "Talk to Interactive canvas sample" را وارد کنید تا Action شروع شود. شما باید یک مثلث چرخان را ببینید که توسط برنامه وب مستقر در
https:// PROJECT_ID .web.appطراحی شده است.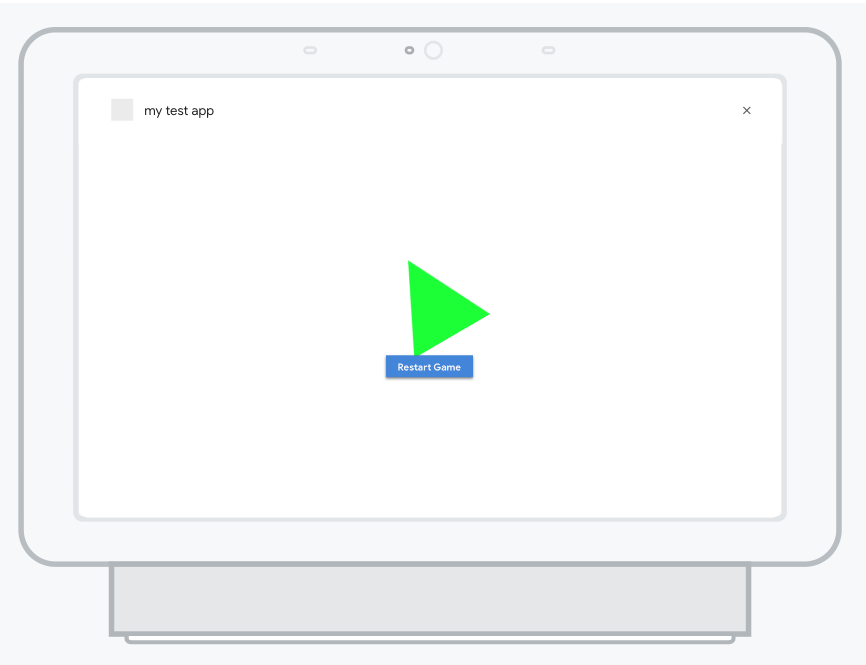
شکل 1 . شبیه ساز در حال پیش نمایش پروژه Actions