Guia de início rápido do SDK e do Builder do Actions
Mantenha tudo organizado com as coleções
Salve e categorize o conteúdo com base nas suas preferências.
Neste guia, você aprende a configurar seu ambiente para criar ações usando
o SDK do Actions e o Actions Builder. Você vai realizar as seguintes tarefas:
Instalar o Node.js:você precisa desse ambiente de execução para usar o Node.js.
de fulfillment.
Instale a CLI do Firebase: essa ferramenta de linha de comando permite desenvolver e
implantar dependências do Firebase, como apps da Web para Tela interativa, para
Firebase Hosting.
Instale a ferramenta de linha de comando gactions:ao desenvolver com as ações
SDK do Cloud, você usa essa ferramenta para criar, gerenciar e implantar o pacote de ações para
sua ação.
Criar um projeto do Actions:um projeto do Actions é o contêiner lógico
para suas ações de conversa. Você precisa criar uma conta no Console do Actions antes de
começar a criar.
Inicializar e implantar uma amostra:esta amostra simples mostra como receber
começou a criar ações com a tecnologia da tela interativa.
Depois de concluir este guia de início rápido, você poderá sincronizar seu projeto do Actions entre
seu ambiente de desenvolvimento local e a experiência na Web do Actions Builder.
Instalar o Node.js e a CLI do Firebase
Fazer o download e instalar o Node.js de acordo com a linguagem
documentação para usar nossa biblioteca de fulfillment. A instalação do Node.js também
permite que você instale a CLI do Firebase com npm e, posteriormente, para executar seus
implementação local do fulfillment conversacional.
Instale e configure a CLI do Firebase de acordo com
a documentação do Firebase. A CLI do Firebase permite implantar uma instância
App da Web Canvas no Firebase Hosting e, se necessário, faça a implantação manual
o fulfillment do Cloud Functions para Firebase.
Instalar a ferramenta de linha de comando do gactions
Instale a ferramenta de interface de linha de comando (CLI) do gactions fazendo o download de um
o pacote de instalação, descompactá-lo e configurar o caminho de execução.
Para instalar e configurar o gactions, siga estas etapas:
Faça o download do pacote adequado para seu sistema operacional:
Extraia o pacote no local que quiser e adicione o binário ao seu
variável PATH do ambiente. Como alternativa, extraia o pacote para um
local que já está na sua variável PATH (por exemplo, /usr/local/bin).
No Linux e no Mac, ative as permissões de execução, se necessário:
chmod +x PATH_TO/gactions
Execute o comando a seguir para autenticar a CLI. Esse comando
inicia um fluxo de autenticação e requer um navegador da Web:
gactions login
Quando o fluxo é concluído, a CLI é autenticada automaticamente.
Criar e configurar um projeto
Antes de poder usar a ferramenta de linha de comando gactions, você deve criar um projeto em
Console do Actions e concede aos gactions acesso ao projeto. Para criar e definir
um projeto, faça o seguinte:
Clique em Novo projeto, digite um nome e clique em Criar projeto.
Selecione uma categoria e clique em Próxima.
Selecione Projeto em branco e clique em Começar a criar.
Ative a API Actions no console do Google Cloud da seguinte forma:
as instruções em Ativar e desativar
APIs.
Isso permite que os gactions interajam com seu projeto.
Fazer o download da amostra "Hello World"
O exemplo interativo "Hello World" mostra como criar um objeto Actions simples
projeto com uma única ação com a tecnologia da tela interativa.
Crie um diretório vazio e inicialize a amostra de tela interativa em
nesse diretório. Por exemplo, o código a seguir inicializa o exemplo em um
interactive-canvas-sample/, que é usado como exemplo
ao longo deste documento:
Abra o arquivo interactive-canvas-sample/sdk/settings/settings.yaml e
altere o valor do campo projectId para o ID do projeto.
Implantar e testar a amostra
Depois de configurar a amostra, você pode implantar o app da Web de tela interativa e
seu projeto do Actions. Esse processo cria uma versão de rascunho das suas ações
que pode ser implantado no simulador do Actions para visualização e teste:
No diretório interactive-canvas-sample/, execute o seguinte comando
para implantar o app da Web de Tela interativa (o conteúdo do arquivo public/
).
É possível ver uma versão renderizada do app da Web no URL retornado pelo
CLI do Firebase em um navegador:
https://PROJECT_ID.web.app:
Abra o arquivo interactive-canvas-sample/sdk/webhooks/ActionsOnGoogleFulfillment/index.js e
mude o valor da variável CANVAS_URL para o URL do app da Web do seu projeto.
const CANVAS_URL = 'https://PROJECT_ID.web.app';
No diretório interactive-canvas-sample/sdk/, execute o seguinte
para enviar a versão local do seu projeto do Actions para o console como um
versão de rascunho:
gactions push
No diretório interactive-canvas-sample/sdk/, execute o seguinte
para testar seu projeto do Actions no simulador:
gactions deploy preview
Abra o link retornado pela ferramenta de linha de comando para acessar o simulador.
No simulador, digite "Talk to Interactive canvas sample" (em inglês) para iniciar a ação. Você
verá um triângulo giratório alimentado pelo app da Web implantado em
https://PROJECT_ID.web.app
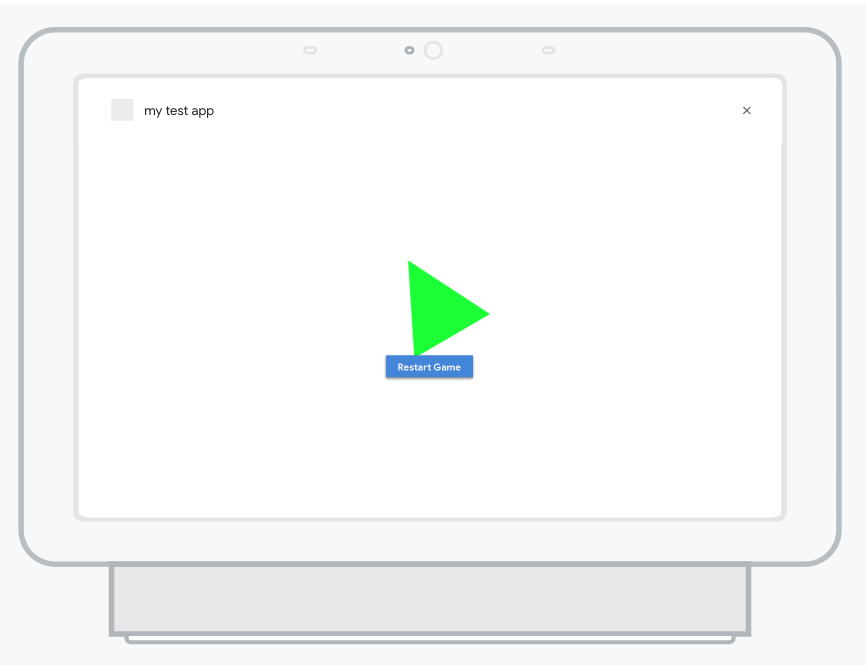
Figura 1. O simulador que visualiza o projeto do Actions
[null,null,["Última atualização 2025-07-26 UTC."],[[["\u003cp\u003eThis guide helps you set up your environment for building Google Actions using the Actions SDK and Actions Builder.\u003c/p\u003e\n"],["\u003cp\u003eYou'll install necessary tools like Node.js, Firebase CLI, and the \u003ccode\u003egactions\u003c/code\u003e command-line tool.\u003c/p\u003e\n"],["\u003cp\u003eThe guide includes steps to create an Actions project, initialize a sample, and deploy it for testing in the Actions simulator.\u003c/p\u003e\n"],["\u003cp\u003eYou'll learn to deploy the Interactive Canvas web app to Firebase Hosting and push your local Actions project to the console.\u003c/p\u003e\n"],["\u003cp\u003eAfter completing the setup, you can preview and test your Action in the Actions simulator by invoking it with a specific phrase.\u003c/p\u003e\n"]]],["To set up for building Actions, install Node.js and the Firebase CLI for fulfillment and web app deployment. Install the `gactions` CLI by downloading and configuring the appropriate package, then authenticate using `gactions login`. In the Actions console, create a new project, enable the Actions API, and use `gactions init` to set up the Interactive Canvas sample. Deploy the web app with `firebase deploy`, update the `CANVAS_URL` and push the Action using `gactions push`. Finally, preview and test the action in the simulator using `gactions deploy preview`.\n"],null,["# Actions SDK and Builder quick start guide\n\nThis guide walks you through setting up your environment to build Actions using\nboth the Actions SDK and Actions Builder. You'll carry out the following tasks:\n\n- **Install Node.js:** You need this runtime environment to use our Node.js fulfillment library.\n- **Install the Firebase CLI:** This command-line tool lets you develop and deploy Firebase dependencies, such as web apps for [Interactive Canvas](/assistant/interactivecanvas), to Firebase Hosting.\n- **Install the gactions command-line tool:** When developing with the Actions SDK, you use this tool to create, manage, and deploy the Action package for your Action.\n- **Create an Actions project:** An [Actions project](/assistant/conversational/build/projects) is the logical container for your Conversational Actions. You have to create one in the Actions console before you can start building.\n- **Initialize and deploy a sample:** This simple sample shows you how to get started building Actions powered by Interactive Canvas.\n\nOnce you complete this quick start, you can sync your Actions project between\nyour local development environment and the web experience of Actions Builder.\n\nInstall Node.js and the Firebase CLI\n------------------------------------\n\nDownload and install [Node.js](https://nodejs.org/) according to the Node.js\ndocumentation to use our fulfillment library. Your installation of Node.js also\nallows you to install the Firebase CLI with [npm](https://www.npmjs.com/), and later, to run your\nconversational fulfillment implementation locally.\n\nInstall and set up the [Firebase CLI](https://firebase.google.com/docs/cli#setup_update_cli) according\nto the Firebase documentation. The Firebase CLI lets you deploy an Interactive\nCanvas web app to Firebase Hosting and, if necessary, manually deploy\nfulfillment to Cloud Functions for Firebase.\n\nInstall the gactions command-line tool\n--------------------------------------\n\nInstall the gactions command line interface (CLI) tool by downloading an\ninstallation package, unpacking it, and configuring your execution path.\n\nTo install and configure gactions, follow these steps:\n\n1. Download the appropriate package for your operating system:\n\n | Platform | Package | Checksum |\n |----------|----------------------------------------------------------------------------------|---------------------------------------------------------------------------------------|\n | Windows | [Download](https://dl.google.com/gactions/v3/release/gactions-sdk_windows.zip) | [SHA256](https://dl.google.com/gactions/v3/release/gactions-sdk_windows.zip.sha256) |\n | Linux | [Download](https://dl.google.com/gactions/v3/release/gactions-sdk_linux.tar.gz) | [SHA256](https://dl.google.com/gactions/v3/release/gactions-sdk_linux.tar.gz.sha256) |\n | Mac OS | [Download](https://dl.google.com/gactions/v3/release/gactions-sdk_darwin.tar.gz) | [SHA256](https://dl.google.com/gactions/v3/release/gactions-sdk_darwin.tar.gz.sha256) |\n\n2. Extract the package to a location of your choice and add the binary to your\n environment's `PATH` variable. Alternatively, extract the package to a\n location that's already in your `PATH` variable (for example, `/usr/local/bin`).\n\n3. On Linux and Mac, enable execute permissions if necessary:\n\n ```scdoc\n chmod +x PATH_TO/gactions\n ```\n4. Run the following command to authenticate the CLI. This command\n starts an authentication flow and requires a web browser:\n\n ```text\n gactions login\n ```\n\n When the flow is complete, the CLI automatically authenticates.\n\nCreate and set up a project\n---------------------------\n\n| **Note:** Actions project creation is not supported in the gactions CLI.\n\nBefore you can use the gactions command-line tool, you must create a project in\nthe Actions console and give gactions access to the project. To create and set\nup a project, do the following:\n\n1. Go to the [Actions console](https://console.actions.google.com).\n2. Click **New project** , enter a project name, and click **Create project**.\n3. Select a category and click **Next**.\n4. Select **Blank project** and click **Start building**.\n5. Enable the **Actions API** in the Google Cloud console by following the instructions in [Enable and disable\n APIs](https://support.google.com/googleapi/answer/6158841). This allows gactions to interact with your project.\n\nGet the hello world sample\n--------------------------\n\nThe hello world interactive sample shows you how to build a simple Actions\nproject with a single Action powered by Interactive Canvas.\n\n1. Create an empty directory and initialize the Interactive Canvas sample in\n that directory. For example, the following code initializes the sample in an\n `interactive-canvas-sample/` directory, which is used as an example\n throughout this document:\n\n gactions init interactive-canvas --dest interactive-canvas-sample\n cd interactive-canvas-sample\n\n2. Open the `interactive-canvas-sample/sdk/settings/settings.yaml` file and\n change the value of the `projectId` field to your project's ID.\n\n | **Note:** To get your project's ID, first open your project in the Actions console and click the more *more_vert* icon. Then, select **Project settings** and copy the string in the **Project ID** field.\n\nDeploy and test the sample\n--------------------------\n\nAfter you set up the sample, you can deploy the Interactive Canvas web app and\nyour Actions project. This process creates a draft version of your Actions\nproject that you can deploy to the Actions simulator for previewing and testing:\n\n1. From the `interactive-canvas-sample/` directory, run the following command\n to deploy the Interactive Canvas web app (the contents of the `public/`\n directory).\n\n firebase deploy --project \u003cvar translate=\"no\"\u003ePROJECT_ID\u003c/var\u003e --only hosting\n\n You can see a rendered version of the web app at the URL returned by the\n Firebase CLI in a browser:\n `https://`\u003cvar translate=\"no\"\u003ePROJECT_ID\u003c/var\u003e`.web.app`.\n2. Open the `interactive-canvas-sample/sdk/webhooks/ActionsOnGoogleFulfillment/index.js` file and\n change the value of the `CANVAS_URL` variable to your project's web app URL.\n\n const CANVAS_URL = 'https://\u003cvar translate=\"no\"\u003ePROJECT_ID\u003c/var\u003e.web.app';\n\n3. From the `interactive-canvas-sample/sdk/` directory, run the following\n command to push the local version of your Actions project to the console as a\n draft version:\n\n gactions push\n\n | **Note:** You'll see some warnings related to not having some project settings and resources defined. You can safely ignore them or now.\n4. From the `interactive-canvas-sample/sdk/` directory, run the following\n command to test your Actions project in the simulator:\n\n gactions deploy preview\n\n | **Note:** If you are using a new project, you need to enable the [Cloud Functions\n | API](https://console.cloud.google.com/apis/library/cloudfunctions.googleapis.com) and associate a billing account with your project in Google Cloud. You can enable the Cloud Functions API by visiting the [Cloud Console](https://console.cloud.google.com/billing).\n5. Open the link that the command-line tool returns to go to the simulator.\n\n6. In the simulator, enter *\"Talk to Interactive canvas sample\"* to start the Action. You\n should see a spinning triangle powered by the web app deployed at\n `https://`\u003cvar translate=\"no\"\u003ePROJECT_ID\u003c/var\u003e`.web.app`\n\n **Figure 1**. The simulator previewing the Actions project"]]