Tetap teratur dengan koleksi
Simpan dan kategorikan konten berdasarkan preferensi Anda.
Panduan ini akan menuntun Anda dalam menyiapkan lingkungan untuk membuat Action menggunakan
Action SDK dan Actions Builder. Anda akan melakukan tugas-tugas berikut:
Instal Node.js: Anda memerlukan lingkungan runtime ini untuk menggunakan Node.js
library fulfillment.
Instal Firebase CLI: Dengan alat command line ini, Anda dapat mengembangkan dan
men-deploy dependensi Firebase, seperti aplikasi web untuk Interactive Canvas,
menggunakan Firebase Hosting.
Menginstal alat command line gaction: Saat mengembangkan dengan Actions
SDK, Anda menggunakan alat ini untuk membuat, mengelola, dan men-deploy paket Action untuk
Action Anda.
Membuat project Actions:Project Actions adalah penampung logis
untuk Action Percakapan Anda. Anda harus membuatnya di konsol Actions sebelum
dapat mulai dibangun.
Melakukan inisialisasi dan men-deploy sampel: Contoh sederhana ini menunjukkan cara mendapatkan
mulai membuat Actions yang didukung oleh Interactive Canvas.
Setelah menyelesaikan mulai cepat ini, Anda dapat menyinkronkan project Action antara
lingkungan pengembangan lokal Anda dan pengalaman web Actions Builder.
Menginstal Node.js dan Firebase CLI
Download dan instal Node.js sesuai dengan Node.js
dokumentasi lain untuk menggunakan library fulfillment. Penginstalan Node.js Anda juga
memungkinkan Anda menginstal Firebase CLI dengan npm, dan selanjutnya untuk menjalankan
implementasi fulfillment percakapan secara lokal.
Menginstal dan menyiapkan Firebase CLI sesuai
ke dokumentasi Firebase. Dengan Firebase CLI, Anda dapat men-deploy
Aplikasi web Canvas ke Firebase Hosting dan, jika perlu, men-deploy secara manual
ke Cloud Functions for Firebase.
Menginstal alat command line gaction
Instal alat antarmuka command line (CLI) gaction dengan mendownload
paket instalasi, mengekstraknya, dan mengkonfigurasi jalur eksekusi.
Untuk menginstal dan mengonfigurasi gaction, ikuti langkah-langkah berikut:
Download paket yang sesuai untuk sistem operasi Anda:
Ekstrak paket ke lokasi pilihan Anda dan tambahkan biner ke
variabel PATH lingkungan. Atau, ekstrak paket ke
lokasi yang sudah ada dalam variabel PATH Anda (misalnya, /usr/local/bin).
Di Linux dan Mac, aktifkan izin eksekusi jika diperlukan:
chmod +x PATH_TO/gactions
Jalankan perintah berikut untuk mengautentikasi CLI. Perintah ini
memulai alur autentikasi dan memerlukan browser web:
gactions login
Setelah alurnya selesai, CLI akan otomatis melakukan autentikasi.
Membuat dan menyiapkan project
Sebelum dapat menggunakan alat command line gaction, Anda harus membuat project di
konsol Actions dan memberikan akses gaction ke project. Untuk membuat dan menetapkan
menjalankan sebuah proyek, lakukan hal berikut:
Klik New project, masukkan nama project, lalu klik Create project.
Pilih kategori, lalu klik Berikutnya.
Pilih Blank project, lalu klik Start building.
Aktifkan Actions API di Konsol Google Cloud dengan mengikuti
petunjuk dalam Mengaktifkan dan menonaktifkan
API tertentu.
Hal ini memungkinkan gaction untuk berinteraksi dengan project Anda.
Dapatkan sampel hello world
Contoh interaktif halo dunia menunjukkan cara membuat Actions sederhana
project dengan satu Action yang didukung oleh Interactive Canvas.
Buat direktori kosong dan lakukan inisialisasi contoh Interactive Canvas di
direktori tersebut. Misalnya, kode berikut menginisialisasi contoh dalam
Direktori interactive-canvas-sample/, yang digunakan sebagai contoh
di seluruh dokumen ini:
Buka file interactive-canvas-sample/sdk/settings/settings.yaml dan
ubah nilai kolom projectId ke ID project Anda.
Men-deploy dan menguji sampel
Setelah menyiapkan contoh, Anda dapat men-deploy aplikasi web Canvas Interaktif dan
project Actions Anda. Proses ini akan membuat versi draf Action Anda
project yang bisa Anda deploy ke simulator Actions untuk melihat pratinjau dan menguji:
Jalankan perintah berikut dari direktori interactive-canvas-sample/,
untuk men-deploy aplikasi web Canvas Interaktif (isi dari public/
direktori).
Anda dapat melihat versi aplikasi web yang dirender di URL yang ditampilkan oleh
Firebase CLI di browser:
https://PROJECT_ID.web.app.
Buka file interactive-canvas-sample/sdk/webhooks/ActionsOnGoogleFulfillment/index.js dan
ubah nilai variabel CANVAS_URL ke URL aplikasi web project Anda.
const CANVAS_URL = 'https://PROJECT_ID.web.app';
Dari direktori interactive-canvas-sample/sdk/, jalankan perintah berikut
untuk mengirim versi lokal project Actions Anda ke konsol sebagai
versi draf:
gactions push
Dari direktori interactive-canvas-sample/sdk/, jalankan perintah berikut
untuk menguji project Actions Anda di simulator:
gactions deploy preview
Buka link yang ditampilkan alat command line untuk membuka simulator.
Di simulator, masukkan "Talk to Interactive Canvas sample" untuk memulai Action. Anda
akan melihat segitiga berputar yang didukung oleh aplikasi web yang di-deploy di
https://PROJECT_ID.web.app
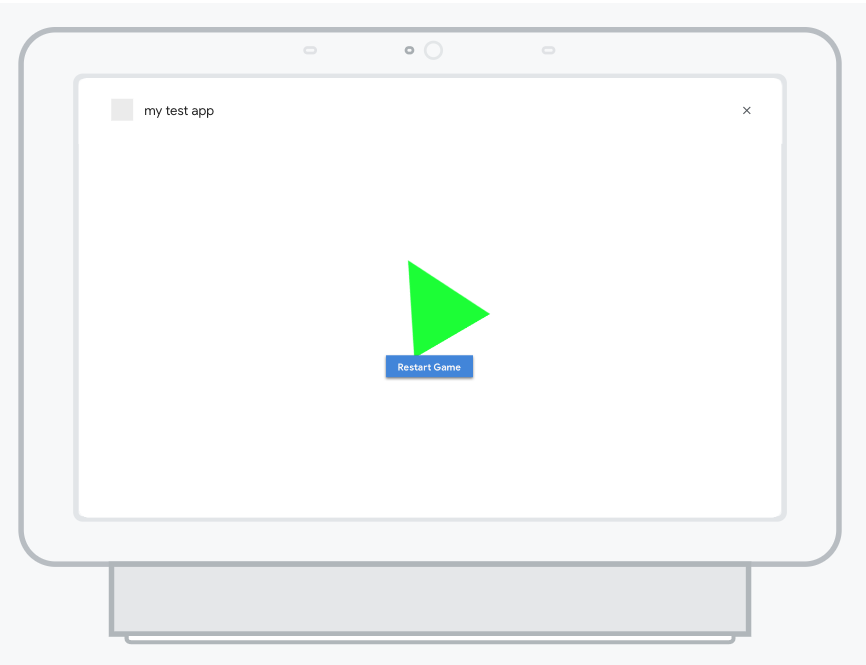
Gambar 1. Simulator yang melihat pratinjau project Actions
[null,null,["Terakhir diperbarui pada 2025-07-26 UTC."],[[["\u003cp\u003eThis guide helps you set up your environment for building Google Actions using the Actions SDK and Actions Builder.\u003c/p\u003e\n"],["\u003cp\u003eYou'll install necessary tools like Node.js, Firebase CLI, and the \u003ccode\u003egactions\u003c/code\u003e command-line tool.\u003c/p\u003e\n"],["\u003cp\u003eThe guide includes steps to create an Actions project, initialize a sample, and deploy it for testing in the Actions simulator.\u003c/p\u003e\n"],["\u003cp\u003eYou'll learn to deploy the Interactive Canvas web app to Firebase Hosting and push your local Actions project to the console.\u003c/p\u003e\n"],["\u003cp\u003eAfter completing the setup, you can preview and test your Action in the Actions simulator by invoking it with a specific phrase.\u003c/p\u003e\n"]]],["To set up for building Actions, install Node.js and the Firebase CLI for fulfillment and web app deployment. Install the `gactions` CLI by downloading and configuring the appropriate package, then authenticate using `gactions login`. In the Actions console, create a new project, enable the Actions API, and use `gactions init` to set up the Interactive Canvas sample. Deploy the web app with `firebase deploy`, update the `CANVAS_URL` and push the Action using `gactions push`. Finally, preview and test the action in the simulator using `gactions deploy preview`.\n"],null,["# Actions SDK and Builder quick start guide\n\nThis guide walks you through setting up your environment to build Actions using\nboth the Actions SDK and Actions Builder. You'll carry out the following tasks:\n\n- **Install Node.js:** You need this runtime environment to use our Node.js fulfillment library.\n- **Install the Firebase CLI:** This command-line tool lets you develop and deploy Firebase dependencies, such as web apps for [Interactive Canvas](/assistant/interactivecanvas), to Firebase Hosting.\n- **Install the gactions command-line tool:** When developing with the Actions SDK, you use this tool to create, manage, and deploy the Action package for your Action.\n- **Create an Actions project:** An [Actions project](/assistant/conversational/build/projects) is the logical container for your Conversational Actions. You have to create one in the Actions console before you can start building.\n- **Initialize and deploy a sample:** This simple sample shows you how to get started building Actions powered by Interactive Canvas.\n\nOnce you complete this quick start, you can sync your Actions project between\nyour local development environment and the web experience of Actions Builder.\n\nInstall Node.js and the Firebase CLI\n------------------------------------\n\nDownload and install [Node.js](https://nodejs.org/) according to the Node.js\ndocumentation to use our fulfillment library. Your installation of Node.js also\nallows you to install the Firebase CLI with [npm](https://www.npmjs.com/), and later, to run your\nconversational fulfillment implementation locally.\n\nInstall and set up the [Firebase CLI](https://firebase.google.com/docs/cli#setup_update_cli) according\nto the Firebase documentation. The Firebase CLI lets you deploy an Interactive\nCanvas web app to Firebase Hosting and, if necessary, manually deploy\nfulfillment to Cloud Functions for Firebase.\n\nInstall the gactions command-line tool\n--------------------------------------\n\nInstall the gactions command line interface (CLI) tool by downloading an\ninstallation package, unpacking it, and configuring your execution path.\n\nTo install and configure gactions, follow these steps:\n\n1. Download the appropriate package for your operating system:\n\n | Platform | Package | Checksum |\n |----------|----------------------------------------------------------------------------------|---------------------------------------------------------------------------------------|\n | Windows | [Download](https://dl.google.com/gactions/v3/release/gactions-sdk_windows.zip) | [SHA256](https://dl.google.com/gactions/v3/release/gactions-sdk_windows.zip.sha256) |\n | Linux | [Download](https://dl.google.com/gactions/v3/release/gactions-sdk_linux.tar.gz) | [SHA256](https://dl.google.com/gactions/v3/release/gactions-sdk_linux.tar.gz.sha256) |\n | Mac OS | [Download](https://dl.google.com/gactions/v3/release/gactions-sdk_darwin.tar.gz) | [SHA256](https://dl.google.com/gactions/v3/release/gactions-sdk_darwin.tar.gz.sha256) |\n\n2. Extract the package to a location of your choice and add the binary to your\n environment's `PATH` variable. Alternatively, extract the package to a\n location that's already in your `PATH` variable (for example, `/usr/local/bin`).\n\n3. On Linux and Mac, enable execute permissions if necessary:\n\n ```scdoc\n chmod +x PATH_TO/gactions\n ```\n4. Run the following command to authenticate the CLI. This command\n starts an authentication flow and requires a web browser:\n\n ```text\n gactions login\n ```\n\n When the flow is complete, the CLI automatically authenticates.\n\nCreate and set up a project\n---------------------------\n\n| **Note:** Actions project creation is not supported in the gactions CLI.\n\nBefore you can use the gactions command-line tool, you must create a project in\nthe Actions console and give gactions access to the project. To create and set\nup a project, do the following:\n\n1. Go to the [Actions console](https://console.actions.google.com).\n2. Click **New project** , enter a project name, and click **Create project**.\n3. Select a category and click **Next**.\n4. Select **Blank project** and click **Start building**.\n5. Enable the **Actions API** in the Google Cloud console by following the instructions in [Enable and disable\n APIs](https://support.google.com/googleapi/answer/6158841). This allows gactions to interact with your project.\n\nGet the hello world sample\n--------------------------\n\nThe hello world interactive sample shows you how to build a simple Actions\nproject with a single Action powered by Interactive Canvas.\n\n1. Create an empty directory and initialize the Interactive Canvas sample in\n that directory. For example, the following code initializes the sample in an\n `interactive-canvas-sample/` directory, which is used as an example\n throughout this document:\n\n gactions init interactive-canvas --dest interactive-canvas-sample\n cd interactive-canvas-sample\n\n2. Open the `interactive-canvas-sample/sdk/settings/settings.yaml` file and\n change the value of the `projectId` field to your project's ID.\n\n | **Note:** To get your project's ID, first open your project in the Actions console and click the more *more_vert* icon. Then, select **Project settings** and copy the string in the **Project ID** field.\n\nDeploy and test the sample\n--------------------------\n\nAfter you set up the sample, you can deploy the Interactive Canvas web app and\nyour Actions project. This process creates a draft version of your Actions\nproject that you can deploy to the Actions simulator for previewing and testing:\n\n1. From the `interactive-canvas-sample/` directory, run the following command\n to deploy the Interactive Canvas web app (the contents of the `public/`\n directory).\n\n firebase deploy --project \u003cvar translate=\"no\"\u003ePROJECT_ID\u003c/var\u003e --only hosting\n\n You can see a rendered version of the web app at the URL returned by the\n Firebase CLI in a browser:\n `https://`\u003cvar translate=\"no\"\u003ePROJECT_ID\u003c/var\u003e`.web.app`.\n2. Open the `interactive-canvas-sample/sdk/webhooks/ActionsOnGoogleFulfillment/index.js` file and\n change the value of the `CANVAS_URL` variable to your project's web app URL.\n\n const CANVAS_URL = 'https://\u003cvar translate=\"no\"\u003ePROJECT_ID\u003c/var\u003e.web.app';\n\n3. From the `interactive-canvas-sample/sdk/` directory, run the following\n command to push the local version of your Actions project to the console as a\n draft version:\n\n gactions push\n\n | **Note:** You'll see some warnings related to not having some project settings and resources defined. You can safely ignore them or now.\n4. From the `interactive-canvas-sample/sdk/` directory, run the following\n command to test your Actions project in the simulator:\n\n gactions deploy preview\n\n | **Note:** If you are using a new project, you need to enable the [Cloud Functions\n | API](https://console.cloud.google.com/apis/library/cloudfunctions.googleapis.com) and associate a billing account with your project in Google Cloud. You can enable the Cloud Functions API by visiting the [Cloud Console](https://console.cloud.google.com/billing).\n5. Open the link that the command-line tool returns to go to the simulator.\n\n6. In the simulator, enter *\"Talk to Interactive canvas sample\"* to start the Action. You\n should see a spinning triangle powered by the web app deployed at\n `https://`\u003cvar translate=\"no\"\u003ePROJECT_ID\u003c/var\u003e`.web.app`\n\n **Figure 1**. The simulator previewing the Actions project"]]