
إنّ ميزة "ربط التطبيقات بقلب التطبيقات" المستندة إلى بروتوكول OAuth تتيح للمستخدمين في مؤسستك ربط حساباتهم بسهولة وسرعة في نظام المصادقة بحساباتهم على Google. إذا كان تطبيقك مثبّتًا على هاتف المستخدم عند بدء عملية ربط الحساب، سيتم توجيهه بسلاسة إلى تطبيقك للحصول على إذن العميل.
توفّر هذه الطريقة عملية ربط أسرع وأسهل، لأنّه ليس على المستخدِم إعادة إدخال اسم المستخدم وكلمة المرور لمصادقته، بل يستخدِم App Flip بدلاً من ذلك بيانات الاعتماد من حساب المستخدِم على تطبيقك. وبعد أن يربط المستخدِم حسابه على Google بتطبيقك، يمكنه الاستفادة من أي عمليات دمج طوّرتها.
يمكنك إعداد ميزة "ربط التطبيقات بسرعة" لكلٍّ من تطبيقات iOS وAndroid.
المتطلبات
لاستخدام ميزة "قلب التطبيق"، يجب استيفاء المتطلبات التالية:
- يجب أن يكون لديك تطبيق Android أو iOS.
- يجب أن تمتلك خادم OAuth 2.0 الذي يتوافق مع مسار رمز تفويض OAuth 2.0 وإدارته ويحافظ عليه.
لمزيد من المعلومات عن مسار رمز التفويض لربط حسابات OAuth، يُرجى الاطّلاع على تنفيذ خادم OAuth.
إرشادات التصميم
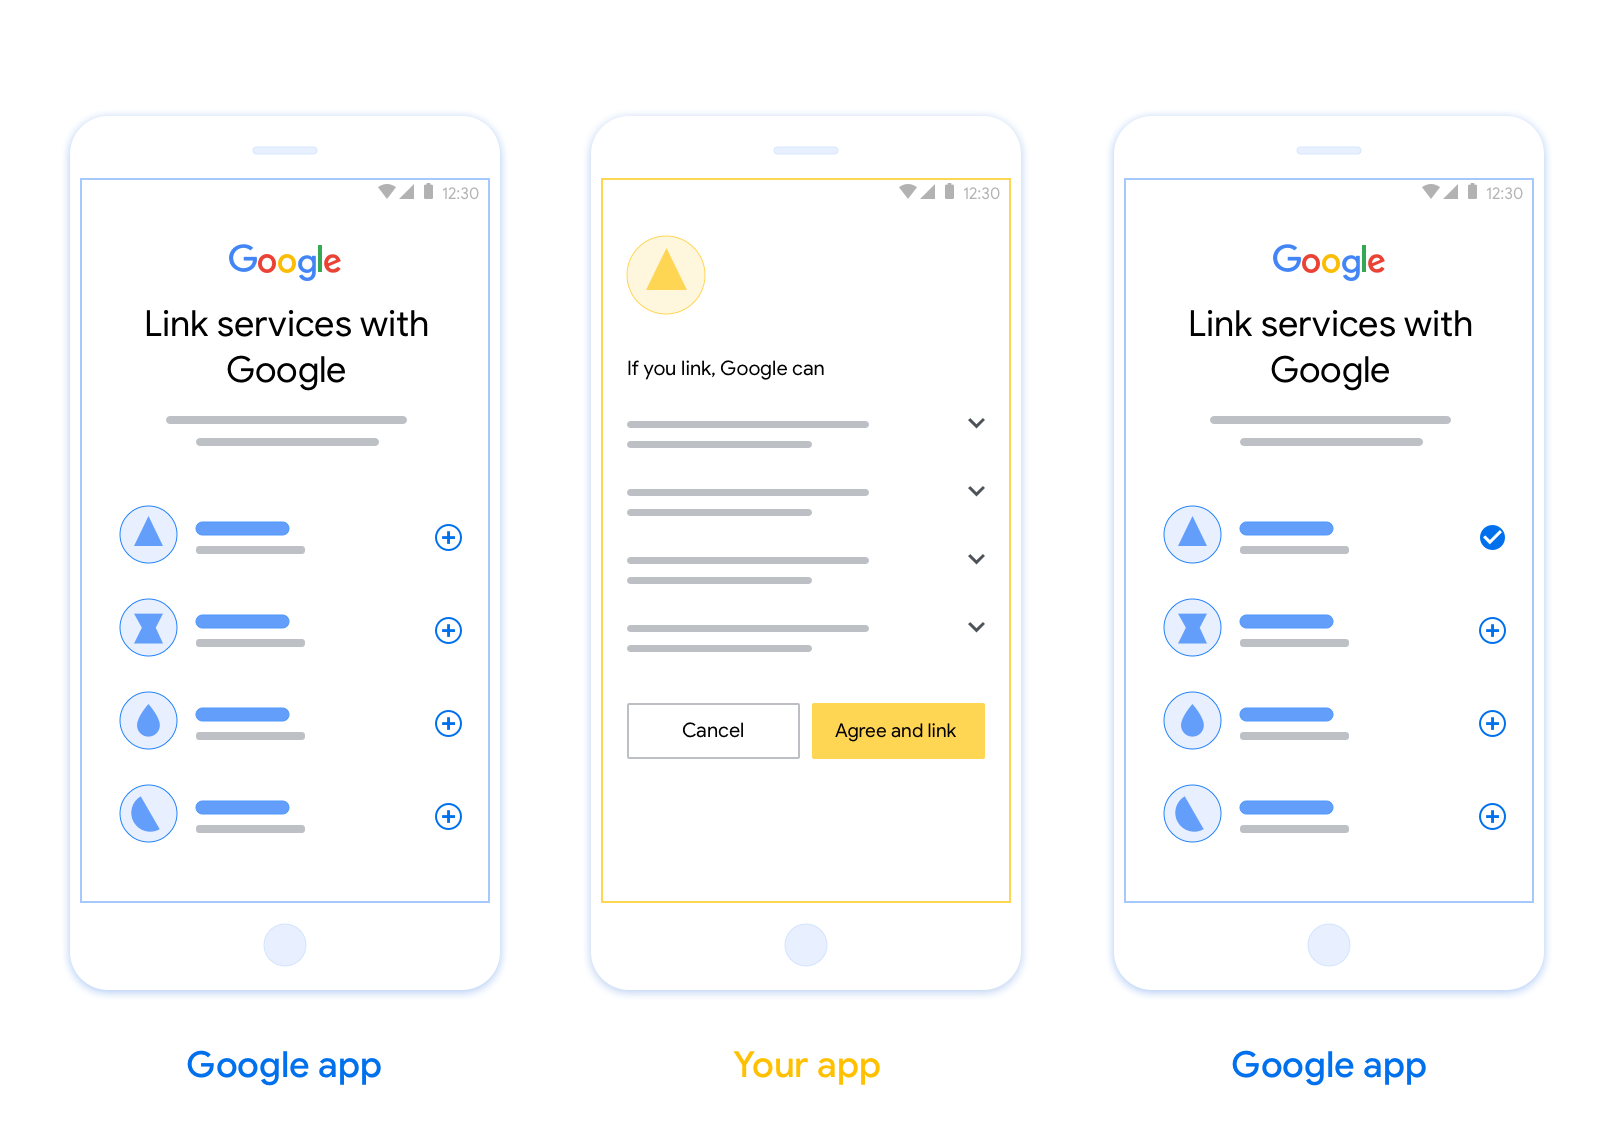
يوضّح هذا القسم متطلبات التصميم واقتراحات شاشة الموافقة على ربط الحسابات في App Flip. بعد أن يتصل Google بتطبيقك، يعرض تطبيقك شاشة الموافقة للمستخدم.
المتطلبات
- يجب توضيح أنّ حساب المستخدم سيتم ربطه بحساب على Google، وليس بمنتج معيّن من Google، مثل Google Home أو "مساعد Google".
اقتراحات
ننصحك باتّخاذ الإجراءات التالية:
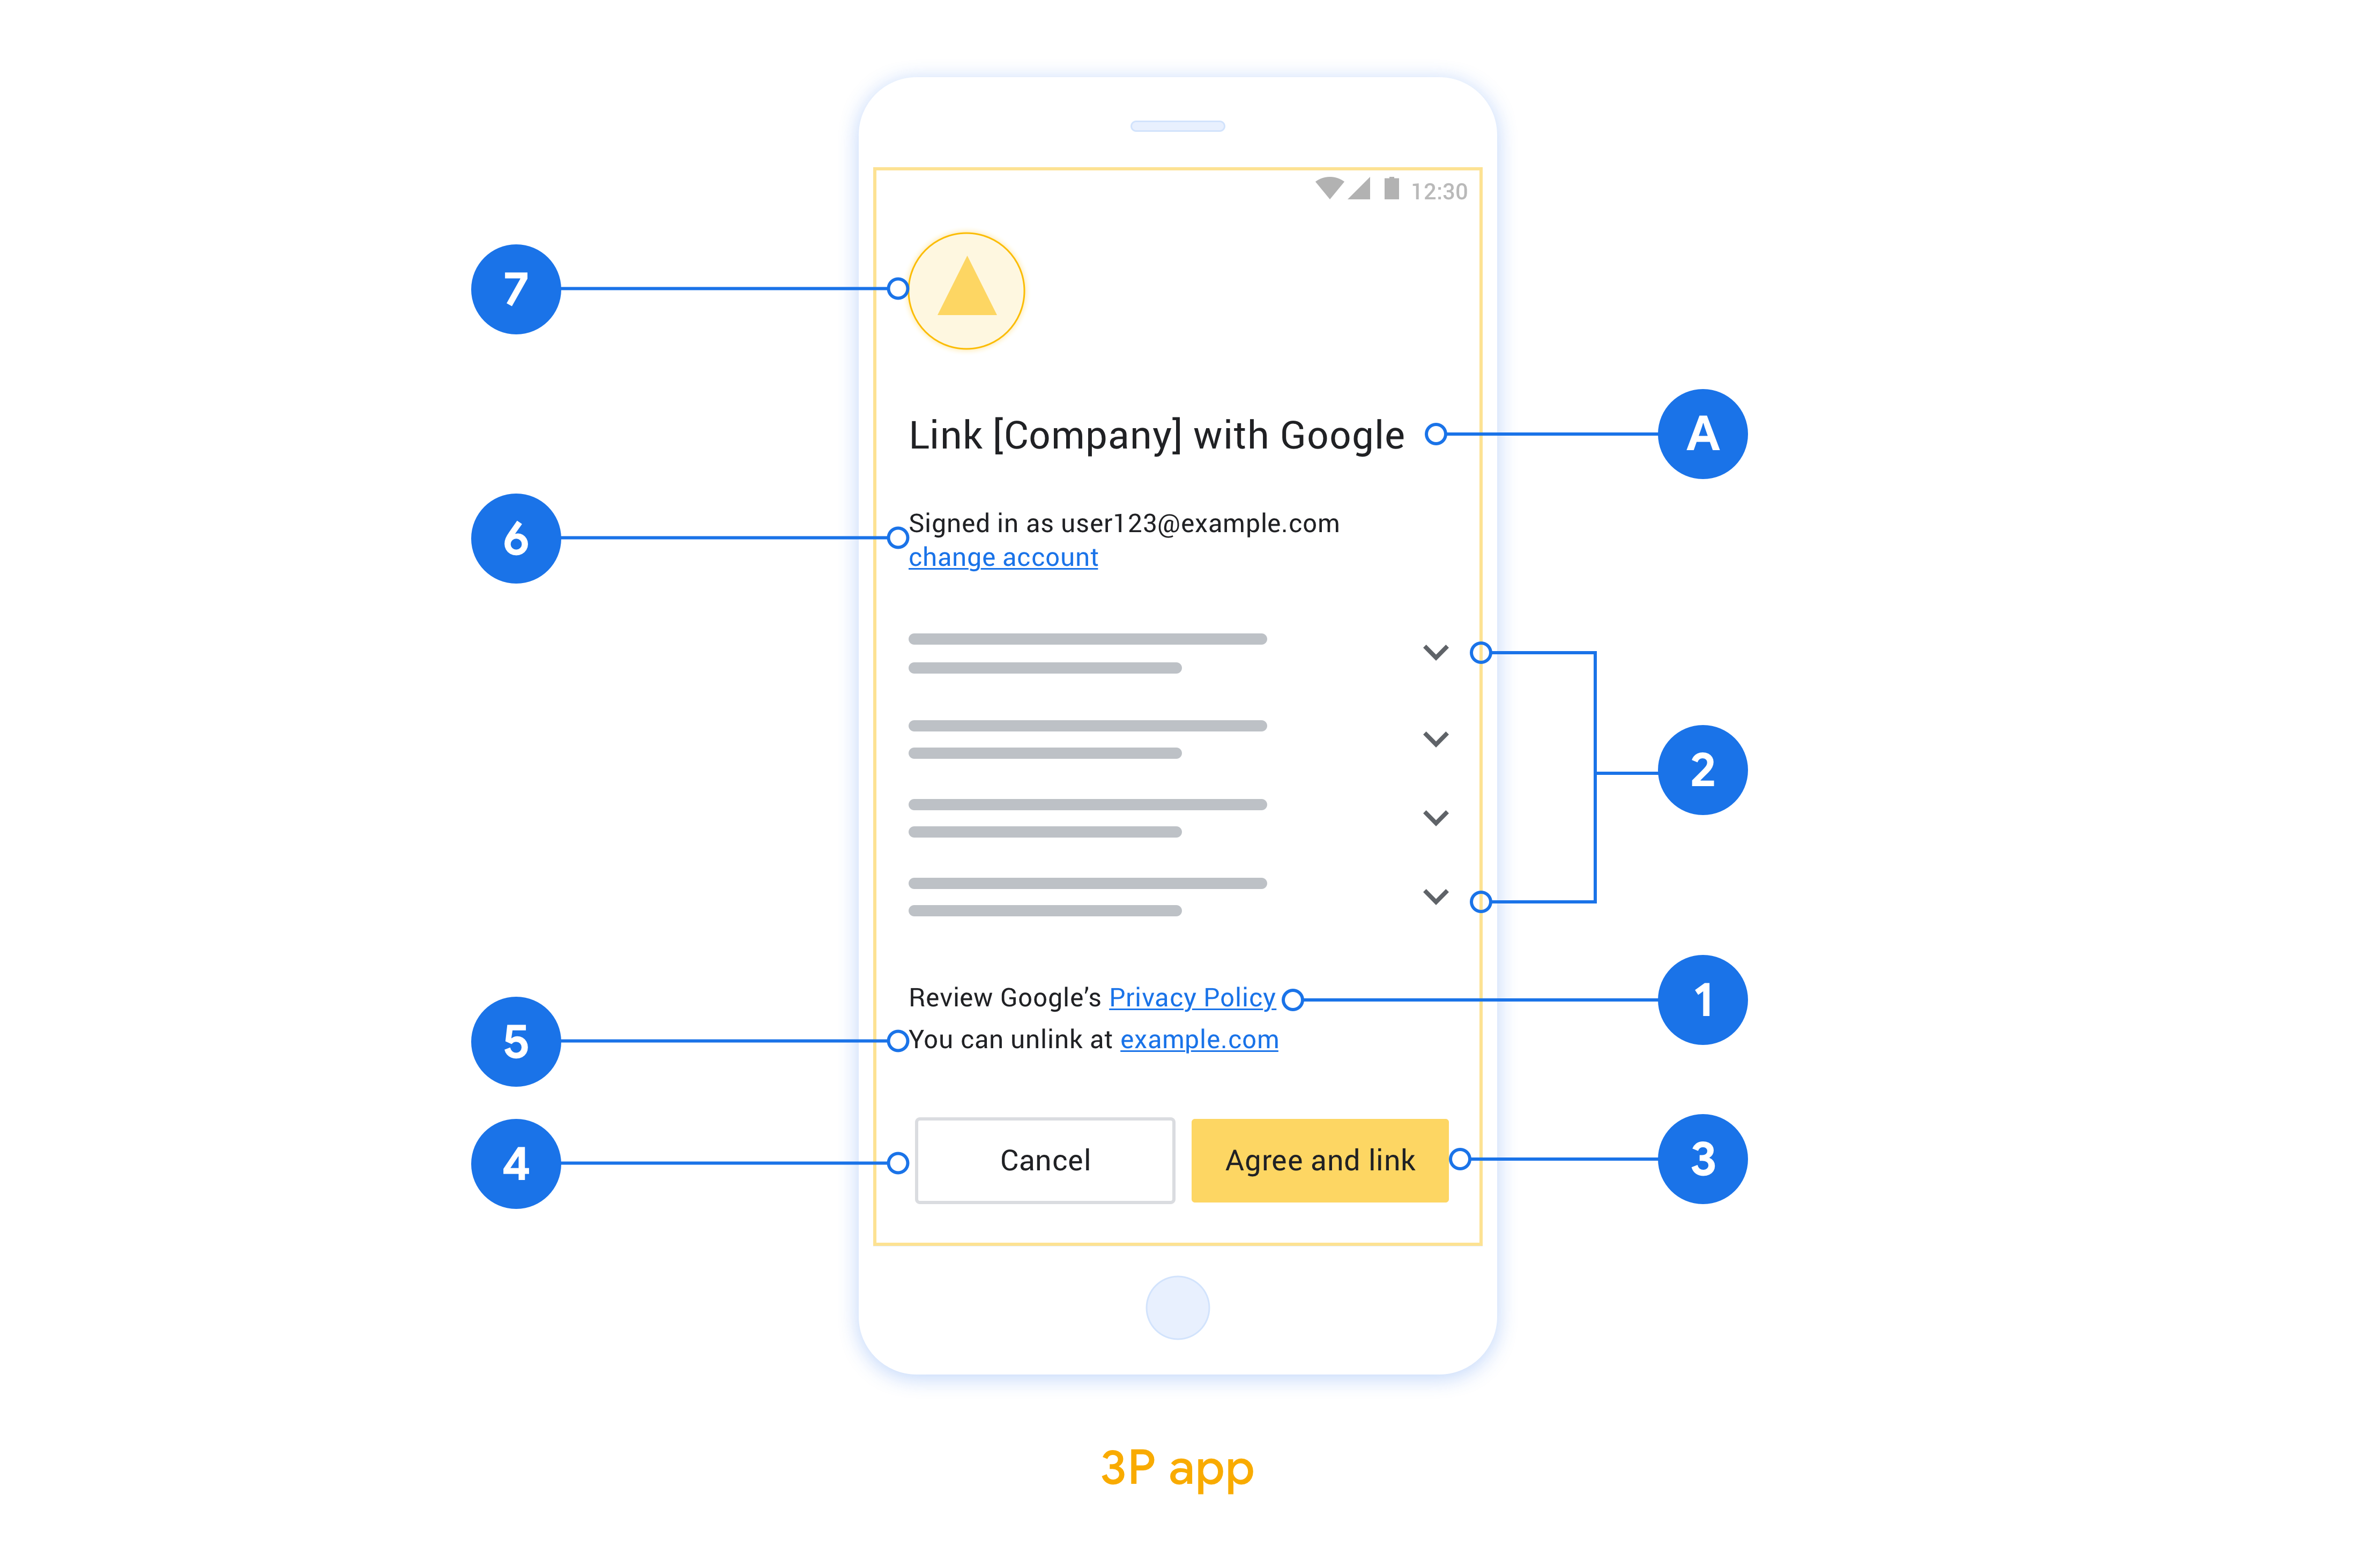
عرض سياسة خصوصية Google تضمين رابط يؤدي إلى سياسة خصوصية Google في شاشة طلب الموافقة
البيانات التي ستتم مشاركتها استخدِم لغة واضحة وموجزة لتوضيح البيانات التي تطلبها Google من المستخدمين وسبب طلبها.
عبارة واضحة تحثّ على اتّخاذ إجراء: يجب تضمين عبارة واضحة تحثّ على اتّخاذ إجراء في شاشة الموافقة، مثل "الموافقة والربط"، لأنّ المستخدمين بحاجة إلى فهم البيانات التي يُطلب منهم مشاركتها مع Google لربط حساباتهم.
إمكانية الرفض أو الإلغاء: توفير طريقة للمستخدمين للرجوع أو الرفض أو الإلغاء، إذا اختاروا عدم الربط
إمكانية إلغاء الربط: توفير آلية للمستخدمين لإلغاء الربط، مثل عنوان URL يؤدي إلى إعدادات حساباتهم على منصتك بدلاً من ذلك، يمكنك تضمين رابط يؤدي إلى حساب Google حيث يمكن للمستخدمين إدارة حساباتهم المرتبطة.
إمكانية تغيير حساب المستخدم اقترِح طريقة تتيح للمستخدمين التبديل بين حساباتهم. ويكون ذلك مفيدًا بشكل خاص إذا كان المستخدمون يميلون إلى امتلاك حسابات متعدّدة.
- إذا كان على المستخدم إغلاق شاشة الموافقة للتبديل بين الحسابات، أرسِل خطأ قابلاً للاسترداد إلى Google ليتمكّن المستخدم من تسجيل الدخول إلى الحساب المطلوب باستخدام ربط الحسابات عبر OAuth ومسار الربط الضمني.
تضمين شعارك: عرض شعار شركتك على شاشة الموافقة استخدِم إرشادات الأسلوب لتحديد موضع شعارك. إذا كنت تريد عرض شعار Google أيضًا، يُرجى الاطّلاع على الشعارات والعلامات التجارية.
إعداد ميزة "تبديل التطبيقات" المستندة إلى OAuth
توضّح الأقسام التالية المتطلبات الأساسية لاستخدام ميزة App Flip المستندة إلى OAuth وكيفية ضبط مشروع App Flip في "وحدة تحكّم Actions".
إنشاء إجراء وإعداد خادم OAuth 2.0
قبل أن تتمكّن من إعداد ميزة "تبديل التطبيقات"، عليك تنفيذ ما يلي:
- إنشاء إجراء لإنشاء إجراء، اتّبِع التعليمات الواردة في قسم إنشاء مشروع.
- إعداد خادم OAuth 2.0 لمزيد من المعلومات حول إعداد خادم OAuth، يُرجى الاطّلاع على تنفيذ عملية ربط حساب OAuth.
ضبط ميزة "تبديل التطبيقات" في "وحدة تحكّم الإجراءات"
يوضّح القسم التالي كيفية ضبط ميزة "تبديل التطبيقات" في وحدة تحكّم الإجراءات.
- انقر على تطوير في شريط التنقّل العلوي. بعد ذلك، انقر على ربط الحساب في شريط التنقّل الأيمن.
- فعِّل مفتاح التبديل بجانب ربط الحسابات.
- ضمن إنشاء الحساب، اختَر لا، أريد فقط السماح بإنشاء حساب على موقعي الإلكتروني.
- انقر على التالي.
- ضِمن نوع الربط، اختَر OAuth ورمز التفويض من القائمتَين المنسدلتَين.
- انقر على التالي.
- املأ جميع الحقول ضمن معلومات عميل OAuth. (في حال عدم توفّر ميزة "تبديل التطبيقات"، يتم استخدام بروتوكول OAuth العادي كحلّ احتياطي).
- انقر على التالي.
- ضَع علامة في المربّع بجانب تفعيل الربط على أجهزة iOS ضمن استخدام تطبيقك لربط الحساب (اختياري).
- املأ حقل الرابط العام. لمزيد من المعلومات حول الروابط العامة، يُرجى الاطّلاع على مقالة السماح للتطبيقات والمواقع الإلكترونية بالربط بمحتواك .
- إذا أردت ضبط عميلك بشكل اختياري، أضِف نطاقات وانقر على إضافة نطاق ضمن ضبط عميلك (اختياري). إذا لم يكن كذلك، انقر على التالي.
- ضمن "تعليمات الاختبار"، اكتب
test(أو أي سلسلة أخرى) كعنصر نائب. (لا يلزم ملء هذا الحقل بحساب تجريبي إلا إذا كنت بصدد إرسال تطبيقك ليتم نشره). - انقر على حفظ.
يمكنك الآن الانتقال إلى القسم التالي لتنفيذ ميزة App Flip في تطبيق iOS أو Android.
تنفيذ ميزة "تبديل التطبيقات" في تطبيقاتك الأصلية
لتنفيذ ميزة App Flip، عليك تعديل رمز تفويض المستخدم في تطبيقك لقبول رابط لصفحة في التطبيق من Google.
اختبار ميزة "تبديل التطبيقات" على جهازك
بعد إنشاء إجراء وضبط ميزة App Flip على وحدة التحكّم وفي تطبيقك، يمكنك اختبار ميزة App Flip على جهازك الجوّال. يمكنك استخدام تطبيق "مساعد Google" لاختبار ميزة App Flip.
لاختبار ميزة "تبديل التطبيقات" من تطبيق "مساعد Google"، اتّبِع الخطوات التالية:
- انتقِل إلى وحدة تحكّم الإجراءات واختَر مشروعك.
- انقر على اختبار في شريط التنقّل العلوي.
- ابدأ عملية ربط الحساب من تطبيق "مساعد Google" باتّباع الخطوات التالية:
- افتح تطبيق "مساعد Google".
- انقر على الإعدادات.
- في علامة التبويب "المساعد"، انقر على التحكّم في المنزل.
- انقر على إضافة(+).
- اختَر الإجراء من قائمة مقدّمي الخدمات. سيتم وضع البادئة "[اختبار]" قبل اسم التطبيق في القائمة. عند اختيار [test] Action من القائمة، من المفترض أن يفتح تطبيقك.
- تأكَّد من إطلاق تطبيقك وابدأ في اختبار مسار التفويض.