
关联帐号可以直接在移动应用中完成,这样您就可以让用户将您服务的帐号与 Google 帐号相关联。建立的关联可向 Google 授予用户同意共享的数据的访问权限。
这种方法可在用户熟悉的应用情境中(而非在 Google 助理对话中)吸引用户,从而提高账号关联效果。它可以集成到用户入门、设置和其他应用界面中,从而为用户发现和使用您的 Google 助理 Action 创造机会。例如,关联后,您可以提供将用户直接带到您的 Action 的选项。
用户可享有的优势包括:
- 用户可以在您的应用中开始并完成帐号关联流程,这是他们熟悉的环境。
- 用户无需登录凭据,因为已在设备和您的移动应用中通过身份验证。
开发者获得的好处包括:
- 在移动应用中(例如,在用户设置中,在插页式广告上或用户登录移动应用后)宣传和启动帐号关联,以提高互动度和关联的帐号数量。
- 转化率有所提高,因为用户可以完成的步骤比基于网络的标准 OAuth 流程少。
- 实现您的平台 (Android) 链接的工程工作量很少,因为此流程已利用您现有的 OAuth2.0 实现(假设您已实现一个)。
- 提升了用户流失率,因为用户无需重新输入登录凭据,用更少的步骤就能完成此流程。 在要求用户召回和输入登录凭据的流程中,流失率可能高达 80%。
运作方式
从平台进行关联的步骤如下:
- 用户将在您的移动应用中点击 / 切换关联触发器。
- 用户选择要关联的 Google 账号。
- 用户选择设备上要关联的现有 Google 账号,或使用新账号登录
- 系统会向用户显示 Google 托管的意见征求界面,用户必须同意才能继续,否则必须取消才能停止账号关联过程。
- 系统会向用户显示您的权限请求页面,用户必须同意才能继续,否则必须取消才能停止账号关联过程。
- 在用户在您的服务中的账号与其 Google 账号之间建立关联。
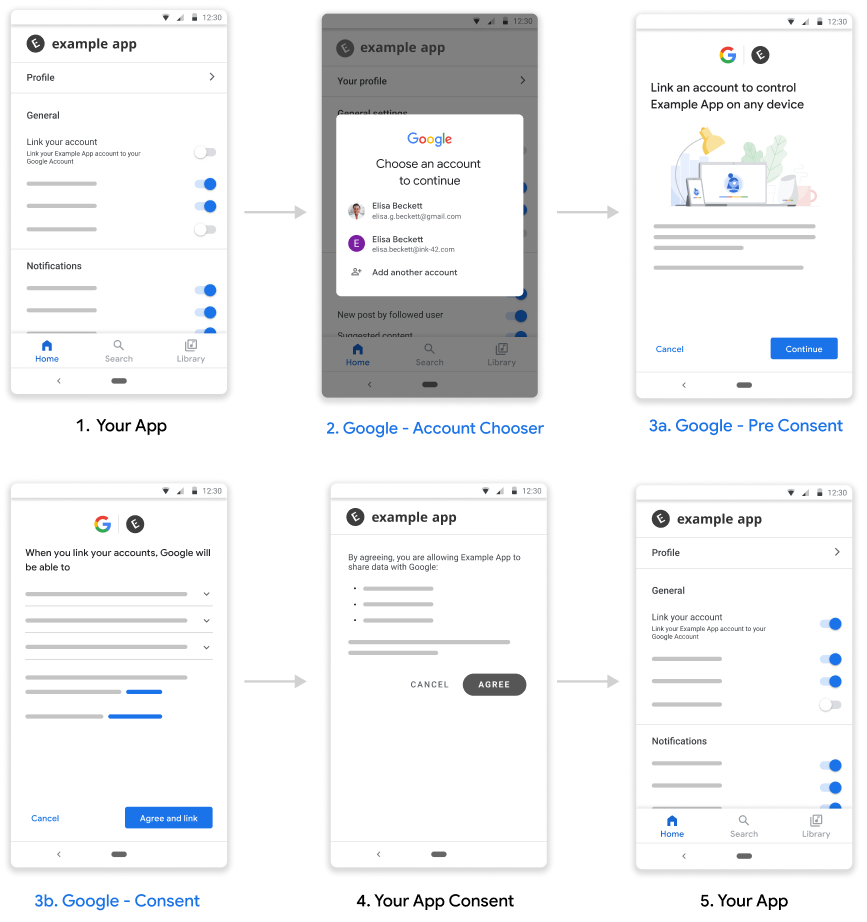
图 1. 平台流程中的链接
要求
如需从您的平台实现链接,您需要满足以下条件:
- Android 应用。
- 拥有、管理和维护支持 OAuth 2.0 授权代码流程的 OAuth 2.0 服务器。
设置
在继续执行以下步骤之前,您必须已完成账号关联注册流程。
设置开发环境
在开发主机上获取最新版 Google Play 服务:
- 打开 Android SDK 管理器。
在 SDK 工具 下,找到 Google Play 服务。
如果这些软件包的状态不是“已安装”,请同时选择这两个软件包,然后点击安装软件包。
配置您的应用
在您的项目级
build.gradle文件中,同时在buildscript和allprojects两个部分中添加 Google 的 Maven 制品库。buildscript { repositories { google() } } allprojects { repositories { google() } }将“与 Google 关联”API 的依赖项添加到模块的应用级 Gradle 文件(通常为
app/build.gradle)中:dependencies { implementation 'com.google.android.gms:play-services-auth:21.6.0' }
添加了对平台链接的支持
平台流程中的关联操作会导致 Google 保存您的服务提供的访问令牌。必须先征得用户同意,然后才能返回用户令牌。
按照以下步骤操作,通过 Google Play 服务 SDK 征得用户同意并返回授权代码令牌。
构建可启动意见征求 activity 的 PendingIntent - 意见征求由 Play 服务 API 启动。调用 API 时,您需要提供
PendingIntent(为清楚起见,以下称为consentPendingIntent)Kotlin
// Build a PendingIntent that can launch the consent activity
val consentPendingIntent = buildConsentPendingIntent()
Java
// Build a PendingIntent that can launch your consent activity
PendingIntent consentPendingIntent =
          buildConsentPendingIntent();
创建相应的 activity 来处理同意 intent
Kotlin
  class ConsentActivity : AppCompatActivity

  private fun onConsentAccepted() {
      // Obtain a token (for simplicity, we’ll ignore the async nature
      // of the following call)
      val token = getToken()
      val intent = Intent()
                  .putExtra(SaveAccountLinkingTokenRequest.EXTRA_TOKEN,
                            token)
      setResult(Activity.RESULT_OK, intent)
      finish()
  }

  private fun onConsentRejectedOrCanceled() {
      setResult(Activity.RESULT_CANCELED)
      finish()
  }
Java
  public class ConsentActivity extends AppCompatActivity {
    ...
    private void onConsentAccepted() {
      // Obtain a token (for simplicity, we’ll ignore the async nature of
      // the following call
      String token = getToken();
      Intent intent = new Intent();
      intent.putExtra(SaveAccountLinkingTokenRequest.EXTRA_TOKEN, token);
      setResult(Activity.RESULT_OK, intent);
      finish();
    }

    private void onConsentRejectedOrCanceled() {
      setResult(Activity.RESULT_CANCELED, null);
      finish();
    }
 }
我们假设,如果用户接受或拒绝/取消您的同意请求,系统会分别调用方法
onConsentAccpeted()和onConsentRejectedOrCanceled()。创建用于保存令牌的请求,并在其他配置参数中传递在上述第 1 步中创建的
PendingIntent。Kotlin
  // Create an ActivityResultLauncher which registers a callback for the
  // Activity result contract
  val activityResultLauncher = registerForActivityResult(
    ActivityResultContracts.StartIntentSenderForResult())
    { result ->
      if (result.resultCode == RESULT_OK) {
        // Successfully finished the flow and saved the token
      } else {
        // Flow failed, for example the user may have canceled the flow
      }
    }

  // Build token save request
  val request = SaveAccountLinkingTokenRequest.builder()
    .setTokenType(SaveAccountLinkingTokenRequest.TOKEN_TYPE_AUTH_CODE)
    .setConsentPendingIntent(consentPendingIntent)
    .setServiceId("service-id-of-and-defined-by-developer")
    //Set the scopes that the token is valid for on your platform
    .setScopes(scopes)
    .build()

   // Launch consent activity and retrieve token
   Identity.getCredentialSavingClient(this)
     .saveAccountLinkingToken(request)
     .addOnSuccessListener( saveAccountLinkingTokenResult -> {
        if (saveAccountLinkingTokenResult.hasResolution()) {
          val pendingIntent = saveAccountLinkingTokenResult
                              .getPendingIntent()
          val intentSenderRequest = IntentSenderRequest
                                    .Builder(pendingIntent).build()
          activityResultLauncher.launch(intentSenderRequest)
        } else {
           // This should not happen, let’s log this
           Log.e(TAG, "Failed to save token");
        }
      })
      .addOnFailureListener(e -> Log.e(TAG, “Failed to save token”, e))
Java
  // Create an ActivityResultLauncher which registers a callback for the
  // Activity result contract
  ActivityResultLauncher<IntentSenderRequest>
      activityResultLauncher =
      registerForActivityResult(new ActivityResultContracts
                                    .StartIntentSenderForResult(),
                                result -> {
      if (result.getResultCode() == RESULT_OK) {
          // Successfully finished the flow and saved the token
      } else {
          // Flow failed, for example the user may have canceled the flow
      }
  });

 // Build token save request
 SaveAccountLinkingTokenRequest request =
    SaveAccountLinkingTokenRequest.builder()
        .setTokenType(
            SaveAccountLinkingTokenRequest.TOKEN_TYPE_AUTH_CODE)
        .setConsentPendingIntent(consentPendingIntent)
        .setServiceId("service-id-of-and-defined-by-developer")
        //Set the scopes that the token is valid for on your platform
        .setScopes(scopes)
        .build();

  // Launch consent activity and retrieve token
  Identity.getCredentialSavingClient(this)
      .saveAccountLinkingToken(request)
      .addOnSuccessListener(
          saveAccountLinkingTokenResult -> {
            if (saveAccountLinkingTokenResult.hasResolution()) {
              // Launch the resolution intent
              PendingIntent pendingIntent =
                  saveAccountLinkingTokenResult.getPendingIntent();
              IntentSenderRequest intentSenderRequest =
                  new IntentSenderRequest.Builder(pendingIntent).build();
              activityResultLauncher.launch(intentSenderRequest);
            } else {
              // This should not happen, let’s log this
              Log.e(TAG, "Failed to save token");
            }
          })
      .addOnFailureListener(e -> Log.e(TAG, "Failed to save token", e));
  ```
上述步骤会提示用户授予同意,并向 Google 返回授权代码。
最佳做法
您的应用应通过按钮、切换开关或类似的视觉元素向用户指示关联状态。
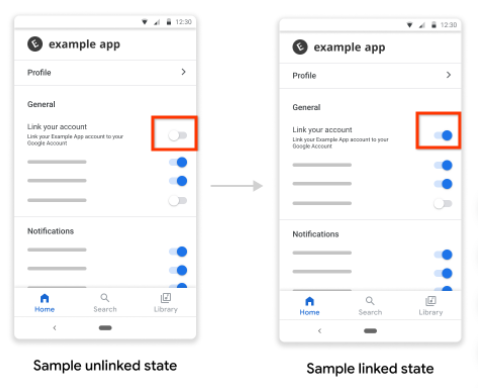
图 1. 链接状态图片示例
成功关联后,您应通知用户,例如显示 Toast 消息、触发切换状态更改或将用户重定向到单独的关联成功页面。
您应考虑提示应用内用户关联账号,最好是根据强信号判断关联账号会给这些用户带来好处。
成功关联后,您应向用户提供有关如何使用关联账号的示例,例如,如果您刚刚关联了音乐在线播放服务,请让 Google 助理播放音乐。
允许用户管理其关联的账号,包括提供解除关联的选项。引导用户前往其 Google 关联账号管理页面,即 https://myaccount.google.com/accountlinking。