با مجموعهها، منظم بمانید
ذخیره و طبقهبندی محتوا براساس اولویتهای شما.
Google Sign-In for the Assistant ساده ترین و آسان ترین تجربه کاربری را برای کاربران و توسعه دهندگان برای پیوند دادن حساب و ایجاد حساب فراهم می کند. Action شما میتواند درخواست دسترسی به نمایه Google کاربر شما را در طول مکالمه کند، از جمله نام کاربر، آدرس ایمیل، و تصویر نمایه.
از اطلاعات نمایه می توان برای ایجاد یک تجربه کاربری شخصی شده در Action خود استفاده کرد. اگر برنامههایی در پلتفرمهای دیگر دارید و از Google Sign-In استفاده میکنند، میتوانید حساب کاربری موجود را پیدا کرده و به آن پیوند دهید، یک حساب جدید ایجاد کنید و یک کانال ارتباطی مستقیم با کاربر ایجاد کنید.
برای انجام پیوند دادن حساب با Google Sign-In، از کاربر میخواهید که رضایت خود را برای دسترسی به نمایه Google خود اعلام کند. سپس از اطلاعات نمایه آنها، به عنوان مثال آدرس ایمیل آنها، برای شناسایی کاربر در سیستم خود استفاده می کنید.
پیوند حساب Google Sign-In را پیاده سازی کنید
برای افزودن پیوند حساب Google Sign-In به Action خود، مراحل زیر را دنبال کنید.
پروژه را پیکربندی کنید
برای پیکربندی پروژه خود برای استفاده از پیوند حساب Google Sign-In، این مراحل را دنبال کنید:
Actions Console را باز کنید و یک پروژه را انتخاب کنید.
روی تب Develop کلیک کنید و Account linking را انتخاب کنید.
سوئیچ کنار Account linking را فعال کنید.
در بخش ایجاد حساب ، بله را انتخاب کنید.
در نوع پیوند ، Google Sign In را انتخاب کنید.
اطلاعات مشتری را باز کنید و به ارزش شناسه مشتری صادر شده توسط Google برای Actions خود توجه داشته باشید.
روی ذخیره کلیک کنید.
رابط کاربری صوتی را برای جریان احراز هویت طراحی کنید
بررسی کنید که آیا کاربر تأیید شده است و جریان پیوند حساب را شروع کنید
یک صحنه جدید برای شروع پیوند دادن حساب در Action خود ایجاد کنید:
روی صحنه ها کلیک کنید.
برای افزودن یک صحنه جدید، روی نماد افزودن (+) کلیک کنید.
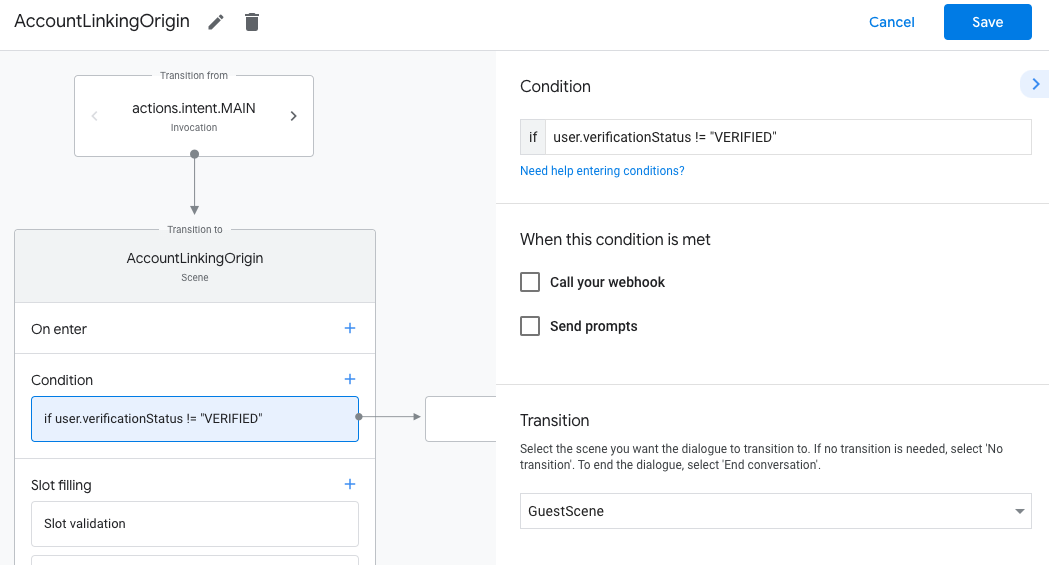
در صحنه جدید ایجاد شده، روی نماد افزودن add برای Conditions کلیک کنید.
شرطی اضافه کنید که بررسی کند آیا کاربر مرتبط با مکالمه یک کاربر تأیید شده است یا خیر. اگر بررسی ناموفق باشد، Action شما نمیتواند پیوند حساب را در طول مکالمه انجام دهد و باید به ارائه دسترسی به عملکردی که نیازی به پیوند حساب ندارد بازگردد.
در قسمت Enter new expression در Condition ، منطق زیر را وارد کنید: user.verificationStatus != "VERIFIED"
در بخش انتقال ، صحنهای را انتخاب کنید که نیازی به پیوند دادن حساب ندارد یا صحنهای که نقطه ورود به عملکرد فقط مهمان است.
روی نماد افزودن add برای شرایط کلیک کنید.
در صورتی که کاربر هویت مرتبطی نداشته باشد، شرطی را برای فعال کردن جریان پیوند حساب اضافه کنید.
در قسمت Enter new expression در Condition ، منطق زیر را وارد کنید: user.verificationStatus == "VERIFIED"
در بخش Transition ، صحنه سیستم پیوند حساب را انتخاب کنید.
روی ذخیره کلیک کنید.
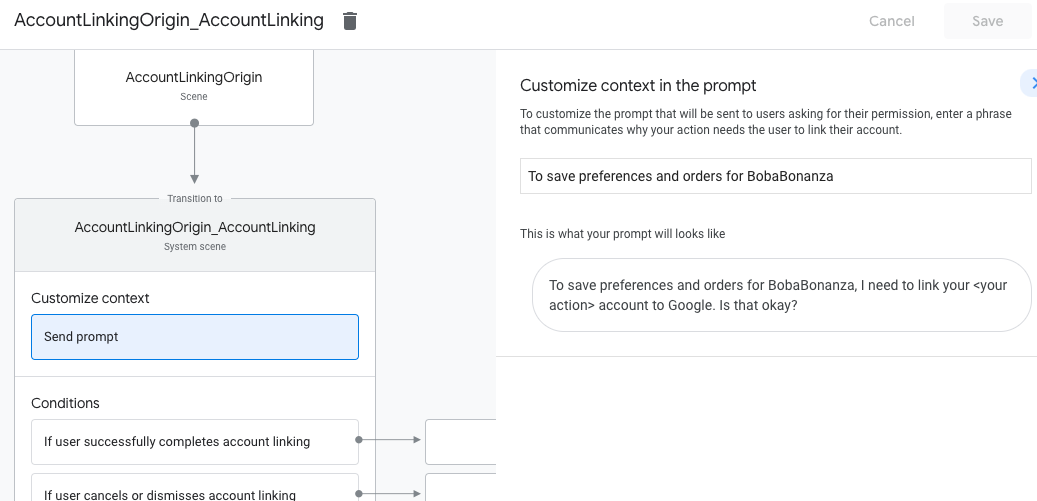
پس از ذخیره، یک صحنه سیستم پیوند حساب جدید به نام <SceneName>_AccountLinking به پروژه شما اضافه می شود.
صحنه پیوند حساب را سفارشی کنید
در بخش صحنهها ، صحنه سیستم پیوند دهنده حساب را انتخاب کنید.
روی Send prompt کلیک کنید و یک جمله کوتاه اضافه کنید تا به کاربر توضیح دهد که چرا Action باید به هویت او دسترسی داشته باشد (به عنوان مثال "برای ذخیره تنظیمات برگزیده").
روی ذخیره کلیک کنید.
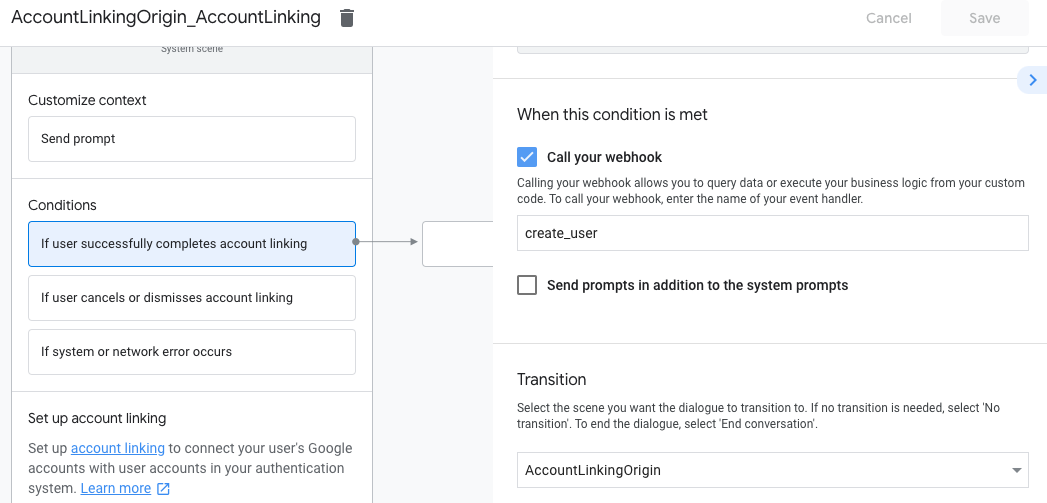
در زیر شرایط ، روی اگر کاربر با موفقیت پیوند حساب را انجام دهد کلیک کنید.
اگر کاربر موافقت کرد که حساب خود را پیوند دهد، نحوه جریان را پیکربندی کنید. به عنوان مثال، برای پردازش هرگونه منطق تجاری سفارشی مورد نیاز و انتقال به صحنه اصلی، با webhook تماس بگیرید.
روی ذخیره کلیک کنید.
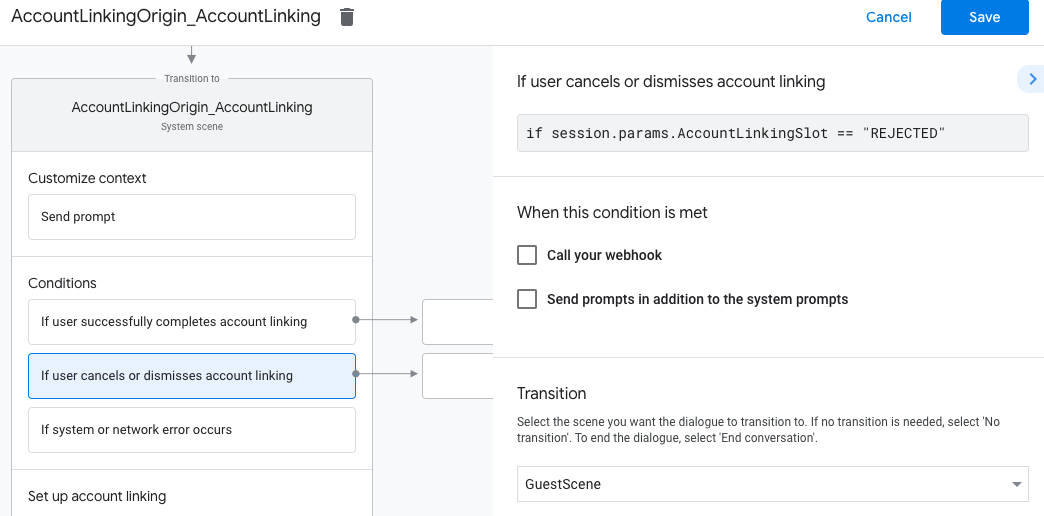
در زیر شرایط ، روی اگر کاربر پیوند دادن حساب را لغو یا رد کرد، کلیک کنید.
اگر کاربر با پیوند دادن حساب خود موافقت نکرد، نحوه جریان را پیکربندی کنید. به عنوان مثال، یک پیام تأیید ارسال کنید و به صحنههایی هدایت کنید که عملکردی را ارائه میکنند که نیازی به پیوند دادن حساب ندارد.
روی ذخیره کلیک کنید.
در قسمت Conditions ، روی If system or network error رخ می دهد کلیک کنید.
اگر به دلیل خطاهای سیستم یا شبکه نمیتوان جریان پیوند حساب را تکمیل کرد، نحوه انجام جریان را پیکربندی کنید. به عنوان مثال، یک پیام تأیید ارسال کنید و به صحنههایی هدایت کنید که عملکردی را ارائه میکنند که نیازی به پیوند دادن حساب ندارد.
روی ذخیره کلیک کنید.
به اطلاعات نمایه در باطن خود دسترسی داشته باشید
پس از اینکه کاربر اقدام شما را برای دسترسی به نمایه Google خود مجاز کرد، یک نشانه Google ID دریافت خواهید کرد که حاوی اطلاعات نمایه Google کاربر در هر درخواست بعدی برای اقدام شما است.
برای دسترسی به اطلاعات پروفایل کاربر، ابتدا باید توکن را با انجام مراحل زیر تایید و رمزگشایی کنید:
از یک کتابخانه رمزگشایی JWT برای زبان خود برای رمزگشایی رمز استفاده کنید و از کلیدهای عمومی Google (در قالب JWK یا PEM موجود است) برای تأیید امضای رمز استفاده کنید.
بررسی کنید که صادرکننده نشانه (فیلد iss در رمز رمزگشایی شده) https://accounts.google.com باشد و مخاطب (فیلد aud در نشانه رمزگشایی شده) مقدار Client ID صادر شده توسط Google برای Actions شما باشد. در کنسول Actions به پروژه شما اختصاص داده شده است.
نمونه زیر نمونه ای از رمزگشایی شده است:
{"sub":1234567890,// The unique ID of the user's Google Account"iss":"https://accounts.google.com",// The token's issuer"aud":"123-abc.apps.googleusercontent.com",// Client ID assigned to your Actions project"iat":233366400,// Unix timestamp of the token's creation time"exp":233370000,// Unix timestamp of the token's expiration time"name":"Jan Jansen","given_name":"Jan","family_name":"Jansen","email":"jan@gmail.com",// If present, the user's email address"locale":"en_US"}
اگر از کتابخانه Actions on Google Fulfillment برای Node.js استفاده میکنید، از اعتبارسنجی و رمزگشایی رمز برای شما مراقبت میکند و به شما امکان دسترسی به محتوای نمایه را میدهد، همانطور که در قطعه کد زیر نشان داده شده است.
برای رسیدگی به درخواست دسترسی به دادهها، فقط بررسی کنید که کاربری که توسط شناسه Google اعلام شده از قبل در پایگاه داده شما حضور داشته باشد. قطعه کد زیر نمونه ای از نحوه بررسی اینکه آیا سفارشات یک کاربر از قبل در پایگاه داده Firestore وجود دارد را نشان می دهد:
...app.handle('Place_Order',asyncconv=>{constorder=conv.session.params.order;constuserDoc=dbs.user.doc(conv.user.params.uid);constorderHistory=userDoc.collection("orderHistory");if(orderHistory){//Orderhistoryexists,sotheuseralreadyplacedanorder.//Updatecounterforordertype.awaitorderHistory.doc(order).update({count:admin.firestore.FieldValue.increment(1)});}else{//FirstordertheyplaceawaitorderHistory.doc(order).set({option:order,count:1});options.forEach(opt=>{if(opt!=order){orderHistory.doc(opt).set({option:opt,count:0});}});}returnconv.add(`Your ${order} has been placed. `+'Thanks for using Boba Bonanza, see you soon!');});
تاریخ آخرین بهروزرسانی 2025-07-24 بهوقت ساعت هماهنگ جهانی.
[null,null,["تاریخ آخرین بهروزرسانی 2025-07-24 بهوقت ساعت هماهنگ جهانی."],[[["\u003cp\u003eGoogle Sign-In for Assistant simplifies account linking and creation for both users and developers, enabling access to user profiles for personalized experiences.\u003c/p\u003e\n"],["\u003cp\u003eDevelopers can leverage Google Sign-In to link or create user accounts across platforms, facilitating seamless user journeys and communication.\u003c/p\u003e\n"],["\u003cp\u003eImplementing Google Sign-In involves configuring the project in Actions Console, designing the authentication flow in Actions Builder, and handling data access requests securely in your backend.\u003c/p\u003e\n"],["\u003cp\u003eUser profile information, such as name, email, and profile picture, can be accessed after user authorization and token validation, allowing for customized interactions within the Action.\u003c/p\u003e\n"],["\u003cp\u003eActions using account linking for financial information are subject to additional policies and review, requiring compliance with financial services policies before submission.\u003c/p\u003e\n"]]],[],null,["# Account linking with Google Sign-In\n\nGoogle Sign-In for the Assistant provides the simplest and easiest user experience\nto users and developers both for account linking and account creation. Your Action\ncan request access to your user's Google profile during a conversation,\nincluding the user's name, email address, and profile picture.\n\nThe profile information can be used to create a personalized user experience\nin your Action. If you have apps on other platforms and they use Google Sign-In,\nyou can also find and link to an existing user's account, create a new account,\nand establish a direct channel of communication to the user.\n\nTo perform account linking with Google Sign-In, you ask the user to give consent\nto access their Google profile. You then use the information in their profile, for\nexample their email address, to identify the user in your system.\n\nImplement Google Sign-In account linking\n----------------------------------------\n\nFollow the steps in the following sections to add Google Sign-In account linking to your\nAction.\n| **Note:** If you're implementing account linking to handle financial information, note that additional policies may apply to your Action. It can take us up to six weeks to review an Action with account linking for financial information, so factor that time in when planning your release schedule. To ease the review process, make sure you comply with the [financial services policies](/assistant/console/policies/general-policies#financial_services) before submitting your Action for review.\n\n### Configure the project\n\nTo configure your project to use Google Sign-In account linking, follow these steps:\n\n1. Open the Actions Console and select a project.\n2. Click the **Develop** tab and choose **Account linking**.\n3. Enable the switch next to **Account linking**.\n4. In the **Account creation** section, select **Yes**.\n5. In **Linking type** , select **Google Sign In**.\n\n6. Open **Client Information** and take note of the value of **Client ID issued by Google to your Actions**.\n\n7. Click **Save**.\n\n### Design the voice user interface for the authentication flow\n\n| **Warning:** Don't give users a required account linking prompt at the start of the conversation with your Action. Instead, give unauthenticated users a guest flow to show how your Action works, and then only ask for account linking if it's necessary to proceed. If users are leaving the Action consistently because of account linking issues, Google will not actively promote the Action, which may decrease the Action's user traffic.\n|\n|\n| **Note:** You must use [Actions Builder](/assistant/conversational/build#actions_builder) to build an Action that implements account linking.\n\n#### Check if the user is verified and start the account linking flow\n\n1. Open your Actions Builder project in the [Actions Console](https://console.actions.google.com).\n2. Create a new scene to start account linking in your Action:\n 1. Click **Scenes**.\n 2. Click the **add** (+) icon to add a new scene.\n3. In the newly created scene, click the add *add* icon for **Conditions**.\n4. Add a condition that checks if the user associated with the conversation is a a verified user. If the check fails, your Action can't perform account linking during the conversation, and should fall back to providing access to functionality that doesn't require account linking.\n 1. In the `Enter new expression` field under **Condition** , enter the following logic: `user.verificationStatus != \"VERIFIED\"`\n 2. Under **Transition**, select a scene that doesn't require account linking or a scene that is the entry point to guest-only functionality.\n\n1. Click the add *add* icon for **Conditions**.\n2. Add a condition to trigger an account linking flow if the user doesn't have an associated identity.\n 1. In the `Enter new expression` field under **Condition** , enter the following logic:: `user.verificationStatus == \"VERIFIED\"`\n 2. Under **Transition** , select the **Account Linking** system scene.\n 3. Click **Save**.\n\nAfter saving, a new account linking system scene called `\u003cSceneName\u003e_AccountLinking`\nis added to your project.\n\n#### Customize the account linking scene\n\n1. Under **Scenes**, select the account linking system scene.\n2. Click **Send prompt** and add a short sentence to describe to the user why the Action needs to access their identity (for example \"To save your preferences\").\n3. Click **Save**.\n\n1. Under **Conditions** , click **If user successfully completes account linking**.\n2. Configure how the flow should proceed if the user agrees to link their account. For example, call the webhook to process any custom business logic required and transition back to the originating scene.\n3. Click **Save**.\n\n1. Under **Conditions** , click **If user cancels or dismisses account linking**.\n2. Configure how the flow should proceed if the user doesn't agree to link their account. For example, send an acknowledging message and redirect to scenes that provide functionality that doesn't require account linking.\n3. Click **Save**.\n\n1. Under **Conditions** , click **If system or network error occurs**.\n2. Configure how the flow should proceed if the account linking flow can't be completed because of system or network errors. For example, send an acknowledging message and redirect to scenes that provide functionality that doesn't require account linking.\n3. Click **Save**.\n\n### Access profile information in your backend\n\nAfter the user authorizes your action to access their Google profile, you will receive\na Google ID token that contains the user's Google profile information in every subsequent\nrequest to your action.\n\nTo access the user's profile information, you need to first validate and decode the token\nby doing the following:\n\n1. Use a [JWT-decoding library](https://jwt.io/) for your language to decode the token, and use Google's public keys (available in [JWK](https://www.googleapis.com/oauth2/v3/certs) or [PEM](https://www.googleapis.com/oauth2/v1/certs) format) to verify the token's signature.\n2. Verify that the token's issuer (`iss` field in the decoded token) is `https://accounts.google.com` and that the audience (`aud` field in the decoded token) is the value of **Client ID issued by Google to your Actions**, which is assigned to your project in the Actions console.\n\nThe following is an example of a decoded token: \n\n```carbon\n{\n \"sub\": 1234567890, // The unique ID of the user's Google Account\n \"iss\": \"https://accounts.google.com\", // The token's issuer\n \"aud\": \"123-abc.apps.googleusercontent.com\", // Client ID assigned to your Actions project\n \"iat\": 233366400, // Unix timestamp of the token's creation time\n \"exp\": 233370000, // Unix timestamp of the token's expiration time\n \"name\": \"Jan Jansen\",\n \"given_name\": \"Jan\",\n \"family_name\": \"Jansen\",\n \"email\": \"jan@gmail.com\", // If present, the user's email address\n \"locale\": \"en_US\"\n}\n```\n\nIf you use the [Actions on Google Fulfillment library for Node.js](https://github.com/actions-on-google/assistant-conversation-nodejs),\nit takes care of validating and decoding the token for you, and gives you access to\nthe profile content, as shown in the following code snippets. \n\n```gdscript\n...\nconst app = conversation({\n // REPLACE THE PLACEHOLDER WITH THE CLIENT_ID OF YOUR ACTIONS PROJECT\n clientId: CLIENT_ID,\n});\n...\n// Invoked on successful completion of account linking flow, check if we need to\n// create a Firebase user.\napp.handle('linkAccount', async conv =\u003e {\n let payload = conv.headers.authorization;\n if (payload) {\n // Get UID for Firebase auth user using the email of the user\n const email = payload.email;\n if (!conv.user.params.uid && email) {\n try {\n conv.user.params.uid = (await auth.getUserByEmail(email)).uid;\n } catch (e) {\n if (e.code !== 'auth/user-not-found') {\n throw e;\n }\n // If the user is not found, create a new Firebase auth user\n // using the email obtained from Google Assistant\n conv.user.params.uid = (await auth.createUser({email})).uid;\n }\n }\n }\n});\n```\n\n### Handle data access requests\n\nTo handle data access request, just verify that the user asserted by the Google ID\ntoken is already present in your database. The following snippet of code shows\nan example of how to check if orders for a user already exist in a Firestore database: \n\n```perl\n...\napp.handle('Place_Order', async conv =\u003e {\n const order = conv.session.params.order;\n const userDoc = dbs.user.doc(conv.user.params.uid);\n const orderHistory = userDoc.collection(\"orderHistory\");\n if (orderHistory) {\n // Order history exists, so the user already placed an order.\n // Update counter for order type.\n await orderHistory.doc(order).update({ count: admin.firestore.FieldValue.increment(1)});\n } else {\n // First order they place\n await orderHistory.doc(order).set({ option: order, count: 1});\n options.forEach(opt =\u003e {\n if (opt != order) {\n orderHistory.doc(opt).set({ option: opt, count: 0});\n }\n });\n }\n return conv.add(`Your ${order} has been placed. ` +\n 'Thanks for using Boba Bonanza, see you soon!');\n});\n```\n\n\u003cbr /\u003e"]]