
Google 助理的 Google 登录功能可提供最简单、最轻松的用户体验 为用户和开发者提供账号关联和账号创建功能。你的 Action 在对话期间可以请求访问您用户的 Google 个人资料; 包括用户名称、电子邮件地址和个人资料照片。
个人资料信息可用于打造个性化的用户体验 。如果您在其他平台上有应用,并且这些应用使用 Google 登录功能, 您还可以查找并关联到现有用户的账号、创建新账号、 并建立与用户之间的直接沟通渠道。
若要通过 Google 登录功能执行账号关联,您需要请求用户同意 访问其 Google 个人资料。然后,您可以使用他们个人资料中的信息, 例如其电子邮件地址,以在您的系统中识别用户。
实现 Google 登录账号关联
请按照以下部分中的步骤,将 Google 登录账号关联添加到您的 行动。
配置项目
如需将项目配置为使用 Google 登录账号关联,请按以下步骤操作:
- 打开 Actions 控制台,并选择一个项目。
- 点击开发标签页,然后选择账号关联。
- 启用账号关联旁边的开关。
- 在账号创建部分,选择是。
在关联类型中,选择 Google 登录。

打开客户端信息,并记下 Google 为您的 Action 签发的客户端 ID 的值。
点击保存。
为身份验证流程设计语音界面
。检查用户是否已通过验证并启动账号关联流程
- 在 Actions 控制台中打开您的 Actions Builder 项目。
- 创建一个新场景,开始在 Action 中关联账号:
<ph type="x-smartling-placeholder">
- </ph>
- 点击 Scenes。
- 点击添加 (+) 图标以添加新场景。
- 在新创建的场景中,点击“添加”图标 add 条件图标。
- 添加一个条件,用于检查与对话关联的用户是否为
是经过验证的用户。如果检查失败,您的 Action 将无法执行账号关联
因此应回退以提供访问权限
即可实现无需账号关联的功能
- 在 Condition 下的
Enter new expression字段中,输入以下逻辑:user.verificationStatus != "VERIFIED" - 在过渡下,选择不需要关联账号的场景或 一个场景,作为仅限访客使用的功能的入口点。
- 在 Condition 下的
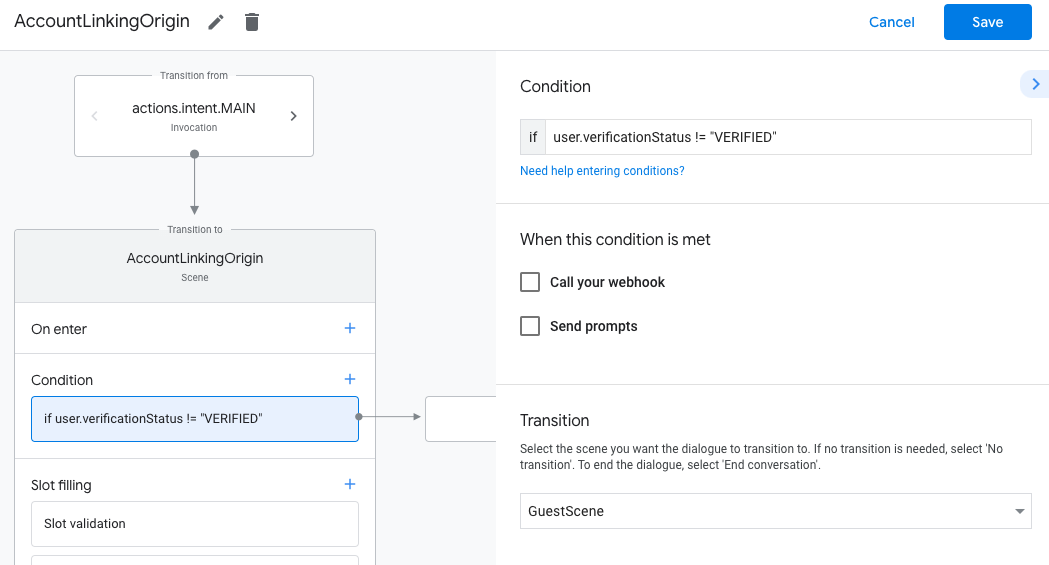
- 点击 Conditions 对应的添加 add 图标。
- 添加一个条件,以便在用户没有关联时触发账号关联流程
关联的身份。
- 在 Condition 下的
Enter new expression字段中,输入以下逻辑:user.verificationStatus == "VERIFIED" - 在 Transition 下,选择 Account Links 系统场景。
- 点击保存。
- 在 Condition 下的
![]()
保存后,一个名为 <SceneName>_AccountLinking 的新账号关联系统场景
会添加到您的项目中
自定义账号关联场景
- 在 Scenes 下,选择账号关联系统场景。
- 点击发送提示,然后添加一个简短句子来向用户描述 Action 需要获取其身份的原因(例如“保存你的偏好设置”)。
- 点击保存。

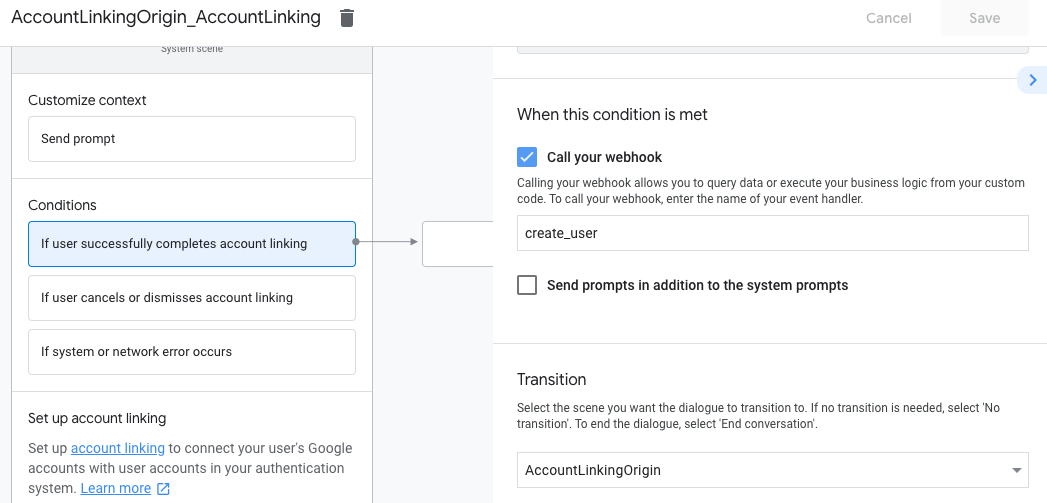
- 在条件下,点击如果用户成功完成账号关联。
- 配置该流程在用户同意关联其账号后应如何操作。 例如,调用 webhook 以处理所需的任何自定义业务逻辑 并过渡回源场景。
- 点击保存。
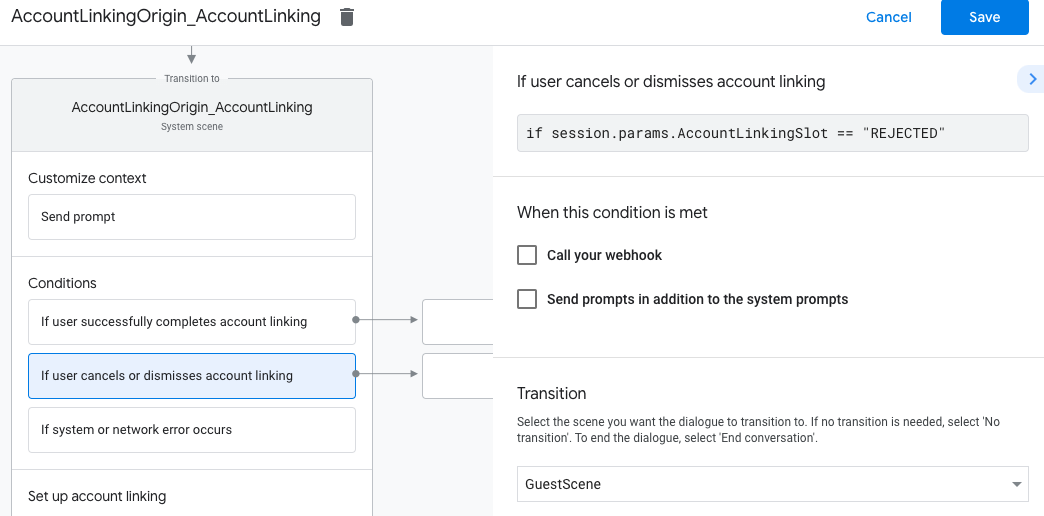
- 在条件下方,点击如果用户取消或忽略账号关联。
- 配置流程在用户不同意关联其账号时应如何继续 。例如,发送确认消息并重定向到场景 提供无需账号关联的功能。
- 点击保存。
- 在条件下方,点击如果出现系统错误或网络连接错误。
- 配置无法完成账号关联流程时应如何处理该流程 已因系统或网络连接错误而完成。 例如,发送确认消息并重定向到场景 提供无需账号关联的功能。
- 点击保存。
访问后端中的个人资料信息
在用户授权您的操作访问他们的 Google 个人资料后,您将收到 包含用户的 Google 个人资料信息的 Google ID 令牌, 您的操作。
要访问用户的个人资料信息,您需要先验证和解码令牌 执行以下操作:
- 根据您的语言使用 JWT 解码库来解码 令牌,并使用 Google 的公钥(可通过 JWK 获取) 或 PEM 格式)来验证令牌的签名。
- 验证令牌的颁发者(解码的令牌中的
iss字段)是否为https://accounts.google.com且受众(解码令牌中的aud字段)是 Google 为您的 Action 签发的客户端 ID,该 ID 会分配给您的项目 在 Actions 控制台中操作。
以下是已解码令牌的示例:
{
  "sub": 1234567890,        // The unique ID of the user's Google Account
  "iss": "https://accounts.google.com",        // The token's issuer
  "aud": "123-abc.apps.googleusercontent.com", // Client ID assigned to your Actions project
  "iat": 233366400,         // Unix timestamp of the token's creation time
  "exp": 233370000,         // Unix timestamp of the token's expiration time
  "name": "Jan Jansen",
  "given_name": "Jan",
  "family_name": "Jansen",
  "email": "jan@gmail.com", // If present, the user's email address
  "locale": "en_US"
}
如果您使用的是适用于 Node.js 的 Actions on Google 执行方式库, 它会为您验证和解码令牌,并授予您访问 个人资料内容,如以下代码段所示。
...
const app = conversation({
  // REPLACE THE PLACEHOLDER WITH THE CLIENT_ID OF YOUR ACTIONS PROJECT
  clientId: CLIENT_ID,
});
...
// Invoked on successful completion of account linking flow, check if we need to
// create a Firebase user.
app.handle('linkAccount', async conv => {
  let payload = conv.headers.authorization;
  if (payload) {
  // Get UID for Firebase auth user using the email of the user
    const email = payload.email;
    if (!conv.user.params.uid && email) {
      try {
        conv.user.params.uid = (await auth.getUserByEmail(email)).uid;
      } catch (e) {
        if (e.code !== 'auth/user-not-found') {
          throw e;
        }
        // If the user is not found, create a new Firebase auth user
        // using the email obtained from Google Assistant
        conv.user.params.uid = (await auth.createUser({email})).uid;
      }
    }
  }
});
处理数据访问请求
如需处理数据访问请求,只需验证 Google ID 声明了用户 令牌。以下代码段显示了 以下示例展示了如何检查用户订单是否已存在于 Firestore 数据库中:
...
app.handle('Place_Order', async conv => {
  const order = conv.session.params.order;
  const userDoc = dbs.user.doc(conv.user.params.uid);
  const orderHistory = userDoc.collection("orderHistory");
  if (orderHistory) {
    // Order history exists, so the user already placed an order.
    // Update counter for order type.
    await orderHistory.doc(order).update({ count: admin.firestore.FieldValue.increment(1)});
  } else {
    // First order they place
    await orderHistory.doc(order).set({ option: order, count: 1});
    options.forEach(opt => {
      if (opt != order) {
        orderHistory.doc(opt).set({ option: opt, count: 0});
      }
    });
  }
  return conv.add(`Your ${order} has been placed. ` +
      'Thanks for using Boba Bonanza, see you soon!');
});