تنظيم صفحاتك في مجموعات
يمكنك حفظ المحتوى وتصنيفه حسب إعداداتك المفضّلة.
الآن وبعد تشغيل "مساعد Google" على الجهاز، حان الوقت لتوسيع نطاقه باستخدام "إجراءات الجهاز". تسمح لك إجراءات الجهاز بالتحكّم في الجهاز عبر الصوت.
في هذا المثال، ستستخدم إجراء مدمج على الجهاز
لتشغيل ضوء وإيقافه.
يمكنك اتّباع هذه التعليمات لتثبيت مصباح LED على الطراز Raspberry Pi 3 الطراز. في خطوة لاحقة، ستقوم بتعديل نموذج التعليمات البرمجية لإضاءة مصباح LED عن طريق أمر صوتي.
متطلّبات الأجهزة
قبل أن تبدأ هذا المثال، ستحتاج إلى المكونات التالية:
لوحة توصيل
مصباح LED
مقاوِمة متسلسلة
سلكان للتوصيل، كلاهما بوصلة ذكر وإناث
يجب ربط المقاومة الكهربائية للمقاوم بمصباح LED المحدد.
للعثور على القيمة الصحيحة، يمكنك استخدام آلة حاسبة على الإنترنت (أو شراء مجموعة أدوات).
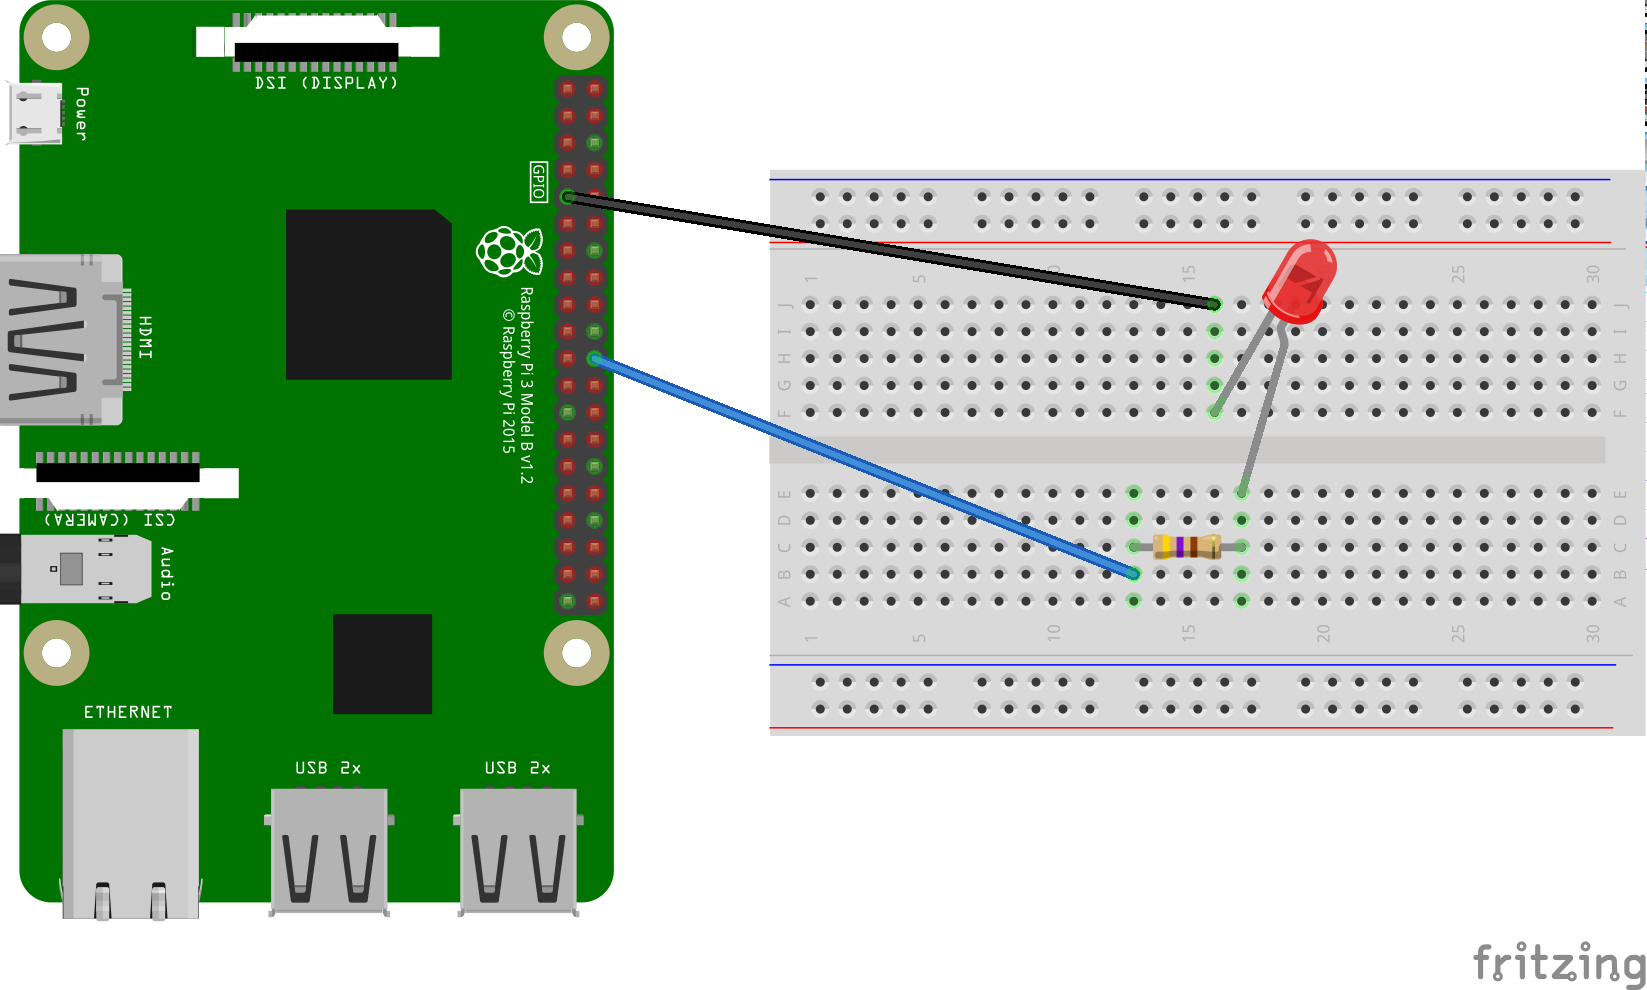
ربط المكوّنات
اربط دبوس الإخراج GPIO BCM25
بأحد جانبي المقاومة التسلسلية. لاحظ أن هذا هو الدبوس المادي 22 على
Raspberry Pi 3.
وصِّل الجانب الآخر من المقاوم بالطرف القطبي (الرصاص الأطول)
في مصباح LED.
وصِّل جانب المهبط (السلك الأقصر) من مصباح LED بالأرض.
تاريخ التعديل الأخير: 2025-07-25 (حسب التوقيت العالمي المتفَّق عليه)
[null,null,["تاريخ التعديل الأخير: 2025-07-25 (حسب التوقيت العالمي المتفَّق عليه)"],[[["\u003cp\u003eThis guide demonstrates how to extend Google Assistant with Device Actions to control a device, like an LED, using voice commands.\u003c/p\u003e\n"],["\u003cp\u003eYou will need a breadboard, LED, resistor, and jumper wires to connect to specific GPIO pins on a Raspberry Pi.\u003c/p\u003e\n"],["\u003cp\u003eEven without the physical components, you can still set up the Device Action and observe the output in the terminal.\u003c/p\u003e\n"],["\u003cp\u003eThis is the first step; the next involves registering device traits to define its capabilities.\u003c/p\u003e\n"]]],[],null,["# Install Hardware (Optional)\n\nNow that you have the Assistant running on the device, it is time to extend it\nwith Device Actions. Device Actions allow you to control your device via voice.\nFor this example, you will be using a [Built-in Device Action](/assistant/sdk/device-actions-overview#built-in)\nto turn a light on and off.\n\nFollow these instructions to install an LED on the Raspberry Pi 3 Model B. In a\nlater step, you will modify the sample code to light the LED by voice command.\n| **Note:** Don't worry if you don't have an LED at the moment. You can still set up a Device Action and print some output to the terminal.\n\nHardware requirements\n---------------------\n\nBefore you begin this example, you'll need the following components:\n\n- A breadboard\n- An LED\n- A series resistor\n- Two jumper wires, both with a male and female connector\n\nThe electrical resistance of the resistor should be tied to the specific LED.\nTo find the correct value, you can use an online calculator (or purchase a [kit](https://www.adafruit.com/product/3227)).\n\nConnect the components\n----------------------\n\n| **Note:** You may want to disconnect power to the Raspberry Pi to avoid short circuits.\n\n1. Connect GPIO output pin [BCM25](https://pinout.xyz) to one side of a series resistor. Note that this is physical pin 22 on the Raspberry Pi 3.\n2. Connect the other side of the resistor to the anode side (longer lead) of the LED.\n3. Connect the cathode side (shorter lead) of the LED to ground.\n\nNext step\n---------\n\n[Register Traits](/assistant/sdk/guides/service/python/extend/register-device-traits)"]]