Page Summary
-
This tutorial provides a step-by-step guide for embedding a Google Map with a marker on a webpage using HTML, CSS, and JavaScript.
-
You'll need to obtain a Google Maps API key and enable billing in order to use the Maps JavaScript API.
-
The tutorial covers HTML structure, API key integration, map initialization, and marker placement with code examples in both TypeScript and plain JavaScript.
-
The map is centered on Uluru, Australia with a customizable marker for demonstration purposes.
-
You can find additional resources and tips for customization and troubleshooting within the tutorial.
Introduction
This tutorial shows you how to add a Google map with a marker to a web page, using HTML, CSS, and JavaScript. It also shows you how to set map options, and how to use control slotting to add a label to the map.
Below is the map you'll create using this tutorial. The marker is positioned at Uluru (also known as Ayers Rock) in the Uluru-Kata Tjuta National Park.
Getting started
There are three steps to creating a Google map with a marker on your web page:
You need a web browser. Choose a well-known one like Google Chrome (recommended), Firefox, Safari, or Edge, based on your platform from the list of supported browsers.
Step 1: Get an API key
This section explains how to authenticate your app to the Maps JavaScript API using your own API key.
Follow these steps to get an API key:
Go to the Google Cloud console.
Create or select a project.
Click Continue to enable the API and any related services.
On the Credentials page, get an API key (and set the API key restrictions). Note: If you have an existing unrestricted API key, or a key with browser restrictions, you may use that key.
To prevent quota theft and secure your API key, see Using API Keys.
Enable billing. See Usage and Billing for more information.
Once you've got an API key, add it to the following snippet by clicking "YOUR_API_KEY". Copy and paste the bootloader script tag to use on your own web page.
<script>
  (g=>{var h,a,k,p="The Google Maps JavaScript API",c="google",l="importLibrary",q="__ib__",m=document,b=window;b=b[c]||(b[c]={});var d=b.maps||(b.maps={}),r=new Set,e=new URLSearchParams,u=()=>h||(h=new Promise(async(f,n)=>{await (a=m.createElement("script"));e.set("libraries",[...r]+"");for(k in g)e.set(k.replace(/[A-Z]/g,t=>"_"+t[0].toLowerCase()),g[k]);e.set("callback",c+".maps."+q);a.src=`https://maps.${c}apis.com/maps/api/js?`+e;d[q]=f;a.onerror=()=>h=n(Error(p+" could not load."));a.nonce=m.querySelector("script[nonce]")?.nonce||"";m.head.append(a)}));d[l]?console.warn(p+" only loads once. Ignoring:",g):d[l]=(f,...n)=>r.add(f)&&u().then(()=>d[l](f,...n))})({
    key: "YOUR_API_KEY",
    v: "weekly",
    // Use the 'v' parameter to indicate the version to use (weekly, beta, alpha, etc.).
    // Add other bootstrap parameters as needed, using camel case.
  });
</script>
Step 2: Create an HTML page
Here's the code for a basic HTML web page:
<!DOCTYPE html>
<!--
 @license
 Copyright 2025 Google LLC. All Rights Reserved.
 SPDX-License-Identifier: Apache-2.0
-->

<html>
  <head>
    <title>Add a Map</title>

    <link rel="stylesheet" type="text/css" href="./style.css" />
    <script type="module" src="./index.js"></script>
    <!-- prettier-ignore -->
    <script>(g=>{var h,a,k,p="The Google Maps JavaScript API",c="google",l="importLibrary",q="__ib__",m=document,b=window;b=b[c]||(b[c]={});var d=b.maps||(b.maps={}),r=new Set,e=new URLSearchParams,u=()=>h||(h=new Promise(async(f,n)=>{await (a=m.createElement("script"));e.set("libraries",[...r]+"");for(k in g)e.set(k.replace(/[A-Z]/g,t=>"_"+t[0].toLowerCase()),g[k]);e.set("callback",c+".maps."+q);a.src=`https://maps.${c}apis.com/maps/api/js?`+e;d[q]=f;a.onerror=()=>h=n(Error(p+" could not load."));a.nonce=m.querySelector("script[nonce]")?.nonce||"";m.head.append(a)}));d[l]?console.warn(p+" only loads once. Ignoring:",g):d[l]=(f,...n)=>r.add(f)&&u().then(()=>d[l](f,...n))})
        ({key: "YOUR_API_KEY", v: "weekly"});</script>
  </head>
  <body>

    <!-- The map, centered at Uluru, Australia. -->
    <gmp-map center="-25.344,131.031" zoom="4" map-id="DEMO_MAP_ID">
    </gmp-map>

  </body>
</html>
This is a very basic HTML page which uses a
gmp-map element to
display a map on the page. The map will be blank since we haven't added any
JavaScript code yet.
Understand the code
At this stage in the example, we have:
- Declared the application as HTML5 using the
!DOCTYPE htmldeclaration. - Loaded the Maps JavaScript API using the bootstrap loader.
- Created a
gmp-mapelement to hold the map.
Declare your application as HTML5
We recommend that you declare a true DOCTYPE within your web application.
Within the examples here, we've declared our applications as HTML5 using the
HTML5 DOCTYPE as shown below:
<!DOCTYPE html>
Most current browsers will render content that is declared with this DOCTYPE
in "standards mode" which means that your application should be more
cross-browser compliant. The DOCTYPE is also designed to degrade gracefully;
browsers that don't understand it will ignore it, and use "quirks mode" to
display their content.
Note that some CSS that works within quirks mode is not valid in
standards mode. Specifically, all percentage-based sizes must inherit
from parent block elements, and if any of those ancestors fail to
specify a size, they are assumed to be sized at 0 x 0 pixels. For
that reason, we include the following style declaration:
<style>
  gmp-map {
    height: 100%;
  }
  html, body {
    height: 100%;
    margin: 0;
    padding: 0;
  }
</style>
Load the Maps JavaScript API
The bootstrap loader prepares the Maps JavaScript API for loading
(no libraries are loaded until importLibrary() is called).
<script>
  (g=>{var h,a,k,p="The Google Maps JavaScript API",c="google",l="importLibrary",q="__ib__",m=document,b=window;b=b[c]||(b[c]={});var d=b.maps||(b.maps={}),r=new Set,e=new URLSearchParams,u=()=>h||(h=new Promise(async(f,n)=>{await (a=m.createElement("script"));e.set("libraries",[...r]+"");for(k in g)e.set(k.replace(/[A-Z]/g,t=>"_"+t[0].toLowerCase()),g[k]);e.set("callback",c+".maps."+q);a.src=`https://maps.${c}apis.com/maps/api/js?`+e;d[q]=f;a.onerror=()=>h=n(Error(p+" could not load."));a.nonce=m.querySelector("script[nonce]")?.nonce||"";m.head.append(a)}));d[l]?console.warn(p+" only loads once. Ignoring:",g):d[l]=(f,...n)=>r.add(f)&&u().then(()=>d[l](f,...n))})({
    key: "YOUR_API_KEY",
    v: "weekly",
    // Use the 'v' parameter to indicate the version to use (weekly, beta, alpha, etc.).
    // Add other bootstrap parameters as needed, using camel case.
  });
</script>
See Step 3: Get an API key for instructions on getting your own API key.
At this stage of the tutorial a blank window appears, showing only the unformatted label text. This is because we haven't added any JavaScript code yet.
Create a gmp-map element
For the map to display on a web page, we must reserve a spot for it. Commonly,
we do this by creating a gmp-map element and obtaining a reference to this
element in the browser's document object model (DOM). You can also use a
div element to do this (learn more),
but it's recommended to use the gmp-map element.
The code below defines the gmp-map element, and sets the center, zoom,
and map-id parameters.
<gmp-map center="-25.344,131.031" zoom="4" map-id="DEMO_MAP_ID">
</gmp-map>
The center and zoom options are always required. In the above code, the
center property tells the API where to center the map, and the zoom property
specifies the zoom level for the map. Zoom: 0 is the lowest zoom, and displays
the entire Earth. Set the zoom value higher to zoom in to the Earth at higher
resolutions.
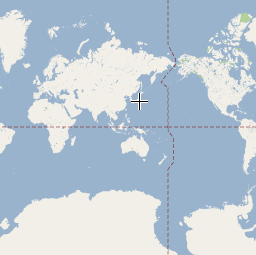
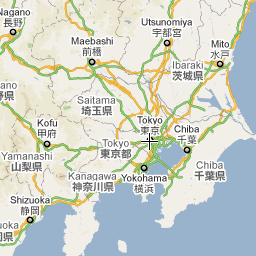
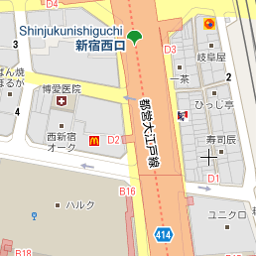
Zoom levels
Offering a map of the entire Earth as a single image would either require an immense map, or a small map with very low resolution. As a result, map images within Google Maps and the Maps JavaScript API are broken up into map "tiles" and "zoom levels." At low zoom levels, a small set of map tiles covers a wide area; at higher zoom levels, the tiles are of higher resolution and cover a smaller area. The following list shows the approximate level of detail you can expect to see at each zoom level:
- 1: World
- 5: Landmass or continent
- 10: City
- 15: Streets
- 20: Buildings
The following three images reflect the same location of Tokyo at zoom levels 0, 7 and 18.


The code below describes the CSS that sets the size of the gmp-map element.
/* Set the size of the gmp-map element that contains the map */
gmp-map {
    height: 400px; /* The height is 400 pixels */
    width: 100%; /* The width is the width of the web page */
}
In the above code, the style element sets the size of the gmp-map. Set the
width and height to greater than 0px for the map to be visible. In this
case, the gmp-map is set to a height of 400 pixels, and width of 100% to
display across the width of the web page. It's recommended to always explicitly
set the height and width styles.
Control slotting
You can use control slotting to add HTML form controls to your map. A
slot is a
predefined position on the map; use the slot attribute to set the needed
position for an element, and nest elements within the gmp-map element. The
following snippet shows adding an HTML label to the upper-left corner of the
map.
<!-- The map, centered at Uluru, Australia. -->
<gmp-map center="-25.344,131.031" zoom="4" map-id="DEMO_MAP_ID">
  <div id="controls" slot="control-inline-start-block-start">
    <h3>My Google Maps Demo</h3>
  </div>
</gmp-map>
Step 3: Add JavaScript code
This section shows you how to load the Maps JavaScript API into a web page, and how to write your own JavaScript that uses the API to add a map with a marker on it.
TypeScript
async function initMap(): Promise<void> { // Request the needed libraries. const [{ Map }, { AdvancedMarkerElement }] = await Promise.all([ google.maps.importLibrary('maps') as Promise<google.maps.MapsLibrary>, google.maps.importLibrary( 'marker' ) as Promise<google.maps.MarkerLibrary>, ]); // Get the gmp-map element. const mapElement = document.querySelector( 'gmp-map' ) as google.maps.MapElement; // Get the inner map. const innerMap = mapElement.innerMap; // Set map options. innerMap.setOptions({ mapTypeControl: false, }); // Add a marker positioned at the map center (Uluru). const marker = new AdvancedMarkerElement({ map: innerMap, position: mapElement.center, title: 'Uluru/Ayers Rock', }); } initMap();
JavaScript
async function initMap() { // Request the needed libraries. const [{ Map }, { AdvancedMarkerElement }] = await Promise.all([ google.maps.importLibrary('maps'), google.maps.importLibrary('marker'), ]); // Get the gmp-map element. const mapElement = document.querySelector('gmp-map'); // Get the inner map. const innerMap = mapElement.innerMap; // Set map options. innerMap.setOptions({ mapTypeControl: false, }); // Add a marker positioned at the map center (Uluru). const marker = new AdvancedMarkerElement({ map: innerMap, position: mapElement.center, title: 'Uluru/Ayers Rock', }); } initMap();
The above code does the following things when initMap() is called:
- Loads the
mapsandmarkerlibraries. - Gets the map element from the DOM.
- Sets additional map options on the inner map.
- Adds a marker to the map.
Get the map object and set options
The innerMap represents an instance of the Map class.
To set map options, get the innerMap
instance from the map element and call setOptions.
The following snippet shows getting the innerMap instance from the DOM, then
calling setOptions:
// Get the gmp-map element.
const mapElement = document.querySelector(
  "gmp-map"
) as google.maps.MapElement;

// Get the inner map.
const innerMap = mapElement.innerMap;

// Set map options.
innerMap.setOptions({
  mapTypeControl: false,
});
Wait for the map to load
When using the gmp-map element, the map loads asynchronously. This can result
in a race condition if other requests are made at initialization time (for
example geolocation or a Place details request). To ensure that your code only
runs after the map is fully loaded, use an addListenerOnce idle event handler
in your initialization function, as shown here:
// Do things once the map has loaded.
google.maps.event.addListenerOnce(innerMap, 'idle', () => {
    // Run this code only after the map has loaded.
    console.log("The map is now ready!");
});
Doing this ensures that your code is only run after the map has loaded; the handler is only triggered once during the app's lifecycle.
Complete example code
See the complete example code here:
TypeScript
async function initMap(): Promise<void> { // Request the needed libraries. const [{ Map }, { AdvancedMarkerElement }] = await Promise.all([ google.maps.importLibrary('maps') as Promise<google.maps.MapsLibrary>, google.maps.importLibrary( 'marker' ) as Promise<google.maps.MarkerLibrary>, ]); // Get the gmp-map element. const mapElement = document.querySelector( 'gmp-map' ) as google.maps.MapElement; // Get the inner map. const innerMap = mapElement.innerMap; // Set map options. innerMap.setOptions({ mapTypeControl: false, }); // Add a marker positioned at the map center (Uluru). const marker = new AdvancedMarkerElement({ map: innerMap, position: mapElement.center, title: 'Uluru/Ayers Rock', }); } initMap();
JavaScript
async function initMap() { // Request the needed libraries. const [{ Map }, { AdvancedMarkerElement }] = await Promise.all([ google.maps.importLibrary('maps'), google.maps.importLibrary('marker'), ]); // Get the gmp-map element. const mapElement = document.querySelector('gmp-map'); // Get the inner map. const innerMap = mapElement.innerMap; // Set map options. innerMap.setOptions({ mapTypeControl: false, }); // Add a marker positioned at the map center (Uluru). const marker = new AdvancedMarkerElement({ map: innerMap, position: mapElement.center, title: 'Uluru/Ayers Rock', }); } initMap();
CSS
/* * Always set the map height explicitly to define the size of the div element * that contains the map. */ gmp-map { height: 100%; } /* * Optional: Makes the sample page fill the window. */ html, body { height: 100%; margin: 0; padding: 0; }
HTML
<html>
<head>
<title>Add a Map</title>
<link rel="stylesheet" type="text/css" href="./style.css" />
<script type="module" src="./index.js"></script>
<!-- prettier-ignore -->
<script>(g=>{var h,a,k,p="The Google Maps JavaScript API",c="google",l="importLibrary",q="__ib__",m=document,b=window;b=b[c]||(b[c]={});var d=b.maps||(b.maps={}),r=new Set,e=new URLSearchParams,u=()=>h||(h=new Promise(async(f,n)=>{await (a=m.createElement("script"));e.set("libraries",[...r]+"");for(k in g)e.set(k.replace(/[A-Z]/g,t=>"_"+t[0].toLowerCase()),g[k]);e.set("callback",c+".maps."+q);a.src=`https://maps.${c}apis.com/maps/api/js?`+e;d[q]=f;a.onerror=()=>h=n(Error(p+" could not load."));a.nonce=m.querySelector("script[nonce]")?.nonce||"";m.head.append(a)}));d[l]?console.warn(p+" only loads once. Ignoring:",g):d[l]=(f,...n)=>r.add(f)&&u().then(()=>d[l](f,...n))})
({key: "AIzaSyA6myHzS10YXdcazAFalmXvDkrYCp5cLc8", v: "weekly"});</script>
</head>
<body>
<!-- The map, centered at Uluru, Australia. -->
<gmp-map center="-25.344,131.031" zoom="4" map-id="DEMO_MAP_ID">
<div id="controls" slot="control-inline-start-block-start">
<h3>My Google Maps Demo</h3>
</div>
</gmp-map>
</body>
</html>Try Sample
Learn more about markers:
Tips and troubleshooting
- Learn more about getting latitude/longitude coordinates, or converting an address into geographical coordinates.
- You can tweak options like style and properties to customize the map. For more information on customizing maps, read the guides to styling, and drawing on the map.
- Use the Developer Tools Console in your web browser to test and run your code, read error reports and solve problems with your code.
- Use the following keyboard shortcuts to open the console in Chrome:
Command+Option+J (on Mac), or Control+Shift+J (on Windows). Follow the steps below to get the latitude and longitude coordinates for a location on Google Maps.
- Open Google Maps in a browser.
- Right-click the exact location on the map for which you require coordinates.
- Select What's here? from the context menu that appears. The map displays a card at the bottom of the screen. Find the latitude and longitude coordinates in the last row of the card.
You can convert an address into latitude and longitude coordinates using the Geocoding service. The developer guides provide detailed information on getting started with the Geocoding service.
