
概览
Google 街景提供整个覆盖区域内以指定道路为中心的 360 度全景视图。街景的 API 覆盖范围与 Google 地图应用 (https://maps.google.com/) 的覆盖范围相同。如要获取街景当前支持的城市列表,请访问 Google 地图网站。
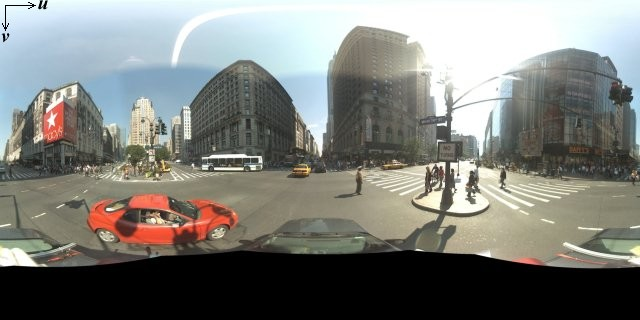
以下显示了一个示例街景图像。
Maps JavaScript API 提供了一项街景服务,用于获取和处理 Google 地图街景中使用的图像。浏览器原生支持该街景服务。
街景地图的使用
尽管街景可在独立 DOM 元素内使用,但其最大的用处是表示地图上的地点。地图上会默认启用街景,并且街景小人控件会集成到导航(缩放和平移)控件中。您可以在地图的 MapOptions 中将 streetViewControl 设置为 false,以便隐藏该控件。您还可以通过将 Map 的 streetViewControlOptions.position 属性设置为新的 ControlPosition 来更改街景控件的默认位置。
借助街景小人控件,您可以直接在地图内查看街景全景图片。当用户点击并按住街景小人时,地图会进行更新,在支持街景的街道周围显示蓝色轮廓,从而带来与 Google 地图应用类似的用户体验。
用户在街道上放置街景小人标记时,地图也会进行更新,以显示所指示位置的街景全景图片。
街景全景图片
通过使用 StreetViewPanorama 对象可支持街景图像,该对象提供了街景“查看器”的 API 接口。每张地图均包含一幅默认的街景全景图片,您可以通过调用地图的 getStreetView() 方法来检索该全景图片。当您通过将地图的 streetViewControl 选项设置为 true 来在地图上添加街景控件时,系统会自动将街景小人控件与这个默认的街景全景图片相关联。
您也可以创建自己的 StreetViewPanorama 对象,然后将地图的 streetView 属性显式设置为该构造对象,从而将地图设置为使用该对象而非默认的街景全景图片。如果您想修改默认行为,例如在地图和全景图片之间自动共享叠加层,则可能希望覆盖默认全景图片。(请参阅下文的街景内的叠加层。)
街景容器
您也可能希望在单独的 DOM 元素(通常为 <div> 元素)内显示 StreetViewPanorama。只需在 StreetViewPanorama 的构造函数内传递相应 DOM 元素即可实现此目的。要想获得最佳图像显示效果,我们建议的最小图像尺寸为 200x200 像素。
注意:尽管街景功能设计为与地图结合使用,但这并非强制性要求。您也可以在不使用地图的情况下单独使用街景对象。
街景位置和视角 (POV)
StreetViewPanorama 构造函数还支持使用 StreetViewOptions 参数设置街景位置和视角。您可以在构造完成后对该对象调用
setPosition() 和 setPov() 来更改其位置和 POV。
街景位置会定义图像的镜头焦点位置,但不会定义该图像的镜头朝向。为此,StreetViewPov 对象会定义以下两个属性:
heading(默认值为0),以相对于正北方的度数定义以镜头位置为中心的旋转角度。朝向按顺时针进行测量(90 度表示正东)。pitch(默认值为0),定义与镜头初始默认倾斜度的“向上”或“向下”角度差值。镜头的初始默认倾斜度通常(但并不总是)为水平。(例如,在山上拍摄的图像可能会呈现出非水平的默认倾斜度。)当镜头仰视时,测量出的倾斜角度为正值(最大 +90 度,表示垂直向上,与默认倾斜度正交);当镜头俯视时,测量出的倾斜角度为负值(最大 -90 度,表示垂直向下,与默认倾斜度正交)。
StreetViewPov 对象最常用于确定街景镜头的视角。您还可通过 StreetViewPanorama.getPhotographerPov() 方法确定拍摄者的视角,该视角通常是汽车或街景三轮车所面向的方向。
以下代码将显示一张初始视角为芬威球场的波士顿地图。选择街景小人并将其拖放到地图上支持该控件的某个位置,即可更改街景全景图片:
TypeScript
function initialize() { const fenway = { lat: 42.345573, lng: -71.098326 }; const map = new google.maps.Map( document.getElementById("map") as HTMLElement, { center: fenway, zoom: 14, } ); const panorama = new google.maps.StreetViewPanorama( document.getElementById("pano") as HTMLElement, { position: fenway, pov: { heading: 34, pitch: 10, }, } ); map.setStreetView(panorama); } declare global { interface Window { initialize: () => void; } } window.initialize = initialize;
JavaScript
function initialize() { const fenway = { lat: 42.345573, lng: -71.098326 }; const map = new google.maps.Map(document.getElementById("map"), { center: fenway, zoom: 14, }); const panorama = new google.maps.StreetViewPanorama( document.getElementById("pano"), { position: fenway, pov: { heading: 34, pitch: 10, }, }, ); map.setStreetView(panorama); } window.initialize = initialize;
CSS
html, body { height: 100%; margin: 0; padding: 0; } #map, #pano { float: left; height: 100%; width: 50%; }
HTML
<html>
<head>
<title>Street View split-map-panes</title>
<link rel="stylesheet" type="text/css" href="./style.css" />
<script type="module" src="./index.js"></script>
</head>
<body>
<div id="map"></div>
<div id="pano"></div>
<!--
The `defer` attribute causes the script to execute after the full HTML
document has been parsed. For non-blocking uses, avoiding race conditions,
and consistent behavior across browsers, consider loading using Promises. See
https://developers.google.com/maps/documentation/javascript/load-maps-js-api
for more information.
-->
<script
src="https://maps.googleapis.com/maps/api/js?key=AIzaSyB41DRUbKWJHPxaFjMAwdrzWzbVKartNGg&callback=initialize&v=weekly"
defer
></script>
</body>
</html>试用示例
移动设备上的动作跟踪功能
在支持设备屏幕方向事件的设备上,用户可以通过 API 随设备的移动改变街景视角。用户可通过移动设备环视四周。这个功能就称为动作跟踪或设备旋转跟踪。
作为应用开发者,您可以按照以下方式更改默认行为:
- 启用或停用动作跟踪功能。默认情况下,在任何支持动作跟踪的设备上,该功能都处于启用状态。以下示例将停用动作跟踪,但仍使动作跟踪控件保持可见状态。(请注意,用户可通过点按动作跟踪控件启用该功能。)
var panorama = new google.maps.StreetViewPanorama(
    document.getElementById('pano'), {
      position: {lat: 37.869260, lng: -122.254811},
      pov: {heading: 165, pitch: 0},
      motionTracking: false
    });
-
隐藏或显示动作跟踪控件。默认情况下,支持动作跟踪的设备上会显示该控件。用户可以点按该控件来开启或关闭动作跟踪功能。请注意,如果设备不支持动作跟踪,无论
motionTrackingControl的值是什么,该控件都不会显示。以下示例将同时停用动作跟踪功能和动作跟踪控件。在此情况下,用户无法开启动作跟踪功能:
var panorama = new google.maps.StreetViewPanorama(
    document.getElementById('pano'), {
      position: {lat: 37.869260, lng: -122.254811},
      pov: {heading: 165, pitch: 0},
      motionTracking: false,
      motionTrackingControl: false
    });
- 更改动作跟踪控件的默认位置。默认情况下,该控件会显示在靠近全景图片右下角(位置
RIGHT_BOTTOM)的位置。以下示例会将控件的位置设置成左下角:var panorama = new google.maps.StreetViewPanorama( document.getElementById('pano'), { position: {lat: 37.869260, lng: -122.254811}, pov: {heading: 165, pitch: 0}, motionTrackingControlOptions: { position: google.maps.ControlPosition.LEFT_BOTTOM } });
要了解动作跟踪的实用效果,请在移动设备(或任何支持设备屏幕方向事件的设备)上查看以下示例:
街景内的叠加层
默认的 StreetViewPanorama 对象支持以原生方式显示地图叠加层。叠加层通常在“街道级别”显示,并锚定在 LatLng 位置。(例如,显示标记时,其尾部会锚定于街景全景图片内相应位置的水平面。)
目前,街景全景图片支持的叠加层类型仅限于 Marker、InfoWindow 和自定义 OverlayView。您在地图上显示的叠加层可显示在街景全景图片上,方法是将全景图片视为 Map 对象的替代项,调用 setMap(),并以参数形式传递 StreetViewPanorama(而非地图)。同样,通过调用 open() 并传递 StreetViewPanorama() 而不是地图,也可以在街景全景图片中打开信息窗口。
此外,在创建使用默认 StreetViewPanorama 的地图时,只要与地图关联的街景全景图片可见,则在地图上创建的任何标记都会自动与该全景图片共享。如要检索默认街景全景图片,请对 Map 对象调用 getStreetView()。请注意,如果您将地图的 streetView 属性显式设置为您自己构造的 StreetViewPanorama,则会覆盖默认全景图片。
以下示例将显示一些标记,用于表示纽约市阿斯特广场周围的不同位置。将显示画面切换到街景可显示 StreetViewPanorama 内显示的共享标记。
TypeScript
let panorama: google.maps.StreetViewPanorama; let innerMap: google.maps.Map; async function init() { // Request needed libraries. const [{ Marker }] = await Promise.all([ google.maps.importLibrary('marker'), google.maps.importLibrary('maps'), ]); // Set the location of Astor Place. const astorPlace = { lat: 40.729884, lng: -73.990988 }; const mapElement = document.querySelector('gmp-map')!; innerMap = mapElement.innerMap; document .getElementById('streetview-toggle-button')! .addEventListener('click', toggleStreetView); const cafeIcon = document.createElement('img'); cafeIcon.src = new URL('./public/cafe_icon.svg', import.meta.url).href; const dollarIcon = document.createElement('img'); dollarIcon.src = new URL('./public/bank_icon.svg', import.meta.url).href; const busIcon = document.createElement('img'); busIcon.src = new URL('./public/bus_icon.svg', import.meta.url).href; // Set up the markers on the map new Marker({ position: { lat: 40.730031, lng: -73.991428 }, map: innerMap, title: 'Cafe', icon: cafeIcon.src, }); new Marker({ position: { lat: 40.729681, lng: -73.991138 }, map: innerMap, title: 'Bank', icon: dollarIcon.src, }); new Marker({ position: { lat: 40.729559, lng: -73.990741 }, map: innerMap, title: 'Bus Stop', icon: busIcon.src, }); // We get the map's default panorama and set up some defaults. // Note that we don't yet set it visible. panorama = innerMap.getStreetView()!; // TODO fix type panorama.setPosition(astorPlace); panorama.setPov({ heading: 265, pitch: 0, }); } function toggleStreetView(): void { const toggle = panorama.getVisible(); if (!toggle) { panorama.setVisible(true); } else { panorama.setVisible(false); } } void init();
JavaScript
let panorama; let innerMap; async function init() { // Request needed libraries. const [{ Marker }] = await Promise.all([ google.maps.importLibrary('marker'), google.maps.importLibrary('maps'), ]); // Set the location of Astor Place. const astorPlace = { lat: 40.729884, lng: -73.990988 }; const mapElement = document.querySelector('gmp-map'); innerMap = mapElement.innerMap; document .getElementById('streetview-toggle-button') .addEventListener('click', toggleStreetView); const cafeIcon = document.createElement('img'); cafeIcon.src = new URL('./public/cafe_icon.svg', import.meta.url).href; const dollarIcon = document.createElement('img'); dollarIcon.src = new URL('./public/bank_icon.svg', import.meta.url).href; const busIcon = document.createElement('img'); busIcon.src = new URL('./public/bus_icon.svg', import.meta.url).href; // Set up the markers on the map new Marker({ position: { lat: 40.730031, lng: -73.991428 }, map: innerMap, title: 'Cafe', icon: cafeIcon.src, }); new Marker({ position: { lat: 40.729681, lng: -73.991138 }, map: innerMap, title: 'Bank', icon: dollarIcon.src, }); new Marker({ position: { lat: 40.729559, lng: -73.990741 }, map: innerMap, title: 'Bus Stop', icon: busIcon.src, }); // We get the map's default panorama and set up some defaults. // Note that we don't yet set it visible. panorama = innerMap.getStreetView(); // TODO fix type panorama.setPosition(astorPlace); panorama.setPov({ heading: 265, pitch: 0, }); } function toggleStreetView() { const toggle = panorama.getVisible(); if (!toggle) { panorama.setVisible(true); } else { panorama.setVisible(false); } } void init(); export {};
CSS
/* * Always set the map height explicitly to define the size of the div element * that contains the map. */ #map { height: 100%; } /* * Optional: Makes the sample page fill the window. */ html, body { height: 100%; margin: 0; padding: 0; } #floating-panel { position: absolute; top: 10px; left: 25%; z-index: 5; background-color: #fff; padding: 5px; border: 1px solid #999; text-align: center; font-family: 'Roboto', sans-serif; line-height: 30px; padding-left: 10px; } #streetview-toggle-button { height: 40px; display: flex; align-items: center; justify-content: center; padding: 0 17px; border: none; background: white; cursor: pointer; border-radius: 2px; box-shadow: 0 1px 4px -1px rgba(0, 0, 0, 0.3); margin: 10px 0px 10px -2px; font-family: Roboto, Arial, sans-serif; font-size: 18px; font-weight: 400; color: rgb(86, 86, 86); } #streetview-toggle-button:hover { background: #f4f4f4; color: #000; }
HTML
<html>
<head>
<title>Overlays Within Street View</title>
<link rel="stylesheet" type="text/css" href="./style.css" />
<script type="module" src="./index.js"></script>
<script>
// prettier-ignore
(g=>{var h,a,k,p="The Google Maps JavaScript API",c="google",l="importLibrary",q="__ib__",m=document,b=window;b=b[c]||(b[c]={});var d=b.maps||(b.maps={}),r=new Set,e=new URLSearchParams,u=()=>h||(h=new Promise(async(f,n)=>{await (a=m.createElement("script"));e.set("libraries",[...r]+"");for(k in g)e.set(k.replace(/[A-Z]/g,t=>"_"+t[0].toLowerCase()),g[k]);e.set("callback",c+".maps."+q);a.src=`https://maps.${c}apis.com/maps/api/js?`+e;d[q]=f;a.onerror=()=>h=n(Error(p+" could not load."));a.nonce=m.querySelector("script[nonce]")?.nonce||"";m.head.append(a)}));d[l]?console.warn(p+" only loads once. Ignoring:",g):d[l]=(f,...n)=>r.add(f)&&u().then(()=>d[l](f,...n))})({
key: "AIzaSyA6myHzS10YXdcazAFalmXvDkrYCp5cLc8"
});
</script>
</head>
<body>
<gmp-map map-id="DEMO_MAP_ID" center="40.729884, -73.990988" zoom="18">
<input
type="button"
value="Toggle Street View"
id="streetview-toggle-button"
slot="control-block-start-inline-start" />
</gmp-map>
</body>
</html>试用示例
街景事件
在街景之间导航或操纵其朝向时,您可能希望监控指示 StreetViewPanorama 状态变化的若干事件:
pano_changed,在单个全景图片 ID 发生改变时触发。此事件不能保证触发此事件时全景图片内的任何关联数据(如链接)也发生了改变;此事件仅表示全景图片 ID 发生了改变。请注意,全景图片 ID(可用于引用相应全景图片)只在当前浏览器会话内保持稳定。position_changed,在全景图片的底层 (LatLng) 位置发生改变时触发。旋转全景图片不会触发此事件。请注意,您可以在不改变关联全景图片 ID 的情况下改变全景图片的底层位置,因为 API 会自动将距离最近的全景图片 ID 与全景图片的位置关联。pov_changed,在街景的StreetViewPov发生改变时触发。请注意,此事件可能会在位置和全景图片 ID 均保持稳定的情况下触发。links_changed,在街景的链接发生改变时触发。请注意,此事件可能会在pano_changed指示全景图片 ID 发生改变后异步触发。visible_changed,在街景的可见性发生改变时触发。请注意,此事件可能会在pano_changed指示全景图片 ID 发生改变后异步触发。
以下代码展示了如何处理这些事件以收集关于底层 StreetViewPanorama 的数据:
TypeScript
function initPano() { const panorama = new google.maps.StreetViewPanorama( document.getElementById("pano") as HTMLElement, { position: { lat: 37.869, lng: -122.255 }, pov: { heading: 270, pitch: 0, }, visible: true, } ); panorama.addListener("pano_changed", () => { const panoCell = document.getElementById("pano-cell") as HTMLElement; panoCell.innerHTML = panorama.getPano(); }); panorama.addListener("links_changed", () => { const linksTable = document.getElementById("links_table") as HTMLElement; while (linksTable.hasChildNodes()) { linksTable.removeChild(linksTable.lastChild as ChildNode); } const links = panorama.getLinks(); for (const i in links) { const row = document.createElement("tr"); linksTable.appendChild(row); const labelCell = document.createElement("td"); labelCell.innerHTML = "<b>Link: " + i + "</b>"; const valueCell = document.createElement("td"); valueCell.innerHTML = links[i].description as string; linksTable.appendChild(labelCell); linksTable.appendChild(valueCell); } }); panorama.addListener("position_changed", () => { const positionCell = document.getElementById( "position-cell" ) as HTMLElement; (positionCell.firstChild as HTMLElement).nodeValue = panorama.getPosition() + ""; }); panorama.addListener("pov_changed", () => { const headingCell = document.getElementById("heading-cell") as HTMLElement; const pitchCell = document.getElementById("pitch-cell") as HTMLElement; (headingCell.firstChild as HTMLElement).nodeValue = panorama.getPov().heading + ""; (pitchCell.firstChild as HTMLElement).nodeValue = panorama.getPov().pitch + ""; }); } declare global { interface Window { initPano: () => void; } } window.initPano = initPano;
JavaScript
function initPano() { const panorama = new google.maps.StreetViewPanorama( document.getElementById("pano"), { position: { lat: 37.869, lng: -122.255 }, pov: { heading: 270, pitch: 0, }, visible: true, }, ); panorama.addListener("pano_changed", () => { const panoCell = document.getElementById("pano-cell"); panoCell.innerHTML = panorama.getPano(); }); panorama.addListener("links_changed", () => { const linksTable = document.getElementById("links_table"); while (linksTable.hasChildNodes()) { linksTable.removeChild(linksTable.lastChild); } const links = panorama.getLinks(); for (const i in links) { const row = document.createElement("tr"); linksTable.appendChild(row); const labelCell = document.createElement("td"); labelCell.innerHTML = "<b>Link: " + i + "</b>"; const valueCell = document.createElement("td"); valueCell.innerHTML = links[i].description; linksTable.appendChild(labelCell); linksTable.appendChild(valueCell); } }); panorama.addListener("position_changed", () => { const positionCell = document.getElementById("position-cell"); positionCell.firstChild.nodeValue = panorama.getPosition() + ""; }); panorama.addListener("pov_changed", () => { const headingCell = document.getElementById("heading-cell"); const pitchCell = document.getElementById("pitch-cell"); headingCell.firstChild.nodeValue = panorama.getPov().heading + ""; pitchCell.firstChild.nodeValue = panorama.getPov().pitch + ""; }); } window.initPano = initPano;
CSS
/* * Always set the map height explicitly to define the size of the div element * that contains the map. */ #map { height: 100%; } /* * Optional: Makes the sample page fill the window. */ html, body { height: 100%; margin: 0; padding: 0; } #floating-panel { position: absolute; top: 10px; left: 25%; z-index: 5; background-color: #fff; padding: 5px; border: 1px solid #999; text-align: center; font-family: "Roboto", "sans-serif"; line-height: 30px; padding-left: 10px; } #pano { width: 50%; height: 100%; float: left; } #floating-panel { width: 45%; height: 100%; float: right; text-align: left; overflow: auto; position: static; border: 0px solid #999; }
HTML
<html>
<head>
<title>Street View Events</title>
<link rel="stylesheet" type="text/css" href="./style.css" />
<script type="module" src="./index.js"></script>
</head>
<body>
<div id="pano"></div>
<div id="floating-panel">
<table>
<tr>
<td><b>Position</b></td>
<td id="position-cell"> </td>
</tr>
<tr>
<td><b>POV Heading</b></td>
<td id="heading-cell">270</td>
</tr>
<tr>
<td><b>POV Pitch</b></td>
<td id="pitch-cell">0.0</td>
</tr>
<tr>
<td><b>Pano ID</b></td>
<td id="pano-cell"> </td>
</tr>
<table id="links_table"></table>
</table>
</div>
<!--
The `defer` attribute causes the script to execute after the full HTML
document has been parsed. For non-blocking uses, avoiding race conditions,
and consistent behavior across browsers, consider loading using Promises. See
https://developers.google.com/maps/documentation/javascript/load-maps-js-api
for more information.
-->
<script
src="https://maps.googleapis.com/maps/api/js?key=AIzaSyB41DRUbKWJHPxaFjMAwdrzWzbVKartNGg&callback=initPano&v=weekly"
defer
></script>
</body>
</html>试用示例
街景控件
当显示 StreetViewPanorama 时,全景图片上会默认显示各种控件。您可以通过将 StreetViewPanoramaOptions 中的相应字段设置为 true 或 false 来启用或停用这些控件:
panControl,可用于旋转全景图片。默认情况下,此控件显示为标准集成式罗盘和平移控件。您可以通过在panControlOptions字段内提供PanControlOptions来更改该控件的位置。zoomControl,可用于在图像内进行缩放。默认情况下,此控件显示在靠近全景图片右下角的位置。您可以通过在zoomControlOptions字段内提供ZoomControlOptions来更改该控件的外观。addressControl,可提供表示关联位置地址的文本叠加层,并提供在 Google 地图中打开该位置的链接。您可以通过在addressControlOptions字段内提供StreetViewAddressControlOptions来更改该控件的外观。fullscreenControl,可提供以全屏模式打开街景的选项。您可以通过在fullscreenControlOptions字段内提供FullscreenControlOptions来更改该控件的外观。motionTrackingControl,可提供用于在移动设备上启用或停用动作跟踪的选项。该控件只会出现在支持设备屏幕方向事件的设备上。默认情况下,该控件显示在靠近全景图片右下角的位置。您可以通过提供MotionTrackingControlOptions来更改该控件的位置。如需了解详情,请参阅有关动作跟踪的部分。linksControl,可在图像上提供用于切换到相邻全景图像的指示箭头。- Close 控件,允许用户关闭街景查看器。您可以通过将
enableCloseButton设置为true或false来启用或停用 Close 控件。
以下示例将更改关联街景内显示的控件并移除该视图的链接:
TypeScript
function initPano() { // Note: constructed panorama objects have visible: true // set by default. const panorama = new google.maps.StreetViewPanorama( document.getElementById("map") as HTMLElement, { position: { lat: 42.345573, lng: -71.098326 }, addressControlOptions: { position: google.maps.ControlPosition.BOTTOM_CENTER, }, linksControl: false, panControl: false, enableCloseButton: false, } ); } declare global { interface Window { initPano: () => void; } } window.initPano = initPano;
JavaScript
function initPano() { // Note: constructed panorama objects have visible: true // set by default. const panorama = new google.maps.StreetViewPanorama( document.getElementById("map"), { position: { lat: 42.345573, lng: -71.098326 }, addressControlOptions: { position: google.maps.ControlPosition.BOTTOM_CENTER, }, linksControl: false, panControl: false, enableCloseButton: false, }, ); } window.initPano = initPano;
CSS
/* * Always set the map height explicitly to define the size of the div element * that contains the map. */ #map { height: 100%; } /* * Optional: Makes the sample page fill the window. */ html, body { height: 100%; margin: 0; padding: 0; }
HTML
<html>
<head>
<title>Street View Controls</title>
<link rel="stylesheet" type="text/css" href="./style.css" />
<script type="module" src="./index.js"></script>
</head>
<body>
<div id="map"></div>
<!--
The `defer` attribute causes the script to execute after the full HTML
document has been parsed. For non-blocking uses, avoiding race conditions,
and consistent behavior across browsers, consider loading using Promises. See
https://developers.google.com/maps/documentation/javascript/load-maps-js-api
for more information.
-->
<script
src="https://maps.googleapis.com/maps/api/js?key=AIzaSyB41DRUbKWJHPxaFjMAwdrzWzbVKartNGg&callback=initPano&v=weekly"
defer
></script>
</body>
</html>试用示例
直接访问街景数据
您可能希望以编程方式确定街景数据的可用性,或返回有关特定全景图片的信息,而无需直接处理地图/全景图片。您可以使用 StreetViewService 对象来实现此目的,该对象提供了一个连接 Google 街景服务内所存储数据的接口。
街景服务请求
由于 Google Maps API 需要调用外部服务器,因此对街景服务的访问是异步进行的。正因如此,您需要传递一个在请求完成后执行的回调方法。该回调方法会对结果进行处理。
您可以使用 StreetViewPanoRequest 或 StreetViewLocationRequest 向 StreetViewService 发出请求。
如果指定了可唯一标识全景图片的参考 ID,使用 StreetViewPanoRequest 的请求会返回相应的全景图片数据。请注意,这些参考 ID 仅在该全景图像的生命周期内保持稳定。
使用 StreetViewLocationRequest 的请求会使用以下参数在指定位置搜索全景图片数据:
location,用于指定要在什么位置(纬度和经度)搜索全景图片。preference,用于设置偏好设置,确定应在半径范围内查找怎样的全景图片:离指定位置最近的全景图片,还是半径范围内最好的全景图片。radius,用于设置以米为单位的半径,以指定要在指定的纬度和经度周围多大半径范围内搜索全景图片。如果未提供该参数,则默认为 50。source,用于指定要搜索的全景图片来源。有效值为:default,使用默认街景来源;搜索范围不限于特定来源。outdoor,仅搜索室外全景图片。 请注意,指定位置可能不存在室外全景图片。
街景服务响应
函数 getPanorama() 需要一个在通过街景服务检索到结果后执行的回调函数。此回调函数会按照先数据后代码的顺序返回 StreetViewPanoramaData 对象内的一组全景图片数据,以及一个表示请求状态的 StreetViewStatus 代码。
StreetViewPanoramaData 对象规范包含关于街景全景图片的元数据,具体形式如下:
{
  "location": {
    "latLng": LatLng,
    "description": string,
    "pano": string
  },
  "copyright": string,
  "links": [{
      "heading": number,
      "description": string,
      "pano": string,
      "roadColor": string,
      "roadOpacity": number
    }],
  "tiles": {
    "worldSize": Size,
    "tileSize": Size,
    "centerHeading": number
  }
}
请注意,此数据对象本身并不是 StreetViewPanorama 对象。要使用此数据创建一个街景对象,您需要创建一个 StreetViewPanorama 并调用 setPano(),然后向其传递返回的 location.pano 字段中注明的 ID。
status 代码可能会返回以下某个值:
OK,表示服务找到了匹配的全景图片。ZERO_RESULTS,表示服务无法找到与传递的标准相匹配的全景图片。UNKNOWN_ERROR,表示无法处理街景请求,但具体原因未知。
以下代码将创建一个 StreetViewService,它通过创建标记来响应用户在地图上的点击。用户点击该标记时,系统会显示该位置的 StreetViewPanorama。该代码会使用从服务返回的 StreetViewPanoramaData 的内容。
TypeScript
/* * Click the map to set a new location for the Street View camera. */ let map: google.maps.Map; let panorama: google.maps.StreetViewPanorama; function initMap(): void { const berkeley = { lat: 37.869085, lng: -122.254775 }; const sv = new google.maps.StreetViewService(); panorama = new google.maps.StreetViewPanorama( document.getElementById("pano") as HTMLElement ); // Set up the map. map = new google.maps.Map(document.getElementById("map") as HTMLElement, { center: berkeley, zoom: 16, streetViewControl: false, }); // Set the initial Street View camera to the center of the map sv.getPanorama({ location: berkeley, radius: 50 }).then(processSVData); // Look for a nearby Street View panorama when the map is clicked. // getPanorama will return the nearest pano when the given // radius is 50 meters or less. map.addListener("click", (event) => { sv.getPanorama({ location: event.latLng, radius: 50 }) .then(processSVData) .catch((e) => console.error("Street View data not found for this location.") ); }); } function processSVData({ data }: google.maps.StreetViewResponse) { const location = data.location!; const marker = new google.maps.Marker({ position: location.latLng, map, title: location.description, }); panorama.setPano(location.pano as string); panorama.setPov({ heading: 270, pitch: 0, }); panorama.setVisible(true); marker.addListener("click", () => { const markerPanoID = location.pano; // Set the Pano to use the passed panoID. panorama.setPano(markerPanoID as string); panorama.setPov({ heading: 270, pitch: 0, }); panorama.setVisible(true); }); } declare global { interface Window { initMap: () => void; } } window.initMap = initMap;
JavaScript
/* * Click the map to set a new location for the Street View camera. */ let map; let panorama; function initMap() { const berkeley = { lat: 37.869085, lng: -122.254775 }; const sv = new google.maps.StreetViewService(); panorama = new google.maps.StreetViewPanorama( document.getElementById("pano"), ); // Set up the map. map = new google.maps.Map(document.getElementById("map"), { center: berkeley, zoom: 16, streetViewControl: false, }); // Set the initial Street View camera to the center of the map sv.getPanorama({ location: berkeley, radius: 50 }).then(processSVData); // Look for a nearby Street View panorama when the map is clicked. // getPanorama will return the nearest pano when the given // radius is 50 meters or less. map.addListener("click", (event) => { sv.getPanorama({ location: event.latLng, radius: 50 }) .then(processSVData) .catch((e) => console.error("Street View data not found for this location."), ); }); } function processSVData({ data }) { const location = data.location; const marker = new google.maps.Marker({ position: location.latLng, map, title: location.description, }); panorama.setPano(location.pano); panorama.setPov({ heading: 270, pitch: 0, }); panorama.setVisible(true); marker.addListener("click", () => { const markerPanoID = location.pano; // Set the Pano to use the passed panoID. panorama.setPano(markerPanoID); panorama.setPov({ heading: 270, pitch: 0, }); panorama.setVisible(true); }); } window.initMap = initMap;
CSS
/* * Always set the map height explicitly to define the size of the div element * that contains the map. */ #map { height: 100%; } /* * Optional: Makes the sample page fill the window. */ html, body { height: 100%; margin: 0; padding: 0; }
HTML
<html>
<head>
<title>Directly Accessing Street View Data</title>
<link rel="stylesheet" type="text/css" href="./style.css" />
<script type="module" src="./index.js"></script>
</head>
<body>
<div id="map" style="width: 45%; height: 100%; float: left"></div>
<div id="pano" style="width: 45%; height: 100%; float: left"></div>
<!--
The `defer` attribute causes the script to execute after the full HTML
document has been parsed. For non-blocking uses, avoiding race conditions,
and consistent behavior across browsers, consider loading using Promises. See
https://developers.google.com/maps/documentation/javascript/load-maps-js-api
for more information.
-->
<script
src="https://maps.googleapis.com/maps/api/js?key=AIzaSyB41DRUbKWJHPxaFjMAwdrzWzbVKartNGg&callback=initMap&v=weekly"
defer
></script>
</body>
</html>试用示例
提供自定义街景全景图片
Maps JavaScript API 支持在 StreetViewPanorama 对象内显示自定义全景图片。您可以利用自定义全景图片显示建筑内部、景点视图或任何您想像的内容。您甚至可以将这些自定义全景图片与 Google 的现有街景全景图片链接起来。
设置一组自定义全景图像涉及下列步骤:
- 为每幅自定义全景图片创建一幅基础全景图像。此基础图像使用的分辨率应为您想提供的放大图像的最高分辨率。
- (可选但并非建议步骤)根据基础图像创建一组不同缩放级别下的全景图片图块。
- 创建自定义全景图片之间的链接。
- (可选)在 Google 现有的街景图像内指定“入口”全景图片,并自定义设置自定义集与标准集之间的双向链接。
- 在
StreetViewPanoramaData对象内定义每幅全景图像的元数据。 - 实现用于确定自定义全景图片数据和图像的方法,并在
StreetViewPanorama对象内将该方法指定为自定义处理程序。
下文对此过程做了说明。
创建自定义全景图片
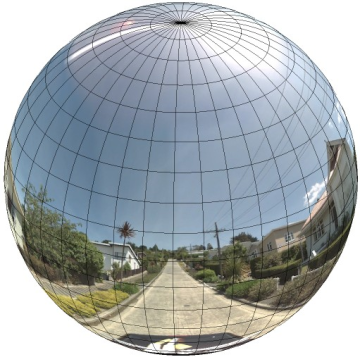
每幅街景全景图片都是一幅或一组图像,提供以单个位置为中心的 360 度全景视图。StreetViewPanorama 对象使用遵照等距柱状 (Plate Carrée) 投影的图像。此类投影包含 360 度水平视图(完整环绕一周)和 180 度垂直视图(从直上至直下)。这样的视野会导致图像的宽高比为 2:1。下方显示了一幅完整环绕一周的全景图片。
一般来说,要制作全景图像,您需要在一个位置拍摄多张照片,然后使用全景图片软件将这些照片拼接到一起。(如需了解详情,请参阅维基百科的照片拼接应用比较)。所有此类全景图像都应从相同的“镜头”位置拍摄。这样,生成的 360 度全景图片便可定义一个球面投影,其图像环绕在球面的二维表面上。
将全景图片视为采用直线坐标系的球面投影有助于将图像分解成直线图块,以及根据计算的图块坐标提供图像。
创建自定义全景图片图块
街景还支持利用缩放控件显示细节程度不同的图像,该控件允许您基于默认视图进行缩放。街景一般可为任何给定全景图像提供五种级别的缩放分辨率。如果您所有的缩放级别都采用一幅全景图像,那么该图像要么过大,这样会显著降低您应用的速度;要么在较高缩放级别下分辨率不佳,只能提供低像素图像。不过,我们可以使用类似于在不同缩放级别下提供 Google 地图图块的设计模式,为各缩放级别下的全景图片提供分辨率适当的图像。
当 StreetViewPanorama 首次加载时,其默认显示的图像包括缩放级别为 1 的全景图片水平宽度的 25%(90 度圆弧)。此视野大致与人的正常视野一致。在此默认视野基础上“缩小”实质上是将圆弧变大,而放大则会将视野缩窄为更小的圆弧。StreetViewPanorama 会自动计算与所选缩放级别相适的视野,然后通过选择与水平视野尺寸大致相同的图块集,选择最适合该分辨率的图像。以下是视野与街景缩放级别的对应关系:
| 街景缩放级别 | 视野(度) |
|---|---|
| 0 | 180 |
| 1(默认值) | 90 |
| 2 | 45 |
| 3 | 22.5 |
| 4 | 11.25 |
请注意,街景内显示的图像尺寸完全取决于街景容器的屏幕尺寸(宽度)。如果您提供的容器较宽,服务仍会为任何给定缩放级别提供相同的视野,但可能会改为选择更适合该分辨率的图块。
由于每一幅全景图片都包括一个等距柱状投影,因此创建全景图片图块相对容易。由于投影提供的图像宽高比为 2:1,因此具有 2:1 宽高比的图块更便于使用,但方形图块可以在方形地图上带来更好的效果(因为视野将是方形的)。
对于宽高比为 2:1 的图块,一幅囊括整个全景图片的图像代表了缩放级别为 0 的整个全景图片“世界”(基础图像),缩放级别每提高一级,图块就增加 4zoomLevel 个(例如,当缩放级别为 2 时,整个全景图片包括 16 个图块)。注意:街景图块处理所使用的缩放级别并不直接对应于使用街景控件时提供的缩放级别;相反,街景控件缩放级别会选择一个视野 (FoV),然后系统再根据该视野选择合适的图块。
通常,您需要为图像图块命名,以便以编程方式选择它们。有关此类命名方案的介绍,请参阅下面的处理自定义全景图片请求。
处理自定义全景图片请求
要使用自定义全景图片,请调用 StreetViewPanorama.registerPanoProvider(),并指定自定义全景图片提供程序方法的名称。全景图片提供程序方法必须返回一个 StreetViewPanoramaData 对象,并具有以下签名:
Function(pano):StreetViewPanoramaData
StreetViewPanoramaData 对象的形式如下:
{
  copyright: string,
  location: {
    description: string,
    latLng: google.maps.LatLng,
    pano: string
  },
  tiles: {
    tileSize: google.maps.Size,
    worldSize: google.maps.Size,
    heading: number,
    getTileUrl: Function
  },
  links: [
    description: string,
    heading: number,
    pano: string,
    roadColor: string,
    roadOpacity: number
  ]
}
按如下所示显示自定义全景图片:
- 将
StreetViewPanoramaOptions.pano属性设置为自定义值。 - 调用
StreetViewPanorama.registerPanoProvider(),以提供自定义全景图片提供程序函数。 - 实现自定义全景图片提供程序函数,以便处理指定的
pano值。 - 构造一个
StreetViewPanoramaData对象。 - 将
StreetViewTileData.getTileUrl属性设置为您提供的自定义图块提供程序函数的名称。例如getCustomPanoramaTileUrl。 - 实现您的自定义图块提供程序函数,如以下示例所示。
- 返回
StreetViewPanoramaData对象。
注意:如果您希望显示自定义全景图片,请不要直接在 StreetViewPanorama 上设置 position,因为此类位置将会指示街景服务请求靠近该位置的默认街景图像。请改为在自定义 StreetViewPanoramaData 对象的 location.latLng 字段中设置此位置。
以下示例将显示 Google 悉尼分公司的自定义全景图片。请注意,此示例未使用地图或默认街景图像:
TypeScript
function initPano() { // Set up Street View and initially set it visible. Register the // custom panorama provider function. Set the StreetView to display // the custom panorama 'reception' which we check for below. const panorama = new google.maps.StreetViewPanorama( document.getElementById("map") as HTMLElement, { pano: "reception", visible: true } ); panorama.registerPanoProvider(getCustomPanorama); } // Return a pano image given the panoID. function getCustomPanoramaTileUrl( pano: string, zoom: number, tileX: number, tileY: number ): string { return ( "https://developers.google.com/maps/documentation/javascript/examples/full/images/" + "panoReception1024-" + zoom + "-" + tileX + "-" + tileY + ".jpg" ); } // Construct the appropriate StreetViewPanoramaData given // the passed pano IDs. function getCustomPanorama(pano: string): google.maps.StreetViewPanoramaData { if (pano === "reception") { return { location: { pano: "reception", description: "Google Sydney - Reception", }, links: [], // The text for the copyright control. copyright: "Imagery (c) 2010 Google", // The definition of the tiles for this panorama. tiles: { tileSize: new google.maps.Size(1024, 512), worldSize: new google.maps.Size(2048, 1024), // The heading in degrees at the origin of the panorama // tile set. centerHeading: 105, getTileUrl: getCustomPanoramaTileUrl, }, }; } // @ts-ignore TODO fix typings return null; } declare global { interface Window { initPano: () => void; } } window.initPano = initPano;
JavaScript
function initPano() { // Set up Street View and initially set it visible. Register the // custom panorama provider function. Set the StreetView to display // the custom panorama 'reception' which we check for below. const panorama = new google.maps.StreetViewPanorama( document.getElementById("map"), { pano: "reception", visible: true }, ); panorama.registerPanoProvider(getCustomPanorama); } // Return a pano image given the panoID. function getCustomPanoramaTileUrl(pano, zoom, tileX, tileY) { return ( "https://developers.google.com/maps/documentation/javascript/examples/full/images/" + "panoReception1024-" + zoom + "-" + tileX + "-" + tileY + ".jpg" ); } // Construct the appropriate StreetViewPanoramaData given // the passed pano IDs. function getCustomPanorama(pano) { if (pano === "reception") { return { location: { pano: "reception", description: "Google Sydney - Reception", }, links: [], // The text for the copyright control. copyright: "Imagery (c) 2010 Google", // The definition of the tiles for this panorama. tiles: { tileSize: new google.maps.Size(1024, 512), worldSize: new google.maps.Size(2048, 1024), // The heading in degrees at the origin of the panorama // tile set. centerHeading: 105, getTileUrl: getCustomPanoramaTileUrl, }, }; } // @ts-ignore TODO fix typings return null; } window.initPano = initPano;
CSS
/* * Always set the map height explicitly to define the size of the div element * that contains the map. */ #map { height: 100%; } /* * Optional: Makes the sample page fill the window. */ html, body { height: 100%; margin: 0; padding: 0; }
HTML
<html>
<head>
<title>Custom Street View Panoramas</title>
<link rel="stylesheet" type="text/css" href="./style.css" />
<script type="module" src="./index.js"></script>
</head>
<body>
<div id="map"></div>
<!--
The `defer` attribute causes the script to execute after the full HTML
document has been parsed. For non-blocking uses, avoiding race conditions,
and consistent behavior across browsers, consider loading using Promises. See
https://developers.google.com/maps/documentation/javascript/load-maps-js-api
for more information.
-->
<script
src="https://maps.googleapis.com/maps/api/js?key=AIzaSyB41DRUbKWJHPxaFjMAwdrzWzbVKartNGg&callback=initPano&v=weekly"
defer
></script>
</body>
</html>试用示例
自定义全景图片提供程序会根据所传递的全景图片 ID、缩放级别和全景图片图块坐标返回合适的图块。由于图像选择取决于这些传递的值,因此根据这些传递的值对可以编程方式选择的图像命名(如 pano_zoom_tileX_tileY.png)很有帮助。
除默认街景导航箭头外,以下示例将为图像额外添加一个箭头,该箭头指向 Google 悉尼分公司并链接到自定义图像:
TypeScript
let panorama: google.maps.StreetViewPanorama; // StreetViewPanoramaData of a panorama just outside the Google Sydney office. let outsideGoogle: google.maps.StreetViewPanoramaData; // StreetViewPanoramaData for a custom panorama: the Google Sydney reception. function getReceptionPanoramaData(): google.maps.StreetViewPanoramaData { return { location: { pano: "reception", // The ID for this custom panorama. description: "Google Sydney - Reception", latLng: new google.maps.LatLng(-33.86684, 151.19583), }, links: [ { heading: 195, description: "Exit", pano: (outsideGoogle.location as google.maps.StreetViewLocation).pano, }, ], copyright: "Imagery (c) 2010 Google", tiles: { tileSize: new google.maps.Size(1024, 512), worldSize: new google.maps.Size(2048, 1024), centerHeading: 105, getTileUrl: function ( pano: string, zoom: number, tileX: number, tileY: number ): string { return ( "https://developers.google.com/maps/documentation/javascript/examples/full/images/" + "panoReception1024-" + zoom + "-" + tileX + "-" + tileY + ".jpg" ); }, }, }; } function initPanorama() { panorama = new google.maps.StreetViewPanorama( document.getElementById("street-view") as HTMLElement, { pano: (outsideGoogle.location as google.maps.StreetViewLocation).pano } ); // Register a provider for the custom panorama. panorama.registerPanoProvider( (pano: string): google.maps.StreetViewPanoramaData => { if (pano === "reception") { return getReceptionPanoramaData(); } // @ts-ignore TODO fix typings return null; } ); // Add a link to our custom panorama from outside the Google Sydney office. panorama.addListener("links_changed", () => { if ( panorama.getPano() === (outsideGoogle.location as google.maps.StreetViewLocation).pano ) { panorama.getLinks().push({ description: "Google Sydney", heading: 25, pano: "reception", }); } }); } function initMap(): void { // Use the Street View service to find a pano ID on Pirrama Rd, outside the // Google office. new google.maps.StreetViewService() .getPanorama({ location: { lat: -33.867386, lng: 151.195767 } }) .then(({ data }: google.maps.StreetViewResponse) => { outsideGoogle = data; initPanorama(); }); } declare global { interface Window { initMap: () => void; } } window.initMap = initMap;
JavaScript
let panorama; // StreetViewPanoramaData of a panorama just outside the Google Sydney office. let outsideGoogle; // StreetViewPanoramaData for a custom panorama: the Google Sydney reception. function getReceptionPanoramaData() { return { location: { pano: "reception", // The ID for this custom panorama. description: "Google Sydney - Reception", latLng: new google.maps.LatLng(-33.86684, 151.19583), }, links: [ { heading: 195, description: "Exit", pano: outsideGoogle.location.pano, }, ], copyright: "Imagery (c) 2010 Google", tiles: { tileSize: new google.maps.Size(1024, 512), worldSize: new google.maps.Size(2048, 1024), centerHeading: 105, getTileUrl: function (pano, zoom, tileX, tileY) { return ( "https://developers.google.com/maps/documentation/javascript/examples/full/images/" + "panoReception1024-" + zoom + "-" + tileX + "-" + tileY + ".jpg" ); }, }, }; } function initPanorama() { panorama = new google.maps.StreetViewPanorama( document.getElementById("street-view"), { pano: outsideGoogle.location.pano }, ); // Register a provider for the custom panorama. panorama.registerPanoProvider((pano) => { if (pano === "reception") { return getReceptionPanoramaData(); } // @ts-ignore TODO fix typings return null; }); // Add a link to our custom panorama from outside the Google Sydney office. panorama.addListener("links_changed", () => { if (panorama.getPano() === outsideGoogle.location.pano) { panorama.getLinks().push({ description: "Google Sydney", heading: 25, pano: "reception", }); } }); } function initMap() { // Use the Street View service to find a pano ID on Pirrama Rd, outside the // Google office. new google.maps.StreetViewService() .getPanorama({ location: { lat: -33.867386, lng: 151.195767 } }) .then(({ data }) => { outsideGoogle = data; initPanorama(); }); } window.initMap = initMap;
CSS
html, body { height: 100%; margin: 0; padding: 0; } #street-view { height: 100%; }
HTML
<html>
<head>
<title>Custom Street View Panorama Tiles</title>
<link rel="stylesheet" type="text/css" href="./style.css" />
<script type="module" src="./index.js"></script>
</head>
<body>
<div id="street-view"></div>
<!--
The `defer` attribute causes the script to execute after the full HTML
document has been parsed. For non-blocking uses, avoiding race conditions,
and consistent behavior across browsers, consider loading using Promises. See
https://developers.google.com/maps/documentation/javascript/load-maps-js-api
for more information.
-->
<script
src="https://maps.googleapis.com/maps/api/js?key=AIzaSyB41DRUbKWJHPxaFjMAwdrzWzbVKartNGg&callback=initMap&v=weekly"
defer
></script>
</body>
</html>